
French
Construire Voler S'écraser Répéter
This build has been about a month in the making and a total pain in my... Last November/December, I received a Raceflight Bolt V2 esc and Revolt FC in a Kwad Box. I'm not generally a Raceflight fan, but I was inspired to start a new build after seeing the Hyperlow frames.
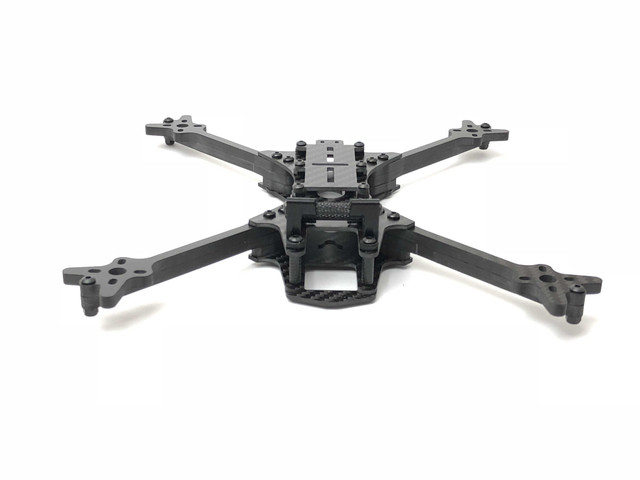
First, I ordered the Vert Racer frame. I was drawn to it because of its low weight, low mount, offset motors and vertical arms. It's an extremely tight build which would have required my unify VTX to be mounted in front of the FC/ESC stack. Ultimately, I decided the newer Vert Freestyle frame would be better for me for a number of reasons 1) it already comes designed for a GoPro couch; 2) even though there is some extra weight, the extra grams were not going to cramp my freestyle flying anyway. I contacted Richard at Hyperlow, and he was so easy to work with. About a week later I had my new frame.
In the meantime, I decided I'd rather not build this frame out with Revolt FC. I donated the FC to Loose_Transistor from FPVChat in order to do some testing on it. Initially, I was going to install a CL Racing F4S FC. I planned out the component mounting and wire lengths for the still extremely tight build (15mm). I'm generally a very meticulous and clean builder. I measure four times and cut once. I always take care to plan out every connection, but as you're about to see I totally messed up a few times on this build.
I wired up the CL F4S with perfect wire lengths. I was using the Caddx SDR1 CMOS camera for the first time, so I took extra care making sure I understood how it worked. I’ve wired numerous unify’s and R-XSRs, so I rushed through that process. Unfortunately, it seems I forgot that the R in R-XSR stands for redundancy and that you’re not supposed to wire the s.bus in pin to the s.bus on the flight controller. Ultimately, I think I fried something on the R-XSR as it would still power up and bind to my QX7, but it was not outputting any s.bus signal. Yes, I wired it correctly first. I chalked it all up to a learning experience, and I ordered a new R-XSR from RDQ…
While waiting for the new receiver, Butterflight and the new Helio 32bit flight controller were released. I decided to jump on the hype train and to give the Helio a try. I quickly ordered one from RDQ… Of course, this meant the wiring harness for my Unify VTX was too short. Thankfully, Flopster on FPVC came to the rescue and agreed to send me a few harnesses. I was extremely thankful.
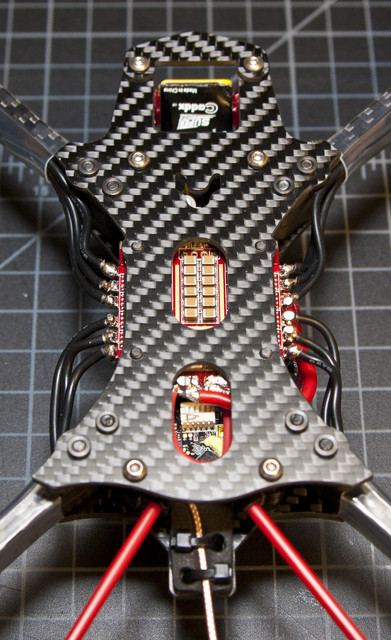
Next, I picked up some pretty yellow standoffs from Piroflip, some red TPU, red antenna tubes, titanium screws, 25mm bolts, and yellow TinyTy LEDs to finish off the aesthetics of the build. I printed a red GoPro Session couch from Hyperlow’s thingiverse, and I designed a TPU bracket to secure my power leads and keep them out of the props.
I think I only ended up using ten of the original bolts that came with the kit, and eight of those were to secure the arms. I used 25mm bolts for the FC stack, as this allowed me to use M3 nylon nuts under the battery mount to have plenty of space for a battery strap. Then I used a second M3 nut to secure the battery mount to the top plate. The extra bolt length was used to mount the FC and ESC. I used two 1mm nylon washers to add a little extra space between the boards. The remaining screw length perfectly slides into the bolt holes on the bottom plate and barely protrude from the bottom of the quad.
This frame is built extremely well. Like most of my frames, I lightly filed the edges of the main body to ensure smooth edges before installing the electronics. I also put some thin CA on the arms to reduce the likelihood of delamination in a crash. I ultimately decided to use clear heatshrink on the vertical arms of the Hyperlow to protect the motor wires and to help mid-arm issues from any crashes.
I received my Helio and quickly got it setup with the latest firmware and settings. Even though I didn’t have my TBS Unify harness yet, I had everything planned. When building out the CL F4S, I had to adapt the Bolt’s 8-pin wiring harness into a 6-pin harness. After reviewing the Helio wiring diagram a number of times, I was elated to see that it appeared to use the same 8-pin harness in the same order as the Bolt. I had everything ready. Or so I thought.
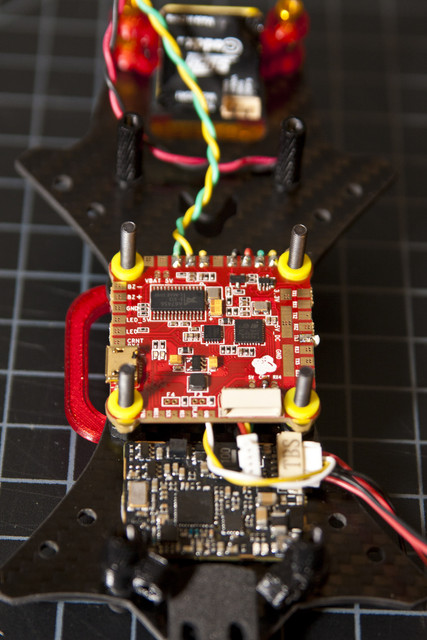
Next, the Unify harnesses finally arrived. I rushed home from work, fired up the soldering iron, and got to the important business. I cleanly wired it all up, checked for continuity where it shouldn’t be, plugged in a smoke stopper, and powered it on with a storage-charged 3S battery (lower voltage). No magic smoke. But something wasn’t right. My once well-lit Helio was no longer flashing its LEDs. I started worrying. I immediately unplugged the battery and attempted to power the FC directly from usb power. No luck. It seems as though in my haste to plan everything, I overlooked the fact that the Bolt’s 8-pin wire was exactly the opposite of the Helio’s 8-pin port. This issue was only exacerbated by the fact that pins 1 AND 8 are RED on the Bolt! It seems I fed vbat directly to the Helio’s MCU over the motor 4 pin. Ouch.
Top
Mounted Correctly

Did I also mention that USPS lost my LEDs!!! I was inches away from scrapping the whole build. I felt like it was clearly cursed.
However, I pulled myself together. I took a deep breath. And in the last 3 hours, I pulled out the CL F4S, wired it in, fully wired in the motors for the first time, flashed the latest butterflight and setup all the preferences, updated bl-heli, got everything configured and working correctly, took these photos, maidened the quad in the back yard, and ordered another Helio from RDQ…

GoPro Session "Hyph Hat" protector


My favorite image

Stats:
Dry weight 321g
CL Racing F4S FC
Emax LS2207 2550kv motors
HQ 5x4.8x3 props
Unify Pro Race
Axii u.fl (bondic used to secure the antenna)
R-XSR
Caddx SDR1 CMOS
First, I ordered the Vert Racer frame. I was drawn to it because of its low weight, low mount, offset motors and vertical arms. It's an extremely tight build which would have required my unify VTX to be mounted in front of the FC/ESC stack. Ultimately, I decided the newer Vert Freestyle frame would be better for me for a number of reasons 1) it already comes designed for a GoPro couch; 2) even though there is some extra weight, the extra grams were not going to cramp my freestyle flying anyway. I contacted Richard at Hyperlow, and he was so easy to work with. About a week later I had my new frame.
In the meantime, I decided I'd rather not build this frame out with Revolt FC. I donated the FC to Loose_Transistor from FPVChat in order to do some testing on it. Initially, I was going to install a CL Racing F4S FC. I planned out the component mounting and wire lengths for the still extremely tight build (15mm). I'm generally a very meticulous and clean builder. I measure four times and cut once. I always take care to plan out every connection, but as you're about to see I totally messed up a few times on this build.
I wired up the CL F4S with perfect wire lengths. I was using the Caddx SDR1 CMOS camera for the first time, so I took extra care making sure I understood how it worked. I’ve wired numerous unify’s and R-XSRs, so I rushed through that process. Unfortunately, it seems I forgot that the R in R-XSR stands for redundancy and that you’re not supposed to wire the s.bus in pin to the s.bus on the flight controller. Ultimately, I think I fried something on the R-XSR as it would still power up and bind to my QX7, but it was not outputting any s.bus signal. Yes, I wired it correctly first. I chalked it all up to a learning experience, and I ordered a new R-XSR from RDQ…
While waiting for the new receiver, Butterflight and the new Helio 32bit flight controller were released. I decided to jump on the hype train and to give the Helio a try. I quickly ordered one from RDQ… Of course, this meant the wiring harness for my Unify VTX was too short. Thankfully, Flopster on FPVC came to the rescue and agreed to send me a few harnesses. I was extremely thankful.
Next, I picked up some pretty yellow standoffs from Piroflip, some red TPU, red antenna tubes, titanium screws, 25mm bolts, and yellow TinyTy LEDs to finish off the aesthetics of the build. I printed a red GoPro Session couch from Hyperlow’s thingiverse, and I designed a TPU bracket to secure my power leads and keep them out of the props.
I think I only ended up using ten of the original bolts that came with the kit, and eight of those were to secure the arms. I used 25mm bolts for the FC stack, as this allowed me to use M3 nylon nuts under the battery mount to have plenty of space for a battery strap. Then I used a second M3 nut to secure the battery mount to the top plate. The extra bolt length was used to mount the FC and ESC. I used two 1mm nylon washers to add a little extra space between the boards. The remaining screw length perfectly slides into the bolt holes on the bottom plate and barely protrude from the bottom of the quad.
This frame is built extremely well. Like most of my frames, I lightly filed the edges of the main body to ensure smooth edges before installing the electronics. I also put some thin CA on the arms to reduce the likelihood of delamination in a crash. I ultimately decided to use clear heatshrink on the vertical arms of the Hyperlow to protect the motor wires and to help mid-arm issues from any crashes.
I received my Helio and quickly got it setup with the latest firmware and settings. Even though I didn’t have my TBS Unify harness yet, I had everything planned. When building out the CL F4S, I had to adapt the Bolt’s 8-pin wiring harness into a 6-pin harness. After reviewing the Helio wiring diagram a number of times, I was elated to see that it appeared to use the same 8-pin harness in the same order as the Bolt. I had everything ready. Or so I thought.
Next, the Unify harnesses finally arrived. I rushed home from work, fired up the soldering iron, and got to the important business. I cleanly wired it all up, checked for continuity where it shouldn’t be, plugged in a smoke stopper, and powered it on with a storage-charged 3S battery (lower voltage). No magic smoke. But something wasn’t right. My once well-lit Helio was no longer flashing its LEDs. I started worrying. I immediately unplugged the battery and attempted to power the FC directly from usb power. No luck. It seems as though in my haste to plan everything, I overlooked the fact that the Bolt’s 8-pin wire was exactly the opposite of the Helio’s 8-pin port. This issue was only exacerbated by the fact that pins 1 AND 8 are RED on the Bolt!
It seems I fed vbat directly to the Helio’s MCU over the motor 4 pin. Ouch.Top
Mounted Correctly
Did I also mention that USPS lost my LEDs!!! I was inches away from scrapping the whole build. I felt like it was clearly cursed.
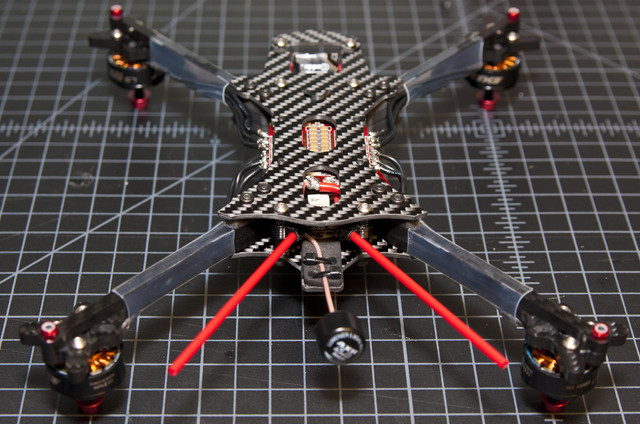
However, I pulled myself together. I took a deep breath. And in the last 3 hours, I pulled out the CL F4S, wired it in, fully wired in the motors for the first time, flashed the latest butterflight and setup all the preferences, updated bl-heli, got everything configured and working correctly, took these photos, maidened the quad in the back yard, and ordered another Helio from RDQ…
GoPro Session "Hyph Hat" protector
My favorite image
Stats:
Dry weight 321g
CL Racing F4S FC
Emax LS2207 2550kv motors
HQ 5x4.8x3 props
Unify Pro Race
Axii u.fl (bondic used to secure the antenna)
R-XSR
Caddx SDR1 CMOS


