1:9 Scale B-17G - 'Sweet Pea'

wilmracer

I build things that fly (sometimes)
Mentor
It is SO cold in the shop right now. I have a pair of space heaters that keep it bearable until it drops into the 20s outside, but that is what we've had the last few evenings. I've tried to get out there and work but haven't lasted very long. I've still been working on the 17 though...

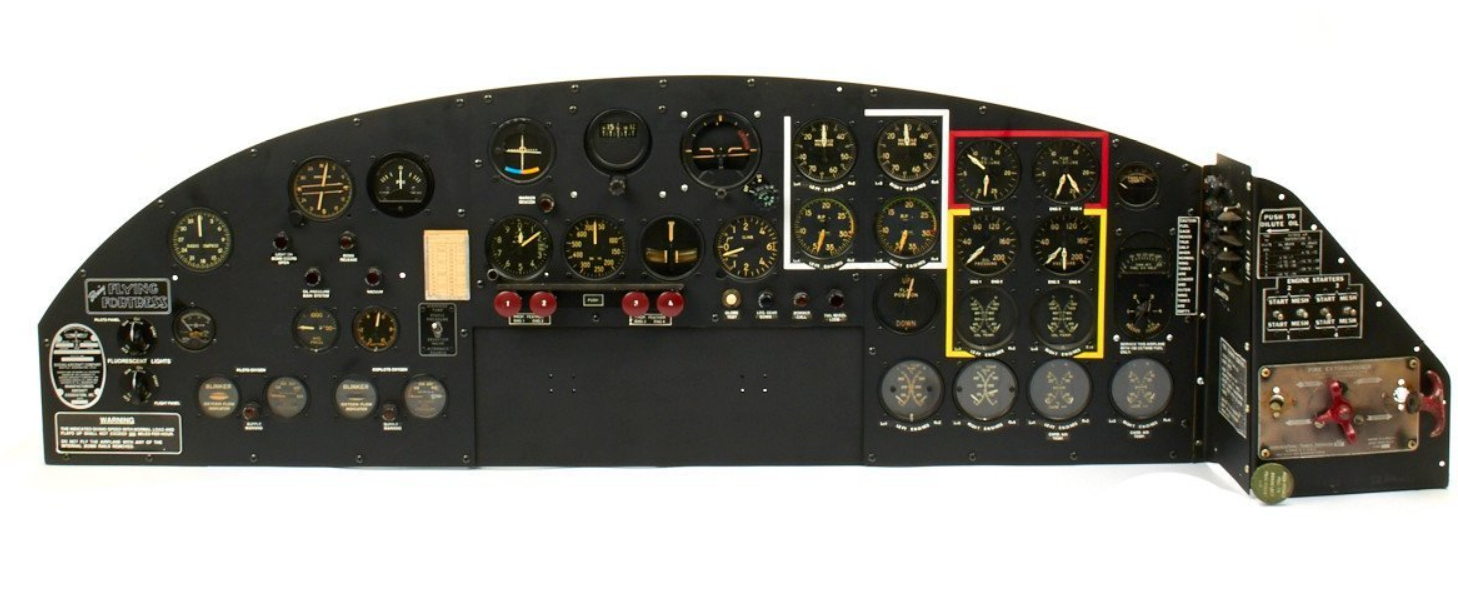
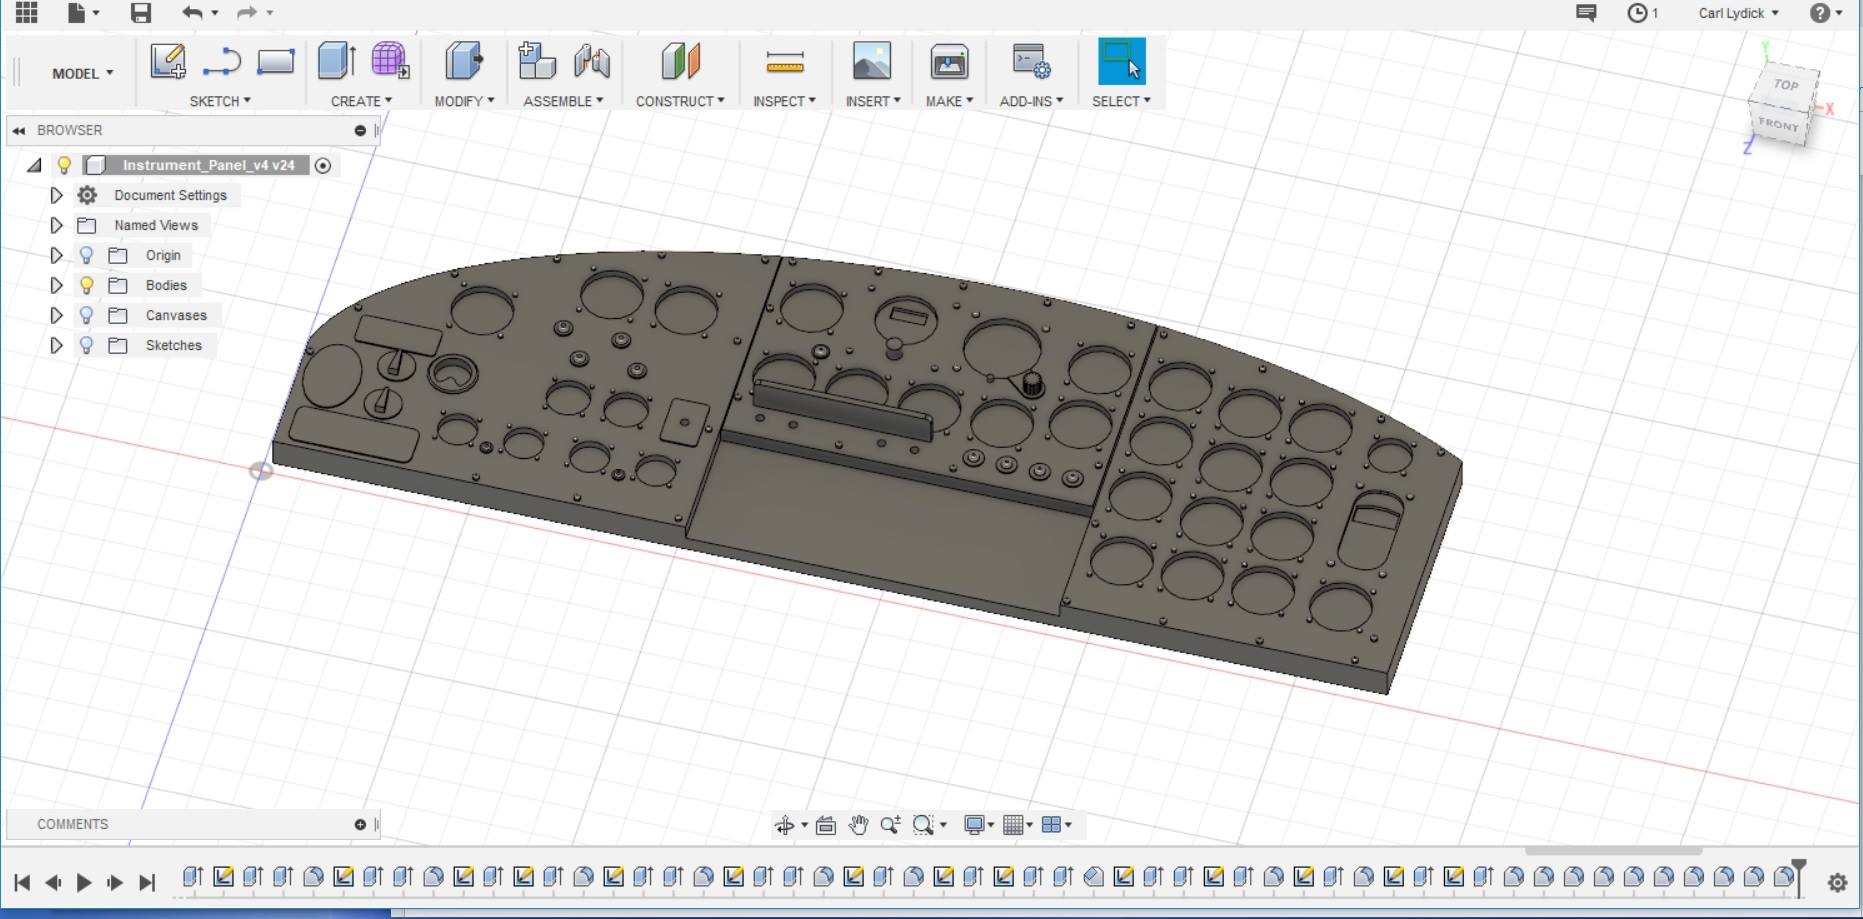
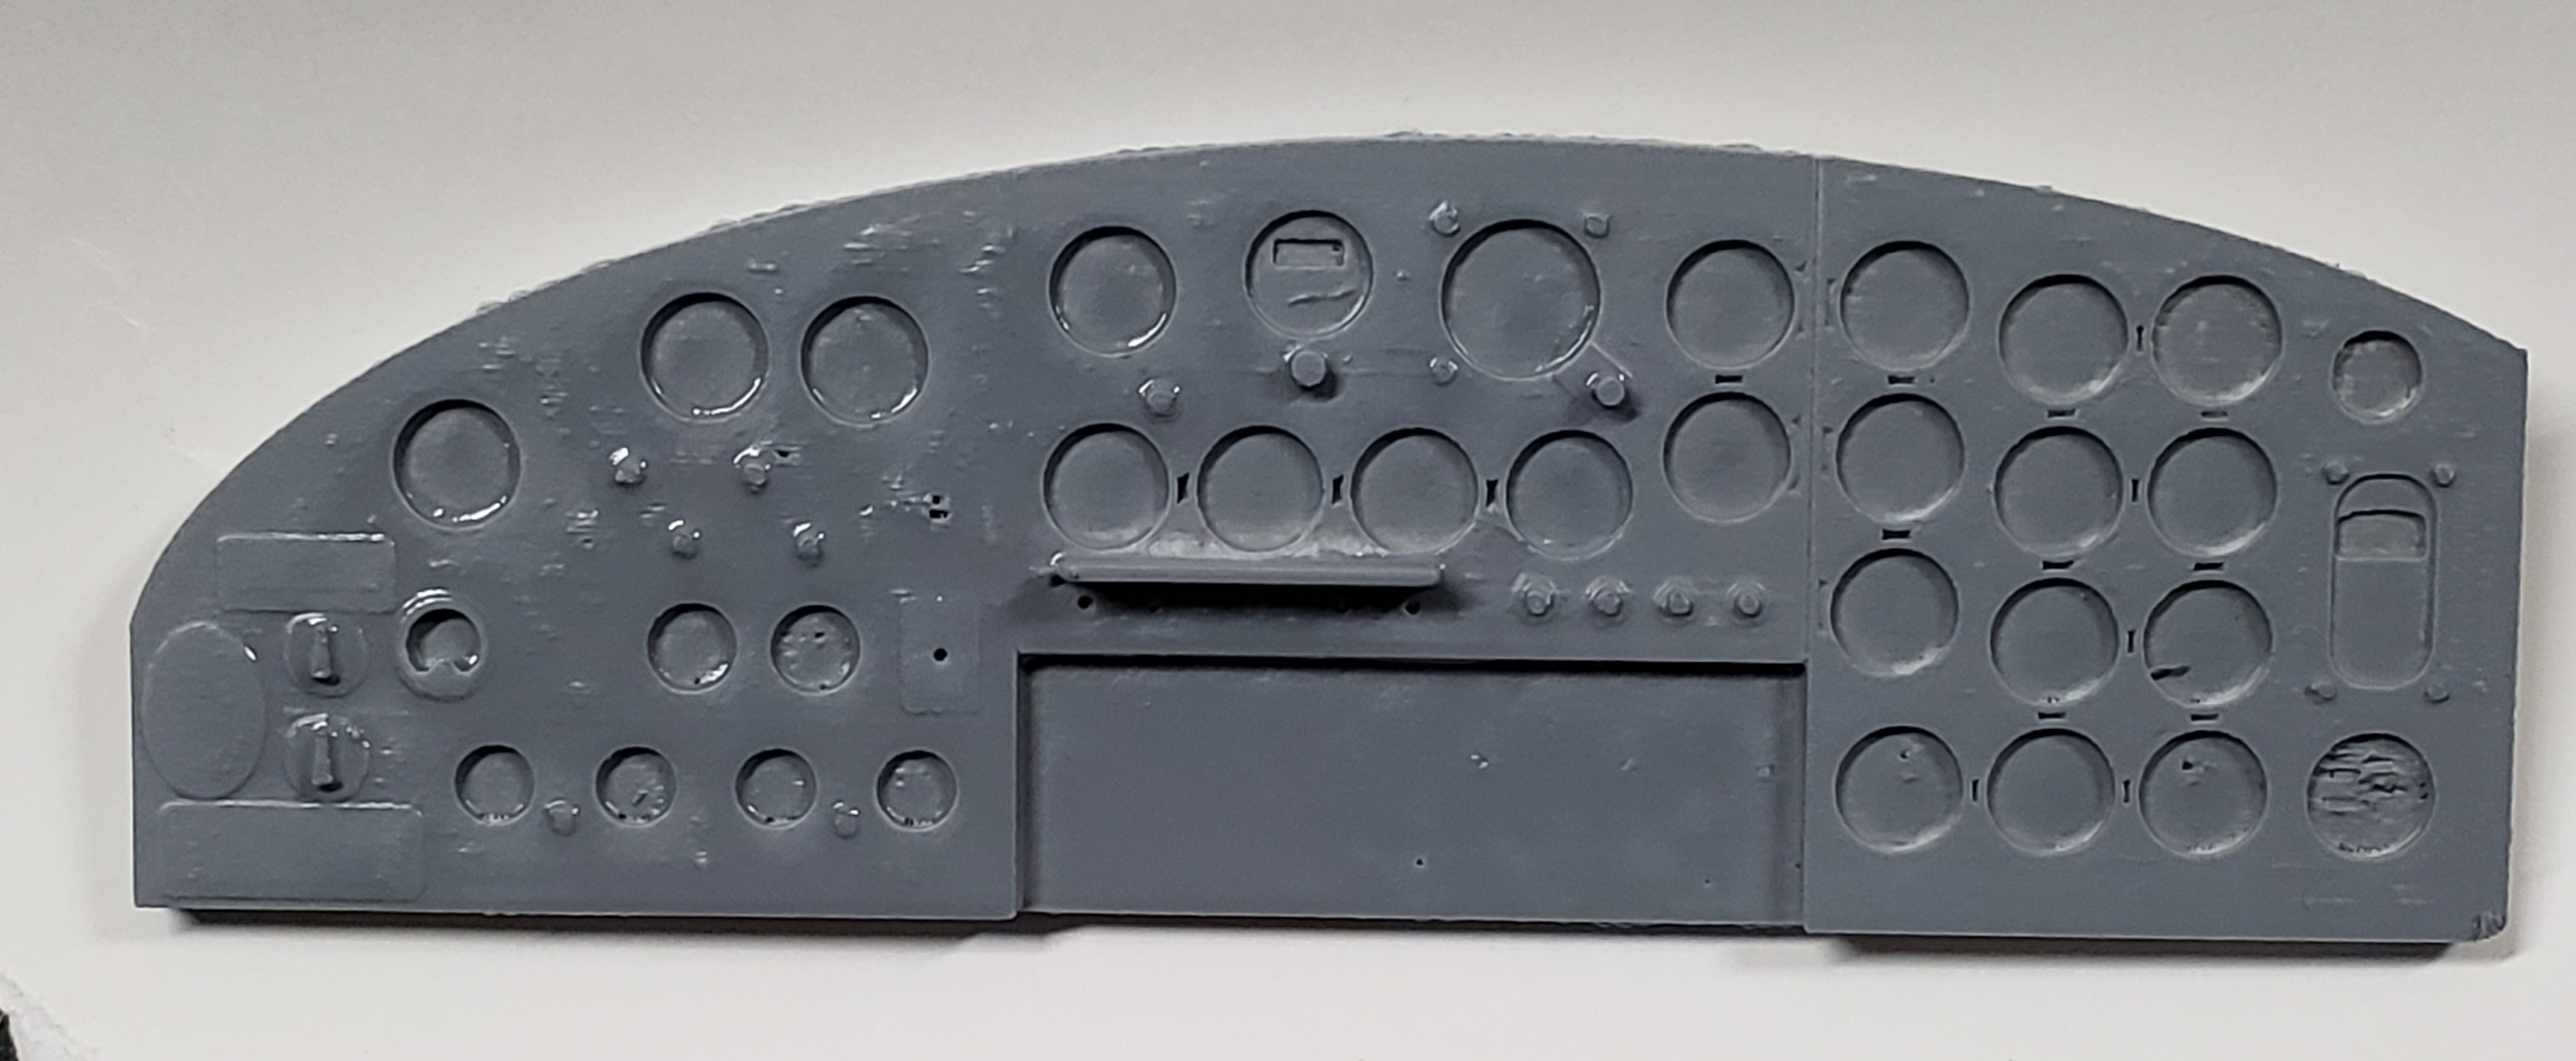
I'm still a beginner with Fusion360, but I'm learning. I'm going to use this project to build my CAD skills and make the most of the 3D printer. I ran through a few iterations on the main instrument panel section and I'm pretty happy with my current design. Some of the small details got washed out in the first test print, but I'm going to tweak the settings and see what I can do about that. I'm not shocked to be honest. The screw heads are TINY at this scale. It may be the kind of thing I have to go back and add in by hand, but we'll see. I bet they would print just fine at 1:6th scale :p

I'll keep working on this until I'm happy with the print and then start modeling the rest. Aside from the cockpit area I know I'll need to model:
  • Norden Bomb Sight
  • Bombardier seating area
  • Browning M2 Machine Guns
  • Turrets and associated hardware (including Ball Turret?)
  • Likely lots of other various parts for interior.
  • Turbo Chargers and exhaust
I'll also need to either mod the radial I have to look more like a Wright Cyclone, or I'll need to tackle modeling the radial myself, which is currently WAY over my head
 

Attachments

  • Instrument_Panel.png
    Instrument_Panel.png
    985.3 KB · Views: 0
  • Instrument_Panel_CAD_V3.jpg
    Instrument_Panel_CAD_V3.jpg
    143.9 KB · Views: 0
  • instrument_panel_print_1.jpg
    instrument_panel_print_1.jpg
    517.1 KB · Views: 0

JTarmstr

Elite member
I just got a book from the library:The Mighty Eight: The Air War in Europe as Told by the Men Who Fought it, excited to see whether this unit is in it.
 

wilmracer

I build things that fly (sometimes)
Mentor
I just got a book from the library:The Mighty Eight: The Air War in Europe as Told by the Men Who Fought it, excited to see whether this unit is in it.

Awesome! Let me know!

I think there is a film/series in the works by that same name. Hopefully they do it justice.
 

JTarmstr

Elite member
Awesome! Let me know!

I think there is a film/series in the works by that same name. Hopefully they do it justice.

Yes, i have seen the trailer for it. Supposedly it is the companion series to band of brothers and the pacific which are both very accurate shows.
 

willsonman

Builder Extraordinare
Mentor
Yeah, tiny stuff like this the main factor is to account for you printer's nozzle diameter. In my experience, any detail that is like a single dot of your nozzle diameter will look bad. Example: 0.4mm nozzle diameter and your screw head is 0.4mm diameter. Generally, double the diameter will look the best. Nozzles of smaller diameter are pretty cheap but printing with them has their own challenges. The speed is slower and with that comes adhesion difficulties depending on your setup. Since your printer is enclosed, you will likely not have any issues. Remember to think outside the box too. Sure some things can be printed but others do not have to be. Shrink tube makes for fantastic lightweight pipes. I used it as the flared nozzle on the in-cockpit fire extinguisher on the Corsair. I used sewing pins for levers. I also recommend you come to your community (here) for some of this. The hive mind often comes up with some REALLY clever things.
 

wilmracer

I build things that fly (sometimes)
Mentor
Remember to think outside the box too. Sure some things can be printed but others do not have to be. Shrink tube makes for fantastic lightweight pipes. I used it as the flared nozzle on the in-cockpit fire extinguisher on the Corsair. I used sewing pins for levers. I also recommend you come to your community (here) for some of this. The hive mind often comes up with some REALLY clever things.

Oh yeah, I'll definitely be looking at other options for a lot of the knobs, buttons, and switches. Might raid a few plastic model kits I have sitting around too. And I'm ALWAYS open to suggestions from the community for anything that will make my life easier :).

Second print with tweaked settings is already a bit cleaner. For the screw heads I might just use a syringe and formula 560, if I even decide it needs them. I'm happy with how this part came out so I'll get started modeling the rest of the instrument panel.
 

Attachments

  • 20190116_203202.jpg
    20190116_203202.jpg
    1.8 MB · Views: 0

wilmracer

I build things that fly (sometimes)
Mentor
Took the fuselage out to our club meeting last night. Had fun talking about the build technique and got some interesting suggestions. There are a few guys who don't understand why I'd build something this large using foam, or electric, but the response was overwhelmingly positive for both this build and for @rockyboy big FW-42.
 

Attachments

  • 20190117_191949.jpg
    20190117_191949.jpg
    2.7 MB · Views: 0
  • 20190117_192014.jpg
    20190117_192014.jpg
    2.9 MB · Views: 0

wilmracer

I build things that fly (sometimes)
Mentor
Made a mock up of the cockpit floor and doorway to the nose section. This revealed a few mistakes I made with the height of the column, so I modified it and will be printing new parts tonight. Next up I need to model the pilot and copilots seats, which bear a strong resemblance to high-chairs because they mount on the lower floor on either side of the door to the bombardier section. Once I have the height nailed down I'll mock up side panels and some additional detail for this area.

To be honest I have no idea how much of this I'll realistically be able to use in the final model, but it is too cold in the shop to get much done so working on CAD models gives me something to do. In the end I will use what I can to detail out the model as much as possible. There are a lot of windows into this portion of the fuse and the more detailed this area can be the better the final look will be.
 

Attachments

  • 20190120_151509.jpg
    20190120_151509.jpg
    2.6 MB · Views: 0

wilmracer

I build things that fly (sometimes)
Mentor
Still refining the cockpit but I had to wait for v2 parts to print before modeling the rest, so I went ahead and mocked up the Browning AN-M2 .50 cal machine gun. It is not 100% accurate, but at this scale I think it will look the part if the prints come out well. Included with the gun is the mount and "tray" that was used in late war B-17s and was installed in Aluminum Overcast when Joshua and I went for a ride. This includes the Sperry K13 compensating sight as well.

If this CAD works I'll be able to use the same model for the turret guns as well as the "flexible" positions for the waist gunners. First test print will run overnight and we'll see how it looks in the morning
 

Attachments

  • ANM2_Waist_Gun_1-1202x385.jpg
    ANM2_Waist_Gun_1-1202x385.jpg
    47.5 KB · Views: 0
  • Browning_M2_v3.jpg
    Browning_M2_v3.jpg
    219.1 KB · Views: 0

wilmracer

I build things that fly (sometimes)
Mentor
Pulled the print off the bed this morning before the kid woke up. No time to clean them up but I'm happy with the first run. Barrel will likely need to be printed with higher infill or hollow so a rod can be installed, but I'll make that tweak later. I'll test for the rest of the parts tonight and make the changes, but it should look pretty good at this scale.
 

Attachments

  • 20190124_072435.jpg
    20190124_072435.jpg
    3.3 MB · Views: 0

wilmracer

I build things that fly (sometimes)
Mentor
That came out great!

Thanks! V2 is printing right now that has a few minor tweaks and some additional detail.
For tonight's CAD I mocked up V1 of the Pilot/Copilot seats. I'll print a set tomorrow and see what adjustments need to be made. This looks pretty simple but getting the angles right and getting the pieces to slot together was actually a bit of a challenge for me. Hopefully not too many tweaks are needed.

The weather is warming up a bit for a few days before dropping back into the 20s next week, so I will probably try to get some airframe work done this weekend. Fingers crossed :)
 

Attachments

  • Pilot_Seats.jpg
    Pilot_Seats.jpg
    271.3 KB · Views: 0

wilmracer

I build things that fly (sometimes)
Mentor
Final prints for the guns will be finished out a lot nicer than this (prime, sand, prime, paint, weather) and I'll use more appropriate colors than a flat black and a generic metallic, but I tossed some color on the latest print so I could see the different parts. I'm happy with it. Should look very convincing on a flyby.

First print of the seats is running now. I expect to have to make some changes but we'll see.
 

Attachments

  • ANM2_Color_1.jpg
    ANM2_Color_1.jpg
    314 KB · Views: 0
  • ANM2_Color_2.jpg
    ANM2_Color_2.jpg
    483.8 KB · Views: 0

wilmracer

I build things that fly (sometimes)
Mentor
Looks awesome to me!

Thanks! Its just a bit too shiny with too many sparkles :) It will look real enough when it is dirty, oily, and has a belt of .50 fed into it. Fortunately someone else has already put a great ammo belt on thingiverse so all I have to do is scale it.
 

Grifflyer

WWII fanatic
Final prints for the guns will be finished out a lot nicer than this (prime, sand, prime, paint, weather) and I'll use more appropriate colors than a flat black and a generic metallic, but I tossed some color on the latest print so I could see the different parts. I'm happy with it. Should look very convincing on a flyby.

First print of the seats is running now. I expect to have to make some changes but we'll see.
One down twelve to go:p