Airbender sailplane scratchbuild

speedbirdted

Legendary member
Lately thermals have started cropping up at my field more and more so the glider itch has returned. Unfortunately my Gentle Lady is no more (don't worry it's still flying just not with me holding the box anymore) so I have to build something to fill the void. Or maybe that's not so unfortunate?

I also set myself a challenge; a 2-meter sub-250 gram ship. It sounds impossible and... that's because I think it is, at least for a sport flier like me who's airplanes must put up with the rigors of transport and frequent usage. With lots of composite wizardry I'm sure you could do it and end up with an airframe that didn't splinter if you looked at it the wrong way, but balsa is more fun to build things with :p So the design requirements were scaled back a bit to a 60" span, and I think that's doable.

Obviously that light of an airframe is not going to take the violence of bungee launches for very long so I'm sticking a motor on it. And it's also just a nice luxury to have, if you get too low all you have to do is put in a little power.

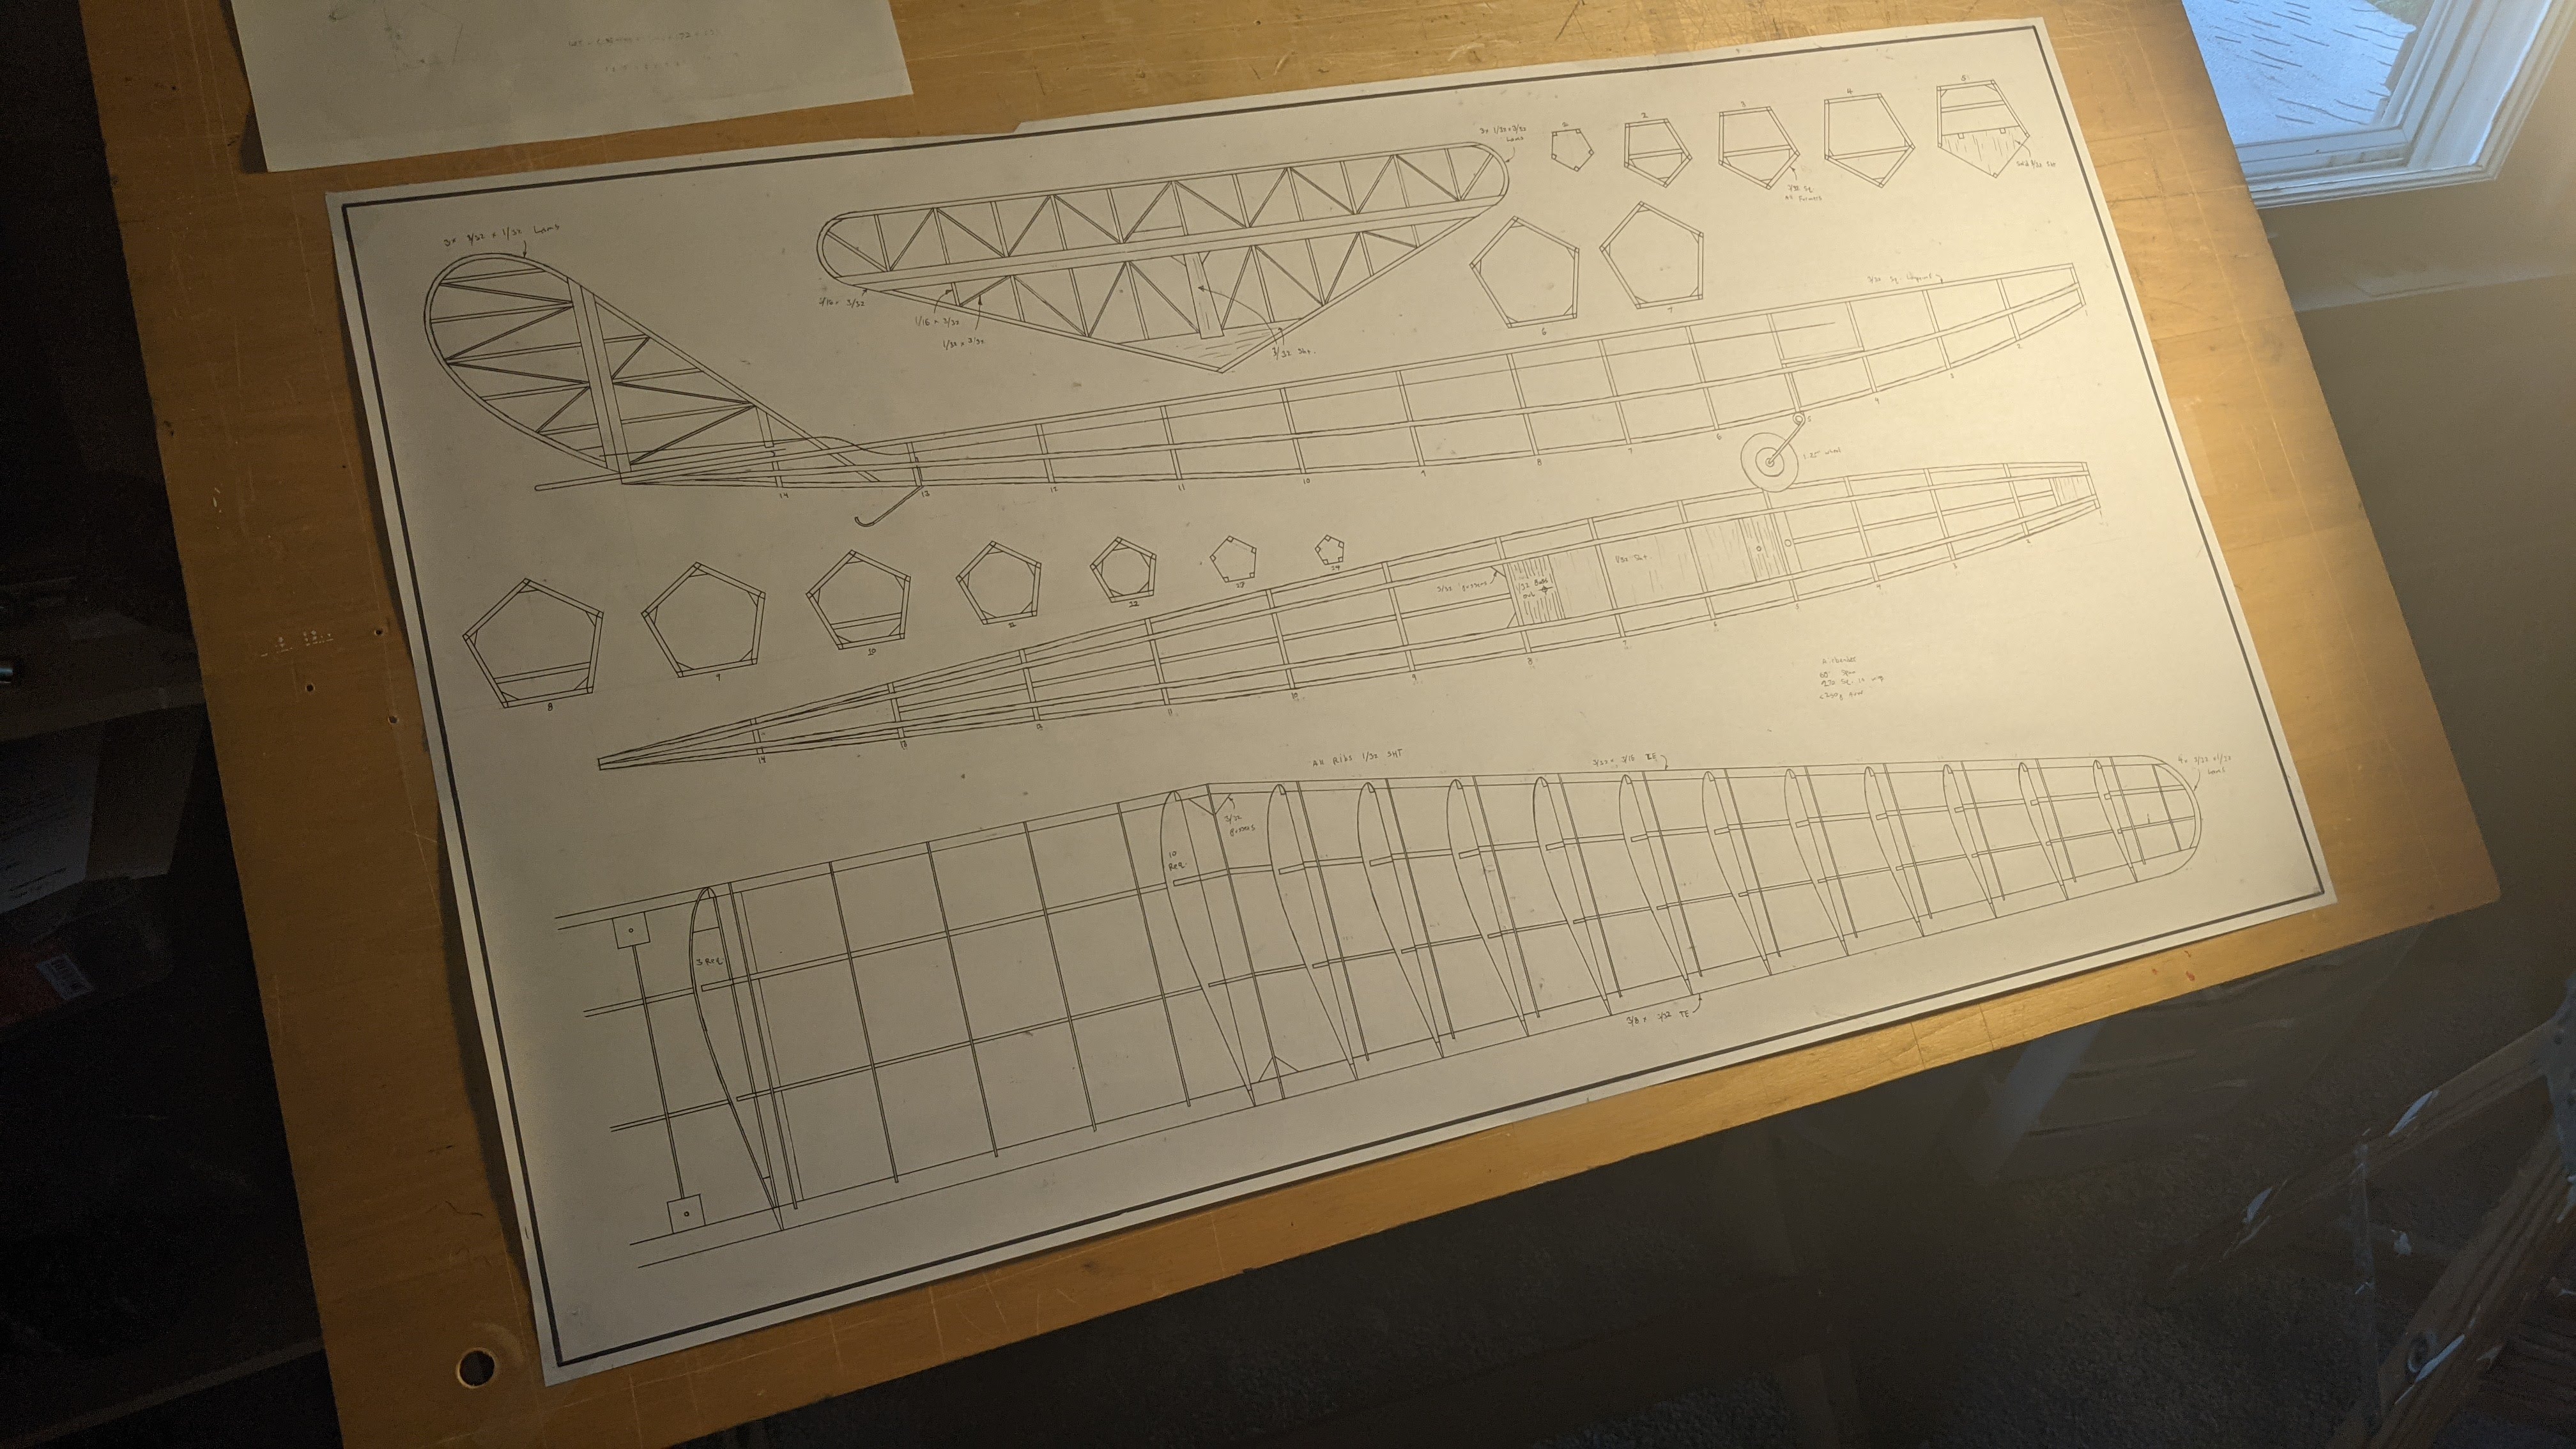
I had the design done from concept to finished plan in less than 48 hours. I didn't really employ any especially outlandish features, other than the pentagonal fuselage which you don't see too often. This was done just to make it look less generic, I guess. I had just enough time left today to run down to the print shop and get some copies made. Unfortunately I forgot to ask them to mirror one of them so I could build the left wing so I get to go do that tomorrow...
PXL_20210506_230001004 (1).jpg


I really wanted to start with the wing but sadly a quick survey of the balsa I have resulted in the discovery that all the 1/32 sheets I have are far too heavy to be used for the wing ribs. Like, so damn heavy that the identically sized 3/32 sheet I stripped to make the fuse formers was significantly lighter. Looks like I get to buy some of that too...

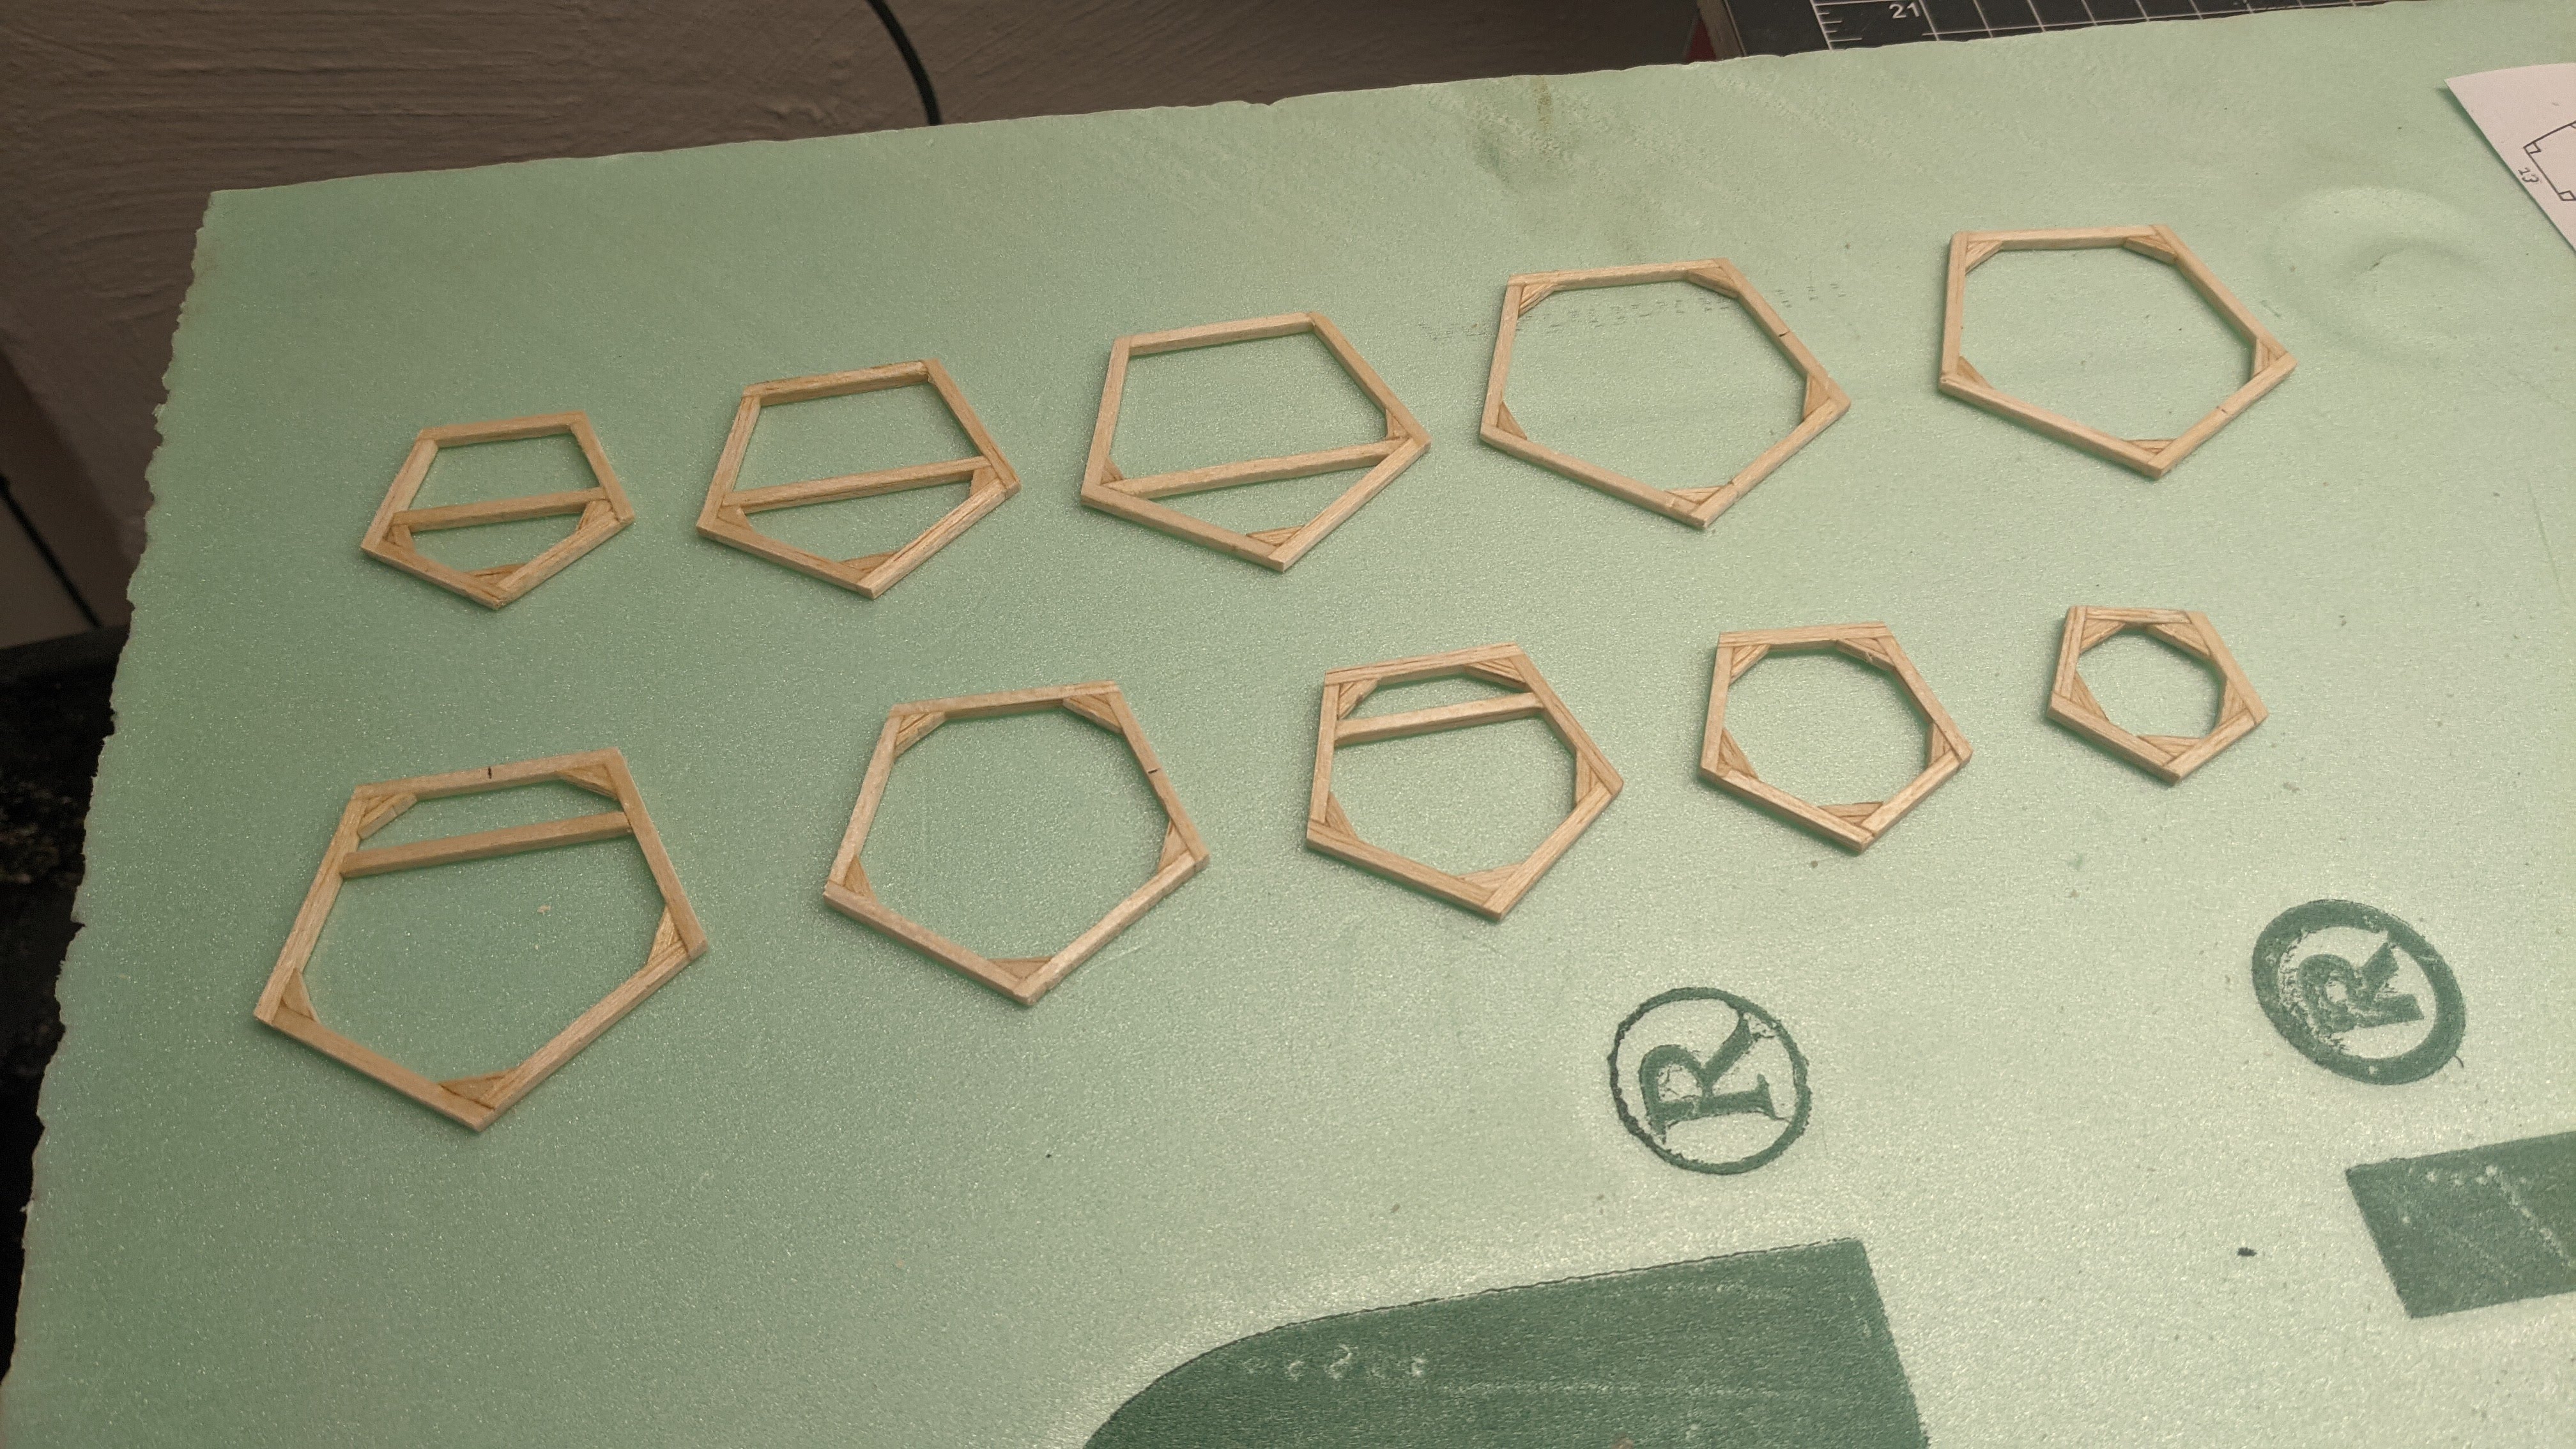
Speaking of those, that's what I have done for now, at least the ones that don't require the scroll saw to make (as my family banned me from using it when they're trying to sleep, either because it's too loud or they're just terrible at sleeping) I also have to cut the notches in them which I'm going to make some special sanding apparatus to do. The notches are actually meant to be cut at an angle which only requires one side of the longeron to be sanded flat, which will make it much easier to get it unformly smooth. It also allows me to build the fuselage without a jig directly over the plan, starting with the top longerons.
PXL_20210507_042132303.jpg


The electronics I bought from the Willy Nillies man arrived yesterday so other than the aforementioned wood problems I should have this done pretty fast. For covering I'm thinking tissue. I really don't want this thing ending up overweight...
 

The Hangar

Fly harder!
Mentor
Lately thermals have started cropping up at my field more and more so the glider itch has returned. Unfortunately my Gentle Lady is no more (don't worry it's still flying just not with me holding the box anymore) so I have to build something to fill the void. Or maybe that's not so unfortunate?

I also set myself a challenge; a 2-meter sub-250 gram ship. It sounds impossible and... that's because I think it is, at least for a sport flier like me who's airplanes must put up with the rigors of transport and frequent usage. With lots of composite wizardry I'm sure you could do it and end up with an airframe that didn't splinter if you looked at it the wrong way, but balsa is more fun to build things with :p So the design requirements were scaled back a bit to a 60" span, and I think that's doable.

Obviously that light of an airframe is not going to take the violence of bungee launches for very long so I'm sticking a motor on it. And it's also just a nice luxury to have, if you get too low all you have to do is put in a little power.

I had the design done from concept to finished plan in less than 48 hours. I didn't really employ any especially outlandish features, other than the pentagonal fuselage which you don't see too often. This was done just to make it look less generic, I guess. I had just enough time left today to run down to the print shop and get some copies made. Unfortunately I forgot to ask them to mirror one of them so I could build the left wing so I get to go do that tomorrow...

View attachment 199746

I really wanted to start with the wing but sadly a quick survey of the balsa I have resulted in the discovery that all the 1/32 sheets I have are far too heavy to be used for the wing ribs. Like, so damn heavy that the identically sized 3/32 sheet I stripped to make the fuse formers was significantly lighter. Looks like I get to buy some of that too...

Speaking of those, that's what I have done for now, at least the ones that don't require the scroll saw to make (as my family banned me from using it when they're trying to sleep, either because it's too loud or they're just terrible at sleeping) I also have to cut the notches in them which I'm going to make some special sanding apparatus to do. The notches are actually meant to be cut at an angle which only requires one side of the longeron to be sanded flat, which will make it much easier to get it unformly smooth. It also allows me to build the fuselage without a jig directly over the plan, starting with the top longerons.

View attachment 199747

The electronics I bought from the Willy Nillies man arrived yesterday so other than the aforementioned wood problems I should have this done pretty fast. For covering I'm thinking tissue. I really don't want this thing ending up overweight...
Sweet, I’ll be following. (y)
 
Lately thermals have started cropping up at my field more and more so the glider itch has returned. Unfortunately my Gentle Lady is no more (don't worry it's still flying just not with me holding the box anymore) so I have to build something to fill the void. Or maybe that's not so unfortunate?

I also set myself a challenge; a 2-meter sub-250 gram ship. It sounds impossible and... that's because I think it is, at least for a sport flier like me who's airplanes must put up with the rigors of transport and frequent usage. With lots of composite wizardry I'm sure you could do it and end up with an airframe that didn't splinter if you looked at it the wrong way, but balsa is more fun to build things with :p So the design requirements were scaled back a bit to a 60" span, and I think that's doable.

Obviously that light of an airframe is not going to take the violence of bungee launches for very long so I'm sticking a motor on it. And it's also just a nice luxury to have, if you get too low all you have to do is put in a little power.

I had the design done from concept to finished plan in less than 48 hours. I didn't really employ any especially outlandish features, other than the pentagonal fuselage which you don't see too often. This was done just to make it look less generic, I guess. I had just enough time left today to run down to the print shop and get some copies made. Unfortunately I forgot to ask them to mirror one of them so I could build the left wing so I get to go do that tomorrow...

View attachment 199746

I really wanted to start with the wing but sadly a quick survey of the balsa I have resulted in the discovery that all the 1/32 sheets I have are far too heavy to be used for the wing ribs. Like, so damn heavy that the identically sized 3/32 sheet I stripped to make the fuse formers was significantly lighter. Looks like I get to buy some of that too...

Speaking of those, that's what I have done for now, at least the ones that don't require the scroll saw to make (as my family banned me from using it when they're trying to sleep, either because it's too loud or they're just terrible at sleeping) I also have to cut the notches in them which I'm going to make some special sanding apparatus to do. The notches are actually meant to be cut at an angle which only requires one side of the longeron to be sanded flat, which will make it much easier to get it unformly smooth. It also allows me to build the fuselage without a jig directly over the plan, starting with the top longerons.

View attachment 199747

The electronics I bought from the Willy Nillies man arrived yesterday so other than the aforementioned wood problems I should have this done pretty fast. For covering I'm thinking tissue. I really don't want this thing ending up overweight...
That's some very fine work there. And it's good to see paper on a drafting table. Beautiful drafting work. (y) These days it seems people can't handle this without a 3D program.
 

TooJung2Die

Master member
What a cool unique design. Kinda retro. Are you sure you want to use tissue? I love tissue too. It can't be beat for light weight and looks. Tissue and document laminating film are my two favorite covering materials. I saw a John Woodward lightweight design glider he covered with clear document laminating film. He colored the balsa frame instead of the painting the film. It looked great. Doculam will "put up with the rigors of transport and frequent usage" better than tissue. I always have a tough time choosing between the two.
 

speedbirdted

Legendary member
That's some very fine work there. And it's good to see paper on a drafting table. Beautiful drafting work. (y) These days it seems people can't handle this without a 3D program.

Cad software infuriates me. I tried to design a plane with my cracked copy of Fusion 360 once, what a waste of time that was. Doing everything with pencil and paper has always been much easier for me, not sure why. I think this is how I'll design all my planes in the future. Though for some of my ideas I will need a bigger table...

What a cool unique design. Kinda retro. Are you sure you want to use tissue? I love tissue too. It can't be beat for light weight and looks. Tissue and document laminating film are my two favorite covering materials. I saw a John Woodward lightweight design glider he covered with clear document laminating film. He colored the balsa frame instead of the painting the film. It looked great. Doculam will "put up with the rigors of transport and frequent usage" better than tissue. I always have a tough time choosing between the two.

I did think about doculam, though I don't currently have enough to complete the project. The strength of tissue has actually pleasantly surprised me quite a bit. The only other plane I've covered in it so far has had quite a few flights put on it now, including many collisions with walls and tall grass, and it's only suffered a few holes that were easily fixed with patches.

I'm also not ashamed to admit I've fallen fully in love with the finish of tissue. It just looks so great when done well. I'm not really a sucker for a shiny airplane after all.
 

danskis

Master member
Your plan/plane looks great and I really enjoyed my first tissue covering lately. The guys at my field are shooting for 360 - 400 grams for a 2 meter plane that is motor or bungee. One guy regularly hits that weight but he's built about 30 2 meter gliders. You can read about one of his builds here. Yellow Jacket GS Build Log - RC Groups just an fyi....you can bungee launch it for years because of the carbon spar.
 

speedbirdted

Legendary member
I finished the formers, and cut out the remaining semi-solid ones. I thought about a way to make the notches that need to be perpendicular with one edge of the former for a while but ended up coming up with this ridiculously simple tool:

PXL_20210508_022556939.jpg


All it is is just a piece of balsa with sandpaper glued to it, glued to another piece of balsa. To make the notch you just rub the naked wood against the former edge while pushing a bit sideways and this will cut a nice notch perfectly aligned with it. It's a little annoying because you can't replace the paper after it gets a bit worn down but it's easy enough to just make another to replace it.

From there the formers were stuck onto the top two longerons like so.

PXL_20210508_040952415.jpg


In retrospect building a jig would have helped a bit with this. It's so minor most wouldn't even notice the little warps here and there but knowing they're there is not exactly comforting...

From there I added the side and top longerons, and removed it from the board. It still needs a lot of cleanup and I will start with sanding the longerons flush with the formers.

PXL_20210509_031602463.jpg
 

speedbirdted

Legendary member
I've been working on this little by little. Pylon racing starts soon so I've been prepping planes for that and tinkering with them in the hopes of going faster, and that along with work has been eating up the majority of my time. For starters, I got the laminations done for everything. After I got frustrated with CA continually destroying my jigs for making them I decided to use wood glue instead. It takes a while to dry but having a reusable jig in case you need to make more is nice, and it also doesn't cause the foam to melt into the wood like CA tends to do. We'll see how they sand down. I'm guessing it'll be a pain to do, and should that be the case I could make some more using Sigment or Super Phatic because they sand a lot better though in the latter's case I'll have to buy more.

PXL_20210517_030401349.jpg


I also cut out the wing ribs. This was a huge pain because 1/32 sheet is too narrow to allow the more usual technique of sanding all the ribs using the largest and smallest ones as templates on either end, so all the ribs on the tapered section of the wing had to be cut manually.

PXL_20210514_015928099.jpg


For now I also have 1/3 of the wing framed up at least. It needs the tip lamination glued in, and the smallest and farthest out rib added (which in a moment of severe stupidity I totally forgot to draw a template for)

PXL_20210517_041950258.jpg
 
Last edited:

speedbirdted

Legendary member
More wing progress. Built up the center section. The blocks are for the screws to go through; I will drill the holes for them on the fuselage to ensure that the wing goes on straight. I'm not sure if I'll countersink the screws into the wing, or build little raised flat sections for the screw heads to sit on.

PXL_20210518_040538701 (1).jpg


I thought for a while how to make the dihedral braces. The joint is bent on two separate planes due to the wing sweep, so a more traditional ply or bass brace can't be used. On a hunch I joined a couple of pieces of balsa with butt joints and then reinforced them with threads, and tried to break them apart. The thread makes it incredibly strong without adding much weight at all, so that's what I used. It's ugly, but it'll hide under the tissue, and most importantly it does its job well.

PXL_20210518_051901405 (1).jpg


I then added the ribs that go on the joints and the gussets, and the basic structure of the wing is complete. I never bothered to specify any actual dihedral measurement, I just figured I'd mock it up and use an amount that looked right. I ended up giving it 3" under each tip and that seemed perfect.

PXL_20210518_055442083.jpg


Not bad for a 60" wing. The tissue will add a bit more weight, but I'm still happy with the end product.

PXL_20210518_055539874.jpg
 

speedbirdted

Legendary member
Time to tackle the horizontal. I would have done the vertical too but unfortunately I messed up the lamination for it by using insufficient glue, resulting in it falling apart in my hands when I took it off the building board :p Oh well, I've got another one curing on the building board right now. It's handy having a reusable jig.

I also figured out this disgustingly simple method to getting better glue adhesion with wood glue on laminations. It tends to cure with the most strength when there is a little pressure on it, and sometimes the channel-style jigs do not provide constant pressure throughout the whole lamination. A rubber band provides much more uniform pressure, and I find that wood glue also doesn't stick to it either so it's easy to remove. It also removes the need to cut out the other side of the jig which saves a bit of time and suffering.

I'm fairly sure this method would not work very well if applied to a larger part, but for small parts it works very nicely. Maybe with very wide rubber bands you could do it?

PXL_20210519_043108436 (1).jpg


Putting together the horizontal. A nice trick to getting a smoothly running hinge is to cut out the sticks that make up the parts of the elevator and horizontal as one single stick, then cut it into two pieces down the center to ensure that the joint will line up perfectly and there will be little to no gap on the whole seam. In this case, the 3/16x3/32 stick at the rear of the horizontal actually started life as a 3/8x3/32 stick; I then cut it in half, and used the other half when I built the elevator.

PXL_20210519_040053548.jpg


Horizontal and elevator complete; all it needs is hinges installed (probably tyvek or fishing line, not sure what to use at this point) a control horn added which I'll cut from 1/32 ply, and the obvious tissue.

PXL_20210520_032601434 (1).jpg


Total weight so far for all the bits I've put together (wing, fuse, horizontal) is 41g. My hope for naked airframe weight was 50g and it looks like I'll achieve that.
 
I've been working on this little by little. Pylon racing starts soon so I've been prepping planes for that and tinkering with them in the hopes of going faster, and that along with work has been eating up the majority of my time. For starters, I got the laminations done for everything. After I got frustrated with CA continually destroying my jigs for making them I decided to use wood glue instead. It takes a while to dry but having a reusable jig in case you need to make more is nice, and it also doesn't cause the foam to melt into the wood like CA tends to do. We'll see how they sand down. I'm guessing it'll be a pain to do, and should that be the case I could make some more using Sigment or Super Phatic because they sand a lot better though in the latter's case I'll have to buy more.

View attachment 200283

I also cut out the wing ribs. This was a huge pain because 1/32 sheet is too narrow to allow the more usual technique of sanding all the ribs using the largest and smallest ones as templates on either end, so all the ribs on the tapered section of the wing had to be cut manually.

View attachment 200284

For now I also have 1/3 of the wing framed up at least. It needs the tip lamination glued in, and the smallest and farthest out rib added (which in a moment of severe stupidity I totally forgot to draw a template for)

View attachment 200285
Hey that's buff trace. Rock on man.
 

cyclone3350

Master member
Holy Cow! I do not know where to begin or how to comment on this one. I am still starring @ your plans. As amazing as that is, it just keeps getting better as I scroll through the pics. (y)
 

speedbirdted

Legendary member
Today I built the vertical and rudder, as well as figured out the electronics situation for the most part. Unfortunately the design of this fuselage means I simply cannot add the electronics after covering; they must be installed beforehand. Same with the gear, which I also made:

PXL_20210521_043537157.jpg


It's horrendously overkill on an airplane like this but it only adds about 6 grams total for the wheel and wire, and plus that's weight in front of the CG. However, I noticed a problem. When I test mounted the tail feathers, I found that with the wing installed the fuselage could tilt side to side enough on the ground for the horizontal to touch the ground and bend. This is obviously not good for it, so I think I will add small outrigger skids on the wing where the split between the outer and center panels is, to prevent it tilting as much.

With all the major parts complete, it's time for a bare bones photoshoot. It's really hard to get a good picture of this plane without portions of it clipping out of frame in my tiny shop.

PXL_20210522_031503228.jpg


I forgot to take a picture of it up close, but I also mounted the stick in the fuselage that the ESC, receiver and battery will get stuck onto. YOu can kind of see it here; it's got the big black piece of velcro stuck to the top of it. The ESC and receiver will be stuck to the bottom of it.
 

speedbirdted

Legendary member
Can you post plans? I would LOVE to build that. looks so nice

If you want to screw around with it, it's attached. You'll need a large format printer for it though as I have neither the ability to tile plans for a standard printer or the inclination to learn how to.

Good luck building it though, as I made zero effort whatsoever to make it more decipherable to builders that aren't myself. There are a lot of things on this plan that really should be labeled in more detail that I just couldn't be bothered doing because frankly, I don't know how well this plane is going to fly, and if it doesn't do it well there's no point in making the plan pretty in the first place.

Though, if it gets enough attention at Balsa 250 next weekend I might be compelled to...
 

Attachments

  • PDF0626-01.pdf
    2.7 MB · Views: 0