
You are using an out of date browser. It may not display this or other websites correctly.
You should upgrade or use an alternative browser.
You should upgrade or use an alternative browser.
Airtronics Olympic II electric sailplane build
- Thread starter GliderFlyer
- Start date
GliderFlyer
Elite member
Thanks. And you're welcome.The plane is looking great - really clean. And a big thanks for the SkyBench website!!!!
GliderFlyer
Elite member
I sanded the polyhedral joints tonight, the next step is spoiler installation!
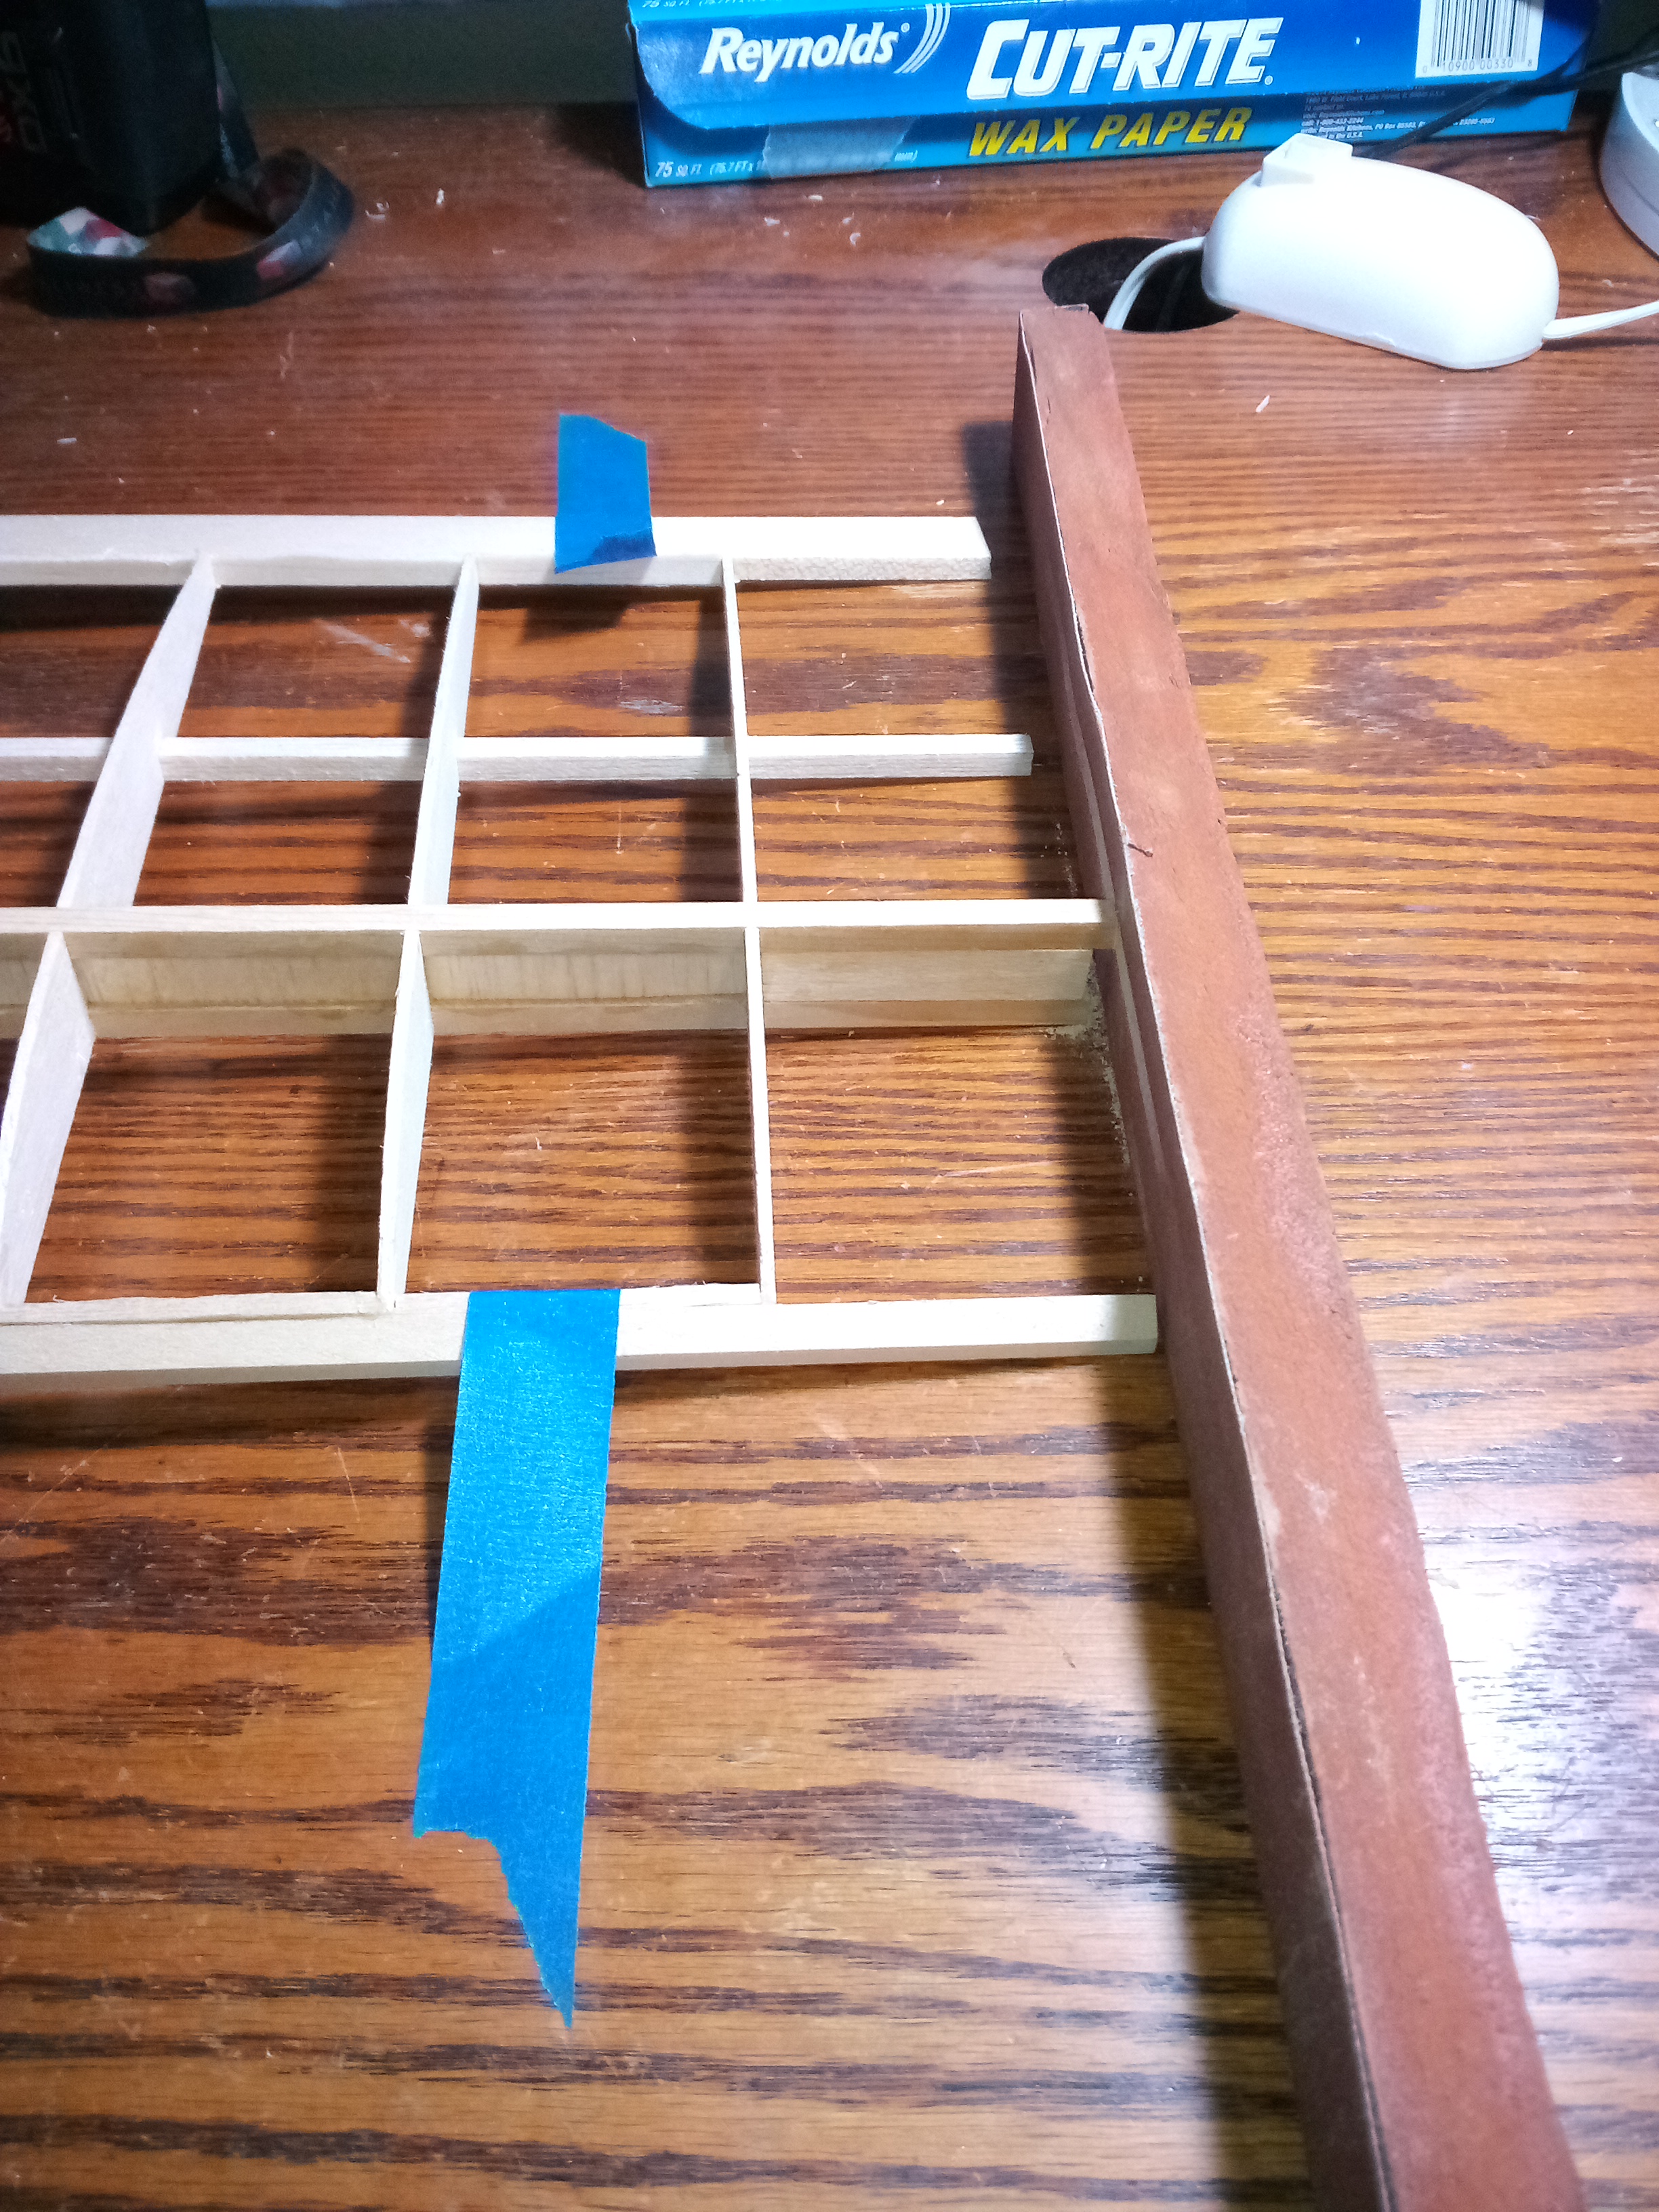
Question: should I plug in the servo extension cords or solder them? Once they're in there, they won't be coming out for a long time.
Another question: I don't know what effect this would have on strength, so should I drill the servo cord holes against the shear web (so they aren't as noticeable) or in the middle of the section between the shear webs and the rear spar ?
In other words(or pictures), the red line or black line?
Attachments


GliderFlyer
Elite member
Are hitec HS-81 servos a good size for spoilers? I've heard some people use HS-55.
Strength wise it probably doesn't matter where the holes are. Aesthetics would suggest you should glue it to the shear web. You could use a connecter but I would glue it....CA maybe
You could also give a little wire wrap, tape, tie a knot, hot glue, canopy glue, or shrink wrap too.
But if you use CA, don't use the thin stuff. Ask me know I know.

GliderFlyer
Elite member
I'm not a fan of the thin stuff either.You could also give a little wire wrap, tape, tie a knot, hot glue, canopy glue, or shrink wrap too.
But if you use CA, don't use the thin stuff. Ask me know I know.
TooJung2Die
Master member
I soldered the cable extensions for the last couple of aileron servos. It's neat and tidy and I know there's no chance of it ever disconnecting. If using connectors I like to use hot glue. Put a drop of hot glue on the connector and quickly wipe off the excess. If it ever comes time to take it apart a squirt of alcohol on the hot glue and it comes right off clean.
GliderFlyer
Elite member
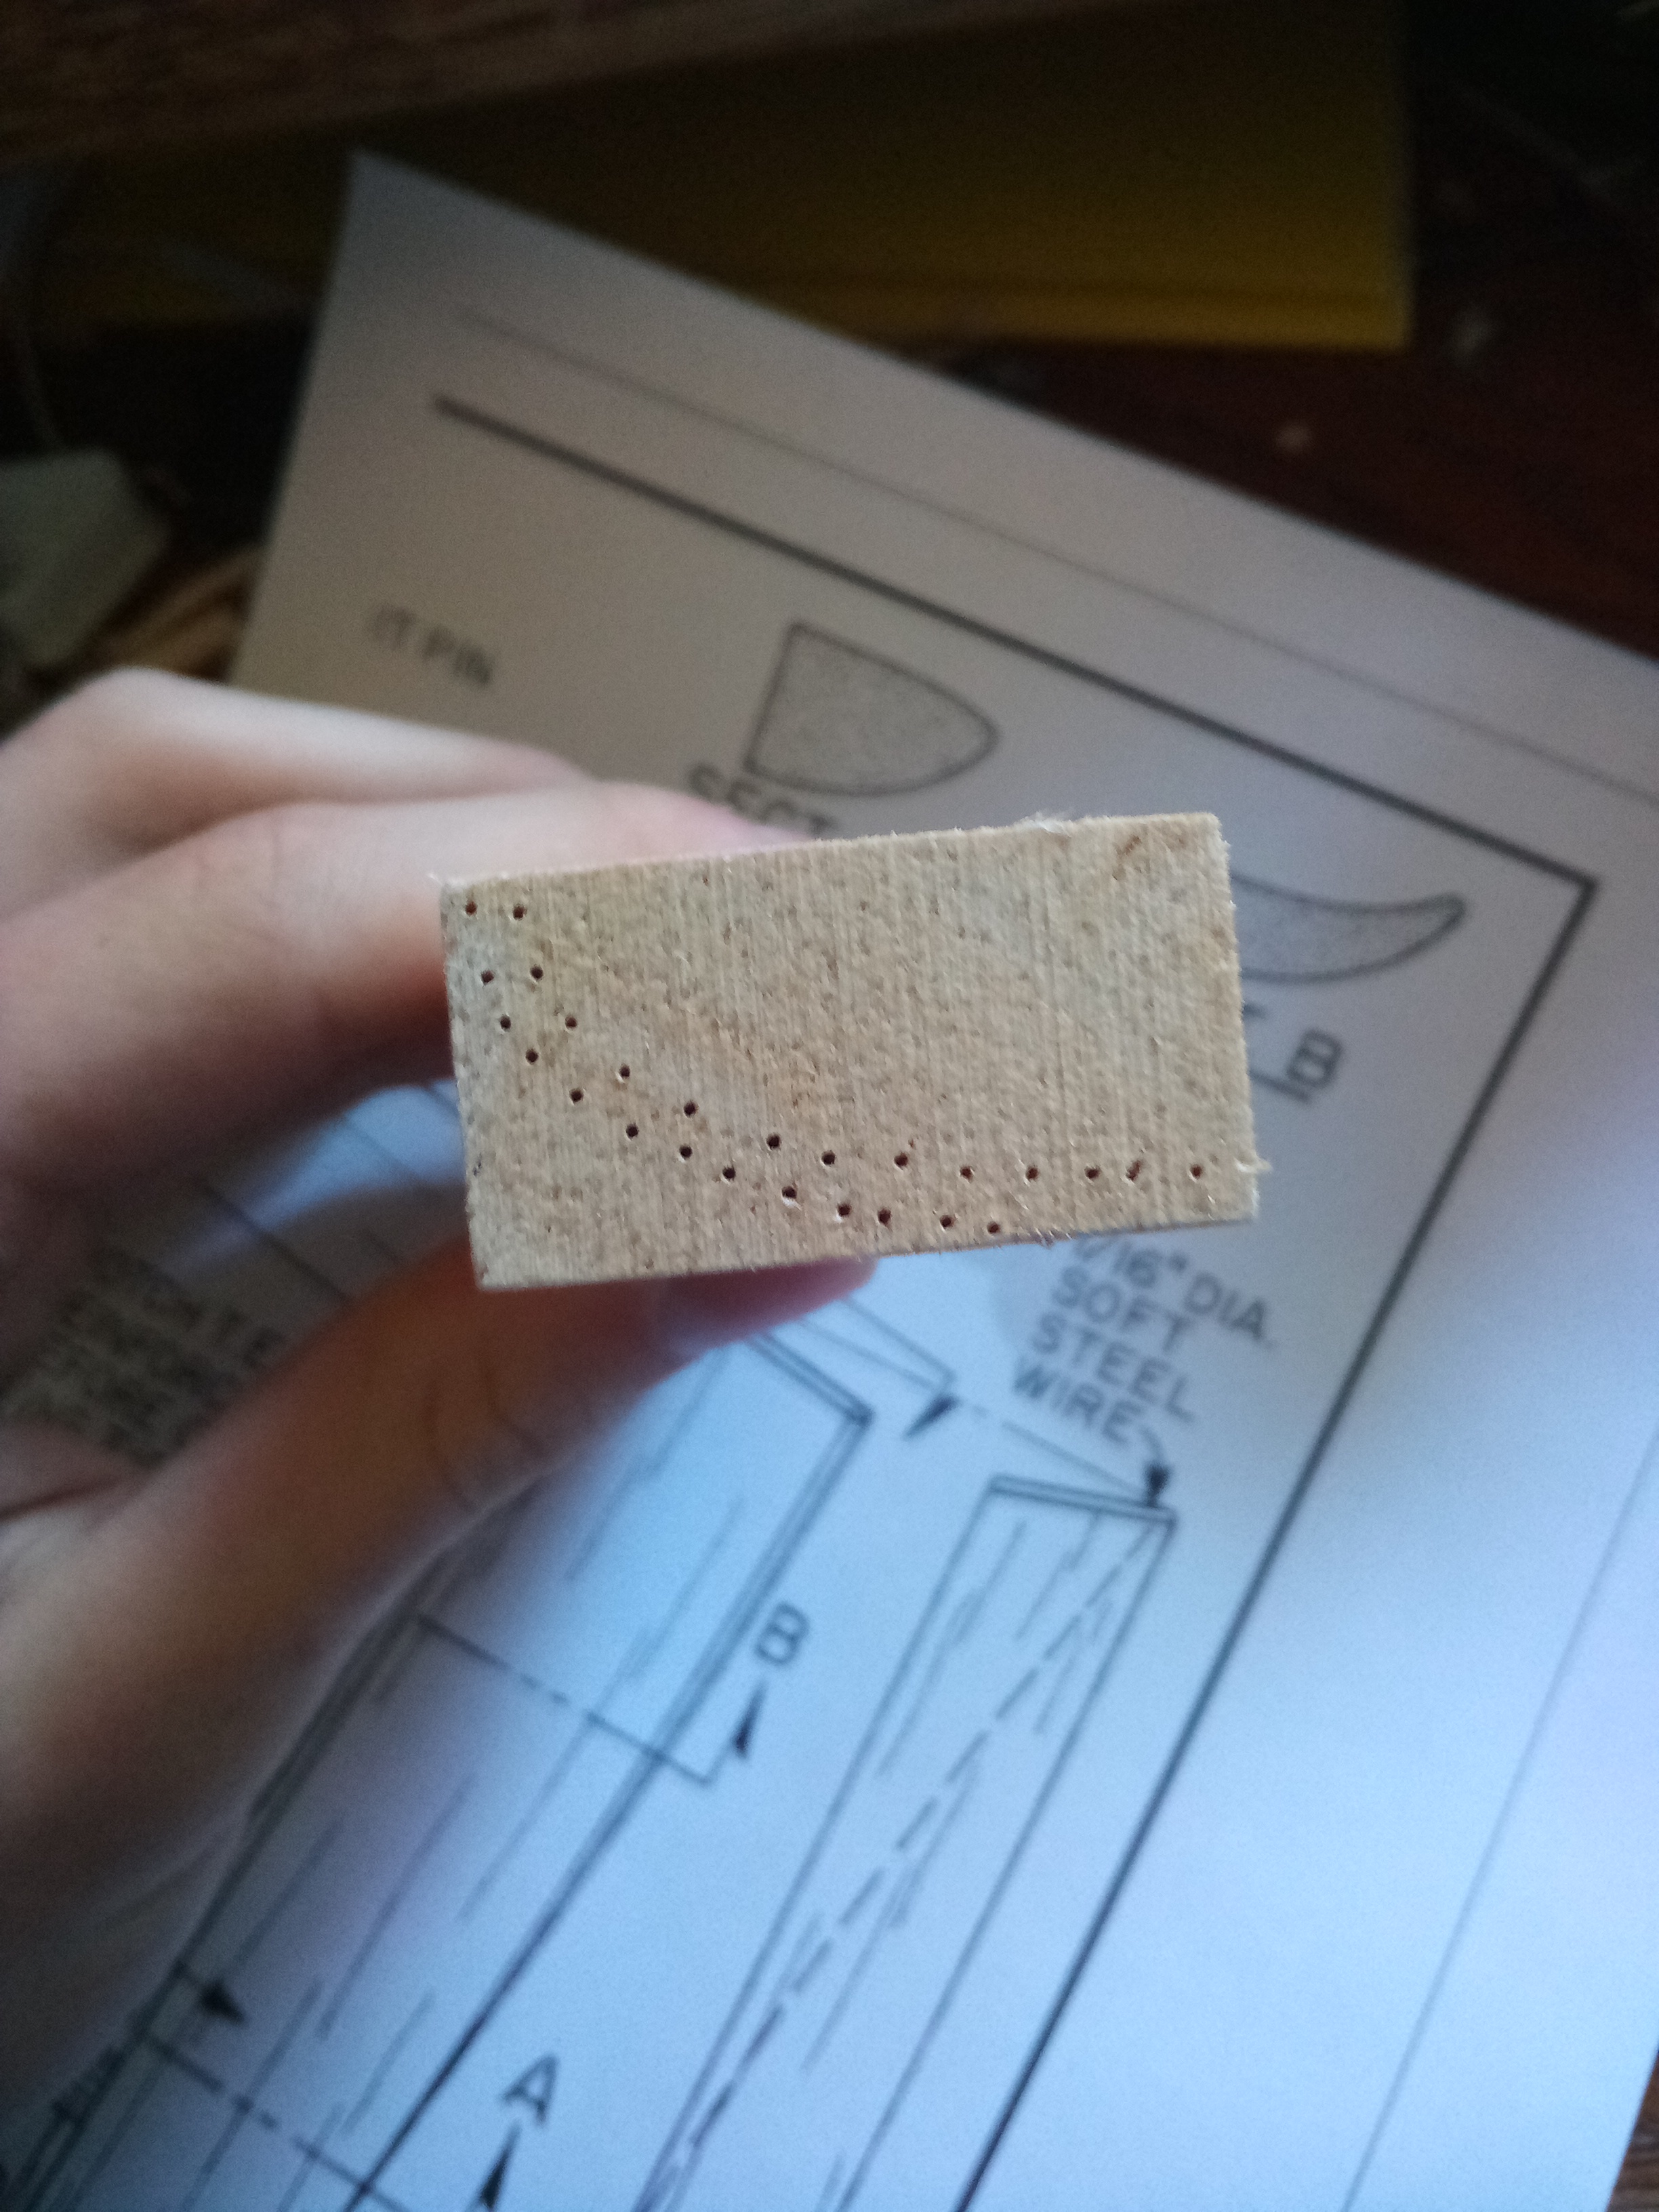
Now that I have had success putting threads in a wooden block, I want my Olympic II to have bolt on wings. I will have to use metal screws for bolts though because to make a threader, I need to use a metal screw that is identical. I also have heard that nylon screws break if they aren't maintained.
![IMG_20210317_085435[1].jpg](https://ftforumx2.s3.amazonaws.com/2021/03/357534_e33a0ef97e5645eb2118a6997795bad3.jpg "IMG_20210317_085435[1].jpg")
This is the threaded block I made easily today.
This is the threaded block I made easily today.
vhandon
Active member
I prefer the nylon screws myself. I bought a tap that I just reuse for all my builds. Supposedly the nylon screws will break during a crash and mitigate some damage. That may be a myth but I will take any small insurance I can considering how I fly. I don't see any problems using metal screws though.
speedbirdted
Legendary member
Now that I have had success putting threads in a wooden block, I want my Olympic II to have bolt on wings. I will have to use metal screws for bolts though because to make a threader, I need to use a metal screw that is identical. I also have heard that nylon screws break if they aren't maintained.
View attachment 195697
This is the threaded block I made easily today.
Nylon screws do indeed break away in crashes and help save whatever is around what they're screwed into. The white ones do this better than the black ones... I don't know why, maybe brand matters more than color.
About threading wood, don't do that. Eventually, the threads will disintegrate over time until you have basically just a smooth hole. What can sometimes happen is the threads will deteriorate to the point where the wing feels solid on the ground, but then it'll leave the airframe in flight or when you G load the airframe some. Just get a couple of claw nuts and stick them in there. If done right, this system will outlive pretty much the airframe itself.
An alternate solution is to use a soft balsa block epoxied in as your wing mounting plate that the blind nuts go into. This allows you to now use any kind of screw you want to hold the wing on as opposed to nylon breakaway bolts. This is nice as you can then use something like a small machine screw with a washer or a countersunk screw which will fit completely flush with the wing, which is cleaner aerodynamically and aesthetically. The breaking away part will now come from either the block itself breaking or the epoxy joints - epoxy tends to break much more cleanly at the point of adhesion as opposed to something like thin CA which will effectively join all the pieces of wood into one and as a result destroy everything in the surrounding area upon the force being applied. As a result of this after a crash all you have to do is either epoxy the block back in or make a new block. After a crash that breaks nylon wing bolts, airframe repairs are usually needed anyway so it's not like you're really doing any extra work.
GliderFlyer
Elite member
I forgot to post yesterday that I started the outboard panels. I though might as well since I can. When I was cutting the spars, I discovered that one length was too short! I don't know why, it may be because I accidentally used part of it already when building the tail or something else. Anyways, luckily, I searched my box of scrap balsa and spruce, and I happened to have the right size, and just enough of it. I tested the springiness of the new piece (actually, the wood was quite old) and it turned out to have just as much springiness as a piece from the kit. I would haver bought a replacement from my LHS, but they only sell basswood, not spruce, and I wanted the spars to match. Only a slight color difference.

The one on the left has the replacement spar.
The one on the left has the replacement spar.
GliderFlyer
Elite member


GliderFlyer
Elite member
Oh yeah, and I forgot to say that I did not include the steel wire in the tips because I have heard that it is not that necessary so long as you make them a little bit thicker.
GliderFlyer
Elite member
The tip panels are glued in, minus the polyhedral joint reinforcer. Wood glue was used for this. I added about 2 degrees extra as recommended, which means the tips are propped up 3" instead of 2-1/2".
Holes for more strength
 modified plywood jointer to match the modified polyhedral

3" both sides

Holes for more strength
3" both sides
Attachments


GliderFlyer
Elite member
Wingtips were hollowed out to make them lighter. It only made a difference of 3 grams. Both wingtips weigh 7 grams total.
I got a crazy idea because it fit so well...


I got a crazy idea because it fit so well...
GliderFlyer
Elite member
The spoiler servos arrived, so I can start building that now. My agenda for today is:
-finish both spoilers
-glue on wingtips
-install R/E pushrods
-finish both spoilers
-glue on wingtips
-install R/E pushrods
GliderFlyer
Elite member
It has been a super long time since I have worked on the OLY. I have installed the pushrod tubes, but they still need a little sanding around the exit (I should have used microballoons!) I also installed the spoiler servo mounts, and constructed a spoiler mechanism according to the skybench aerotech website.
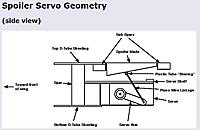
Question: how do I hinge these? For my gentle lady, I used the covering film as a hinge. Is that what works best for spoilers?
More pictures
 This was taken from the underside of the wing
 Tack glued into place
 Reinforced with fiberglass
Question: how do I hinge these? For my gentle lady, I used the covering film as a hinge. Is that what works best for spoilers?
More pictures
GliderFlyer
Elite member
I sheeted the top of the rear fuselage today. Rubber bands keep the balsa on while the glue dries.


GliderFlyer
Elite member
Today I soldered servo extensions for the spoilers.
I also applied filler to the many scrapes, gouges, gaps, and dents. My next step is to finish the bolt on wing system. I think I have changed my mind for the configuration. I am choosing to go with pegs in front and bolts in the rear. Now I need to look into the best way to attach the pegs.
![IMG_20210607_104854[1].jpg](https://ftforumx2.s3.amazonaws.com/2021/06/369352_9e6388587f5c8752b8368eb062fca69e.jpg "IMG_20210607_104854[1].jpg")
I also applied filler to the many scrapes, gouges, gaps, and dents. My next step is to finish the bolt on wing system. I think I have changed my mind for the configuration. I am choosing to go with pegs in front and bolts in the rear. Now I need to look into the best way to attach the pegs.
Similar threads
- Replies
- 4
- Views
- 2K
- Replies
- 24
- Views
- 2K
- Replies
- 3
- Views
- 861