Alternate foamboard testing

n0ukf

New member
Rather than the normal paper-skinned foamboard (which I'll get the next time I'm in Dollar Tree, the nearest is 100 miles), at our local closing-forever Shopko I bought a bunch of plastic-skinned foamboard, images printed on one side and glossy orange on the other. I am now testing the FT foamboard building techniques to see which are usable as-is and which need to be modified.

The first thing I noticed was when I cut half way through and bent it, the uncut sheeting cracked (whether scored or not). This raised some issues regarding the thoroughly demonstrated building techniques. Paper (sheeting) hinges are out, as this sheeting material is more like styrene (whether it actually is or not). I'll have to do it as tape hinges or glue in actual hinges. Test bending (A,B and C) folds is out, as this willl crack at the fold. Peeling one side of sheeting... I'm not sure yet but it looks like it'll be difficult.

Gluing I found will help against the cracking bends, the heat from the glue softens the sheeting until it cools. Where some planes have a spar made by half-cutting the foam and gluing it folded back (there's no fold name for this like for the A, B & C?), I'll have to see if a bead of glue on the fold will soften it enough to fold tight or just let it crack and the glue holds it alone. I haven't tested the bonds yet but when I do get around to actually building planes, if I am gluing the shiny side, I'll scuff it up first with sandpaper, like roughing up the side of servos to glue them.

Here I made up a wing segment from the Simple Cub plans to test these methods (not the hinges yet). Is the trailing edge really that thick, or did I misread the plans?
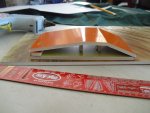
WingTest.jpg

Having no paper, I think this board should work nicely for anything that might see use on water (floats, sea planes, actual boats, etc.) or fly in rainy weather (nobody ever does that, do they?;)). The glossy side should also slide nicely on snow.
 
Last edited:

FastCrash45

Elite member
Rather than the normal paper-skinned foamboard (which I'll get the next time I'm in Dollar Tree, the nearest is 100 miles), at our local closing-forever Shopko I bought a bunch of plastic-skinned foamboard, images printed on one side and glossy orange on the other. I am now testing the FT foamboard building techniques to see which are usable as-is and which need to be modified.

The first thing I noticed was when I cut half way through and bent it, the uncut sheeting cracked (whether scored or not). This raised some issues regarding the thoroughly demonstrated building techniques. Paper (sheeting) hinges are out, as this sheeting material is more like styrene (whether it actually is or not). I'll have to do it as tape hinges or glue in actual hinges. Test bending (A,B and C) folds is out, as this willl crack at the fold. Peeling one side of sheeting... I'm not sure yet but it looks like it'll be difficult.

Gluing I found will help against the cracking bends, the heat from the glue softens the sheeting until it cools. Where some planes have a spar made by half-cutting the foam and gluing it folded back (there's no fold name for this like for the A, B & C?), I'll have to see if a bead of glue on the fold will soften it enough to fold tight or just let it crack and the glue holds it alone. I haven't tested the bonds yet but when I do get around to actually building planes, if I am gluing the shiny side, I'll scuff it up first with sandpaper, like roughing up the side of servos to glue them.

Here I made up a wing segment from the Simple Cub plans to test these methods (not the hinges yet). Is the trailing edge really that thick, or did I misread the plans?
View attachment 128481

Having no paper, I think this board should work nicely for anything that might see use on water (floats, sea planes, actual boats, etc.) or fly in rainy weather (nobody ever does that, do they?;)). The glossy side should also slide nicely on snow.
It looks like the trailing edge was cut short on the bottom by an inch or so because I think the top should touch the bottom leaving enough to add ailerons. Is have to look at the plans again but my off reader isn't opening files at the moment
 

Merv

Site Moderator
Staff member
Looks interesting, any idea who makes it. BTW, my Dollar General carries Adams foam board. Wal-Mart has Ross foam board.
 

FastCrash45

Elite member
Rather than the normal paper-skinned foamboard (which I'll get the next time I'm in Dollar Tree, the nearest is 100 miles), at our local closing-forever Shopko I bought a bunch of plastic-skinned foamboard, images printed on one side and glossy orange on the other. I am now testing the FT foamboard building techniques to see which are usable as-is and which need to be modified.

The first thing I noticed was when I cut half way through and bent it, the uncut sheeting cracked (whether scored or not). This raised some issues regarding the thoroughly demonstrated building techniques. Paper (sheeting) hinges are out, as this sheeting material is more like styrene (whether it actually is or not). I'll have to do it as tape hinges or glue in actual hinges. Test bending (A,B and C) folds is out, as this willl crack at the fold. Peeling one side of sheeting... I'm not sure yet but it looks like it'll be difficult.

Gluing I found will help against the cracking bends, the heat from the glue softens the sheeting until it cools. Where some planes have a spar made by half-cutting the foam and gluing it folded back (there's no fold name for this like for the A, B & C?), I'll have to see if a bead of glue on the fold will soften it enough to fold tight or just let it crack and the glue holds it alone. I haven't tested the bonds yet but when I do get around to actually building planes, if I am gluing the shiny side, I'll scuff it up first with sandpaper, like roughing up the side of servos to glue them.

Here I made up a wing segment from the Simple Cub plans to test these methods (not the hinges yet). Is the trailing edge really that thick, or did I misread the plans?
View attachment 128481

Having no paper, I think this board should work nicely for anything that might see use on water (floats, sea planes, actual boats, etc.) or fly in rainy weather (nobody ever does that, do they?;)). The glossy side should also slide nicely on snow.
You'll also have to pay attention to the weight. I bought some Wal-Mart Foam board and it's twice as heavy as the Adams rediboard. Chuck glide it first to make sure of the chances of it flying well. Of course you can add more power but that adds more weight. Ask someone who has built the cub how much theirs weighed and compare them.
 

n0ukf

New member
Yes, the top is intentionally cut short because I knew ailerons would have to be added with some other hinge material. This was just a short segment of wing for initial testing. Result of part of that testing, the C fold has a crack half way along one bend from a little initial test bending. The hot glue softened the rest to bend easier without breaking and subsequently held everything together.

Here's my stash, waiting to find a more permanent place to await use. It might last me a little while. ;)
ShopkoFoam.jpg
 
Last edited:

n0ukf

New member
Got a start on the Simple Cub using this board. Though I haven't built with the normal foamboard yet, I can tell this is stiffer to work with even with the hot glue softening the sheeting.
CubWing1.jpg CubWing2.jpg CubWing3.jpg CubWing4.jpg
Because of this I added one more score line to the leading edge. I maybe should have cut a wider V for the LE. This stiffness lost me 1/4" of aileron but this shouldn't be much problem. I have hinges to glue in but I'll wait a while before finishing the aileron cuts. I'm still waiting for the power pack (back-ordered just a couple days ago) and motor mounts to arrive. Once the plane is (nearly) finished, I have a twist to add for those who haven't seen me mention it in another thread.
 
Last edited:

Arcfyre

Elite member
Looks good to me. How does the weight compare to the regular Adams board?

Elmer's board from Walmart is about the same thickness as the Adams stuff, but is roughly twice as heavy. It has it's uses in certain applications, as it is stronger. For example, I use it in my Storch fuselage which sees a whole lot of takeoffs and landings at gross weight due to my camera gear. I've found that it doesn't wrinkle where the gear connects to the fuse.

I'm curious how your material compares in weight and structural integrity.
 

n0ukf

New member
See the wingtip, there's a double line for the aileron, one transferred from the plans and the other drawn after gluing.

I haven't cut any board down to 20x30 to make comparison. The wing without servos is 18oz (509 grams). If the Elmer's is still paper-sheeted), this probably has more structural integrity, especially where i don't peel one side (that will be a job in itself).
 

Arcfyre

Elite member
Man, that seems a bit heavy to me. For comparison, my Storch wing has an aluminum spar in it and it's 16" wider than a standard Storch wing, for a total wingspan right around 75". That wing comes in at 24 oz with 4 servos and the RX attached.

I'm not trying to be negative in the slightest, nor am I trying to discourage you, but I'm worried that your cub may be extremely overweight by the time you've finished her. The specs on the store site for that bird claim the finished weight of the entire airframe should be around 10 oz.

Perhaps a design less sensitive to being overweight would make a better testbed for this material? I have firsthand experience with overweight Cubs, and long story short, they are frustrating. A wing design, like a versa for example, is much less sensitive to being heavy. I've built a couple with some monster motors out of the Elmer's stuff and they still glide extremely well, much to my surprise. Just my 2¢, best of luck to you!
 

n0ukf

New member
Well, I attempted some weight savings inside the fuselage... and got a whole ounce back.
Cub1.jpg
However, this little fatty is a whopping 31oz. without power pack, battery and gear.
Cub2.jpg Cub3.jpg Cub4.jpg
Since I have no servos yet (and thus the tail isn't glued in yet, nor rudder/elevator cut), I think I'll go ahead building my additional idea for this. I'll use normal foamboard for it...
 

Arcfyre

Elite member
Great looking build, I love the color especially. Too bad about the weight, although it may still fly if you can get it going fast enough, lol.
 

n0ukf

New member
When glide testing, is it better to be a little tail heavy? I put a couple NiCd packs in the nose to balance it a little nose heavy and it dove into the ground. A little damage to the hood from one of the packs sticking up slamming into it, so I'll just cut out and replace that panel segment.
Cub5.jpg
Just a few minutes and "it never happened." ;)
Cub6.jpg
 
Last edited:

n0ukf

New member
That maiden will have to wait for my back-ordered power pack from FT.
BTW, does anyone have a measurement or estimation of how much thrust power pack B gives on 3s?
 
Last edited:

n0ukf

New member
I'd ordered a couple sets of servos from Bangood and the first set (steel gear Tower Pro) arrived a couple weeks ago. Yesterday I got the other set... I've never heard of "lofty ambition" brand. After squeezing one into the too tight hole in the wing and pulling it back out, a layer of labels came off, revealing a Tower Pro servo. Is this branded for Tower Hobbies or is it a completely unrelated brand (has no Tower Hobbies logo)? In the photo, the brand was blacked out.
CubWing5.jpg
 

n0ukf

New member
Got my power pack and discovered the plane's nose was 1/8" too long so the prop would hit (not just rub). A little trimming fixed it. Made a maiden attempt with this hefty thing...
With no rudder input (straight), why am I doing donuts? Fastening a large nut just behind the firewall, it is still tail-heavy, balancing barely forward of the wing's center. My next idea before building a whole new plane out of normal DTFB is to add a DTFB wing below to make it a biplane. Maybe then it'll get airborn with power pack B. If not, I may have to try a C on this plane. This will all have to be a couple weeks down the road though, as we're preparing for a long road trip to a nephew's wedding.
 

Hai-Lee

Old and Bold RC PILOT
Got my power pack and discovered the plane's nose was 1/8" too long so the prop would hit (not just rub). A little trimming fixed it. Made a maiden attempt with this hefty thing...
With no rudder input (straight), why am I doing donuts? Fastening a large nut just behind the firewall, it is still tail-heavy, balancing barely forward of the wing's center. My next idea before building a whole new plane out of normal DTFB is to add a DTFB wing below to make it a biplane. Maybe then it'll get airborn with power pack B. If not, I may have to try a C on this plane. This will all have to be a couple weeks down the road though, as we're preparing for a long road trip to a nephew's wedding.
Making your Cub fly is not difficult but without as few changes you will have a nightmare on your hands!

Firstly you will definitely require to add weight to the nose as the plane balance point is important. A metal spinner is one method that is easy to accomplish as is the use of the largest diameter SF prop that the motor can handle!

With the ailerons now being reduced in cord you may find that you have inadvertently increased the negative incidence angle of the wing, (it points downwards at the front), and this negates or reduces lift when trying to maintain flight. You may need to place a shim or 2 under the wing LE so that the plane will fly if at all. If necessary you could always extend the ailerons and even the wing tips to obtain greater wing area!

The turning or doing donuts could be simply the wheels binding on the axles or a "P" factor issue. A large SF prop will reduce the "P" factor effects and so a straighter taxi will be easier. If it persists you may wish to consider adding some side thrust!

Have fun!
 

Hondo76251

Legendary member
Fixing the balance is paramount...
Tail heavy planes are a nightmare to fly, if they fly at all!

Also looks like you need a lot more power. Even a heavy version of that plane should have its tail up within a few feet and be off the ground easily in the distance it looked like you were covering. Fixing the balance should also help get the tail to too...

That foam probably isnt ideal for the flitetest build methods but it is pretty strong. Ived used similar before for home made designs that worked well. Might as well figure out how to build with what you got!