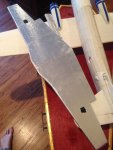
Aluminum sheeted P51-D foamie.

Archimedian

Member
Howdy. What we are going to have here is a DTFB/purple foam/balsa composite build with full aluminum foil sheeting. Other features are aluminum tube for control surface hinges, aluminum tube suspension, and a belly exhaust vent.

Wingspan: 36"
Predicted weight: 400grams
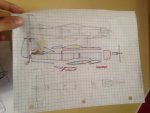
30657299_984548645047692_1330274717280655523_n.jpg

The wing is built on top of a thick piece of corkboard that has been glued to a wooden board. The planform of the lower surface is cut and pinned to the work surface. I applied a wide strip of plastic tape underneath where I glued the leading and trailing edges.
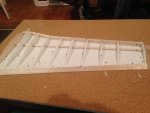
30657166_984542241714999_2458865378461742302_n.jpg

A box is made on each side to house the aileron servos flush with the lower surface.

30688230_984542245048332_5172894553568851158_n.jpg

With the servo and servo wiring in place, the upper surface sheet is applied.

30709293_984542271714996_238307047119198103_n.jpg

I attached the two wing halves before attaching the upper surface on one side. This was so i could add reinforcement to the centerline joint.

30705559_984542285048328_2978377503092631450_n.jpg

Small strips of purple insulation foam were glued to the wingtips. Now the wing can be shaped with sanding blocks. Once this is done, the ailerons are cut from the wing.

30725058_984542311714992_8091860981840060296_n.jpg

I dont have a detail of it now, but a 1/4 inch aluminum tube with some bits of concentric size tube, is used to make a hinge spanning the entire length of the aileron.

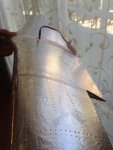
Before gluing the aileron and hinge to the wing, the wing and surface are completely sheeted with aluminum foil. Im using some extremely cheap foil because it is the thinnest i can find. I am adhering the aluminum using some epoxy mixed with glass balloons for lightening.

This process does not feel proper or pretty. The aluminum likes to wrinkle immediately with flexes in the airframe. Carry on though, and when large surfaces start to shine, you wont care about wrinkles. Be careful not to get grubby fingers on the aluminum. You cant sand it off. Use alcohol immediately.

30704886_984542318381658_5429175368286536352_n.jpg

30657033_984542358381654_6380510990049689078_n.jpg

30707720_984542381714985_644904317134448510_n.jpg

30714619_984542408381649_1530223010056779961_n.jpg


Thats all for this post. Wing comes in at around 100grams, which i dont think is very bad. The fuselage contains more pink foam which will stack up the weight quickly.

Also, if anyone noticed, i completely forgot to incorporate my landing gear. This will get keyed into the spars later.
 
Last edited:

Fluburtur

Cardboard Boy
Will look nice, be aware that it will block radio signal so you will need to have the antennas outside and in a way that won't block them.
 

Archimedian

Member
Fuselage Core: 57 grams

Fuselage sides are delaminated foamboard. Side panels terminate at the rudder hinge aft. A purple foam bulkhead is placed at the rear end of the canopy.

Purple foam is cut and glued to accommodate a power pod swappable and an air intake. This element is glued to the firewall of the dtfb fuse. A rectangle of foam is also used as the bottom panel of the fuselage forward of the wing saddle. This prevents a round to square junction of the nosecone and fuse, as both can be sanded deeply together.

nosep51a.jpg

nosep51b.jpg

A canopy hatch is fitted between the nosecone and the rear bulkhead. (I know its very long) It is secured with dowels and magnets.

nosep51c.jpg

The belly radiator is made from two pieces of purple foam. I mocked up the saddle and wing joint to measure and glue the angle between the two components. Then rough sanded the element and glued it to the fuselage. Once applied, it does a good job of holding the wing in place.

A slot is cut in the back of the radiator to exhaust air from inside of the fuselage.

bellyp51a.jpg

bellyp51b.jpg

bellyp51c.jpg

bellyp51d.jpg


I routed coffee straws through the rear fuselage and out into the outside and into the forward access compartment. By placing control rods in the straws and rubber banding them to the tail, I prevented the straw's tendency to curve when exiting the slanted hole.

View attachment 105476
 
Will look nice, be aware that it will block radio signal so you will need to have the antennas outside and in a way that won't block them.

Just a question, would it also work if you would link the antenna to the aluminium of the fuselage?
Or would be the surface of the antenna to big then? :confused:
 

Fluburtur

Cardboard Boy
Well antennas need to be at a certain size so that the resonant frequency of the antenna is the frequency you want to transmit/receive so unless you shape the whole plane to work as an antenna this wouldn't work.

But I guess if you cut a strip of aluminium insulated from the rest it should work.
 

Archimedian

Member
Thanks for the warning, Fluburtur.

Perhaps i could forego the aluminum on the canopy hatch, but i assume that I could still experience loss in different orientations.

I also assume that i cannot extend the antenna without corrupting the frequency tune? Scale antenna perhaps.

Maybe just dangling out the bottom of the chin.

Anyhow, sheeting of the fuse is underway. Foil and epoxy adds weight at approximately the same rate as a layer of paper. Fuse looks like it will end up being about 100 grams.

30712172_985585838277306_1634659467290408352_n.jpg

30725785_985585728277317_729088285727828022_n.jpg
 

Fluburtur

Cardboard Boy
The only part that matters is the exposed part of the antenna so you can put a longer antenna, as long as the active part is the right size.
Didn't the p51 have an antenna mast on it or something? you could put the antenna there. And yes you need to place your antennas so you won't lose them in certain orientation.
 

Archimedian

Member
Okay so bear with me. Is what you are saying: I can extend the antenna, but i must shield the antenna except for the tip of approximate length to the original antenna (Antennas, 2)

In the meantime, progress on the sheeting and plastic canopy.

And a reference model of a paint scheme.

30739797_986340058201884_7269129821489924897_n.jpg

a2762103-9-qp-rpro.jpg
 

Fluburtur

Cardboard Boy
Yeah that's what I meant, depending on the receiver you have you can probably guy replacement antennas that could be longer or just buy some antenna wire, this way you get a cleaner result.
 

Archimedian

Member
Canopy complete. I decided not to use this opportunity to learn heat shrink canopies. Instead I cut the shape from the curved shoulder of a water bottle. All paint is on the inside. Painted the canopy frame in silver and washed some bronze and gold over that.

The effect gives more of a "custom racer" look. Im hoping that once its up on its legs showing off the belly radiator, it will be a little more obvious. Paint decals will help alot.

Tail surfaces to be hinged and placed.
Landing gear to be made.
Power pod to be made.

Its getting close.

30742772_987063574796199_379691644181971990_n.jpg

30739311_987063654796191_6595608091485697288_n.jpg

30726175_987063738129516_3619490002726212936_n.jpg

Wartenburg wheel for rivets. Applied when aluminum epoxy is semi cured.
30723952_987063821462841_3126154468513557042_n.jpg
 

Archimedian

Member
Some updates. Sheeted and painted horizontal stab. At bottom you can see the aluminum tube shock absorber for one of the wheels. Double tube construction eliminates the need for an oleo strut.

30740029_987572748078615_2904533117903903650_n.jpg

30704563_987572841411939_8775908803017518334_n.jpg

30741075_987572891411934_9108481117652889009_n.jpg
 

Archimedian

Member
All of the hinges on this model are made of aluminum tube. The tube is sold in diameters that slip nicely within each other. The same tubing is used for the shock absorbers.

All of this aluminum tubing is because
1) the diameter of the hinge is approximately the thickness of the leading edge of the control surfaces. Easy fit.
2)aluminum is the theme of this foamie, so im giving it a shot.

It is a little heavier than the small nylon hinges that could be used in fully built up control surfaces. Perhaps 0.5grams/inch. Plus epoxy.

31052326_987786391390584_3855213786752814370_n.jpg
 

Archimedian

Member
Here we have the completed shock absorber landing gear. Each unit weighs 18 grams including wheel. Springs are from "Pilot G2" handwriting pens. Each unit compresses approximately 1 inch under 900 gram load.

springsp51.jpg


30859363_988298994672657_1171105318_n.jpg