(Another) P51-D swappable design/build log

JasonEricAnderson

Senior Member
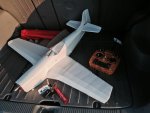
image.jpg

Maiden flight went well. I had it weighted a bit tail heavy at first but it adjusted well enough. It took a few tumbles like a champ with only some minor scuffs and grass stains.*


image.jpg
I need to add in a plate to the nose area to strengthen it and avoid it crimping like this.

image.jpg

image.jpg

With the design validated I'm going to update the plans, put them into a nice PDF and collect the highlights of the build log into an article.

Question to the group
Should I wait to release the final plans and article until after I build another, 'final' build?
 
Last edited:

Jaxx

Posted a thousand or more times
Jason,
Do you plan to make any changes to the plans? If not, I'd say you can post them now. If nothing else, we can help “beta test” the design for you. :)
 
Last edited:

JasonEricAnderson

Senior Member
Jason,
Do you plan to make any changes to the plans? If not, I'd say you can post them now. If nothing else we can help “beta test” the design for you. :)
The only real changes are those I marked in that screen shot the other day. Minor tweaks and simplifications but about 97% the same as this version. Oh and I'm going to work up some exhaust pipes built from coffee stir sticks. I may get some more air time this afternoon if my luck holds out.
 
Last edited:

Craftydan

Hostage Taker of Quads
Staff member
Moderator
Mentor
BTW, Jason . . . Time to update your signature -- the P-51D is solidly in the "Flown" category :)
 

JasonEricAnderson

Senior Member
I've been really fighting with the wing geometry and trying to get it something that would be easier to build with less of a chance of messing up the dihedral. I've gone back and remodeled the whole wing and spar from scratch. The root isn't as 'fat' as the flying prototype and the upper faces of the transition are better. Plans soon.
Screenshot_040914_035826_PM.jpg

Screenshot_040914_035919_PM.jpg

Screenshot_040914_035939_PM.jpg
 

JasonEricAnderson

Senior Member
Beta plans.
For anyone who'd want to take a crack at this early version of the plans. Please note, I am still trying to refine these to an even more detailed state. If you've scratch built many of the other FT designs you should be able to infer how this goes together.


POST EDIT:
LINKS TO BETA PLANS REMOVED. SEE FINAL PLANS Page 1, Page 2, Page 3

I'm putting together some visual build guides as well.
P51D-v2-007-Instructions01_041014_044135_PM.jpg
P51D-v2-007-Instructions02_041014_044204_PM.jpg
P51D-v2-007-Instructions03_041014_044218_PM.jpg
P51D-v2-007-Instructions04_041014_044233_PM.jpg
 
Last edited:

JasonEricAnderson

Senior Member
I'm designing a printable wrap for my mustang design. Once completed I'll be able to print it out on a color laser printer, cut out the sections, and use Super77 spray adhesive to apply it to a built Mustang. The end result would be a DTFB built, scale Mustang with a detailed scale surface. Huge visual impact for a small investment of time and money. While not being rivet count accurate I'm hoping it will really dress it up. If this works I'll do the same for the FT Mustang plans and maybe even the FT Spitfire and my upcoming A10.

More progress...
Screenshot_050114_032937_PM.jpg

The wing segments overlay
Screenshot_050114_033212_PM.jpg
 
Last edited:

SP0NZ

FT CAD Gremlin
Staff member
Admin
Moderator
Mentor
Jason, if you plan on tiling them, can you also post the non-tiled graphics? I might have a local printer that would print to vinyl. Would love to give that a try.
 
Hey Jason,

The motor that you are using on this, How does it compare to the recommended NTM and Suppo motor that FliteTest recommends on all of their bigger planes. I am looking into getting a bigger motor for my baby blender and spitfire, but don't want to spend $15 dollars on a motor and then another couple bucks on the accessory pack for it because the motor probably won't last too long as these will be my first 4 channel planes. Thanks in advance for the help and great looking model and graphics.

Nathan
 
One more question, would you consider making a 4 channel pusher trainer. I have built, flown, and crashed a few smash drones now and want to get into 4 channel flying bit would like a pusher because I am on a very small budget, being 16, and its made even worse by a mother who really doesn't support this hobby (she feels it is a big waste of time, money, and that I should focus more on school, even though I have wanted to become an aeronautical engineer for years) so if I could find a good 4 channel pusher trainer that would be great because that means that I will break less props, which means less orders from hobbyking for props. That you for all you again and please consider this. (The a10 would satisfy this if you can figure out the rudder ad if it flies well)

Nathan
 

JasonEricAnderson

Senior Member
Hey Jason,

The motor that you are using on this, How does it compare to the recommended NTM and Suppo motor that FliteTest recommends on all of their bigger planes. I am looking into getting a bigger motor for my baby blender and spitfire, but don't want to spend $15 dollars on a motor and then another couple bucks on the accessory pack for it because the motor probably won't last too long as these will be my first 4 channel planes. Thanks in advance for the help and great looking model and graphics.

Nathan

If you click the link for the FT-Flyer in my signature below you can see the full specs. I've used the same setup for the Mustang. That being said, I'm going to be getting a new power setup at some point soon based on the 'Beef' setup that the Flite Test guys use

As for a 4 channel pusher trainer you might look into building a Maker Trainer. http://makezine.com/makerhangar/

This has a similar body style as the smash drone but is full 4 channel.