Balsa-Foamboard test build - FT Spitfire

Hai-Lee

Old and Bold RC PILOT
A while ago I tried a test build to see how I could save flying weight and increase strength of a FB design by using Balsa.

The resultant plane had a small weight saving mainly because I just "Slapped" Balsa sheets around all exterior surfaces, Wing excepted).which made the tail a little heavy. The wing whilst considerably lighter was done with the aim of actually reducing the weight. The whole plane was then covered in a covering film.

As the design was not a true FT design I started looking for something of FT design that I wanted to build, (something i did not already have that is). My eldest son has a severely damaged FT Spitfire and has been chasing me to repair or rebuild it so it is the FT Spitfire that I will build over the next month or so as an experiment to see how light I can build it and what percentage of weight savings I can achieve and still fly well with the full spectrum of maneuvers which were available in the original design.

I will actually be building 2 of the FT Spitfires so that I have a base line for comparison.

Episode one:

I cut out 2 fuselages from 5mm FB and the control was assembled and glued. It came in at 102 grams without the front and rear decks and without the Power pod.

With the other fuselage I stripped off all of the paper and it came out at 45 grams. I then made lightening holes in the fuselage, the deck formers, the underside rear and in the tail feathers. The all up weight was then 36.5 grams. From there the tail members were profiled to airfoil shape and now the weight is 35.5 grams.

Next episode I start to apply the Balsa and weigh the results.

The parts for the second fuselage with lightening holes.

Lightened.JPG

the 2 fuselages side by side after the tail shaping
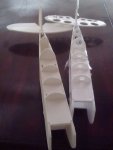
2 Fuselages.JPG

More to come in a few days!
 

JimCR120

Got Lobstah?
Site Moderator
I often use balsa pieces in my builds as a ply of strength in conjunction with other materials. Balsa is light, takes little space, and adheres to glues well.
 

Hai-Lee

Old and Bold RC PILOT
After the first experimental build I tested the fuselage strength by throwing the balsa covered fuselage fuselage straight onto the concrete and a full FB version as well. The FB version ended up shorter with lots of creases and tears after a couple of impacts whereas the balsa covered version bounced back quite high and the only real damage were a few tiny splits in the balsa and a tiny crush area, (a couple of mm) in the very front of the fuselage, (the impact points).

Hence the pushing ahead with a larger plane build.
 

Hai-Lee

Old and Bold RC PILOT
Managed to squeeze in the cut out and build of the paper covered wings for weighing.

A pair of wings in the FB I use here weigh 164 grams without any extra bracing, servos, or finishing.

This gives a bare airframe weight, (no electrics, Power pod, decking or finishing), of 266 grams.

Paper coated bare airframe:

SUNP0010.JPG

Bare wing next:rolleyes:
 
Last edited:
After the first experimental build I tested the fuselage strength by throwing the balsa covered fuselage fuselage straight onto the concrete


i don't think i could ever bring myself to do this with something i had crafted. Even once I have looted an old foam board plane of it's electronics i still cant bare to part with it
 

Rokcrln

New member
i don't think i could ever bring myself to do this with something i had crafted. Even once I have looted an old foam board plane of it's electronics i still cant bare to part with it

Sometimes good people need to do unspeakable evil things in the name of fun RC flying!
My hats off to him!

I to am in the process of building a hybrid FT spitfire. Mine will not be of the power pod version as I want to open up canopy for battery's and electronic access. It will have a fixed wing and a bit more of a rounded fuse. I plan on several lightening holes everywhere and a combo of balsa and ply reinforcements.

Please keep on this project and thank you for the thought and time into documentation that you are doing.

Kevin
Winters CA.
 
Last edited:

Rokcrln

New member
So are you going to use hot glue or something lighter for the foam to foam and foam to ply? I'm fairly new back into this hobbie and the learning curve is huge with the amount of available options for everything!

Kevin
Winters CA.
 

Hai-Lee

Old and Bold RC PILOT
Roh, I use an old steam iron without the steam of course. A post with pics on another thread on tricks with the new FB or something similar.

Rokcrin, I use a foamsafe craft glue which is so very cheap and similar to UHU-por. As for your battery hatch I am planning to fit a chin loading tray, (Draw), to carry the battery so that I can remove a skewer and slide the tray out of the nose to fit the battery and then slide the tray back and secure with a skewer again. Tray will have internal ribs to stop the battery from sliding around in flight.

CrossedUpChris, I would rather test its strength in such a manner and have easy access to repair than to fit a motor etc and do the test under full power only to have disassemble the plane and buy a replacement motor etc as well as perform the repair.

Now I know what strength I can expect and it cost me a few drops of glue only. (I had already done many static tests before I did the thrown down test).

Anyway I had a little time today and so I just prepared the side planking for the fuselage as well as the other reinforcing bits. Only managed a pic of the Side planking as seen below.

SUNP0010.JPG

More pics tomorrow before I commence assembly.
 
Last edited:

Rokcrln

New member
What is your side planking material and thickness? Looks good, I defiantly will be doing a lot of beefing up when I build and 150 and 200 Spit!

Kevin
Winters CA.
 

Hai-Lee

Old and Bold RC PILOT
The material I am using for the planking is just the thinnest Balsa easily available here which is 1mm.

I use it with the grain going in the same directions I would if building a straight Balsa model which is cross grain on the top and bottom and lengthwise on the sides.

Today's episode is assembling the fuselage and doing a weight check to see if I was able to gain strength and still achieve a weight reduction.

The pics of the assembly.

Ready to laminate!

Ready to laminate.JPG

Sides done!

Sides done.JPG

Completed fuselage box. Port side!

Port.JPG

Starboard side!

Starboard.JPG

Now for the results so far.

The original FB fuselage when assembled weighed in at 75 grams, the paperless, lightened and un-coated fuselage weighed in at 27 grams and finally after the Balsa planking or sheeting the fuselage weighed in at a neat 60 grams.

That equates to a weight saving of 15 grams and a massive strength gain. The weight loss of 20% was also achieved with the CG moving forward by about 30mm at this stage. Whilst I could have achieved greater weight savings the idea of turning my aerial "Hum-Vee" into an Airborne "Tank" kind of appeals to me.

Started adding the Balsa to the aerofoil shaped tail, ARGH! Planking onto compound curves! Thank goodness for hot water and a large number of clamps!

Tomorrow is flying day but I do hope to make some progress on the tail for tomorrow afternoon!
 

Rokcrln

New member
Those are some nice results. If you wouldn't mind could you explain your process for cutting your parts and lightening holes. They are very clean and uniform through all parts.

Thank you for your time on this!

Kevin
Winters CA
 

Hai-Lee

Old and Bold RC PILOT
Firstly When I decide to lighten I save some of the removed paper which is the shape of the cut out parts.

I use the paper and the shape of the object to try to determine where I require strength and where I do not and once determined I draw freehand on the paper template of the part in question.

The tools I use for the marking out of the areas to be removed are a compass and a sharp knife with a steel ruler. When roughed out free hand I formalize the removable areas using the compass and ruler.

Once completed I have a template for use on everything I wish to lighten which is the same shape, i.e. both sides. But I only transfer the centres of the curves and the end points of the straight cuts using either the point of the compass or a pin. I play join the dots on all of the straight line cuts.

For the cutting out I use the ruler and knife combined with a circular cutter which is like a compass but with a razor sharp blade instead of a pencil of lead. All up it is a very simple process with the proper tools but could be a little tedious on a monster build.

As a side issue I was playing with some scrap pieces whilst waiting for glue to dry and thinking over the wing build and I came across something which was amazing and so obvious at the same time. Simply I was thinking of the wing joint and how in the past I have had a few wing fold failures. Yes I do fit extra dihedral bracing but the foam around the joint tends to fail over time. What I discovered or realised is that simply planking across the wing joint using the 1mm Balsa with the grain going across the joint increased the strength of the joint so much that the test failures I was getting were always at the edge of the balsa and not at the joint.

In the past I have tried a plethora of different tapes and glues to try to hold the joint together some with success and some not because of the glue in the tapes never actually setting and so the tape will migrate over time and loosen or stretch thereby effectively failing.

Balsa over the foam to foam joint is so strong and rigid I may rework a few of my other FT designs to fit this and in some cases as a matter of urgency.

Just a side issue and perhaps a topic of a future thread, (far in the future that is).

More later!!
 

Hai-Lee

Old and Bold RC PILOT
Here are some pics of the circular cutter.

SUNP0012.JPG SUNP0013.JPG

Progress today was slow and a little patchy. Next plane build I will either plank the Foam without shaping or cut out an allowance for a solid Leading edge and then shape it post planking. Trying to do small radius bends in sheet Balsa especially cross grain cab be fiddly to say the least.

Anyway I managed to finish the vertical fin and rudder and also made some progress on the Horizontal Stab. See the pics of the Vertical fin and stab, Both sides!

SUNP0010.JPG SUNP0011.JPG

Another short day tomorrow But I think I may be able to complete the Horizontal Stab and Elevator.

Enjoy!
 

Hai-Lee

Old and Bold RC PILOT
Sorry for the lack of post yesterday but I had too much on and too little time. "My Bad!!!"

Any the work on the Horizontal tail was definitely frustrating because I made the, (Insane), decision to use up the scraps I had left over from the lightening of the fuselage doublers. May small fiddly bits and it was not fun but then again it did work out OK in the end.

SUNP0010.JPG SUNP0011.JPG

Saved some weight 1 gram after completing the balsa reinforcing.

Also borrowed the wing from the FB version and checked it for fit and all is sweet.

The weight saving for the fuselage complete with tail assembly is 19 grams and the CG is still slightly further forward than it is in the all FB build.

Cut out the wings and weighed them at 180 grams total.

In order to retain the fuselage wing cut out at the same dimension I will need to reduce the spar height within the wing by 2mm and the cord by 1mm so I will need to do a slight redesign to accomplish this. Also decided to retain the paper on the internal areas of the wing for a more even spread of the spar loading into the wing surface. Details will be supplied as I go.

More later!
 

Rokcrln

New member
This is looking just great! On the tail surface did you just add the balsa skin over the striped foam edges so looking at the end of the edge shows the foam sandwich or is it all balsa? I would love some detailed pics of this for when I start the 200% Spit. Also you will be covering this with a type of mono-cote or ?

Thanks again for taking the time with all this. It really helps when guys want to still build inexpensive to start with and then up their game as time goes on and make these models longer lasting!
 

Hai-Lee

Old and Bold RC PILOT
The tail was "Shaped" and the Balsa skinning at the edges was brought down to give a Balsa to balsa contact and a 2mm trailing edge. The Leading edges were also brought together but here the Balsa is almost butted together and sanded to give the slightly more rounded LE required.

Sorry for the day or so off but the son's Spitfire has suddenly become almost urgent so I spent the time fitting the undercarriage and joining the wing securely.

Also spent time looking into the wing design and made a few changes to suit the extra thickness of the Balsa and the need to keep the external dimensions exactly the same, (in case I do eventually total it and the wing or fuselage survive in a repairable state).

The weight of the wing in its original form was 164 Grams (without wing spars and TE sealing strips), and 170 Grams complete.

The current wing of the stripped wing FB parts is 96 Grams (without wing spars and TE sealing strips), and 102 Grams with all FB parts included.

Need to get some more BALSA as I have used up all of my scrap 1mm I had laying around. So if I do not post for a day or two it is because I am waiting for it to arrive.

Have fun in all things!
 

Rokcrln

New member
Nooooo! Put a rush on that stuff. I just printed out my next Spit plans that I will be using for a 72" version and need more of your ideas to pass off as my own. 😎

Thanks for the explanations.
 

Hai-Lee

Old and Bold RC PILOT
Sad news! I may have until next week for stock in all of my local sources! @#$% IT! That is what it is like when trying to build in AUS.

Anyway I did spend the time on my son's standard version and exactly as with his first FT Spitfire it requires a large amount of Lead in the nose to obtain balance, (I hate lead)!

Mind you he demanded the steerable tail wheel and the heavy main wheel off of his original design as well as the wing to NOT be removable. For my testing I made a hatch behind the canopy for access to the Rx and the servo connections with the purpose of allowing me to swap Rxs. My radio gear is not compatible with his and i will need to test fly it before I hand it over.

Will be back to the Balsa-Foam wing build next week of sooner if the Balsa stock appears. Whilst I could use 1.5mm Balsa this would actually weigh more and this is basically a weight reduction exercise.

BTW. If I had not mentioned it before this build is currently planned to be finished in "Silver" covering film and finished in a post war livery if it survives that long, :rolleyes:

Keep the Faith and Keep Flying.