Bell Boeing V-22 Project

tamuct01

Well-known member
where did you get the heli motor/collective/etc parts? This is an interesting idea that I might take a shot at here once I have some more time.

The heli parts came from a pair of KDS Innova 450BD helicopters that I bought from a gentleman for a very reasonable price. I believe he owns this site: (http://www.kdsmodelsusa.com/ENTRY-LEVEL-KDS-Innova-450BD-Combo-FBL-p/kds-450bd-fbl-combo.htm). I actually bought them a year apart, and it looks like they're no longer available. The kits were complete aside from the battery and receiver.

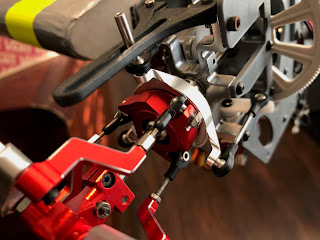
From those kits I used the central assembly minus the tail bits and redesigned and 3D printed new side plates to match the Osprey design. I actually used a photo of the original plates to help place all the mounting holes. I originally used the KDS ESCs that came with the kits, but recently purchased a pair of Castle Talon 60 ESCs to replace them. The Castle ESCs have a proper governor mode. I'm sure I'll reuse the other ESCs in an airplane.

If this whole thing works out, I'd like to replace the rotor head with a 3-blade model. I need to take proper measurements, but I'm thinking a pair of these would work: (AliExpress). I'd also like to swap the symmetrical blades for more efficient ones like this: https://www.rotormast.com/product-page/twisted-blade-set
 

tamuct01

Well-known member
V-22 Osprey Project - Selecting the Right Battery

Recently, I've been able to successfully hover the V-22 around the yard and start to tune some of the control parameters. However, each of these flights is not very long and it has me concerned about battery selection and flight times. The stock 450-sized helicopters recommend a 3S 2200mAh Lipo battery for an estimated flight time of 6 mins. I started testing with two of these in parallel to make a 3S 4400mAh source for the Osprey.

There's no beating around the bush, this machine is heavy. Weighing in at 2lbs, 9.75oz (1186g) without batteries, it's a beast. I've tried to be conscious of weight throughout the build, but with so much structure required for rigidity, it's hard to skimp out on materials knowing that any failure would be catastrophic.

So what's the right mix of battery size to maximize flight time? I had on-hand pairs of 3S 2200mAh, 4S 2200 mAh, and 4S 3000mAh. To round out the selection, I ordered a pair of 3S 3300mAh batteries for testing. I set a couple of timers in my Taranis at 2 minutes and 4 minutes, and with a full battery to start, I took off and hovered around gently until the 2 minutes elapsed. I landed as close to the mark as I could and then recorded the battery level. I took off again and hovered for another 2 minutes and landed again as close to the 4-minute mark as possible. I then took the battery reading and noted it down. Using Google Sheets, I graphed these 3 data points per battery and enabled the trendline to estimate when the battery voltage would drop to a discharged state.

1615850891833.png

Somewhat surprising, the 3S 3300mAh battery lasted the longest. I had expected more life out of the 4S packs, but they didn't necessarily perform as well. I also compared the expected run-time to the weight of the battery pack to get a "flight time per gram" efficiency number as shown below.


Battery

Estimated Flight (s)

Weight (g)

Flight / weight ratio

Turnigy 3S 2200mAh 25-35C

372

337

1.104

Turnigy Graphene 4S 2200mAh 65C

432

559

0.773

HRB 3S 3300mAh 60C

522

529

1.549

Zippy 4S 3000mAh 20C

489

660

1.451

As with any aircraft, the more weight you carry makes the airframe and motors work harder. From my selection of batteries that new 3S 3300mAh looks to be the best bang for the buck balancing runtime and weight.

I also redesigned the wing retention mechanism forgoing the rubber bands in favor of a couple of nylon bolts. I've also been redoing the foamboard fuselage and I ordered the 3-blade rotor heads. I should have an update soon with new versions of those.

https://aggiehobbies.blogspot.com/2021/03/v-22-osprey-project-selecting-right.html
 

NickRehm

Member
Great test with the battery, but might be able to get more refined results on the ground under slightly more controlled conditions. I would have guessed that the 4s (higher voltage) would have performed the best...but I also understand you're using batteries available to you of different manufacturers (another variable possibly affecting the test being their 'quality').

You should also be able to squeeze out a little more flight time by playing with head speed. Rotor efficiency will vary greatly with head speed/blade pitch and you very well could increase flight times by another minute or so. Just be cautious adjusting head speed as it will change the controller's responsiveness. Best to find a nice 'safe' FC tune before running any of those tests, before finally optimally tuning the controller

Best of luck
 

JasonK

Participation Award Recipient
that 4s has a much lower C rating and weights 25% more itself, so internal resistance could be catching up to it.

however that is only 7-8% more AUW, so I wouldn't expect it to be drawing that much more current. So I suspect it is internal resistance or general wear catching up with it.
 

tamuct01

Well-known member
Yes, those 4S 3000mAh packs are a bit older and are likely nearing their end of life. I have the governor currently set at 2600 rpm for normal and idleup1 modes and 2800 rpm for idleup2. The rotor pitch is about 2 degrees positive at mid-stick and the craft hovers slightly above that. With 3-blade rotors, I suspect I can lower the rpm a little bit. If I go with curved instead of symmetrical blades it might work well with even lower speeds.
 

tamuct01

Well-known member
I took the Osprey out to my club field to start testing the transition into forward flight. It certainly got the attention of my fellow club members who were onsite! The first two flights went off without a hitch. I was able to successfully transition the rotors to 45 degrees. I need to tune some additional parameters as the controls became very mushy and not responsive. I think the rotor controls were phasing out before it had enough airspeed to make the flying surfaces functional. On my third flight disaster struck! I had been flying around just fine, but as I transitioned back to hover for landing it suddenly lost control and started pirouetting to the ground. I hit the throttle hold at tree level and it impacted the ground belly first.

At the scene of the crash, I could see that the aluminum tube supporting the right rotor had pulled out of the wing enough for the rotor to flip 180 degrees to the left. I suspect that was the cause of the crash. The left wing broke the carbon spar at the root upon impact. The 3D printed rotor plates broke, but those are designed to be sacrificial. The rotor mechanics seem to be ok. The shafts look straight, no gear teeth missing, and the servos seem fine. The rotor blades didn't even break. When I got home, I opened up each wing and sure enough, the rib in the left wing that retained the aluminum tube had broken and allowed the tube to pull loose. The right wing that broke the spar had actually pulled the spar tube loose from the ribs as well when it broke. Both wings will need a complete rebuild. I've already fired up Fusion 360 to examine how I can reinforce some areas of the wing, shave weight in other areas, and address some issues that made assembly difficult.

The foamboard body suffered only minor damage when it pancaked into the ground, so that is a relief. By the time I get new wings built, the tri-blade heads should arrive from China. I'm looking forward to seeing it with those attached! I'm sad it crashed, but I figured it was inevitable in the process. The real V-22 was almost scrapped due to how many crashes it had. Surely my version would follow a similar path. :)
 

NickRehm

Member
Sorry to hear about the crash, but sounds like you've got plenty of good data for the rebuild.

Curious your mixing/controller setup? Sounds like you're using a 3-pos switch and the linear mixing/fading from the docs? Any adjustment of controller gains between flight modes? There's tons you can program in now that you know it felt 'sluggish' in transition
 

tamuct01

Well-known member
Sorry to hear about the crash, but sounds like you've got plenty of good data for the rebuild.

Curious your mixing/controller setup? Sounds like you're using a 3-pos switch and the linear mixing/fading from the docs? Any adjustment of controller gains between flight modes? There's tons you can program in now that you know it felt 'sluggish' in transition

I do have the transition setup on a 3-pos switch where up and down are hover and FF, respectively. The middle position gives control over to a slider on the Taranis to allow for manual transition to any point. I was mostly using this middle position to get to 45 degrees. The real Osprey starts mixing in FF controls and fading out heli controls at 60 degrees (90 being vertical). I started with this and wrote my own transition function to effectively create a curve where from 90-60 was full heli, 30-0 was full airplane, and from 60-30 degrees was a blend. I think there are some weird numerical artifacts that are causing roll input to be negated through that transition. I think for the next version I'll create 2 similar curves and offset them a bit where hover controls stay active longer and drop off sharper toward that 30-0 degree mark. The V-22 has such a small wing and high wing loading that the flying controls probably won't be effective until it has significant airspeed.
 

tamuct01

Well-known member
It's been 2 months since the crash, and I've been steadily rebuilding the wing on the Osprey. I'm getting pretty close and will be running through the final setup of the servos and ESCs for the 3-blade rotor heads. I definitely will be bringing this to Flite Fest to show it off. I hesitate to fly it too much before then for fear of another crash!

IMG_3873.jpeg . IMG_3874.jpeg
 

NickRehm

Member
It's been 2 months since the crash, and I've been steadily rebuilding the wing on the Osprey. I'm getting pretty close and will be running through the final setup of the servos and ESCs for the 3-blade rotor heads. I definitely will be bringing this to Flite Fest to show it off. I hesitate to fly it too much before then for fear of another crash!

View attachment 200912 . View attachment 200913

I guess I'll see you there then! Would love to help you set up some of the fancier flight controller stuff in person. I'll have a lot of my weird hovering things there as well
 

Taildragger

Legendary member
V-22 Osprey Project - Selecting the Right Battery

Recently, I've been able to successfully hover the V-22 around the yard and start to tune some of the control parameters. However, each of these flights is not very long and it has me concerned about battery selection and flight times. The stock 450-sized helicopters recommend a 3S 2200mAh Lipo battery for an estimated flight time of 6 mins. I started testing with two of these in parallel to make a 3S 4400mAh source for the Osprey.

There's no beating around the bush, this machine is heavy. Weighing in at 2lbs, 9.75oz (1186g) without batteries, it's a beast. I've tried to be conscious of weight throughout the build, but with so much structure required for rigidity, it's hard to skimp out on materials knowing that any failure would be catastrophic.

So what's the right mix of battery size to maximize flight time? I had on-hand pairs of 3S 2200mAh, 4S 2200 mAh, and 4S 3000mAh. To round out the selection, I ordered a pair of 3S 3300mAh batteries for testing. I set a couple of timers in my Taranis at 2 minutes and 4 minutes, and with a full battery to start, I took off and hovered around gently until the 2 minutes elapsed. I landed as close to the mark as I could and then recorded the battery level. I took off again and hovered for another 2 minutes and landed again as close to the 4-minute mark as possible. I then took the battery reading and noted it down. Using Google Sheets, I graphed these 3 data points per battery and enabled the trendline to estimate when the battery voltage would drop to a discharged state.

View attachment 195450
Somewhat surprising, the 3S 3300mAh battery lasted the longest. I had expected more life out of the 4S packs, but they didn't necessarily perform as well. I also compared the expected run-time to the weight of the battery pack to get a "flight time per gram" efficiency number as shown below.

Battery

Estimated Flight (s)

Weight (g)

Flight / weight ratio

Turnigy 3S 2200mAh 25-35C

372

337

1.104

Turnigy Graphene 4S 2200mAh 65C

432

559

0.773

HRB 3S 3300mAh 60C

522

529

1.549

Zippy 4S 3000mAh 20C

489

660

1.451

As with any aircraft, the more weight you carry makes the airframe and motors work harder. From my selection of batteries that new 3S 3300mAh looks to be the best bang for the buck balancing runtime and weight.

I also redesigned the wing retention mechanism forgoing the rubber bands in favor of a couple of nylon bolts. I've also been redoing the foamboard fuselage and I ordered the 3-blade rotor heads. I should have an update soon with new versions of those.

https://aggiehobbies.blogspot.com/2021/03/v-22-osprey-project-selecting-right.html
wdym by aggies and hobbies? Just wondering cause I'm an aggie fan
1621979149452.png
 

tamuct01

Well-known member
After the crash, I purchased a pair of three-blade rotor heads and I rebuilt the wing. A couple of days ago I assembled it all and tried a static test. Apparently, I didn't fully check all of the control responses and it crashed to the floor. It bent one of the rotor shafts and broke the 3d printed rotor plates. Some damage was done to one of the wings, but I haven't been able to fully address that yet. I'm pouring over the control code and ensuring that each rotor is responding 100% correctly. I also found a loose connection on the IMU board that caused the flight controller to stop responding while on the bench. Any of these reasons could have been the cause for this "crash."


JasonK

Participation Award Recipient
ouchie... were you in an angle or rate mode? if you were in an angle mode, my though would be the IMU orientation didn't match the configured orientation, causing it to try to 'level' itself out by rolling.
 

tamuct01

Well-known member
ouchie... were you in an angle or rate mode? if you were in an angle mode, my thought would be the IMU orientation didn't match the configured orientation, causing it to try to 'level' itself out by rolling.

It was in angle mode. I've watched the slow-mo several times and as it started to roll right I killed the throttle. It then settled flat on the table and then the left rotor got a positive pitch command that rolled it over into the paracord tethering the model. I did find in later bench testing that the IMU was glitching out due to a loose power connection. I have now quadruple checked the command orientation from the IMU to all the servos. I also re-did all the swashplate and rotor head leveling on both rotors. I'm now checking out the wing damage and assessing how much of the left wing I need to rebuild. The torque seems to have cracked the PETG translation servo mount at the end of the wing. one of the blades did strike the top of the wing, but that's likely superficial damage.

In short, I got in a hurry and didn't take the time to go over it as closely as I should have. :cry:
 

JasonK

Participation Award Recipient
It was in angle mode. I've watched the slow-mo several times and as it started to roll right I killed the throttle. It then settled flat on the table and then the left rotor got a positive pitch command that rolled it over into the paracord tethering the model. I did find in later bench testing that the IMU was glitching out due to a loose power connection. I have now quadruple checked the command orientation from the IMU to all the servos. I also re-did all the swashplate and rotor head leveling on both rotors. I'm now checking out the wing damage and assessing how much of the left wing I need to rebuild. The torque seems to have cracked the PETG translation servo mount at the end of the wing. one of the blades did strike the top of the wing, but that's likely superficial damage.

In short, I got in a hurry and didn't take the time to go over it as closely as I should have. :cry:
My version, I had to put it in rate mode, angle mode didn't work really well at all (it wasn't controlable).
 

tamuct01

Well-known member
V-22 Osprey Project - Swashplate Repair

It's been a while since my last post. In July my father, my son, and I traveled to Flite Fest. I took the Osprey with me to show off with the hopes of a demonstration flight, but it was not to be. Thanks to everyone who stopped by our campsite and provided your feedback!


I noticed prior to leaving for Ohio that one of the ball links on the left swashplate had stripped out and was loose. I attempted to glue it back in with CA glue as an extreme thread locker, but it came loose during the 1500 mile trip. At the festival, I tried to glue it again with some epoxy, but it came loose again in handling at the festival. Without any additional supplies on hand, this meant that any demonstration flights were canceled.

When I got home I was able to repair the swashplate and ball link by drilling out the ball link itself and threading it with a 2-56 thread. The original threads were 2mm and 2-56 is just slightly larger at 2.18mm. I also drilled and threaded the swashplate for 2-56. I used a short section of 2-56 threaded rod to thread into the ball link. I cut a little relief on the back side of the of the swashplate to allow a nut to seat flat. I then assembled the ball link, swashplate, and retaining nut using the threaded rod and thread locker. After assembly, I cut the remaining rod flush with the ball link. I'm confident that this won't be the weakest link any longer!


I do have some lingering concerns over this build, and I'm not confident that this will be the winning design.

  1. There is a decent amount of backlash in the tilt mechanism gear. There is a lot of torque on the servo and gear and I think this backlash may have a negative impact on stability and flight.

  2. The most recent 3D printed parts I used a transparent PETG filament that I thought would look nice and be more durable. However, after printing and assembling these parts I performed some other prints with the same filament and it seemed quite brittle and had poor layer adhesion. I'm concerned that with the stresses involved that these parts could fail with spectacular results.
My thoughts on how to remedy these issues:
  1. For the printer filament issue, I can certainly re-print all of the affected parts. However, this means completely rebuilding the wing. Rebuilding it would take up considerable time and supplies.

  2. I've long thought that using a simple gear tilt mechanism would have too much backlash or not enough holding torque from the servos. I've examined the mechanism in the Rotormast V-22 and it uses a rack and pinion mechanism with a customized servo with an external potentiometer. I believe that I could copy this design, but it will require many modifications of my design. First, I only have a single-stage gear reduction in the rotor. This means that the driven gear is quite large and sticks out from the rotor side plates. The gear would interfere with the rack portion of the actuator. I would also need to modify the servos to have an external potentiometer.
https://aggiehobbies.blogspot.com/2021/09/v-22-osprey-project-swashplate-repair.html
 
Last edited: