FMGough
New member
I have always been intrigued by this aircraft. To think Chuck Yeager strapped himself (with busted ribs) into a rocket powered, bullet shaped glider, that was then dropped from a B-29 over a desolate region of the United States to attempt to break the sound barrier in level flight in 1947 and then live to tell about it after the fact is just incredible. So I thought, why not build a simple working model myself. Hey, if the Bell corporation could do it with millions of dollars. So can I with just a few dollars worth of scrap foam. And see if it will fly using a model rocket engine. What could go wrong?
Before we go further, there is no RC aspect to this build. Just pure model rocket fun.
Materials and tools used for build:
I started, like most do, searching for simple dimensional plans via Google. No card catalogs for us these days. I found a set that worked for me. And I then took those plans into Sketchup and adjusted them to cut out the main pieces I would need: fuselage, wing, horizontal and vertical stabilizers.
I wanted to build this with very few parts. And with very few steps. After all, I want it to be easily repeatable. You know, in case things do go wrong.
Here is my plan from SketchUp. You can download from here.

Fuselage and Vertical Stablizer
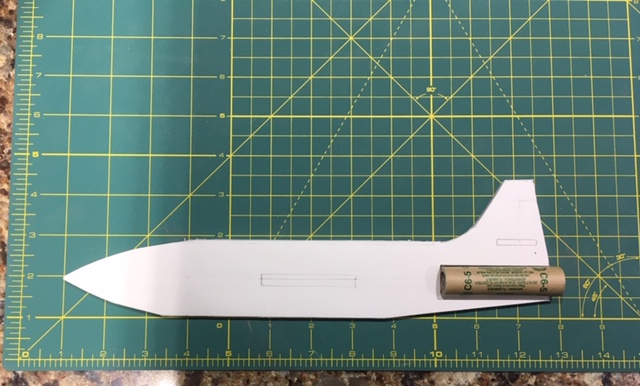
So the first part(s) I focused on were the fuselage and vertical stabilizer. These are made from a single piece of Dollar Store Adams white foamboard that will act as the center line of the model. The rear portion is cut to dimension in order to hold the rocket motor. In this case an Estes C6-5.

Next, I focused on bulking up the fuselage to give the model it's over all shape. For this I decided to use pink insulation foam board. Using the shape of my fuselage piece as a guide, I cut two pieces of insulation board to rough dimensions.

I hollowed out the inside rear of each half to accomodate the rocket motor. And then glued the two pink foam halves to the center foamboard piece. I used Elmer's glue in this case, but am already thinking of another method that I will talk about later as part of my lessons learned.

You can see that I did not concern myself with getting these two halves exact. I knew that I would have to shape them later. Which leads us to the next step. Sanding and shaping the fuselage. Think .50-Caliber bullet and you have the shape for this aircraft.

Using my band saw, I cut the pink foam to give the front and rear sides a rough taper. I then sanded the foam using my disc sander to round things over and even up the pieces. I applied foam putty to fill in gaps and dings in the pink insulation board. And then hand sanded to knock down the dried foam putty and refine the shape further.
.

I then cut the slot for the wing. Using multiple passes with an Exacto knife and bamboo BBQ skewer I hollowed out the slot. I then refined the edges using an Emory board (nail file).
Wing
The wing is a single piece of white foamboard.

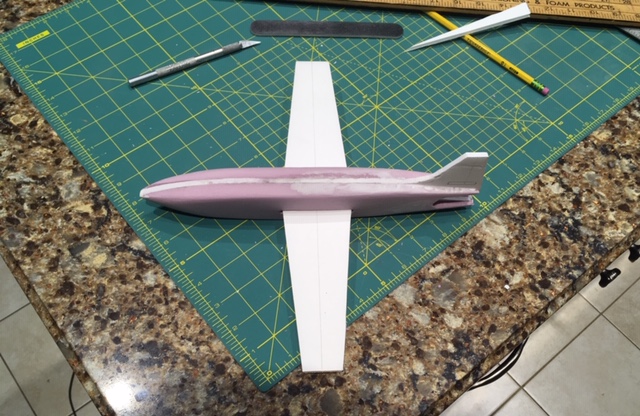
The wing is inserted through the slot made within the fuselage. And hot glued in place.

Horizontal Stabilizer
Again, another single piece of white foamboard inserted in a slot in through the vertical stabilizer. Hot glued in place.

And that is it for main construction. I do intend to paint the model before it's maiden. And I do intend to fill the rear portion of the fuselage around the motor. I am thinking thin pieces of white foamboard to enclose the motor and secure it further.
Lessons Learned:
Maiden Flight:
Video link to come once it occurs.
Before we go further, there is no RC aspect to this build. Just pure model rocket fun.
Materials and tools used for build:
- Dollar Store foamboard (scraps are perfect for this)
- Pink insulation board (1/2 inch scraps were used in this build)
- Elmer's glue (School glue)
- Hot glue
- Exacto knife (razor knife)
- BBQ skewer
- Foam Putty (Woodland Scenics ST1447 to be precise)
- Foam sanding block
- Power tools for convenience:
- Bandsaw
- Disc sander
- Estes C6-5
I started, like most do, searching for simple dimensional plans via Google. No card catalogs for us these days. I found a set that worked for me. And I then took those plans into Sketchup and adjusted them to cut out the main pieces I would need: fuselage, wing, horizontal and vertical stabilizers.
I wanted to build this with very few parts. And with very few steps. After all, I want it to be easily repeatable. You know, in case things do go wrong.
Here is my plan from SketchUp. You can download from here.

Fuselage and Vertical Stablizer
So the first part(s) I focused on were the fuselage and vertical stabilizer. These are made from a single piece of Dollar Store Adams white foamboard that will act as the center line of the model. The rear portion is cut to dimension in order to hold the rocket motor. In this case an Estes C6-5.

Next, I focused on bulking up the fuselage to give the model it's over all shape. For this I decided to use pink insulation foam board. Using the shape of my fuselage piece as a guide, I cut two pieces of insulation board to rough dimensions.

I hollowed out the inside rear of each half to accomodate the rocket motor. And then glued the two pink foam halves to the center foamboard piece. I used Elmer's glue in this case, but am already thinking of another method that I will talk about later as part of my lessons learned.

You can see that I did not concern myself with getting these two halves exact. I knew that I would have to shape them later. Which leads us to the next step. Sanding and shaping the fuselage. Think .50-Caliber bullet and you have the shape for this aircraft.

Using my band saw, I cut the pink foam to give the front and rear sides a rough taper. I then sanded the foam using my disc sander to round things over and even up the pieces. I applied foam putty to fill in gaps and dings in the pink insulation board. And then hand sanded to knock down the dried foam putty and refine the shape further.
.

I then cut the slot for the wing. Using multiple passes with an Exacto knife and bamboo BBQ skewer I hollowed out the slot. I then refined the edges using an Emory board (nail file).
Wing
The wing is a single piece of white foamboard.

The wing is inserted through the slot made within the fuselage. And hot glued in place.

Horizontal Stabilizer
Again, another single piece of white foamboard inserted in a slot in through the vertical stabilizer. Hot glued in place.

And that is it for main construction. I do intend to paint the model before it's maiden. And I do intend to fill the rear portion of the fuselage around the motor. I am thinking thin pieces of white foamboard to enclose the motor and secure it further.
Lessons Learned:
- Peel the paper from the fuselage white foamboard piece. This will allow you to use hot glue instead of Elmer's glue to bond the pink insulation foam to the center piece and reduce wait time for drying.
- Currently the model is very tail heavy. I know that will change once the motor burns up. But I did not account for a location for nose weight if I want the model to glide down nose first. I suggest hollowing out a section on the inside halves of pink foam towards the nose to add a bit of weight. Clay would work for ballast.
- Scale plans up a bit to account for the rear motor location. This should reduce the risk of the open sides as seen in my current version.
Maiden Flight:
Video link to come once it occurs.

