I started building a the Mountain Models EVA Bipe a couple of nights ago. I guess it's time for me to share some of the progress i made.
I consider myself a newbie when it comes to building balsa, so be prepared for some mishaps!

The kit arrived in a good shape, was very excited to get started!

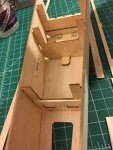
I started assembling the fuselage first. I had to trace some of the laser cut parts especially in the corners of the sheet, but nothing spectacular.

First mishap, i snapped one of the fuselage formers when applying the sheeting on the side. Next time make sure to stabilize the former before just trying to press the sheeting on!

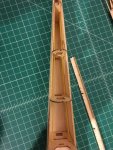
The instructions keep it kind of unclear if the tubes that will guide the control rods are supposed to be crossed or not. The instruction booklet is good, but some of the pictures could be of higher quality. I figured that they should not be crossed as they exit at exactly the same height. Also unclear how they got that nice bend on the exit of the tube...

Next thing was sanding. A lot of sanding. Especially when you only have 400 grit in the house. I really like how the curve turned out. You actually sand deep into the triangle stock under the sheeting.

Sanded the receptacle for the vertical stabilizer. As i told you, a lot of sanding...

Next i assembled the tail surfaces. Loved the puzzle method to putting these together, although some of the small pieces are very, very sensitive. One of the parts of the elevator seemed to be under stress when i put them together. In the end everything looked flat and nice. Oh well.

Another tail surface.

Before i put this bevel in, i was really puzzled on where to put a bevel, and if it would be a double bevel (like V-shaped) or just a single one. Instructions where kind of unclear to me but Joker kindly pointed it out to me how they should look like (Thanks again!)

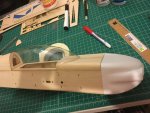
Don't have any pictures of putting together the "cowling" but it's so satisfying when you bend the balsa (dampen it slightly to make it soft) and the just glue it down, and it keeps the shape (i know it might be silly to some old-time balsa builder, but this really was very satisfying to me )
)

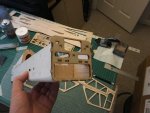
Cutting the canopy. Boy was i afraid to mess up. But keep it slow, and make a rough cut first. Don't try to make to many small cuts, as when there is not much material left to cut, it actually get's harder. Pretty satisfied with how it turned out at the end. Didn't glue it down yet as stuff needs to be covered first.

Pretty satisfied with how it looks right now. Starts looking like a nice airplane!
I consider myself a newbie when it comes to building balsa, so be prepared for some mishaps!

The kit arrived in a good shape, was very excited to get started!

I started assembling the fuselage first. I had to trace some of the laser cut parts especially in the corners of the sheet, but nothing spectacular.

First mishap, i snapped one of the fuselage formers when applying the sheeting on the side.

The instructions keep it kind of unclear if the tubes that will guide the control rods are supposed to be crossed or not. The instruction booklet is good, but some of the pictures could be of higher quality. I figured that they should not be crossed as they exit at exactly the same height. Also unclear how they got that nice bend on the exit of the tube...

Next thing was sanding. A lot of sanding. Especially when you only have 400 grit in the house. I really like how the curve turned out. You actually sand deep into the triangle stock under the sheeting.

Sanded the receptacle for the vertical stabilizer. As i told you, a lot of sanding...

Next i assembled the tail surfaces. Loved the puzzle method to putting these together, although some of the small pieces are very, very sensitive. One of the parts of the elevator seemed to be under stress when i put them together. In the end everything looked flat and nice. Oh well.

Another tail surface.

Before i put this bevel in, i was really puzzled on where to put a bevel, and if it would be a double bevel (like V-shaped) or just a single one. Instructions where kind of unclear to me but Joker kindly pointed it out to me how they should look like (Thanks again!)

Don't have any pictures of putting together the "cowling" but it's so satisfying when you bend the balsa (dampen it slightly to make it soft) and the just glue it down, and it keeps the shape (i know it might be silly to some old-time balsa builder, but this really was very satisfying to me

Cutting the canopy. Boy was i afraid to mess up. But keep it slow, and make a rough cut first. Don't try to make to many small cuts, as when there is not much material left to cut, it actually get's harder. Pretty satisfied with how it turned out at the end. Didn't glue it down yet as stuff needs to be covered first.

Pretty satisfied with how it looks right now. Starts looking like a nice airplane!
