Timmy P
Member
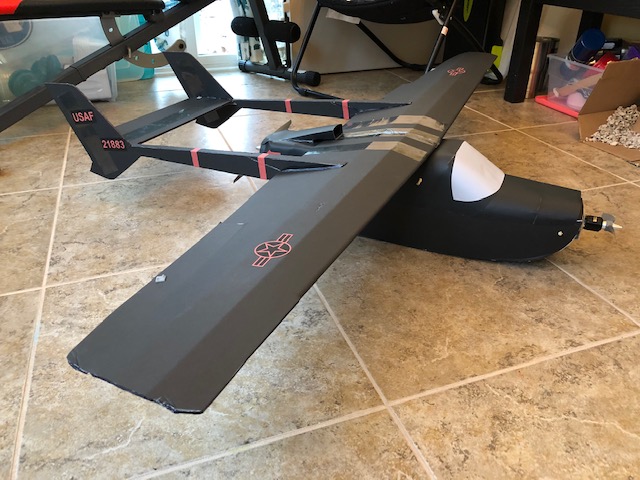
Timmy P, this looks like a great plane...your video/plans inspired me to build my first foam-board plane and actually register on this site. I'm nearing completion on my build - just need to solder everything up and put the posterboard on.
Couple of things that have been confusing to me on the build:
1. In the description you have 1" thick aluminum bar, but it's apparent when putting it together that you used .5" - was too lazy to go back to the store so I hacked the 1" that I bought down to .5" with a grinder
2. I don't see in the plans or the build video how to attach the swappable pod. Based on the finished models, it looks like maybe you put skewers all the way through and did rubber bands on the inside where the pod guide is?
3. I guess the dots in front of the booms are the CG markings...maybe make a note in the plans and I took this to be a cut indicator (so there are two holes on top of my wing, lol.
4. Maybe note in the plans that the second hole on the boom (for rudder) is an option (I learned the number 3 lesson and didn't punch that hole!)
You've done a fantastic job putting this together, and I cannot wait to fly it - when I do, I'll be sure to post pics and video. Oh, how did you do all those fancy graphics for the O-2, they look great!
Greg
Edited with semi-finished plane, done up as O-2, and link to maiden flight:
Hey Greg sorry for the late reply. Thanks for the pointers. There are a few things that need a note attached. As far as the Power Pod goes I use one skewer under the front end of the power pod. and another skewer goes though the pod, located between the motor and the battery location. I appreciate you posting your flight. Looks like everything went well.. When I launch, I toss it hard like a football and then throttle up so I dont get cut by the prop. Hand launching is the only thing not awesome about this plane. The decals I use I make myself with a vinyl plotter. I pretty much just make everything in photoshop and then cut it out, stick it on.
")