Cleaning old Glow Engines

Joker 53150

Mmmmmmm, balsa.
Mentor
Sure, this new thread probably should go in the wet-fuel forum, but the balsa area gets more traffic and glow engines and balsa go together so well! :)

A few weeks ago I picked up another "project" plane. SHOCKER! :) It was taken out of service a couple years ago due to a slightly too aggressive landing, and will eventually be re-built. It came with a Super Tigre .90 glow engine that appears to be in pretty decent shape, other than being all gummed up from not being stored properly. It turned, but only with quite a bit of effort, and the carb was also gummed up tight.

Even though I don't plan on doing anything with the plane for a while I felt the need to get the engine fixed up. Parts availability is pretty slim, so fingers are crossed I can get it done without needing any parts!

The first step was disassembling the parts that would come apart without much difficulty. The head came off, as did the exhaust and carb. The rotating assembly wasn't going to be forced as I don't want to damage the surfaces. Pictures of the carb were taken showing where the limited parts I could remove went so I don't miss anything upon reassembly! :confused:
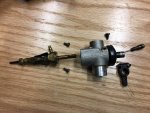
IMG_6246.JPG


The body and muffler are a bit grubby with age and abuse. Hopefully that changes.

IMG_6248.JPG


Here are all the pieces, as far as I could get them. Next up was putting all the parts in an old crock pot filled with a 50/50 mix of antifreeze and water, and getting them up to temp for a while. Well, probably a day for the big parts. The antifreeze (old-style green, NOT the new orange variety) does a great job cleaning gunk from the parts, from what I've heard.

IMG_6249.JPG


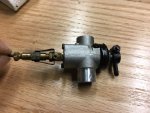
After 6 hours I removed the carb and the parts came apart super easily! I washed them with dish detergent to remove the antifreeze, dried them, and started re-assembly. Note the brass parts weren't put through the antifreeze as I have heard it isn't good for the metal. Everything went together easily after getting a coat of oil, and the movement on the throttle is now super-smooth again! :) I'll post some pics of the rest of the parts as I get to them. Once done I'll give it a hefty coat of oil and then pack it away to wait for the work on the plane.
IMG_6250.JPG
 

Joker 53150

Mmmmmmm, balsa.
Mentor
Cleaning has been going on for about 6 hours or so, and I'm very impressed with the results! Since there were some heavy deposits on the big parts I've been taking them out occasionally to wipe them off to remove excess build-up. All small gunk is now gone and the bare metal looks new in most spots! After they sit in the crockpot overnight I'll fish them out and do a final cleaning with a stiff-bristled nylon brush and dish soap, followed by some oil. The rotating assembly is moving very smoothly now, so the bearings probably survived the neglect from the last few years.

This antifreeze cleaning is said to be very easy and very effective, and so far that appears accurate.

IMG_6251.JPG
 

PsyBorg

Wake up! Time to fly!
Before you store that long term I would get some stuff called after run oil and use it liberally. I will assume since you put the entire mass of block crank and head in the anti freeze in as a once piece that the bearings went in as well. Not sure what residual antifreeze will do if any is left in the bearings but I can tell you you do not want to store them dry. They will potentially bond and or get flat spots thus raising the probability of disintegration upon restart. Also the piston and cylinder insert is different metals and those will bong and leave a nasty ring to slam against when used again.

You can get the stuff at any hobby store called after run oil. To be honest It seems it is very similar if not actually just transmission fluid. You put a few drops of that in the carb and spin the motor to coat all the parts. I would fill the carb venturi after a days run on my motors and give it a good spin with the electric start. If done every 6 months or so you can store a motor in good health indefinitely.
 

Joker 53150

Mmmmmmm, balsa.
Mentor
After run oil is exactly what I’m using. I’ve heard it is transmission fluid as well and am trying to confirm that as a quart is much cheaper than buying a small bottle specially labeled. I’d like to really drown the bearings to avoid rust if possible.
 

Joker 53150

Mmmmmmm, balsa.
Mentor
A little digging found that a common recipe for homemade After Run Oil is a simple 50:50 mix of automatic transmission fluid and Marvel Mystery Oil. Since I have both in my garage right now I'll probably mix that up tonight and use it to heavily coat the inside of the engine. My only real concern is that the engine won't be started for a while which would help burn out any remaining antifreeze or water, so a heavy dose of oil will be used to avoid rust.

Other recipes use ATF and WD-40 or 3-in-1 type oil in the same 50:50 mix, but I've been a fan of MMO for years and will go that route.

The parts were checked this morning before work and it appears most of the gunk on the outside of the engine is gone. An old toothbrush should help clean up the nooks & crannies this afternoon. Based on how well this is working, I'll be dropping in a few more engines soon. The one that came with my newest 1/4 scale Cub could use a bath as well. A little more water was added to the crock pot to replace some that left overnight as steam.

I should have pictures of the finished project tonight.
 

Bricks

Master member
Another one that works very well is airtool oil I find it recommended on many RC forums.
 

Joker 53150

Mmmmmmm, balsa.
Mentor
Another one that works very well is airtool oil I find it recommended on many RC forums.

I saw that as well. Regular or even the MMO version. It appears that just about any decent quality oil is fair game as it helps prevent the rust.
 

SlingShot

Maneuvering With Purpose
That thing was dirty! Dad liked straight up gasoline I think. And then 3 in 1 oil to reassemble and lube.
 

Joker 53150

Mmmmmmm, balsa.
Mentor
Aaaaaaaand, it's done. There is still a little residue in the hard-to-scrub nooks & crannies, but it's transformed from a scrap-heap reject to what could pass as an engine that's only been used for one season. Overall I'm happy with the results. After removing from the antifreeze & water I brought the parts inside and scrubbed with dish washing detergent, followed by a hot water rinse. The compressor was then used to blow off all excess water, followed by another quick wipe-down. I was also able to get a small peak at the rear bearing and it's got some rust, but still turns very smoothly with no noticeable crunching or grinding, so it'll be kept for now. I can't see the front, but again there are no warning signs.

After putting it all together the transformation is complete, and now it'll just have to wait for a plane to be fixed up for it. It still needs a new carb o-ring and a couple lock-washers were missing, plus an exhaust gasket will be ordered. I'll find the recommended starting point for the carb tuning and set that as well before it gets bagged for storage.

IMG_6254.jpg

IMG_6255.JPG

IMG_6256.JPG
 

Bricks

Master member
Not to diminish the Super Tiger 90 seems I have read that some have issues with the carb and running right.
 

Joker 53150

Mmmmmmm, balsa.
Mentor
Not to diminish the Super Tiger 90 seems I have read that some have issues with the carb and running right.

From what I've read there are two different versions of the G-90 carb, and some supposedly don't transition well from low to high. They run, but the mid-range isn't as smooth as others. I figure I've got next to nothing invested in this engine other than time cleaning it, so it's worth cleaning up and eventually testing it out. This G-90 has the less-desirable carb of the two styles.

It wasn't mentioned yesterday, but now that it's been cleaned and oiled there is a ton of compression. Some of that is surely from the oil, but it's still a good sign.
 

Joker 53150

Mmmmmmm, balsa.
Mentor
It looks like two more engines are going to take a dip in the antifreeze Jacuzzi... One is a Thunder Tiger Pro .61 that was mounted to the nose of a Sig 1/4 scale Clipped Wing Cub. That must have been massively underwhelming power for a plane that size. The engine looks like a Frankenstein's monster of parts - it has an OS carb and what I think is a helicopter head with bigger cooling fins. Supposedly the stock carbs weren't that good so MAYBE a previous owner solved the problem with a carb swap?? When I opened it up, the guts were bone-dry, but also free of varnish. After liberal oiling it turned nicely and has plenty of compression. The Pitts-style muffler has a big hole in it, so I'll probably get an original muffler for it eventually, assuming it actually runs. Before trying it it'll get a bath with antifreeze followed by oil, just to make sure it's good and clean.

Engine number Two is an OS .95 that is tentatively going into the Cub mentioned above. It feels smooth as well, but the outside has some build-up that I'd like to remove. Plus, that gives me a good excuse to check out the internals and to give it a heavy dose of oil.
 

Joker 53150

Mmmmmmm, balsa.
Mentor
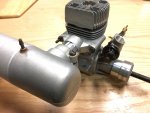
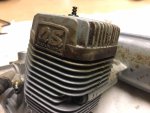
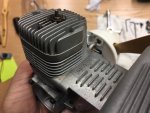
Here is the next engine out of the antifreeze Jacuzzi, an OS 2-stroke which was in good shape before I took it apart for cleaning. :) The top end is the ugliest part on this one, with a bunch of varnish buildup at the head and some splatter across to the muffler. Everything appears to be in good shape, from the bearings to the piston and carb. The cleaning is purely cosmetic in this case.

IMG_6280.JPG

IMG_6281.JPG


And after an overnight soak and a quick brushing with soapy water most of the deposits are gone! It's not perfect, but it's time well spent as I could go through the engine in detail to make sure all parts are in good shape. No red flags popped up on this one. Note that I didn't disassemble or soak the carb. It was mainly a little dirty on the outside and I didn't feel taking it apart was necessary, so it just got a good dose of oil and an exterior wipe-down.

IMG_6282.JPG

IMG_6283.JPG

IMG_6284.JPG
 

PsyBorg

Wake up! Time to fly!
All this work will pay off for the engine longevity too as they will dissipate heat more effectively with out all the thick gunk and grime on them.
Not to mention will make you present better with sparkly clean gear on the flight line. We all know that guy with the nasty sticky everything that always asks for help holding his stuff so you get all sticky and his hands stay clean to touch his radio.
 

Joker 53150

Mmmmmmm, balsa.
Mentor
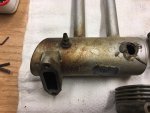
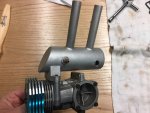
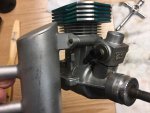
Here's the last engine I have to clean (for now?), a Thunder Tiger Pro .61, which appears to have been run with a leaking exhaust gasket for quite a while based on the build-up on the muffler. This one may never run again, although I'll put fuel in it and give it a shot. The carb is from an OS engine (I've read the original carbs weren't very good quality), the head is probably from a helicopter engine, the body of the engine is fairly beat up from some past abuse, etc. But it came with a plane I got and the seller claims it works fine. Other than the hole in the exhaust - I'm told that's where the smoke line was attached and patched with JB Weld. There was also a little JB Weld around the bolt for the carb for some reason, although I couldn't find any cracks or other reasons it would have been applied there... :confused: I'm not going to Jacuzzi the head in the antifreeze as I'm not sure what that'll do to the blue annodizing.

IMG_6277.JPG

IMG_6279.JPG


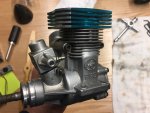
And after cleaning it's a night & day difference! The muffler came out much better than expected, and even the JB Weld was softened enough to come off. That hole can be patched easily enough now, probably with more JB Weld. :) With all the gunk removed you can easily see all the scars from pliers around the snout, and all the other scrapes and bruises it's gotten over the years. Before firing it up I'm going to replace all the head bolts and the bolts for the backplate. The originals don't match in size and the sockets are all getting stripped and filled with rust. It'll also need a prop nut & washer as the one that was on it was trashed. Bearings and the rest of the internals looked OK, so now it goes on the shelf with the others so I can finally get back to working on the planes! :)

IMG_6286.JPG

IMG_6287.JPG

IMG_6288.JPG
 

PsyBorg

Wake up! Time to fly!
Wow that one is a hodge podge of parts. Well done to the guy that made that run hehe. Wonder how much of the internals were changed. Sort of like taking an old 302 block and using a 327 crank to make a stroker motor out of it. No low end torque but would sit at redline all day and run with the best of em on a circle track once you got the rpms up.
 

Joker 53150

Mmmmmmm, balsa.
Mentor
I'm hoping it runs. The plane it was mounted to gives me a little confidence that it actually DOES work. It was on a Sig 1/4 scale Clipped Wing Cub that appears to have had a LOT of flight time. There was also plenty of hidden damage, so maybe it wasn't a reliable engine? :confused: Strangely, the engine was mounted with the cylinder and carb pointing UP, instead of to the right, so the Pitts-style exhaust was aiming to the right instead of down. There was no cowl, so airflow for cooling wasn't an issue. The fuel tank was massive, I think it was a 40 ounce tank! That's a lot of fuel for a .60 size engine, which is borderline too small for that size plane to start with!

For the fun of it, I removed the covering from the fuselage on that plane and it's giving me major flash-backs to the first 1/4 scale Cub I rescued. Through the end of this year I've got 3 and 4 day weekends to burn some time off, so maybe I'll spend a little time getting a stand set up so I can test this one. No idea what it'll be used for IF it runs, but it'd still be a fun little project.