DJSomm1
Member
This is the story of my modified TimSav.
I wanted to keep the simplicity of the TimSav, but add some features to make it more useable:
1. Larger cutting space, to accommodate 24” x 48” underlayment foam sheets.
2. Vacuum bed to simplify alignment, and wrangle warped foam.
3. Fewer 3D printed parts.
This is the result.


Frame:
The frame started with aluminum from the scrap bin at work, and was completed with delrin rollers and aluminum extrusion.


Cutting Head:
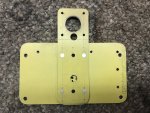
My 3D printer is not running reliably, so I made the cutting head from aluminum angle, and skeletonized it in the mill to reduce weight.


Vacuum Bed:
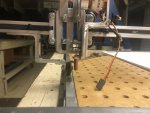
The vacuum bed was inspired by seeing a sheet of pegboard in the local hardware store. The base is a 2ft x 4ft sheet of 1/4” plywood with a perimeter of 1/2” square dowels. Knowing a small pressure differential has a massive effect over a large area, I supported the bed with numerous 1/2” standoffs dispersed between the pegboard and base. Finally, I added an aluminum rail for the roller at the end of the Y-axis. A coat of Minway sealed the surface against stray water droplets.


Software:
The biggest challenge was the software and electronics. I am a mechanical engineer by trade, and it is easy to be overwhelmed by the sea of information out there, so it took a while for me find the best software and electronics setup. In the end, I settled on using an Arduino with GRBL-Servo firmware. I wanted a more CAD-oriented drawing software than Inkscape, and that led me to discover DoubleCAD. I love DoubleCAD. It’s absolutely free, and has even more functionality than FastCAD, which I use professionally. But DoubleCAD does not have the ability to drive a CNC machine, so a bit of digging and testing led me to GRBL-Plotter.
DoubleCAD and GRBL-Plotter are a magnificent combo. Links here:
https://www.turbocad.com/content/doublecad-xt-v5
https://grbl-plotter.de
Wiring:
To simplify the wiring in the cutting head, I modified an Ethernet cable. With the connectors removed, you have access to a core of eight wires in one tidy package. Three wires plug into the Arduino to drive the servo, leaving one unused wire, and two pairs of two wires which are ganged together and plugged into the 12V power supply to power the ESC and drive motor. This cable, and the stepper wiring is each fed through a pair of drag chains to complete the electronics setup.


I wanted to keep the simplicity of the TimSav, but add some features to make it more useable:
1. Larger cutting space, to accommodate 24” x 48” underlayment foam sheets.
2. Vacuum bed to simplify alignment, and wrangle warped foam.
3. Fewer 3D printed parts.
This is the result.


Frame:
The frame started with aluminum from the scrap bin at work, and was completed with delrin rollers and aluminum extrusion.


Cutting Head:
My 3D printer is not running reliably, so I made the cutting head from aluminum angle, and skeletonized it in the mill to reduce weight.


Vacuum Bed:
The vacuum bed was inspired by seeing a sheet of pegboard in the local hardware store. The base is a 2ft x 4ft sheet of 1/4” plywood with a perimeter of 1/2” square dowels. Knowing a small pressure differential has a massive effect over a large area, I supported the bed with numerous 1/2” standoffs dispersed between the pegboard and base. Finally, I added an aluminum rail for the roller at the end of the Y-axis. A coat of Minway sealed the surface against stray water droplets.


Software:
The biggest challenge was the software and electronics. I am a mechanical engineer by trade, and it is easy to be overwhelmed by the sea of information out there, so it took a while for me find the best software and electronics setup. In the end, I settled on using an Arduino with GRBL-Servo firmware. I wanted a more CAD-oriented drawing software than Inkscape, and that led me to discover DoubleCAD. I love DoubleCAD. It’s absolutely free, and has even more functionality than FastCAD, which I use professionally. But DoubleCAD does not have the ability to drive a CNC machine, so a bit of digging and testing led me to GRBL-Plotter.
DoubleCAD and GRBL-Plotter are a magnificent combo. Links here:
https://www.turbocad.com/content/doublecad-xt-v5
https://grbl-plotter.de
Wiring:
To simplify the wiring in the cutting head, I modified an Ethernet cable. With the connectors removed, you have access to a core of eight wires in one tidy package. Three wires plug into the Arduino to drive the servo, leaving one unused wire, and two pairs of two wires which are ganged together and plugged into the 12V power supply to power the ESC and drive motor. This cable, and the stepper wiring is each fed through a pair of drag chains to complete the electronics setup.


Last edited:


