Doculam covering PRO's and PITFALLS.....

Piotrsko

Master member
Doculam is usually used on the outside of DTFB and other foams to protect and make it stronger. I think the guys flying foamy slope soarers discovered it first.
Nope we started with string tape and colored packing tape. Doculam is a tissue covering replacement started by the rubber band flyers after all the light weight film coverings went away
 

speedbirdted

Legendary member
I wonder how much strength Doculam would add back on a "paperless" foam build? :unsure:

Probably quite a lot. For instance DTFB gets the majority of its mechanical stiffness from the paper backing. Given that Doculam (I think) doesn't stretch easily when cold, it should perform largely the same function.
 

TooJung2Die

Master member
I think some sort of testing is in order for the weekend. :sneaky:
I removed the paper on both sides of the "SloFlyr" wing shown in Post #8. One side of the Adams foam board is covered with doculam. It adds about as much strength and stiffness as the paper that was removed with less weight. It is waterproof and doesn't tear like paper. I did something similar on the SE5 biplane. Paper was removed from both sides of the DTFB wings. Spray adhesive was used to attach colored plastic gift wrap from Dollar Tree. The gift wrap shrinks and goes on a lot like doculam but you have to use adhesive to make it stick. It comes in colors or clear.

SloFlyr.jpg
SE5 wings.jpg
Jon
 
Last edited:

rockyboy

Skill Collector
Mentor
Thought I'd drop a painting report in here from my Polikarpov I16 project - total success!

I was using the 1.7 mil "CP Film" aka Doculam ordered from https://alofthobbies.com/new-stuff-laminating-films.html

After ironing on the film and shrinking where necessary, I sanded lightly with 400 grit and then rubbed down with alcohol to clean it well.

Next I sprayed on a thin coat of Adhesion Promoter - this is sold in lots of places, but the one I specifically used came from here https://www.automotivetouchup.com/spray-paint/adhesion-promoter.aspx

Then I used good old latex airbrush paint and some latex house paint through an airbrush - several light coats to build up to what you see below. For masking I used 3M Scotch Removable Magic Tape #811. No problems pulling up the paint at all!

PXL_20201020_223901970_copy_1024x768.jpg
PXL_20201020_223910764_copy_1024x768.jpg
IMG_20201022_213118_463.jpg
 
That looks terrific!

I ended up covering my latest plane in moneykote, but I’m currently experimenting on test panels to see if I can devise a method for my next project. I’m particularly interested in a topcoat that is somewhat low VOC and glow fuel resistant. I have high hopes for a test panel that has some Apple Barrel blue acrylic hastily brushed on, with polyurethane varnish over it. I’m going to let it cure until tomorrow and dribble some 10% nitro onto it and see what happens.

If it wipes off after 5 minutes with no discernible damage, I’m going to have lots of questions about better paint application methods. I don’t have any spray equipment but this cheap acrylic paint doesn’t flow out brush strokes at all, and is not very opaque.
 

TooJung2Die

Master member
If you need fuel proof covering look no further than document laminating film. I haven't found a solvent that affects it including acetone. The puzzle will be what paint to use so it stays fuel proof. You can paint the inside of the film like JustPlaneChris did in Post #36. If the paint is on the inside of the film then maybe the fuel can't get to it.
 
Yes, I saw Chris’ post and was impressed. I haven’t discarded the idea of doing something similar. I’m also experimenting with doping tissue on TOP of the film with PU varnish. It looks pretty sweet (colorful, nearly transparent) and is fuel resistant, but not the right look for the plane I’m going to build.
 
Okay, I’m back from doing some experimenting. The short story is, I spray painted the inside of some film and ironed it onto an old wing that’s destined for the scrap pile. The results are promising.

This is the laminating film I have been using, “School Smart 1.5 mil laminating film:” https://www.amazon.com/gp/product/B003V1BQR6/?tag=lstir-20

I guess I was trying to roll my own 6 foot roll of moneykote. I began by unrolling a 6 foot length around a cardboard box, using pushpins to hold it.
F8C71068-5F76-46BB-9BA2-22384055EC6A.jpeg

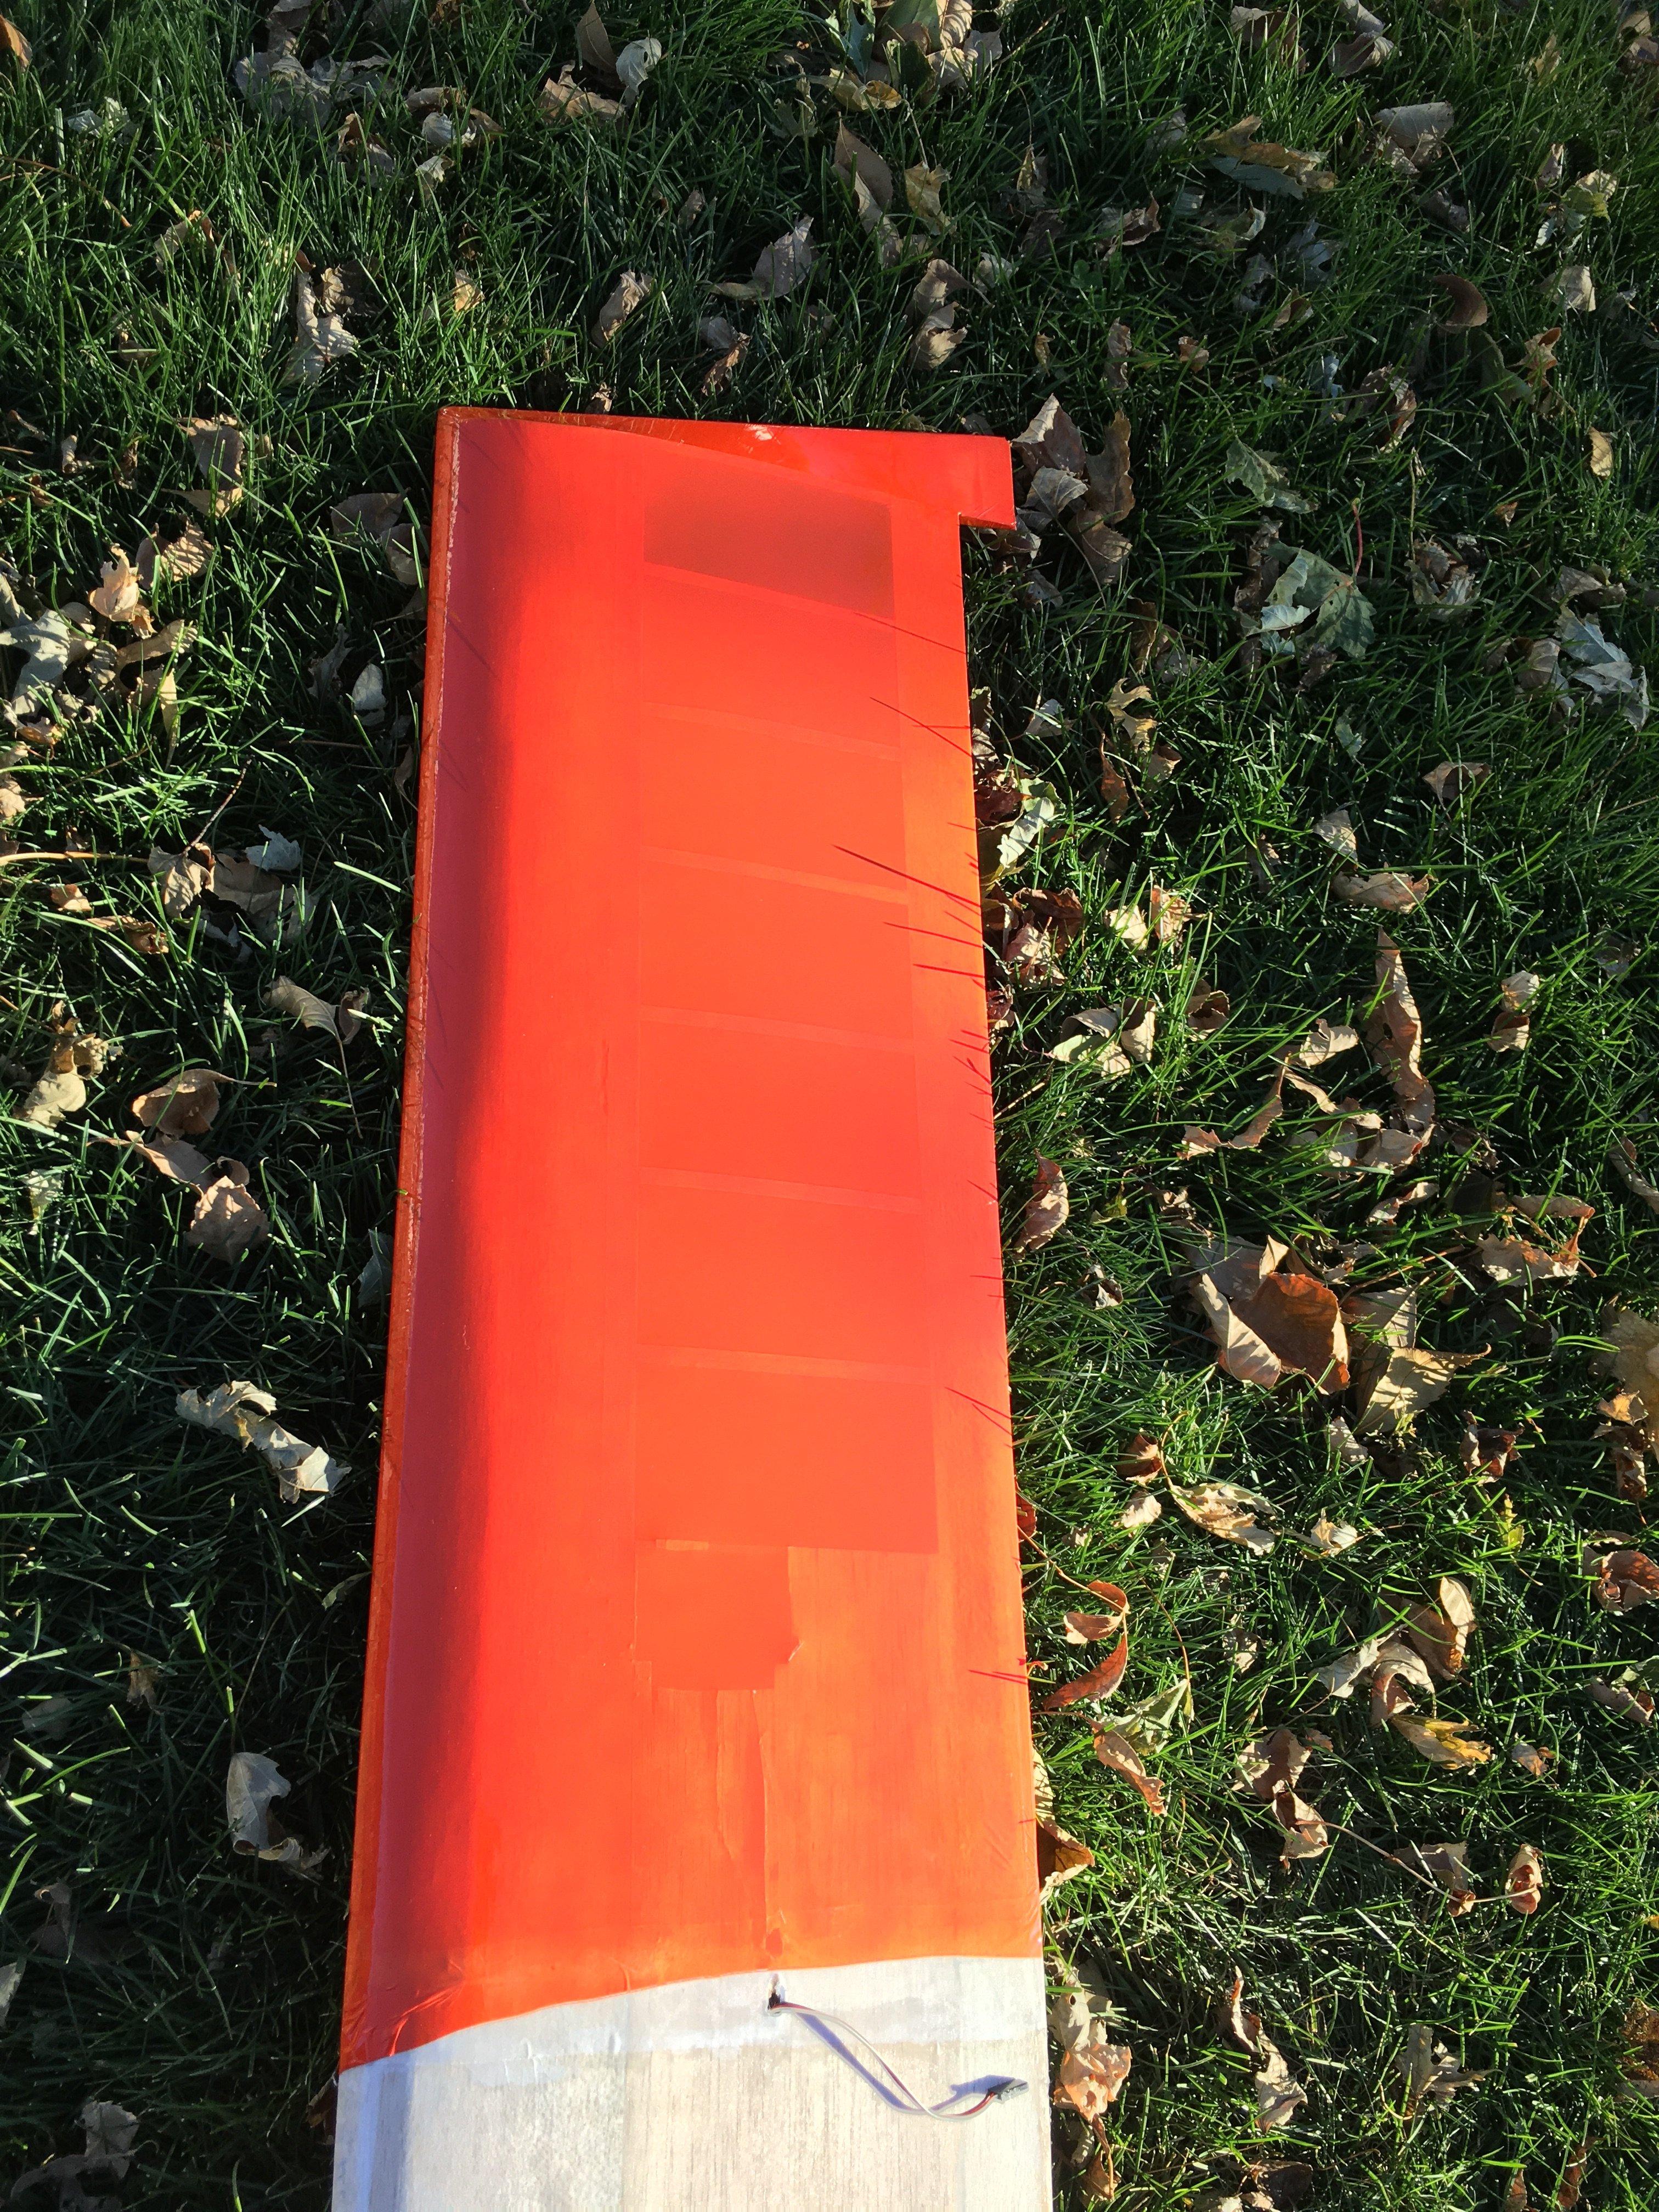
Then I took the box outside and rattle-canned it with Ace Premium Orange gloss enamel. ($3.80) I reckon I used half the can. I immediately got discouraged by the evident lack of opacity, as you can see by the graphic on the cardboard showing through the painted film in this picture:
FBADD37D-A497-442E-BCA8-DEE928F18F88.jpeg

I started trying to “spray it on a little thicker” but I could tell that was not going to help. I felt I got a decent coat in basically one pass. I wasn’t too concerned about splatters or dusting because I figured the side I eventually was going to be looking at was going to look fine. I was mostly correct. The can says “dries in 25 minutes” but we all know that’s a joke. Anyway I let it dry outside for about a half hour before bringing it back in to the basement. It didn’t stink anymore at that point. My original plan was to wait a few days for it to cure before rolling it up, but I decided that it probably wouldn’t stick to itself too bad because it’s film, so I robbed a cardboard tube from our wrapping paper stash and rolled it off the box, adhesive side in.
9CE61209-CA9D-4EE5-9D5C-888CE7A84DB3.jpeg

Then, I fished a wing out of the rafters, tore off the polyester fabric covering, and covered one side of it with some of my $2.35/6 foot roll of orange iron-on covering film.
0CFD301A-302B-4FC6-9291-F7AD317E33E1.jpeg

There’s some shadows messing up that picture above, I couldn’t tell until now.
519A61F2-68C9-4375-9A0A-0E755C092F2C.jpeg

I tried squirting some Ace “Chrome Aluminum” into a few wing bays to see if that would help with the opacity, thinking next time I’d do a layer of that, but I wasn’t thrilled.
DBF07940-7589-4598-B372-7D3BAA8F5FA3.jpeg
6800D85E-4712-4919-BC0C-6F42CF211811.jpeg
AE48E323-1192-41FC-B518-2308B64BC452.jpeg

The entire experiment took about 2 hours. I think it was time well spent. I wish the result was more opaque, at least enough to make the balsa grain less apparent, and I wish the color was less splotchy, but if this is all I had to work with, I’d be happy with it and would use it on my upcoming build.

It should be mentioned that I do not think the paint had a deleterious effect on the adhesion. That being said, I usually always brush some shellac (bug guts in ethanol, evaporates rapidly) onto the balsa I’m covering, followed by a quick wipe with 220 grit, followed by some brushed-on mod-podge for an adhesion promoter even with moneykote.

Hopefully this is useful for the discussion.
 

Attachments

  • 2D91C307-9ED4-45BF-BAA9-DFC453C22A92.jpeg
    2D91C307-9ED4-45BF-BAA9-DFC453C22A92.jpeg
    2.6 MB · Views: 0
Last edited:

Bricks

Master member
If you cover both sides it would appear more opaque if that is what your are looking for will not do anything for the balsa grain showing thru thou. .
 
If you cover both sides it would appear more opaque if that is what your are looking for will not do anything for the balsa grain showing thru thou. .
Yeah, I went ahead and finished covering it, and I'm actually pretty happy with the way it looks. I even like the cheesy "shiny Monokote" gloss effect. I'm not too worried about the sun shining through the open bays, it's mainly just the balsa grain showing through. I think I can mitigate that with a quick coat of some kind of white on the balsa before covering though. I mostly build glow powered sport planes that don't make any pretense at scale modeling, so overall I'm actually pretty happy with how this is going.

I'm glad I have this old wing to mess around with. I think I'm going to rip the fabric off the other half and try painting the balsa before ironing on some more orange laminating film.
 
So spray some of the same orange I used for the film onto the balsa framework, and then iron on the covering? That might be just the ticket. I'll give it a whirl.
 

TooJung2Die

Master member
Very interesting results you got from painting the inside surface of the doculam. I like the translucent effect and wouldn't mind a bit of the balsa grain showing. I will definitely remember this for future builds. 😎👍
 
Username “Justplanechris,” who contributed to this thread on post #36, is primarily responsible for the inspiration behind my attempt. One huge takeaway for me is that it is a very low-effort solution to one “clear” pitfall of doculam. I was amazed at how little extra time, skill, and expense it took to add some color to the equation.

I’m not sure how soon I’ll get to it, but the next thing I need to test is resistance of the heat-sealed edges to raw glow fuel.

The only other thing I want to attempt is the use of something like a foam roller to apply as thin and light of a coat as possible of waterborne latex paint to the inside of the film, for a truly indoors-in-the-wintertime activity. I’ll have more to say about it after I try it.
 

JustPlaneChris

Well-known member
I'm glad my post was useful, and I love the results you got! :)
I know I won't be buying any more moneykote for future projects. I have a gigantic roll of the 1.5mil doculam, enough for a lifetime of models.
 

speedbirdted

Legendary member
Well, I was doing some thinking about builds I would like to do, and I think I'm going to give this stuff a serious try again. I have a question for folks that have been around the block more times than me though; what if instead of painting the film I just painted the wood underneath the film? Would that ruin the adhesion?

Another probably incredibly stupid but nonetheless intrusive though I had was does Aloft Hobbies sell the stuff in a continuous sheet? Like if I bought 10 feet would they send me a 10' x 18" sheet or would they send me ten 12" x 18" sheets? I don't get why they would do that, but I've seen more serious departures from logical thinking in my time...