Oh, I see it now. Thanks.Think it’s supposed to be like that. It just gives the 2 surface more contact to glue to. Mine was the same.

You are using an out of date browser. It may not display this or other websites correctly.
You should upgrade or use an alternative browser.
You should upgrade or use an alternative browser.
Eclipson Model A (free version)
- Thread starter 3pa
- Start date
I think you're both right hereThat's not the problem, if you look he is lining up the canopy cover cut-out (see the inset lip) to the rear of the wing cutout (flat surface). But you are also right in that all the fuselage sections have no top or bottom layers.
") See attached photos where I have the right alignment but the opposite side from the tabs are closed off. I've set my top/bottom layer thickness to 0mm. I'll use that for the rest of the prints and see how I go. If I can save these ones I will, otherwise it's a long old reprint
See attached photos where I have the right alignment but the opposite side from the tabs are closed off. I've set my top/bottom layer thickness to 0mm. I'll use that for the rest of the prints and see how I go. If I can save these ones I will, otherwise it's a long old reprint Thanks for the help
Seán
Attachments

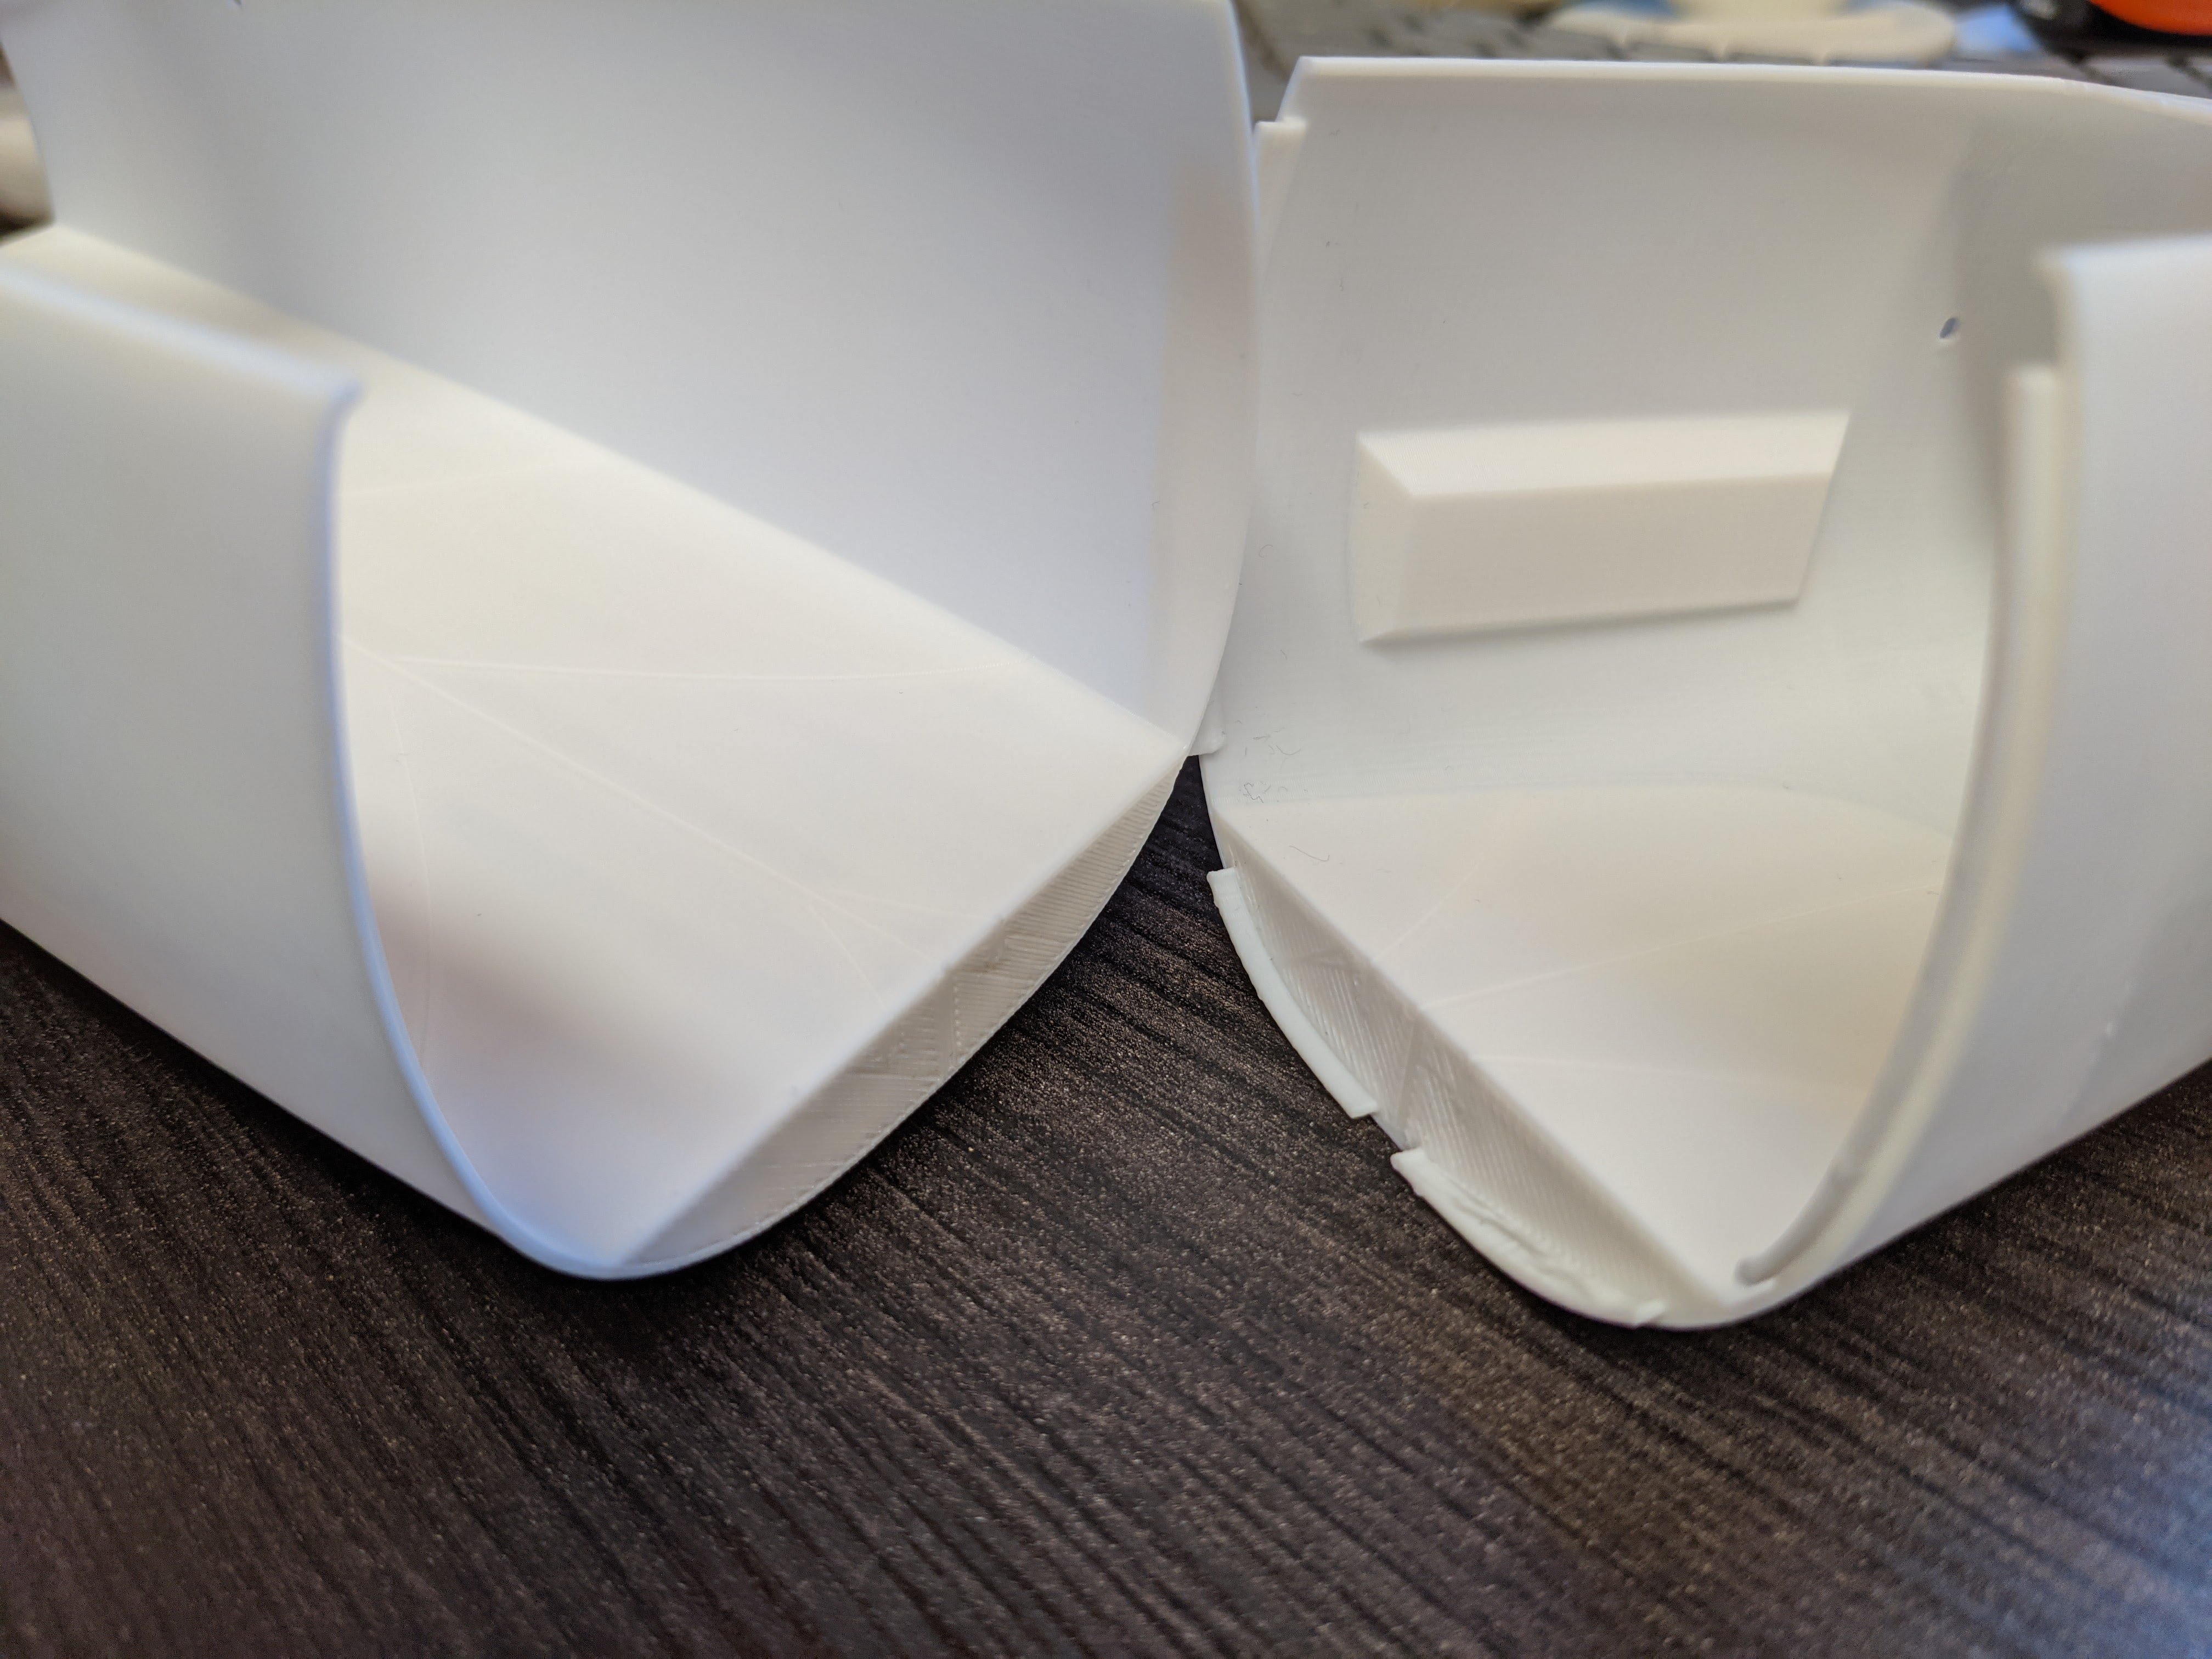
That's not the problem, if you look he is lining up the canopy cover cut-out (see the inset lip) to the rear of the wing cutout (flat surface). But you are also right in that all the fuselage sections have no top or bottom layers.
You are right, alignment of the parts in the picture is not correct, however, even with correct alignment, they wouldn't fit if not printed correctly.
You are right, alignment of the parts in the picture is not correct, however, even with correct alignment, they wouldn't fit if not printed correctly.
Great looking build.Finished, just need some good weather to go flying!
Flaperons are wired through a y-harness. Might experiment with mixing when I feel brave!
TheStapler
New member
Just started printing the fus and notice the seam seems abit thick. Anyone know if this is normal? Should i leave it when assembling it to gether or try and sand it? I have tried slicing myself and still the same. Im printing on a ender 3 v2 and my prints normally come out perfect.
Attachments


Spitfire76
Well-known member
Apart from the motor screws I did not see what type and size screws are needed else where in the build video.

jpot1
Elite member
Apart from the motor screws I did not see what type and size screws are needed else where in the build video.
M2 x 8mm
jpot1
Elite member
Just started printing the fus and notice the seam seems abit thick. Anyone know if this is normal? Should i leave it when assembling it to gether or try and sand it? I have tried slicing myself and still the same. Im printing on a ender 3 v2 and my prints normally come out perfect.
Looks normal. I just oriented the seam so it was on the bottom.
I will preface this post by saying that I have actually printed and assembled the wing and fuselage, but...
I have had all sorts of problems while printing the wing parts. I am using a Prusa MK3s
I have had all sorts of problems while printing the wing parts. I am using a Prusa MK3s
Looks like a great job! Could you let me know how you went about printing the wing sections? I have a Prusa MK3s and I have been having all sorts of issues with the edges of the parts lifting off the build plate. I have a wing printed and assembled but I am not happy with the gaps that I have as a result. Also - did you print the parts using those colors or did you paint it?
jpot1
Elite member
I will preface this post by saying that I have actually printed and assembled the wing and fuselage, but...
I have had all sorts of problems while printing the wing parts. I am using a Prusa MK3s
Looks like a great job! Could you let me know how you went about printing the wing sections? I have a Prusa MK3s and I have been having all sorts of issues with the edges of the parts lifting off the build plate. I have a wing printed and assembled but I am not happy with the gaps that I have as a result. Also - did you print the parts using those colors or did you paint it?
I used different color PLA. I just printed all the wing parts with a brim and had no issues with anything lifting. A little trimming to remove the brim and good to go.
Spitfire76
Well-known member
While printing the wing sections I did notice a lifting from the brim at the leading edge which has resulted in some small gaps when sections are glued together as the bottom of that wing section is not straight. I changed the initial layer height in profile A from 0.2 to 0.3 and that has helped. I also just printed the motor holder and noticed that layers from 7 to 15 are printed with infill which is only 10% and so the top layers have little support which results in small gaps. I may try again with a higher infill.
Sero
Elite member
I used the provided G-code files on my Longer LK2 printer, initially I was having some layer separation issues. I'm printing in my garage which is fairly cold, so I modifies the G-code to raise the extruder temperature and reduced the fan speed from 255 to 160. Seems good now, so printing begins!
TheStapler
New member
What battery is everyone using on the pla version? Itrying to work out what to buy a 4s or 3s.
jpot1
Elite member
I used a 3s 1300.What battery is everyone using on the pla version? Itrying to work out what to buy a 4s or 3s.
Spitfire76
Well-known member
Using M2 x 8mm self taping screws with head washer to secure the wing servo mounts and they don't seem to bite well as if they are too small. I know this is metal into plastic but thought they would bite better. Anyway used some slightly larger ones and now the wing is complete. Checked the weight and it comes in at 240g and I have used regular PLA so hopefully that's about right.
Last edited:
cafe_delmar
New member
Hi All!
Today i started printing the Free version of the model A. However, I found out that the stl file for the fuse (fus1) is skewed, after having printed it twice and after looking in the slicer software, this appears to be the case ... are there others that also run into this?


Today i started printing the Free version of the model A. However, I found out that the stl file for the fuse (fus1) is skewed, after having printed it twice and after looking in the slicer software, this appears to be the case ... are there others that also run into this?
The Fopster
Master member
Might that be side thrust on the motor mount?Hi All!
Today i started printing the Free version of the model A. However, I found out that the stl file for the fuse (fus1) is skewed, after having printed it twice and after looking in the slicer software, this appears to be the case ... are there others that also run into this? View attachment 192712 View attachment 192713 View attachment 192714 View attachment 192715
cafe_delmar
New member
Yes this is the part where the motor must be mounted (down on the plate)Might that be side thrust on the motor mount?
Similar threads
- Replies
- 8
- Views
- 2K
- Replies
- 6
- Views
- 362
- Replies
- 4
- Views
- 1K
- Replies
- 17
- Views
- 2K