Feather 2 DLG kit

danskis

Master member
I'm seriously hooked on DLG flying. It reminds me of when I was a kid and all I had to do was chuck that glider into the air. Of course things have become more sophisticated now with DLG but the feeling is still the same. First I'm not really sure where to put this as it doesn't have very much balsa in it but I figure its as good here as anywhere else. The Feather 2:

Feather² Squared Micro F3k DLG RC Glider Airplane Kit Ultralight Ultrafun (microbirds.com)

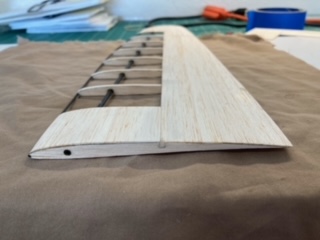
It is really a micro so I'm thinking I won't be able to throw it real hard but we'll see. The kit cost about $130 complete with receiver, servos and covering. Pretty cheap for a DLG. This is the most complete I've ever seen. It comes complete with extra micro electrical connectors, a brush to brush on epoxy, wing plans and access to a very good build video. I started on the fuselage which is just a block of roughly shaped foam and a carbon rod. You dig out a trench for the rod and gorilla glue it in. You then dig out some recesses for your receiver and battery. I haven't done it yet but your supposed to cover the fuse with carbon tow covered with epoxy (the build calls for burying the receiver and the battery). I'm waiting until everything is built, installed and working.

feather fuse with gear.jpg
 

danskis

Master member
This is the second glider I've built with a carbon leading edge. Both had a lot of wood on the trailing edge. It could be that's the current design trend - I don't know. I'll turn it over and take a pic and you'll see that there really is no trailing edge - just the balsa sheeting glued to the ribs.
 

danskis

Master member
I've completed the wing and sanded it. Tonight I installed the throwing peg and glassed the dihedral. I'm really enjoying this kit. If I can get it to fly as well as the videos I'll be thrilled. Did I mention this kit is incredibly complete - it even comes with a special tip for the CA.


feathrWingComplete.jpg


Notice there is no trailing edge - the top sheet is the trailing edge. The sheet balsa on top ends on top of the balsa spar and stick up the thickness of the wood. Plans don't call for it but I capped each rib so there wouldn't be a step up to the top sheet.

feathr throwing peg.jpg
 

Attachments

  • feather airfoil0.jpg
    feather airfoil0.jpg
    25.6 KB · Views: 0
Last edited:

danskis

Master member
Well its getting closer. Some mistakes I made putting the servos/control rods in. The kit comes complete with carbon push rods, z bends with different sizes for the servo and horns on the tail, guides for the push rods and shrink tube to connect the z bends to the push rods. What I didn't know was that the carbon push rods were already cut to length (nothing in the instructions) and I cut the long one to fit the horizontal stabilizer so I had two short ones. No big deal I just made a longer new z bend. The more serious mistake was to completely install the servos and push rods before covering the wing. I'll have to remove the push rods and guides, cover the wings and then reinstall the push rods. If you want more pics let me know.

Feather complete.jpg
 

danskis

Master member
The Feather 2 completed. As you can see I opted for Japanese tissue covering. There are no trees where I fly so this seemed like a reasonable option and its also the lightest. I still need a lot of practice before I get good at it. I also had trouble using the glue stick for the tissue paper. I had a lot of de-lams that I ended up fixing with CA. If I build this again I would probably change some things. I think it is way over reinforced in some areas (havent flown it yet).
feather top.jpg

feather bottom.jpg

feather tail.jpg

feather servos.jpg

feather boom.jpg
 

danskis

Master member
Paper comes from easybuiltmodels. Order more than you need because the shipping is more than the paper.
 

danskis

Master member
The kit is incredibly complete and includes plenty of tissue to cover the plane and it even had some extra smaller pieces of colored tissue (pot luck on the colors) to add contrasting trim. The included tissue is white and not as light as aftermarket tissue - what can I say, I splurged. The kit even came with a special thin spout CA applicator. As stated above the aftermarket tissue is cheap and cost less than shipping it. I'm not sure I would do that again.
 
The kit is incredibly complete and includes plenty of tissue to cover the plane and it even had some extra smaller pieces of colored tissue (pot luck on the colors) to add contrasting trim. The included tissue is white and not as light as aftermarket tissue - what can I say, I splurged. The kit even came with a special thin spout CA applicator. As stated above the aftermarket tissue is cheap and cost less than shipping it. I'm not sure I would do that again.
That's good to know. I ordered the same kit earlier this week and I was planning on using the tissue and giving it a clear nitrate dope finish. What I am hoping is that the white tissue will become transparent so that I can have some of the wood show through with color tissue as accents. I know I could do that with Polyspan, but that's too heavy. But I'll go ahead and spring for the Esaki tissue on it as well so that I can apply the tissue wet. EasyBuiltModels has a few odds and ends I've been meaning to pick up anyway.
 

danskis

Master member
FYI - they recommend clear spray on enamel of some type instead dope to finish it. It seems to work fine and is crystal clear. I'd love to see your build so post it here. Also, he recommends you tie/wrap the carbon boom to the carbon wing spar with the supplied carbon "string". If you epoxy the finished wing to the boom I seriously doubt you need to wrap the two together as it makes it a hassle to put the covering on. Also, I had a flat 4mm piece of carbon that I used to reinforce the nose pod with instead of using all the carbon tow. It still came out tail heavy enough that I think I could put a bigger battery in the nose. I needed to add some weight to get it to balance. With that in mind I would consider grinding down the very back of the boom around the tail to make the tail lighter. I think it would still be plenty strong. More edit - while the kit is very complete I did not get any response on several of the questions I asked him.
 
Last edited:
I'll have to do a sample frame of the tissue and dope to see how much weight it will add. From one forum post I saw, I estimated that a basic 2 coat doping would add about 4 grams of weight to the tissue for the wing. That's highly variable depending on how much dope you really want to build up. I'd like to see how much weight the desired finish would add and see if I can find out the impact.