Found a Middle Stick Kit from ~1969

TooJung2Die

Master member
I can clearly see why the barriers of entry into this hobby were very high about 20 years ago. Max parts on a foamie are maybe 30, this plane has at least 150 individual parts to cut, shape, and/or glue. Crashes would be catastrophic, expensive, and wholly avoided when all you can fly are balsa planes.
Well stated. I never thought of it in those terms. I just think about the hours spent as I throw it into the sky the first time.
 

Bricks

Master member
The new lazer cut kits are so much better and easier, they seem to about snap together. If you got a die cut plane which your is you were lucky if yours was one of the first stamped out as the dies got older they would crush more then cut the balsa.
 

TooJung2Die

Master member
I really dislike die crunched kits.
Ditto. Some are so bad I wish they hadn't bothered and printed the pieces on balsa like the vintage kits. You spend too much time fixing the poor cuts. The Guillow's SE5a kit I did was so bad it would've taken less time to cut the pieces by hand. I don't like the burnt edges from the laser kits but the cuts are usually flawless. I enjoy cutting balsa by hand.
 

Piotrsko

Master member
And to think that the “stick” was one of the most simple and basic trainer planes. Imagine what a large scale warbird would feel like flying... 😬
Fwiw: flying a scale warbird was pretty much like flying the real thing according to friends that knew. Only cheaper and much safer.

$800 P51's for sale in Palmdale CA, with a spare pickled merlin after the war, BUT average wage was about $50 a month. The sign was still there in the '70s
 

KSP_CPA

Well-known member
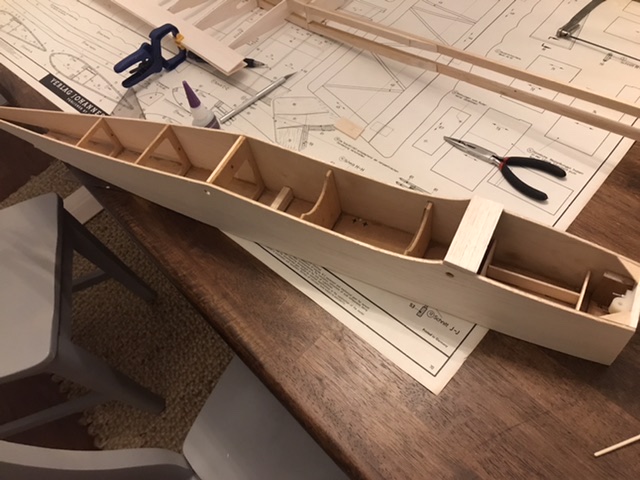
Was on vacation last week but did get the fuselage back from my father-in-law and did some more work last night.

Added some reinforcement pieces to the fuse, top plate, and other odds and ends. I’m a bit at a stopping point with the fuselage as the next items are to mount wheels, stabilizers, etc.
E3E56597-25CE-43DB-BCF9-59443357F1C3.jpeg


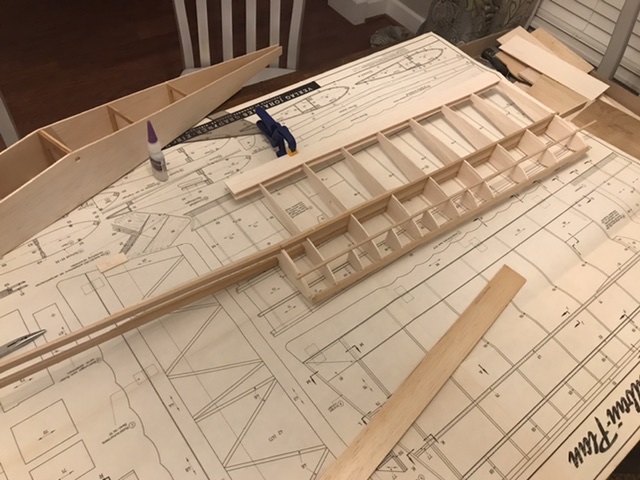
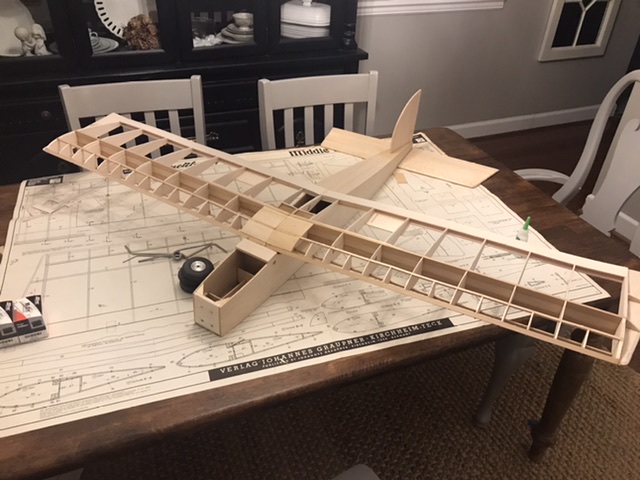
Cut out additional ribs on my wife’s Cricut and put the remaining ribs on the left side wing in place. Ran out of CA before I could get the top stringer in place with the leading edge half ribs. The complexity of the wing design is starting to become apparent.
87364294-DB9A-46BC-BB2C-0ED7BF0E6FDF.jpeg
 

KSP_CPA

Well-known member
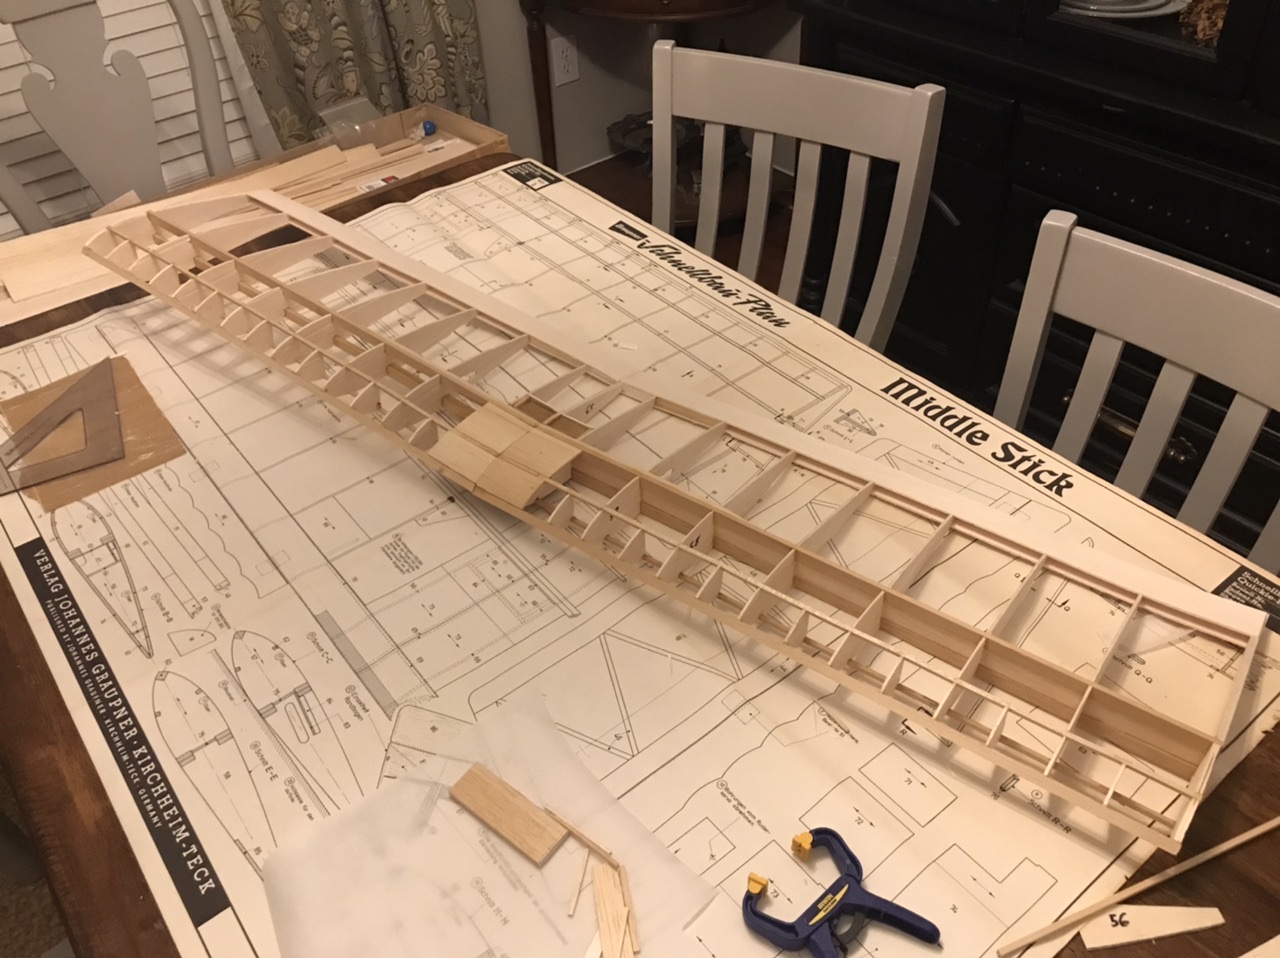
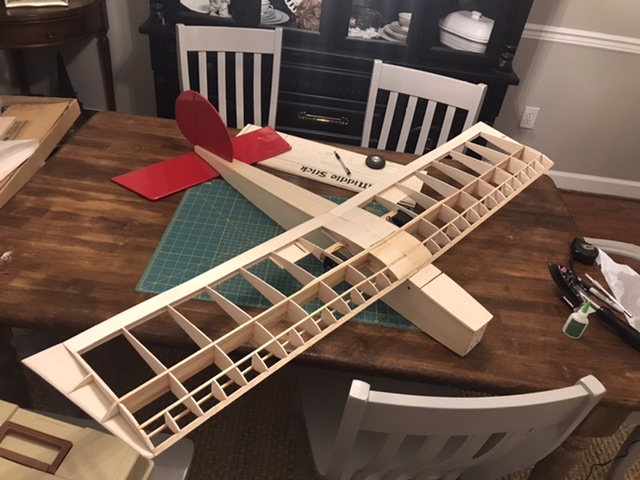
Cut out the other half of the ribs and quarter-ribs this week, finishing most of the wing. Did some of the interior sheeting.

2C37CB01-1F3A-4985-9018-5B56C4943CF7.jpeg

9D80FFC4-34DD-40FF-8865-856EB6C85232.jpeg


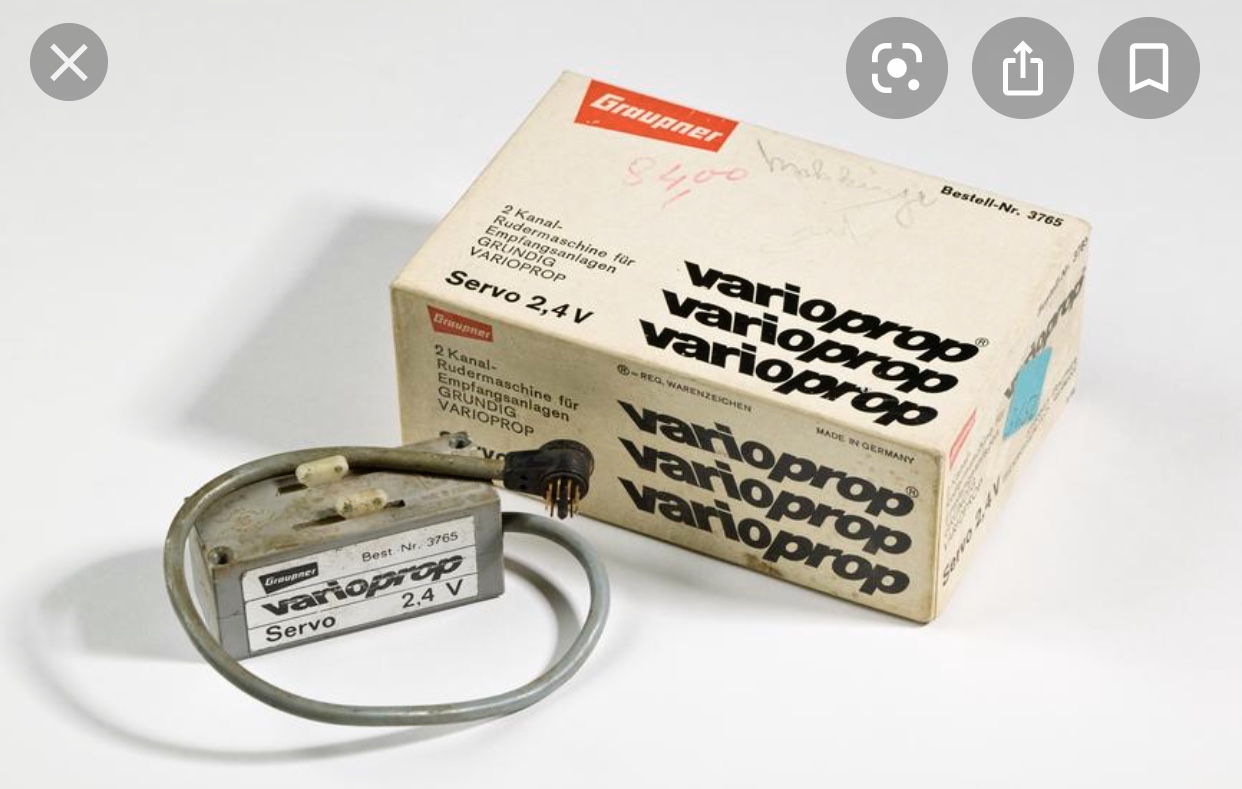
My attention is turning toward servos and power plant. First thing are the servos. Interestingly this used Varioprop 3765 servos which don’t appear to rotate like regular servos but have two sliding attachment points. Best photo I can find is as follows.
764C09CF-D77E-4D1C-A7E7-47EA5F283C9C.jpeg

I was able to find a Graupner ordering catalog from 1968 which lists this model (linked to a website Here, all in German). Translating the stats doesn’t help much to find a comparable modern equivalent as it is a 50gram weighted servo and no torque stats are listed.

I relay the question to the master builders out there. Any suggestions on what servo to use for the ailerons, rudder (with front wheel steering), and elevator?
 

OliverW

Legendary member
Cut out the other half of the ribs and quarter-ribs this week, finishing most of the wing. Did some of the interior sheeting.

View attachment 173761
View attachment 173762

My attention is turning toward servos and power plant. First thing are the servos. Interestingly this used Varioprop 3765 servos which don’t appear to rotate like regular servos but have two sliding attachment points. Best photo I can find is as follows.
View attachment 173764
I was able to find a Graupner ordering catalog from 1968 which lists this model (linked to a website Here, all in German). Translating the stats doesn’t help much to find a comparable modern equivalent as it is a 50gram weighted servo and no torque stats are listed.

I relay the question to the master builders out there. Any suggestions on what servo to use for the ailerons, rudder (with front wheel steering), and elevator?
Hitec 311's
 

KSP_CPA

Well-known member
The wing continues to take shape. End formers and plates in place with rounded edges on wings. Horizontal and vertical stabilizers sanded to rounded edges. Placing everything “in place” makes it look a lot like a plane, which is what I am going for.
854D6D2B-3236-4D92-8877-D023CBEA174D.jpeg

Servos arrived today (thank you SquirrelTail for the suggestion) and a covering iron is en route.

I decided to take everything to my work where I had a postage scale to check weight to make sure I am on track. The results were as follows (in metric units only despite primarily using Freedom units of measure)

Current plane all in: 736 grams
Fuselage-all: 547 grams
Fuse less tail: 456 grams
Fuse less tail and gear: 261 grams
Gear: 192 grams
Wheels (3): 102 grams
Tail: 88 grams
Horz stab: 23 grams
Wing: 187 grams

Left to install is:
4 servos, wires, push rods, receiver etc: 250 grams
1 2218B motor with mount and ESC: 125 grams
1 4S 2300 MAH battery: 250 grams
Monokote Covering of about 110dm2 (best guess): 170 grams
Other odds/ends and overage: 150 grams

With what I have now plus the budget left to install, I’m at 1,681 grams (3.7 lbs) estimated flying weight. The original plans have the flying weight at around 2,000 grams (4.4 lbs) so I’ll be about 16% underweight as it stands now. I don’t think that’s a problem and I’m pleased to be projected under weight rather than over. We’ll see how close I am to the final weight.

Servos will be a bit of a challenge in the wings for ailerons and will require modifications, will look at that next and then the great sand-off will begin.

Two things truly scare me now; covering with Monokote and flying it for the first time.
 

TooJung2Die

Master member
The wing continues to take shape. End formers and plates in place with rounded edges on wings. Horizontal and vertical stabilizers sanded to rounded edges. Placing everything “in place” makes it look a lot like a plane, which is what I am going for.

Good progress. You're right, it looks like an airplane. At this point you're supposed to run around the house with it making airplane noises. It's good mojo for the maiden flight. :LOL:
 
Cut out the other half of the ribs and quarter-ribs this week, finishing most of the wing. Did some of the interior sheeting.

View attachment 173761
View attachment 173762

My attention is turning toward servos and power plant. First thing are the servos. Interestingly this used Varioprop 3765 servos which don’t appear to rotate like regular servos but have two sliding attachment points. Best photo I can find is as follows.
View attachment 173764
I was able to find a Graupner ordering catalog from 1968 which lists this model (linked to a website Here, all in German). Translating the stats doesn’t help much to find a comparable modern equivalent as it is a 50gram weighted servo and no torque stats are listed.

I relay the question to the master builders out there. Any suggestions on what servo to use for the ailerons, rudder (with front wheel steering), and elevator?

Nice! I had a radio set my dad made that used the old EK Linear servos similar to these. I had it setup in an Esquire with an Enya .19.
Many hours of enjoyment flying that plane. :)
 
Context; my wife’s grandfather passed away a few years back and while they were cleaning his house out, they found an R/C kit and gave it to me. I started building FT planes a few months after the kit was given to me and forgot about it until I was cleaning out a closet today.

The kit; it is a Middle Stick balsa wood quick-build kit, the manufacture date is not explicitly stated on the box or “instructions” but best I can tell it is no earlier than 1968; “70” is printed in the corner of the plans for no apparent reason, so I would assume that is the “model year”. Nearly all the wording on the box and plans is written in German. Where and when the kit was purchased is unknown.

The Box
View attachment 171347

The Plans
View attachment 171348
View attachment 171349 View attachment 171350
The materials; this is where I get a little confused. Some of the balsa wood pieces are marked with numbers corresponding to the plans, but most are just “stock” type balsa pieces. No precut spars, etc. everything looks to be there but I can’t be certain.
View attachment 171351
View attachment 171352
Conclusion; I have never assembled a balsa kit but this looks like a fun one to try. I also don’t speak German but I have started using Google translate’s camera feature and putting sticky notes over ze’ German instructions.

The “Stick” line of planes are still being produced today, but if anyone has seen a kit like this and put it together let me know what you think!
So cool. I built my simple trainer around the same concept.

Does the word "Stik" appear anywhere? I'm really curious. I've seen it both ways in many variations and I wonder if the design concept just floated around among manufacturers, if there was one original designer who named it blah blah Stik and others followed with "Stick". Or Stik is the German word and yours was named for an international market??? But the rest is in German... Or if one company came in (I keep seeing Great Planes) and branded theirs by misspelling Stick.
 

TooJung2Die

Master member
"Das Ugly Stik" was the original design with the German spelling. It was designed by Phil Kraft. Clones and copies had various names and spelling.
 

KSP_CPA

Well-known member
Thanks @TooJung2Die. Looks like that was too easy. I'll need to come up with a harder question!
The plans refer to the name “Middle Stick”, but are an authorized production model from Phil Kraft. I did find a very interesting history of the "Stik/Stick" type of airplanes located here; it's 76 pages long but had some interesting history of the hobby in general.
 
The plans refer to the name “Middle Stick”, but are an authorized production model from Phil Kraft. I did find a very interesting history of the "Stik/Stick" type of airplanes located here; it's 76 pages long but had some interesting history of the hobby in general.
Very cool. Thanks!
 

KSP_CPA

Well-known member
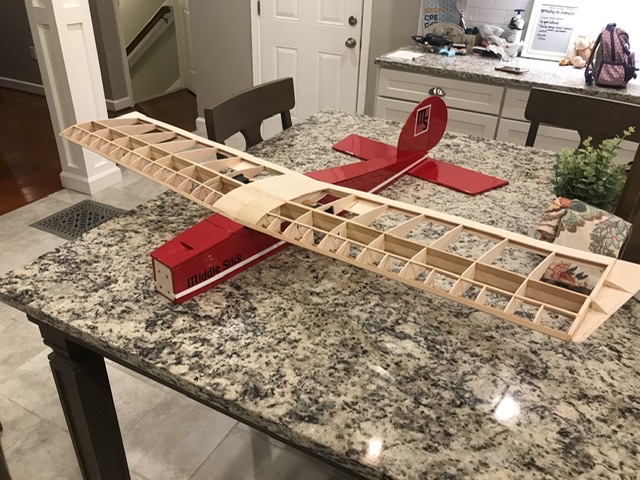
Covering has begun. I have never worked with Monokote and, quite frankly, this intimidated me. I covered the horizontal and vertical stabilizer and also cut out hinge slots and mounted the rudder.

Found out any sized gap between pieces is emphasized by Monokote covering. A slight gap (aprox 2~3mm) in the fitting between my horizontal stabilizer outer framing caused the Monokote to wrinkle instead of shrink. This is warned on the official instructions, but I didn’t heed. It is not very noticeable, but I’m going to have to do some wood filling and more sanding on the wing before attempting. Other than that, just taking your time was the best advice I found, we’ll see how it goes going forward.

Lots of sanding to even out the wing (should have worn a mask, even outside, felt like I had a sinus infection the next day from inhaling), wing servos are mounted, and remaining items are ordered (motor, ESC, servo horns, control rods/cable). Still quite a bit of work left but still an enjoyable project at this stage.

324D2E2D-B541-4158-8FD0-27B9892C28B3.jpeg
 

KSP_CPA

Well-known member
covering of the fuselage is mostly complete. I also applied the 40+ year old water slide graphic to the vertical stabilizer and nose with surprisingly good results. We’ll see how well they stand up during flight. Ran out of “True Red” Monokote, and my local hobby store was also out, so more ordering is required.

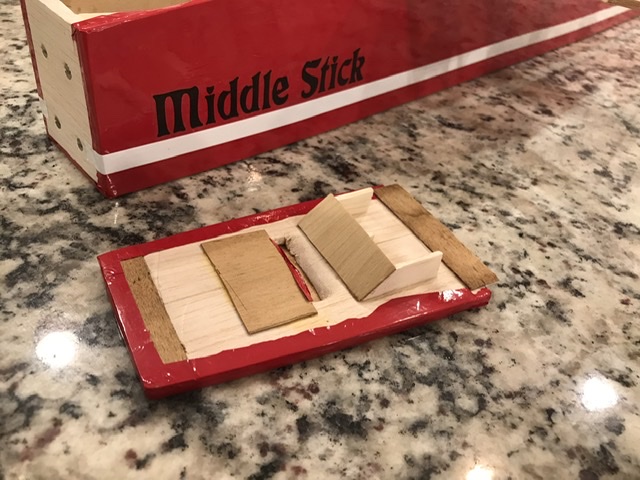
No airflow through the fuselage was necessary for the old gasser design, but I have an unfortunate past experience with a LOS which was possibly due to overheating from inadequate airflow through the fuselage. I spent a considerable amount of time redesigning the front nose hatch/plate to incorporate an air scoop. Reinforced the thin wood where the scoop comes down and put a down wash plate inside to force air onto where the ESC and battery will rest during flight. I cut a vent hole through a solid interior bulkhead and also cut a vent hole on the back of the fuse to allow continuous airflow throughout.

Next will be control surfaces, servos, and push rods. I bought some white Monokote trim prices to do the fuse stripe and cover the control surfaces but I found out they’re just vinyl sticker sheets. I don’t want to buy a whole roll of Monokote for those small control surfaces and I don’t really want to spray paint them; I wonder if just covering them completely on both sides with those trim vinyl stick sheets would work. Any thoughts from the expert balsaneers out there?

36981D9B-D1C4-4BFC-9A8F-202CDC067D9A.jpeg


F6694122-353D-4881-9CBB-6771BFB9133E.jpeg


20161E3D-3D9D-4DC3-96CD-10555ED7899A.jpeg