FTFC20 Bellanca Aircruiser C-27A by Matagami Designs

Matagami Designs

Master member
@willsonman I drew up some of the wing and tail incidences in SolidWorks. I am assuming Datum is just a line through the CG in the direction of the air stream? It would seem most everything is at 0° incidence other than the main wing which is actually closer to 2°. I don't know too much about the design considerations for these angles but from the bit of research i have done today i believe 2° is considered standard or acceptable. As far as the tail i understand that it is countering the nose down moment created by the center of pressure on the wing so it seems that a negative incidence may help. Looking at my diagram it would appear that thrust will also create a slight nose down moment. This also seems to indicate that negative incidence on the horizontal stabilizer may be warranted. Thanks!
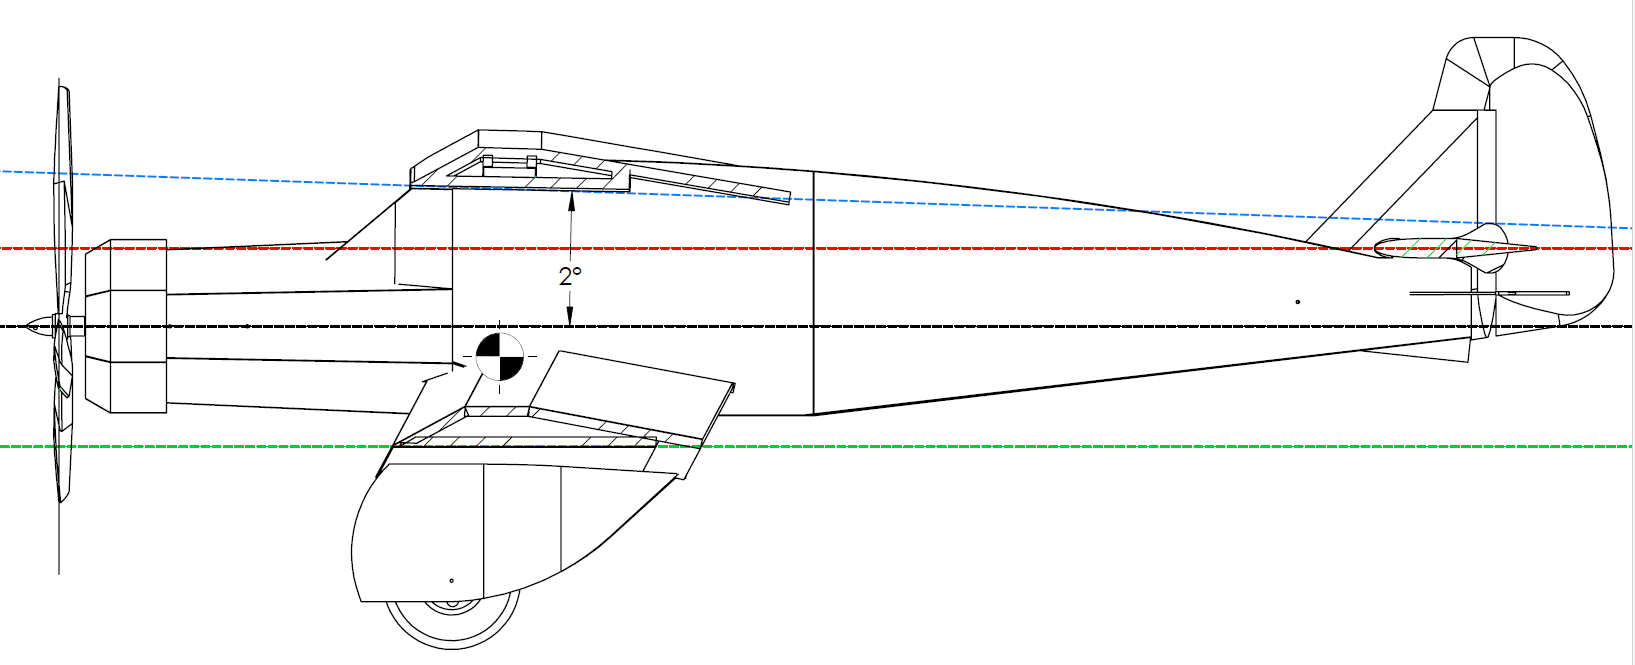
wing incidence v1.PNG
 

Matagami Designs

Master member
So i started looking at wing loading for this model. My AUW is 31 oz with 1800 mAh battery and C pack radial and my wing area is about 346 inches squared. If i include the flying struts the total area is increased to 472 inches squared. I plugged this into a wing loading calculator: http://www.ef-uk.net/data/wcl.htm

This gave me a wing loading of 12.9 oz/sqft and WCL of 8.3 for the main wing and a wing loading of 9.46 oz/sqft and WCL of 5.2 with the flying struts factored in as well. I'm not sure which of these is accurate but both seem to be in the range of a trainer aircraft. (y)

Out of curiosity I also put in the specs of the actual 66-70 model aircruiser from wikipedia. 74880 sq.in. wing area and 128000 oz at 1/2 capacity gives 246.2 oz/sqft wing load and a WCL value of 10.8.:unsure:
 

willsonman

Builder Extraordinare
Mentor
Well, bigger always does fly better but either of your calculations show that wing loading is not a problem. I've flown aircraft with 20 oz/sqft. It will be fine... famous last words, right?
 

Matagami Designs

Master member
I would like to give a huge thanks to @willsonman for helping me get the right flight characteristics for this bird. Thank you for your help yesterday. I will make the adjustments to the plans and will have v1.5 pdf and dxf as well as build instructions out soon. Here is a video of yesterday's flight testing once we got things dialed in.
 
Last edited:

willsonman

Builder Extraordinare
Mentor
It was a fun time and my absolute pleasure to lend a hand. The first flight was short but I still blame Spektrum tech on the second one😜. We lacked a bit of elevator movement and it was a struggle to get her under control. A small outpatient surgery was performed by the creator to move the control rod to the end of the servo horn. Much more control but still did funny things in turns. It would go up and just sort of stop in the sky and then pick up speed again.

I was convinced that a bit of down thrust was needed as when the airplane was slow, I’d pour on the throttle and it would balloon until I got more air speed and she would settle in. We grabbed a few washers to adjust the thrust angle on the motor and placed the battery a bit further forward and she is a PEACH to fly. Nice look in the air. Very predictable and relaxing to fly.

Again, thank you for the opportunity to get behind the sticks on this one.

Joshua
 

Matagami Designs

Master member
It was a fun time and my absolute pleasure to lend a hand. The first flight was short but I still blame Spektrum tech on the second one😜. We lacked a bit of elevator movement and it was a struggle to get her under control. A small outpatient surgery was performed by the creator to move the control rod to the end of the servo horn. Much more control but still did funny things in turns. It would go up and just sort of stop in the sky and then pick up speed again.

I was convinced that a bit of down thrust was needed as when the airplane was slow, I’d pour on the throttle and it would balloon until I got more air speed and she would settle in. We grabbed a few washers to adjust the thrust angle on the motor and placed the battery a bit further forward and she is a PEACH to fly. Nice look in the air. Very predictable and relaxing to fly.

Again, thank you for the opportunity to get behind the sticks on this one.

Joshua

Yes the first flight was quite sketchy going nearly straight up, but you made a nice recovery and no damage was done. I feel moving the CG forward helped in this since it came down with a nice glide slope. As for the 2nd flight i believe that was LOS? i have heard a few complaints about these Spektrum Rx with no antenna and now i have seen it 1st hand. Very luck it wasn't over the corn when it happened. I feel i will look into the recommended lemon brand Rx further since they are cheaper and have dual antenna. Thanks again Josh.
 

Matagami Designs

Master member
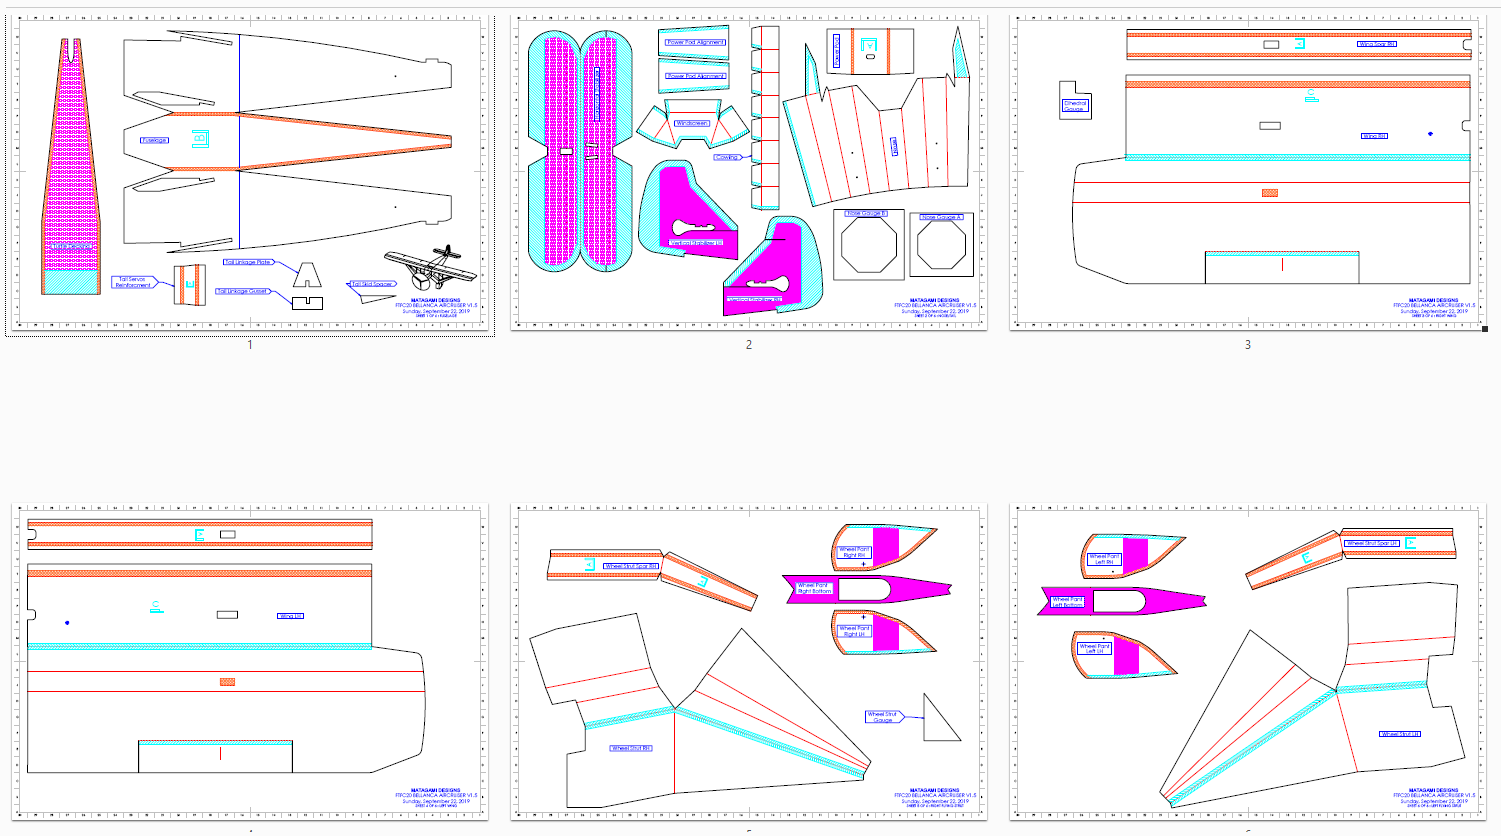
Here are the PDF plans and DXF flies for version 1.5 as well as detailed build instructions.

v1.5 preview.PNG


And here are a few specs:

Flite Test 'C' power pack W/ 1800 mAh battery running 4 channels. 6 sheets, 31 Oz all up weight with a 50" wing span and 30" in length. 9.46 oz/sqft and WCL of 5.2 with the flying struts factored in. Flights were performed swinging a Master Airscrew 10 x 7 x 3 prop (probably overkill). CG is 1.5" from the Leading edge.

Now on to V2.:sneaky:
 

Attachments

  • FTFC20 BELLANCA AIRCRUISER V1.5.DXF
    1,005.4 KB · Views: 0
  • FTFC20 BELLANCA AIRCRUISER V1.5.PDF
    314.9 KB · Views: 0

Matagami Designs

Master member
So here is a sneak peek at V2, includes the C27-A Livery and going to try to roll the nose and cowling rather than fold it, Although i do like the way the V1.5 folded nose/cowling came out i think this will give it more of a scale appearance. This will be my 1st time covering in tape to give the colors. Any tips for this? I will be using colored duct tape since i couldn't find the colored packing tape i have seen others using. I'm not sure how this compares weight/strength wise. Anything else i should incorporate before getting started?

"
 

wilmracer

I build things that fly (sometimes)
Mentor
I know @wilmracer has covered ft foam airplanes with covering film, rather than packing tape. Duct tape is gonna be heavy.

Yeah... I would stay away from duct tape. Not just heavy but generally a pretty rough surface. More drag and a pita to paint.

I've had great luck with applying low and medium temp covering to foam. I have NOT attempted to do it on dtfb with the paper still applied, but you can always peel the paper off the outside surfaces like I did with my seasick.

On my stearman build I found my favorite technique so far. Spray the backing for the covering (in that case monokote) with 3m90 adhesive. Let it outgass and get rid of all propellant for a few minutes and then apply to the parts before shaping and assembly. The covering will have an orange peel appearance at first, but hit it with an iron on low temp and it will smooth out beautifully. Build the plane as planned and then go back and cover any seems with strips of covering applied the same way.

The stearman is approaching 50+ flights (including a nasty midair on the maiden) and the covering still looks great. A lot of people assume it is a balsa plane until I tell them otherwise. Let me know if you need more details on the process but I'd say give it a shot.
 

Attachments

  • 20190824_130848.jpg
    20190824_130848.jpg
    3.2 MB · Views: 0

Sheriff

Active member
Totally different approach: I use acrylics paint to add colors to my builds.

It is pretty cheap (2$ for a 2oz bottle), the choice of colors is immense (including metallic paints), it is water-based so much safer to apply on foamboards.
https://ftforumx2.s3.amazonaws.com/2019/04/222904_38d67cbc4b7ecb234323e29dc46737e8.jpg

The paint often curls the foamboard by shrinking the paper on the painted side, but you can easly correct it later. Simply spay water on the unpainted side and let it dry on a flat surface with a few items/books on top to hold in place.

I use an airbrush, but you could also roll the paint on the foamboard before or after cutting your parts.


Love that you choose to built such a quirky airplane. I have been around too long to still be excited by another P-51D Mustang.. but a Bellanca Aircruiser !! Oui, oui, oui !

Au revoir
 

Matagami Designs

Master member
Thanks for the tips all. I hadn't even considered the surface of the duct tape being rough.

Anyway seeing as this challenge is sort of an homage to balsa planes i went ahead and ordered some olive drab and cub yellow monokote from the local hobbytown store.

That is a great looking stearman @wilmracer. Just curious is the 3m Adhesive necessary? i was hoping to just iron it on while it is still flat and then fold/roll the parts up. I would like to try it without removing paper as well. I realize it keeps things light but removing paper on Ross brand foam board seems to be a PITA compared to DTFB. Thanks
 

wilmracer

I build things that fly (sometimes)
Mentor
Thanks for the tips all. I hadn't even considered the surface of the duct tape being rough.

Anyway seeing as this challenge is sort of an homage to balsa planes i went ahead and ordered some olive drab and cub yellow monokote from the local hobbytown store.

That is a great looking stearman @wilmracer. Just curious is the 3m Adhesive necessary? i was hoping to just iron it on while it is still flat and then fold/roll the parts up. I would like to try it without removing paper as well. I realize it keeps things light but removing paper on Ross brand foam board seems to be a PITA compared to DTFB. Thanks

I dont know how well the monokote will take to the paper covered foamboard. My gut tells me that the heat necessary to get it to stick (especially without the 3m90) may weaken the bond between the paper and the board. In any case even if your bond to the paper is perfect and the heat doesn't weaken the paper/board bond the paper would still be prone to delamination over time. I havent seen that behavior with the covering film directly to the foam.

If you dont use the spray adhesive you may find that you have to take the heat so high to get a good bond that you wrap or melt foam. It will really depend on what temp your covering bonds at. Try it on some scrap first for sure.
 

willsonman

Builder Extraordinare
Mentor
My concern about covering the foam prior to construction is that the shrink from the covering will warp the board and cause creases in the paper. Maybe I'm wrong but I've had a lot of success with building FT parts and then removing the paper. Pretty easily. Then cover with the monokote and be done with it.
 

Aviator08

Flagstaff,AZ
I dont know how well the monokote will take to the paper covered foamboard. My gut tells me that the heat necessary to get it to stick (especially without the 3m90) may weaken the bond between the paper and the board. In any case even if your bond to the paper is perfect and the heat doesn't weaken the paper/board bond the paper would still be prone to delamination over time. I havent seen that behavior with the covering film directly to the foam.

If you dont use the spray adhesive you may find that you have to take the heat so high to get a good bond that you wrap or melt foam. It will really depend on what temp your covering bonds at. Try it on some scrap first for sure.


I covered the PT-17 that I designed / built with Monicote just to see how it would do. Used the lowest setting that would make it stick on and had zero issues. You can see pictures and videos of it Here . Stayed on for over two years. Recently had a "hard landing" and decided to build a new one. ( By the way, I am now selling laser cut kits of my PT-17s and my other designs.)
 

Matagami Designs

Master member
I covered the PT-17 that I designed / built with Monicote just to see how it would do. Used the lowest setting that would make it stick on and had zero issues. You can see pictures and videos of it Here . Stayed on for over two years. Recently had a "hard landing" and decided to build a new one. ( By the way, I am now selling laser cut kits of my PT-17s and my other designs.)

Looks good @Aviator08 just curious did you apply monokote before forming or while the pieces were still flat? also are the roundels monokote as well or something else? i have been doing cheap laser printed decals but i feel like they will look like a joke if the monokote turns out well.
 

Aviator08

Flagstaff,AZ
Looks good @Aviator08 just curious did you apply monokote before forming or while the pieces were still flat? also are the roundels monokote as well or something else? i have been doing cheap laser printed decals but i feel like they will look like a joke if the monokote turns out well.

I put the monokote on after the wings were formed. I also used cheap printer paper for the roundels. Just a side note, The plane was $5 of foamboard, and the monokote was $20. :)