I pulled a Jeff and got a new project: ESM 71" SBD-5 Dauntless

willsonman

Builder Extraordinare
Mentor
Learning from the best in our little community I picked up a new distraction, errr.... project. A club member had this airplane for years now and never flew it. The price was too good to pass up so I jumped at it before he could change his mind. This is the same guy I got my Curtiss Hawk from.

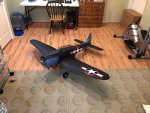
Here she is fully assembled. No flaps or retracts just yet but all the main control surfaces are.
IMG_5941.JPG

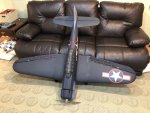
Just a mild size comparison up against our 3-person sofa.
IMG_5940.JPG

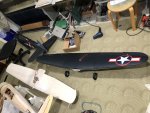
Another size comparison next to the Corsair.
IMG_5939.JPG

The wing root on this airplane is massive. I do NOT have small hands but it makes them look quite puny.
IMG_5942.JPG

The DLE 26cc gasser before it was removed along with the associated hardware like pesky throttle servo and ignition cutoff servo. The whole nose has been emptied now.
IMG_5943.JPG

And she has been safely stashed in the corner until the Corsair nears completion.
IMG_5944.JPG

Watch this space. I do hope to have this one ready to bring to FF this year.
 

Joker 53150

Mmmmmmm, balsa.
Mentor
Cool acquisition, although I'm not sure if I'm being made a good example or bad example! What are your plans with that gas engine? :)
 

willsonman

Builder Extraordinare
Mentor
Gas engine goes back to the owner. I only purchased the airplane. So all of that is now gone and in a box.

Plans for the rest? Mostly just finishing her out. No plans for major detail overhaul. The split flaps will be functional and I'll put in some retracts. I'll make a bomb drop for it eventually but I would like to really do a true trapeze drop like the full-scale. Dummy radial will likely be printed. No plans for any sort of cockpit work. I'll likely do some better decals from Callie as the roundels are not exactly period-accurate for a midway paint scheme.

I love dive bombers and I've missed having one in my hangar.
 

willsonman

Builder Extraordinare
Mentor
I took yesterday off due to snow and I worked on the Corsair but I also got a little done on the Dauntless too.

I looked at the Cowl and the large hole from the gas engine is massively awful. I contacted VQ Warbirds about purchasing anew one. It is listed but on backorder. As ESM is no more it is very doubtful that a new one can be procured. I've considered modeling and 3D printing one but it is so large I MAY have a hard time getting it to fit on the print bed.
IMG_5947.JPG

The instructions call for the center flap to have it's own servo, which I installed. The outer top/bottom flaps are instructed to be linked to the same servo and deployed together. This is completely wrong with how the full scale flaps were deployed. The bottom flaps were all deployed for landings and the top were only used for dive-bombing runs. I took a note from the Corsair build and linked the center flap to the two outer flaps via a steel rod. This is glued into the center flap and moves freely in a hole in the outer flaps. All three bottom flaps now operate together and on one beefy servo.
IMG_5953.JPG

I also installed servos in the wings for the two top flaps. As the hardware was not included to do this I improvised with the materials I had and no issues in that process. The ignition switch that was removed from the gas engine left a hole in the side of the fuselage. I cut a piece of styrene sheet and screwed it in and looks like an access panel. Some paint will be needed to blend it in.

So, the wings are now set. I now need to pull the motor/ESC etc. from the Hawk and put it in the Dauntless. The really fun part will be cutting a hatch and situating a battery tray. It is always the hardest part of these conversions.
 

willsonman

Builder Extraordinare
Mentor
Thanks, Carl. As VQ is the "official" owner of all remaining stock I wanted to buy from them. I never did get a response from them but I check the website this morning to find that they were listed in stock! I snagged one for $42 shipped. Well worth it as reconstructing this one would be major work and not look nearly as nice.
 

Joker 53150

Mmmmmmm, balsa.
Mentor
Congrats on finding a replacement, that'll make a huge difference in the final look of the plane for sure. I've found a lot of cowls and wheel pants available at Fiberglass Specialties in the past, although they don't have anything listed for ESM.
 

willsonman

Builder Extraordinare
Mentor
I forgot to mention that I also spent time seeing if my bomb design was scalable. At 200% of its original size, I would say so. We can use this to toss around at events, like a football but much MUCH more relevant.

Here is a picture that includes my original design, the included ESM bomb, and the 200% of my design. THe body did not quite max out my printer but it was about 50mm close to it on the z axis.
29242759_10103674474355981_1137992915_o.jpg
 

Joker 53150

Mmmmmmm, balsa.
Mentor
Have you considered making a bomb that would break apart upon impact? You could fill it with powder (flour, chalk, talc, etc) and add another level to the realism.
 

wilmracer

I build things that fly (sometimes)
Mentor
So, the wings are now set. I now need to pull the motor/ESC etc. from the Hawk and put it in the Dauntless. The really fun part will be cutting a hatch and situating a battery tray. It is always the hardest part of these conversions.

I'll be curious to see how far forward you need to place the pack to get it to balance. It wouldn't be fun but I suppose it is possible the hatch might have to be in the underside of the new cowling.
 

willsonman

Builder Extraordinare
Mentor
I really do not want to go that way but I've seen it done. I believe if I go with the packs vertically I can get more mass up front than if they were laid longway with the fuselage. Once I get things put together I will play with placement BEFORE I cut.
 
You’re braver than I am. I really don’t like big electric stuff. I have a 192 kV hacker motor and some 5800 mAh 5 cells I’ve been trying to get rid of. Anything big, that needs 10 cells, I am going to fly with gas. My biggest issue is the cost of the dang batteries, and flight times. I have four batteries, two matched pairs, and they were over $65 each. I get about seven minutes flying for a lot of time spent charging. That’s nearly $150 in batteries for two flights a day...(our field doesn’t have electricity, and I don’t have a generator so everything has to charge at home).
 

Joker 53150

Mmmmmmm, balsa.
Mentor
I really do not want to go that way but I've seen it done. I believe if I go with the packs vertically I can get more mass up front than if they were laid longway with the fuselage. Once I get things put together I will play with placement BEFORE I cut.

FT has a video from years ago where they took a P-47 and converted it to electric by doing vertical battery install right behind the firewall. Could be worth a quick watch as reference.
 

willsonman

Builder Extraordinare
Mentor
Rovers: I hear you! Electrics can be troublesome when you get to the larger sizes. The debate of the pros and cons have been well-documented in these forums but I maintain my allegiance to burning electrons for my flying.

Joker: I did something similar to the Jug I used to have. While my Texan and Hawk have the batteries lay flat with the fuselage the CG just worked out that way. The Corsair will likely be the same. The Jug used TWO of those 6600mAh 4S packs that were sold by RMRC a couple years ago at FF. After a couple of flights and crunching the numbers, I could fly that thing for a solid 15 minutes WOT.
 

willsonman

Builder Extraordinare
Mentor
Little bits of progress over the past couple of days.

Motor is mounted.
IMG_5961.JPG

Battery hatch cut... easy peasy with a razor saw
IMG_5965.JPG

Hinges
IMG_5967.JPG

Magnets
IMG_5970.JPG

PLENTY of room for batts. These are the two 5800mAh 3S packs. Another set in parallel could easily fit and give me over 10 minutes of flying time. Need to check CG first but nearing ready to fly. Cowl is in the mail still.
IMG_5969.JPG
 

willsonman

Builder Extraordinare
Mentor
While I wait for the weather to break for further work on the Corsair, the new cowl arrived in the mail. It did not come with the intended ply mounting ring so I used hard balsa blocks and screws to mount it.
IMG_5972.JPG

IMG_5973.JPG

CG was a bit far aft so I added some nose ballast. Lead shot mixed with gorilla glue. There is some additional lead under the motor that I can remove once I get a dummy radial in there.
IMG_5975.JPG

I also got the whole thing assembled and programmed. Throws are all set and flaps are working as intended. One aileron servo was bad so I replaced that. My servo stash is nearly depleted, which is an odd feeling. The rudder pull-pull lines were not tightening properly and the culprit was a fitting in the tail that was not properly tightened. That is now set and I also adjusted the tail wheel to be true with the rudder so that ground handling is more accurate. All that is left is to add some ply for a proper battery box and she will be ready to fly.
 
Dang! Sorry about the lead.... I know you’ve never been a fan of dead weight. I’m not either. I do whatever I can to avoid things like lead, unless it’s a slope glider :D Cool plane! Looking forward to a flight video.