Inherited a Telemaster 40

NC_Flyer

New member
Hey everybody!

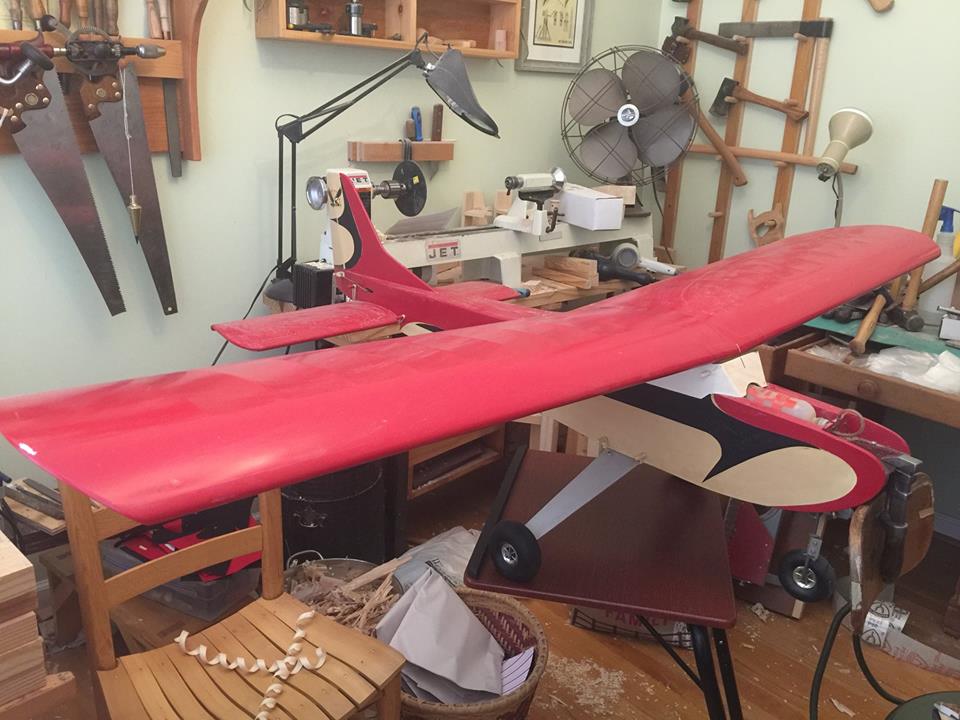
This is my first post here. I inherited a Telemaster 40 in excellent condition (except for some minor issues) from my late step-father and it looks to be about 30 years old. I have a few questions for this group and I'm seeking some advice.

First, we (my seventeen year old son and I) are both neophytes to this hobby, so we decided to get some flying experience before ever thinking about flying the Telemaster. We purchased the "FT Simple Cub Get Started Package" kit with the DX6e radio to build and learn to fly RC planes. After looking at RTF and ARF options we decided the Flight Test kit would give us more flexibility going forward. We are currently having a blast building that plane now.

The Telemaster was an IC plane back in the day and I would like to convert it to EP if possible. As I will have a DX6e radio, I would like to get a compatible Rx for it. I might also want the option of a SAFE enabled Rx from Spektrum, so I have less of a chance of crashing it :) . Any recommendations on a compatible Rx to my DX6e for SAFE tech? As it stands now, there are no Ailerons and would need to be modified to be a 4 channel plane or I could just fly it as a 3 channel and leave it as it is.

Also, as the Telemaster is an older plane, would you even consider flying this old bird again? It does have some issues with the elevators connection (the fabric or material has dry rotted off) to the horizontal stabilizer. The two sides of the elevator are still solidly connected to each other by a metal rod. Any suggestions on reconnecting them to the horizontal stabilizer? I'm not sure what the skin is, it could be tissue or some type of plastic if that helps at all.

This looks like a really nice forum and I look forward to my time here :D

Peace -Aaron
 

Attachments

  • My_telemaster_40.jpg
    My_telemaster_40.jpg
    89.2 KB · Views: 4
Last edited:

Joker 53150

Mmmmmmm, balsa.
Mentor
Welcome to the forum! First up, you've got a good plan in building and flying some inexpensive foamboard planes to learn with, it'll prove invaluable for later success. The Telemaster is an excellent design and an easy (compared to most) plane to fly. Honestly I wouldn't add the ailerons as that will just create a lot of additional work, and if you're not familiar with working in balsa it isn't the easiest task. Updating it to electric power is a good idea, and the conversion shouldn't be too difficult. Once you're comfortable flying the foamboard planes you should be fine with this one without the SAFE, gyros, or other aids. The saying is "Nothing flies like a Telemaster" for a reason! Keep it simple and enjoy a near-perfect design.

Moving on to the covering, if it's brittle, cracked, or falling off you may as well plan on re-covering it. Doing that will also give you a chance to inspect the structure inside. Broken joints can be fixed and you don't have to worry about the covering falling apart in the sky! :) I've bought, stripped, fixed, re-covered, modified, etc numerous planes and yours looks to be in better shape than most of the ones I drag into my shop.
 

Bricks

Master member
Not understanding elevators not attached and dry rot? A picture would really help. As it looks like it is setup for Nitro already that would be the cheapest way to go, as 40 size nitro engines are cheap. Check RCgroups classifieds $35 to $60 can get you a good engine.
 

NC_Flyer

New member
Thanks Joker and Bricks for your responses. There are strips of fabric that attach the elevator to the Horizontal stabilizer (I mistakenly said vert. stabilizer the second time) and they are what has dry rotted. The actual skin on the plane is perfect and in great shape. Here is a picture of the problem area.

elevator_attachment.JPG

Thanks again :)
 

Joker 53150

Mmmmmmm, balsa.
Mentor
I assume those are "CA hinges", which are simply a stiff fabric/nylon/etc hinge that is inserted into the surface and secured with CA glue which wicks into the balsa. The pivot point on the hinge also gets the CA glue, but it cracks off and remains flexible. Does that describe what you may have? It may be in better shape than you think. Maybe...
 

NC_Flyer

New member
Joker, that's it exactly! Unfortunately, they are all broken and need to be replaced. There seems to be a pin at each attachment point on the stabilizer side and the elevator side that is barely visible in the photo. -Aaron
 

Joker 53150

Mmmmmmm, balsa.
Mentor
So whoever built it probably glued the hinges AND pinned them as well, not a bad plan considering the plane was running a glow engine with plenty of vibration and engine oil covering them after a flight.

You could attack them a couple different ways - You could do a little surgery with a blade to see if you can pull the pins out. MAYBE the glue is dried up and the hinge falls out with a little persuasion. Or you could simply cut the remaining hinge material and cut new slots for new CA hinges. If the old hinges are glued you'll probably find all kinds of stubborn glue keeping you from easily re-using the original slots. Depending on the thickness of the stabilizer and control surfaces you may also be able to use a pin-style hinge or barrel-hinge.

If I were doing the work and the original covering is in good shape I'd probably start by seeing if the original hinge material is going to come loose or not. If so I'd do the surgery to remove the pin and try to use the original slot with new hinges and adhesive. If the original stuff is going to fight you I'd just trim it back as far as possible without damaging the covering and cut new slots. Keep in mind that if you cut new slots you could end up running into some of the inner structure which could lead to damage if the glue joints are brittle.

Another option may be to switch over to tape hinges, although the plane may be a bit large for that. Plus other options I couldn't think of at the moment... :)
 

NC_Flyer

New member
Thanks again Joker! I will investigate and try to do the least damage as possible with this repair. I am going to my local RC hobby store tomorrow, I will mention your suggestions and see what they have that can help fix my beautiful plane :) . Peace -Aaron
 

Bricks

Master member
For me I would first determine if the hinges are bad, if so cut the two surfaces apart and slot in new ones right nest to the old ones and not tear anything up.
 
Last edited:

nhk750

Aviation Enthusiast
The covering looks pretty good in the pics. That's a Classic trainer plane and a great first time kit build. I would convert to 3s batter power to keep it light and read some conversion threads on the web, there should be plenty. RCG (Remote Control Groups) website may have some. Check youtube for replacing the ca hinges, it is easy though, just cut the old ones, trim flush, make new slots next to them and install new. You could get fancy and install nylon hinges too. Yes, definitely fly the foam board for a while before trying to fly this one, you don't want to be heartbroken in a crash. Check out lots of videos as there it's lots.
 

rockyboy

Skill Collector
Mentor
Welcome to the forums Aaron!

Others have addressed the structural build stuff quite well so I wanted to chime in on the electric conversion. The recommended motor size on this is a .46 IC, and a flying weight of 6 pounds. Going electric, I like to use the propeller test data at Heads Up RC's website to really understand what a potential motor is going to do for different battery and prop combinations. In this case, I'd recommend the PowerUp 46 620kv

http://www.headsuphobby.com/Power-Up-46-Sport-620kv-Outrunner-Brushless-Motor_p_723.html

Taking a look at the Prop Test Data tab shows that you'll need to be in a 4 cell battery rather than a 3 to be at or above the 100 watts per pound rule of thumb for sport flying with a 13 or 14 inch prop. The manufacturer calls for a 13 in prop so going up an inch shouldn't cause any problems with ground clearance. This motor also allows you to go up to a more powerful battery and greatly increase your power output in the future if you want to start using it as a tow plane for gliders, or a candy bomber, or just get crazy with the vertical climb. :) And at just under $40 it's a pretty affordable choice too.

I'd pair it with a 60 amp esc to make sure you have an appropriate amount of headroom on the electronics - if you run too close to the max capacity of the esc it will start dumping out a lot of heat, which can lead to big problems if there isn't enough cooling. Having 20% or so safety margin helps keep things running cool. I'd go for this one http://www.headsuphobby.com/Sky-Power-60A-ESC-with-Switchmode-BEC_p_2213.html

Note that it does come with a T style battery connector, which isn't very popular anymore. You'll probably need to break out the soldering iron and switch it to an XT-60 connector - or dig around for a good price on an ESC that already comes with the right connector for your batteries.