Krashing Flying Mayhem - The KFM Wing and you

Hai-Lee

Old and Bold RC PILOT
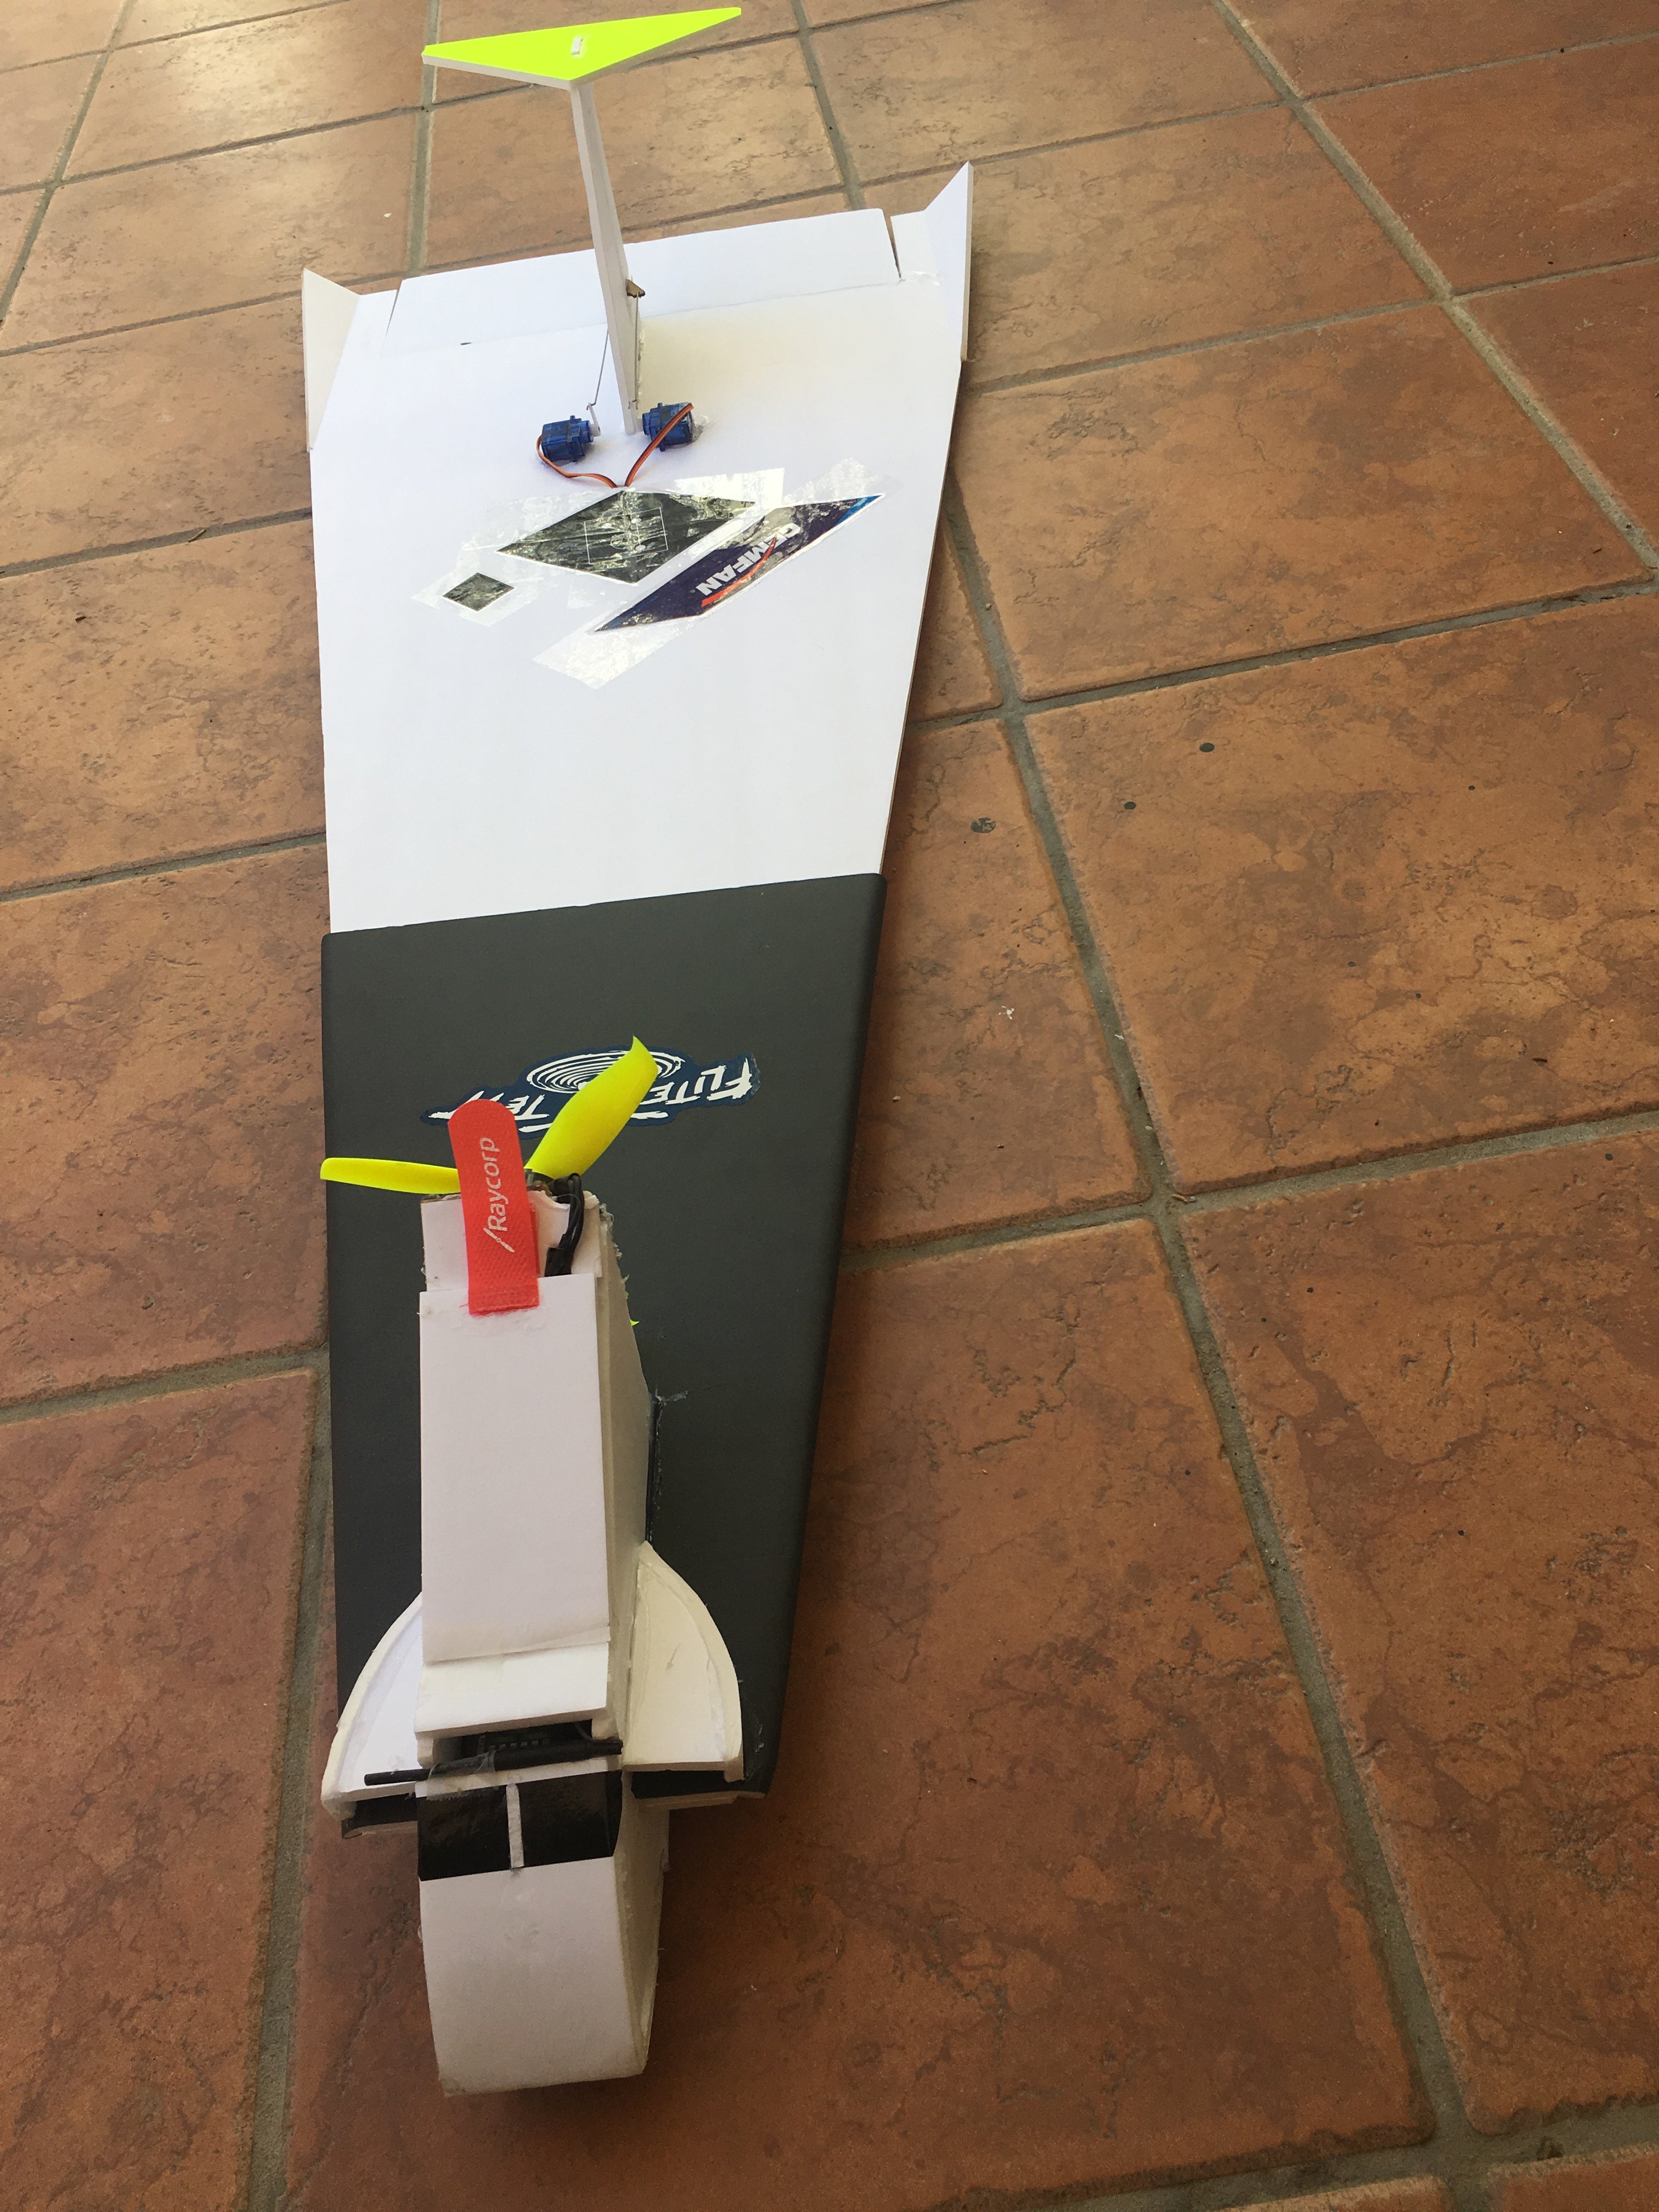
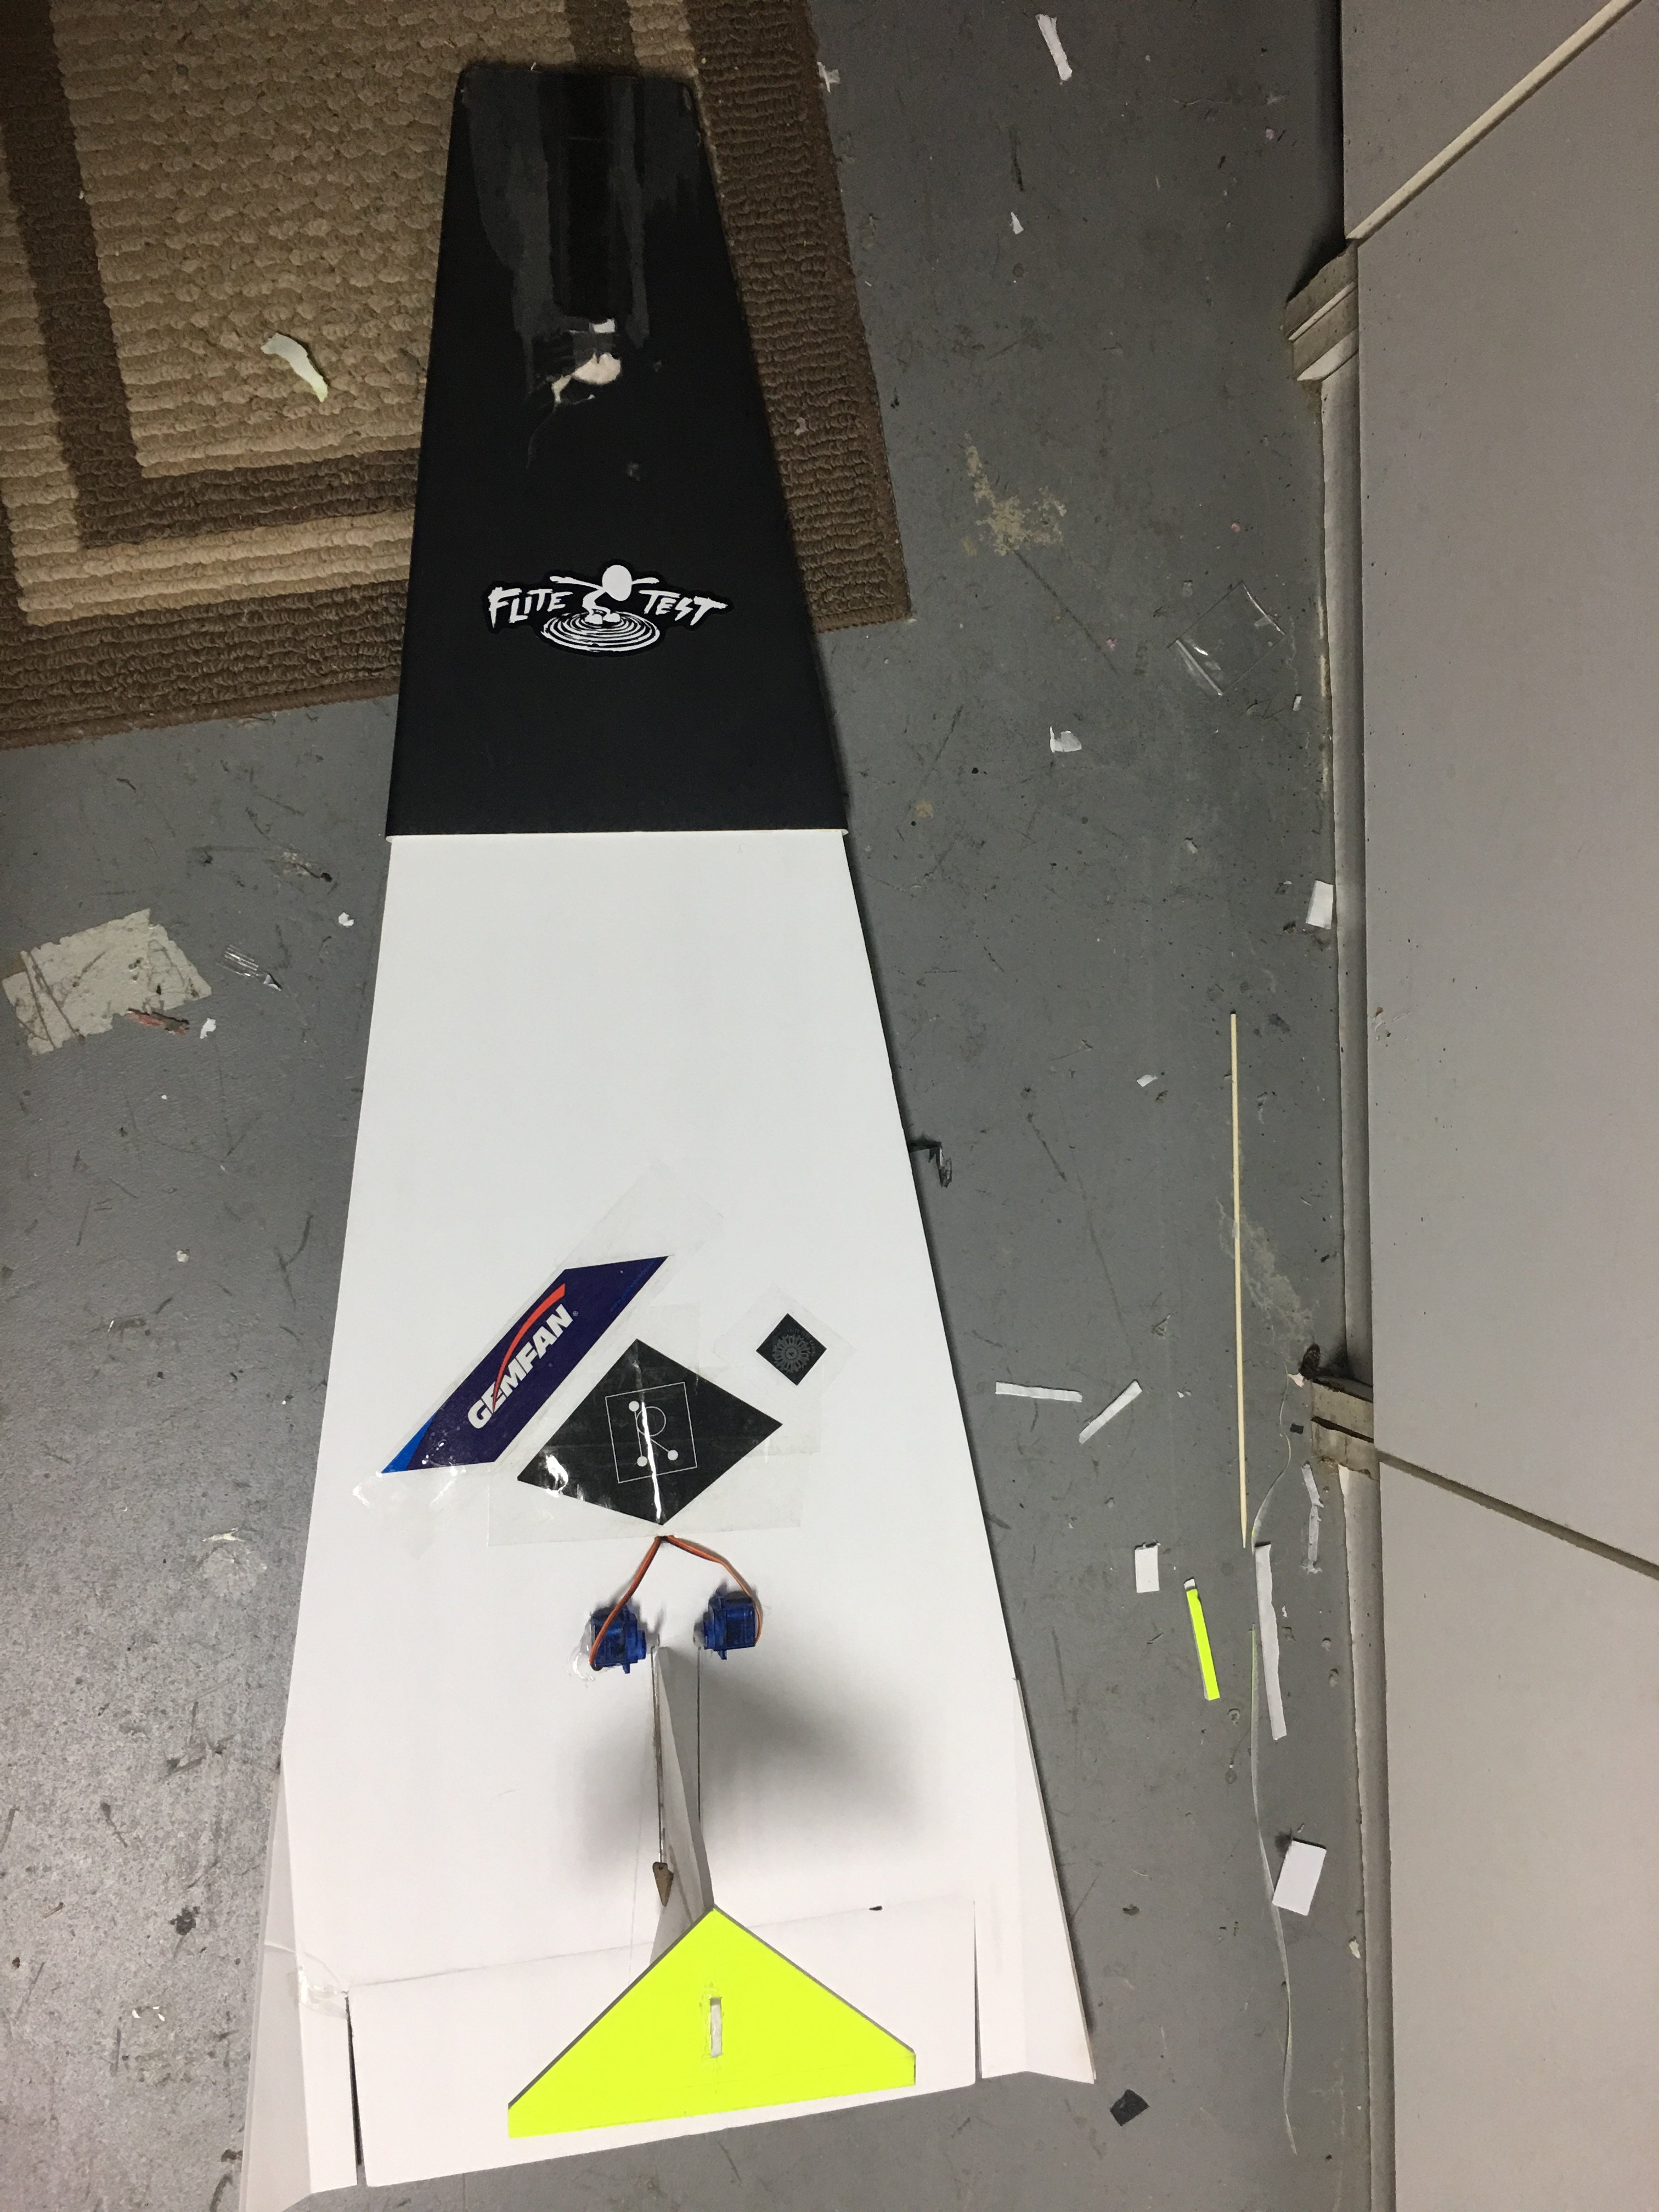
As per the name of the thread if you build fly and crash a KFM wing then please post your story, pics, or videos. This will help with making the wing even tougher over time!

If you actually need to , build, fly or repair your wing this is the thread that hopefully brings it all together for you! Whilst the thread was suggested as a vehicle for the wing found here:- https://forum.flitetest.com/index.php?threads/collaborators-build-1-800-mm-kfm-flying-wing.54085/ , it is equally applicable and open to all other KFM wing types and builds.

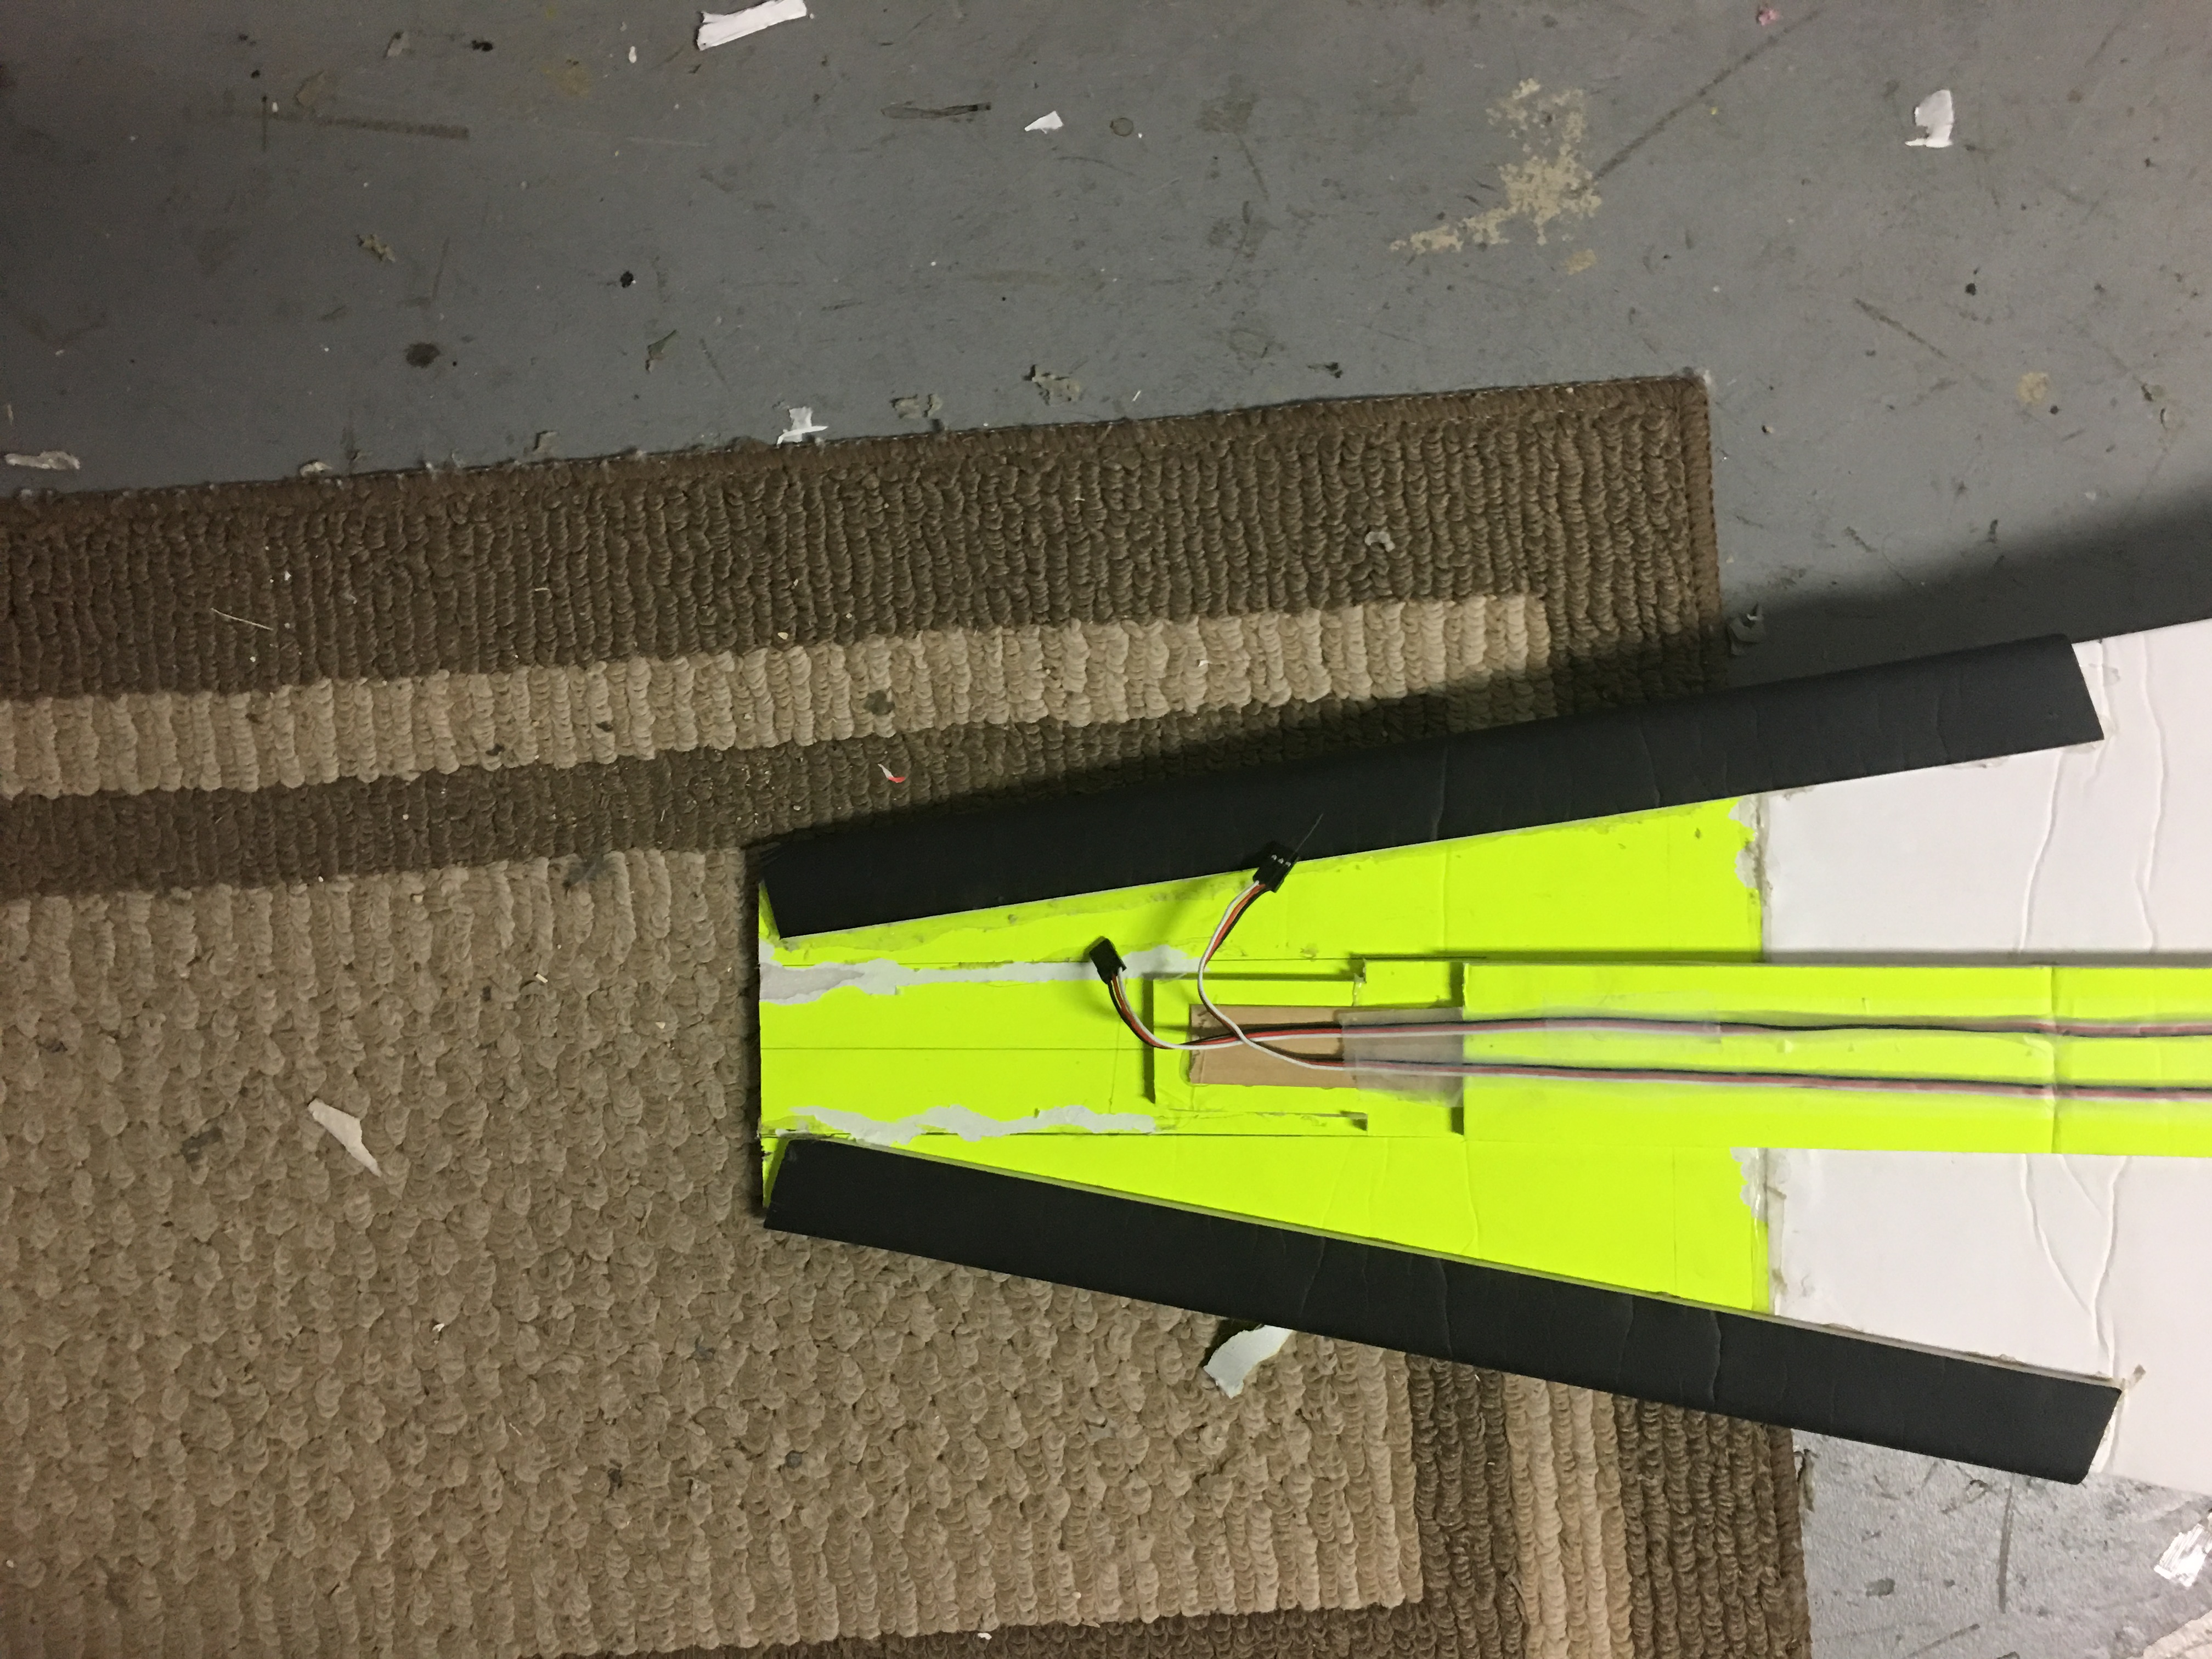
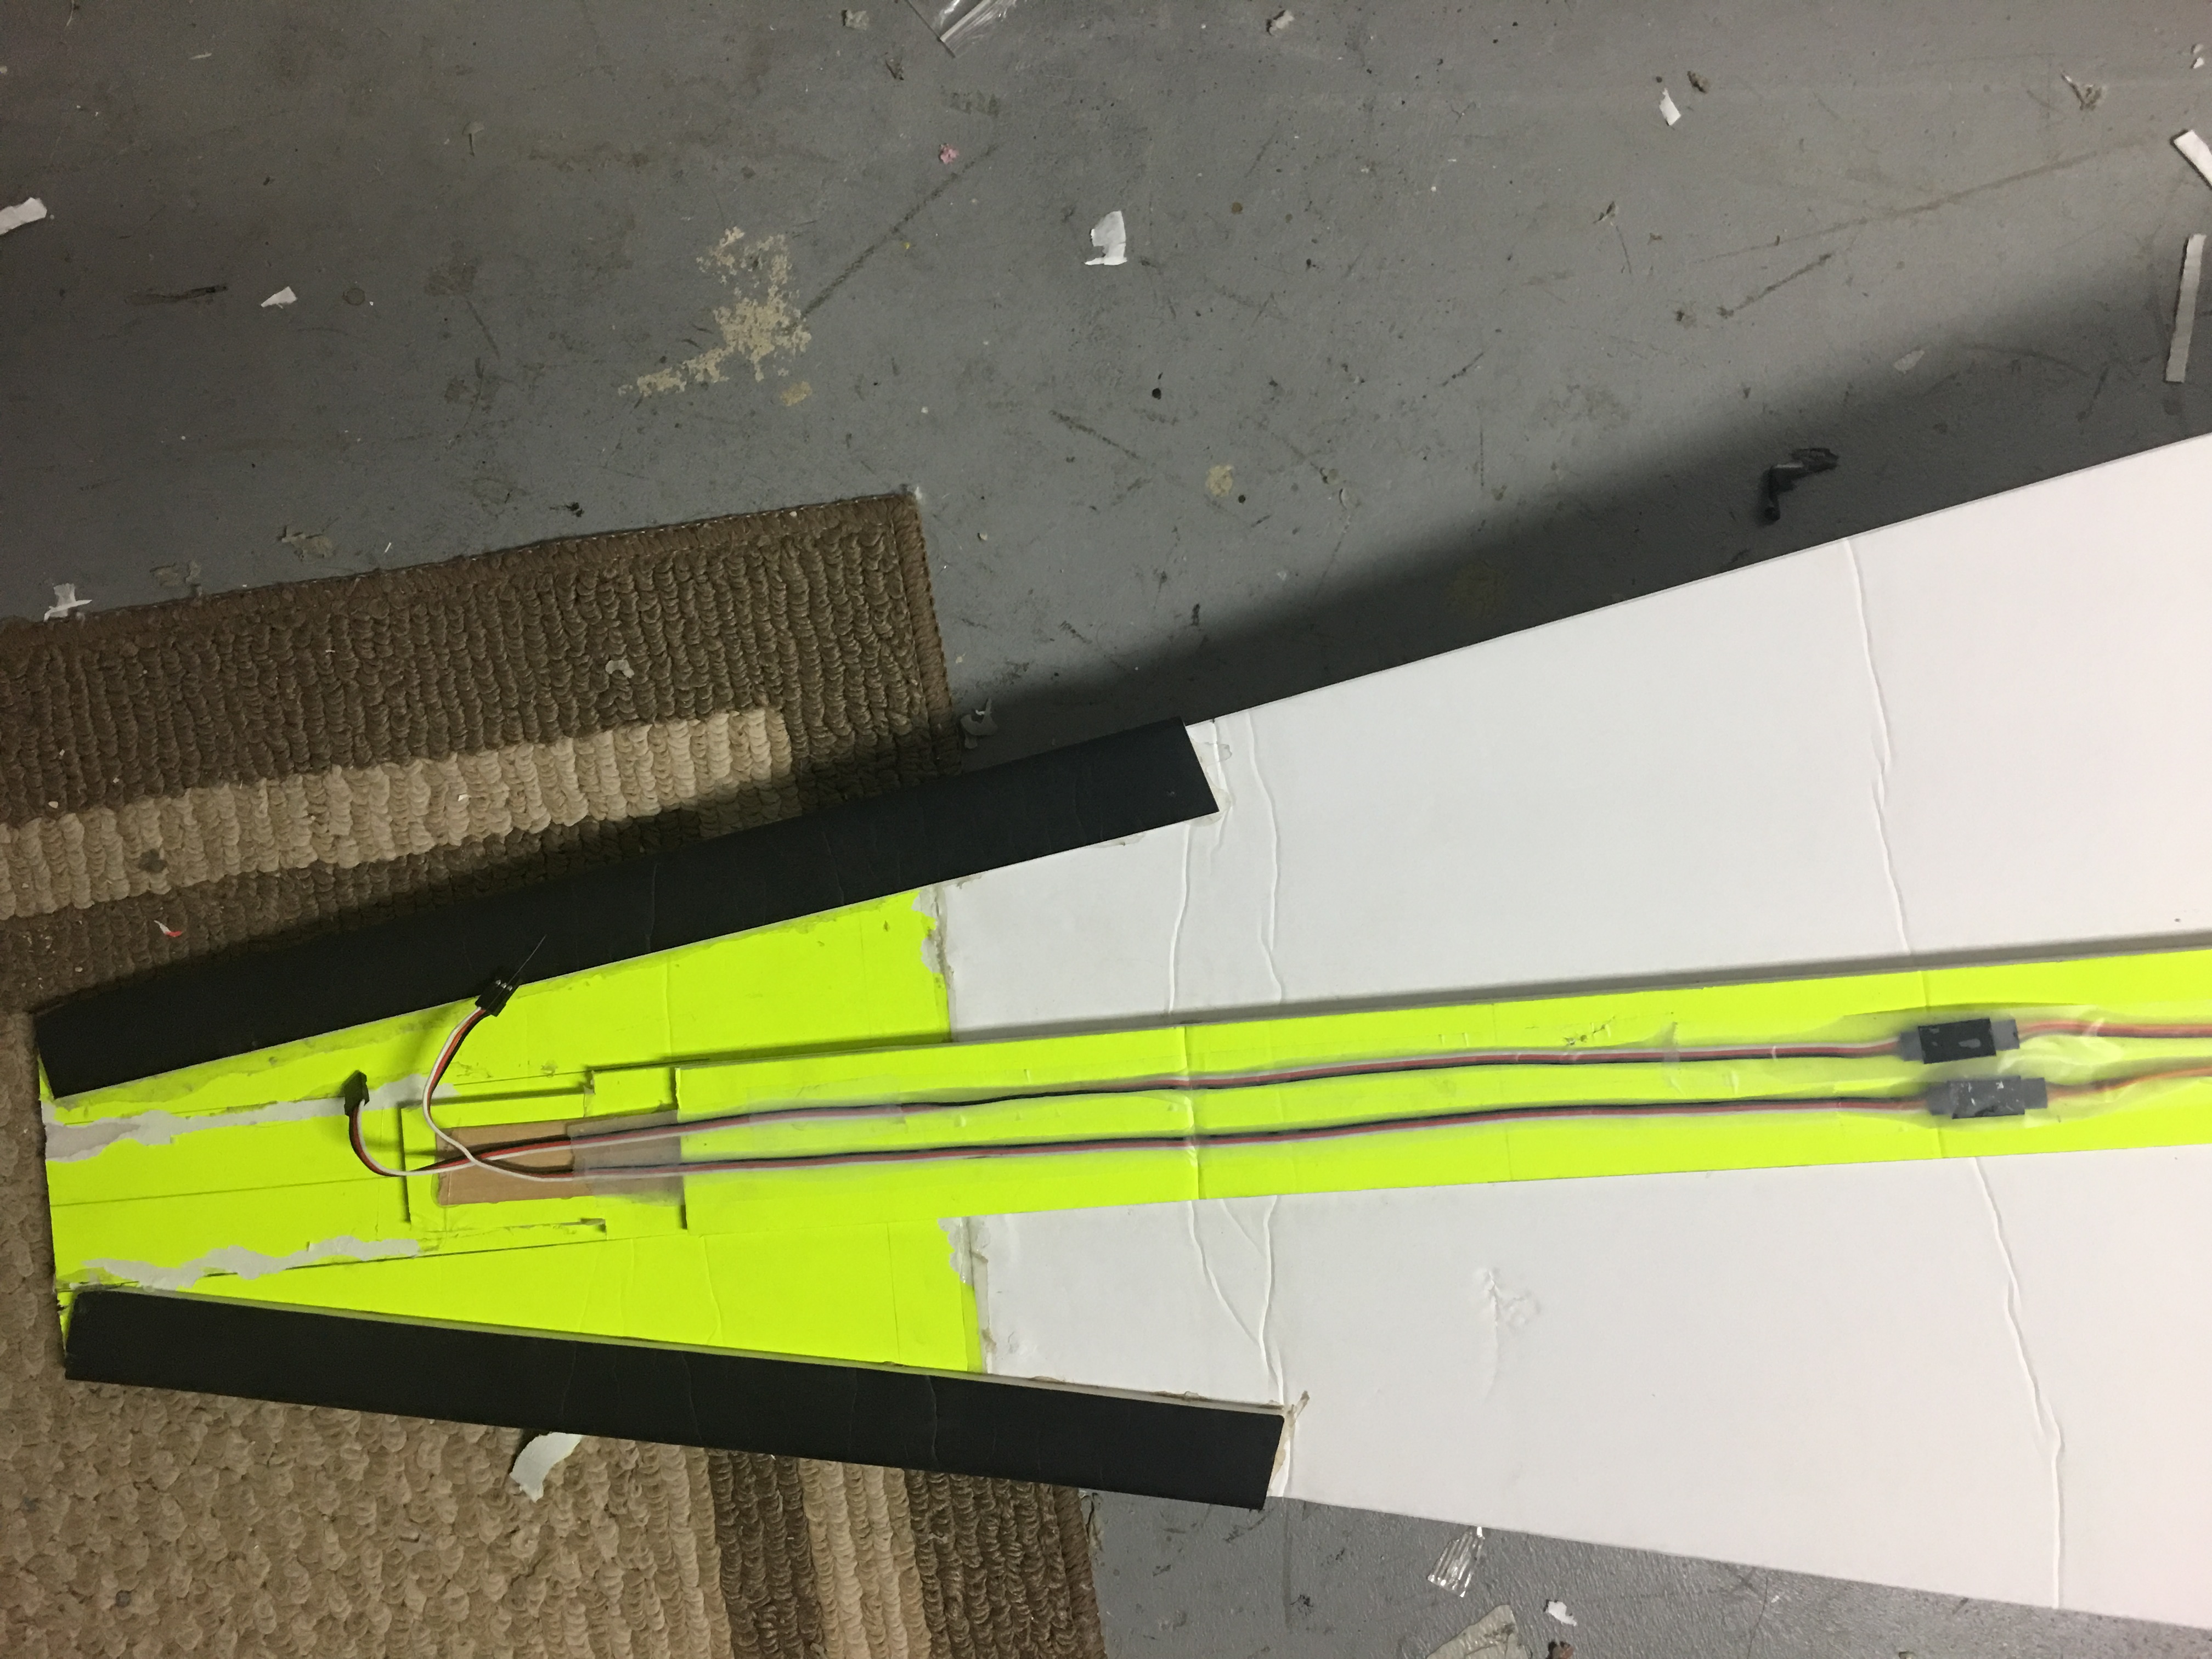
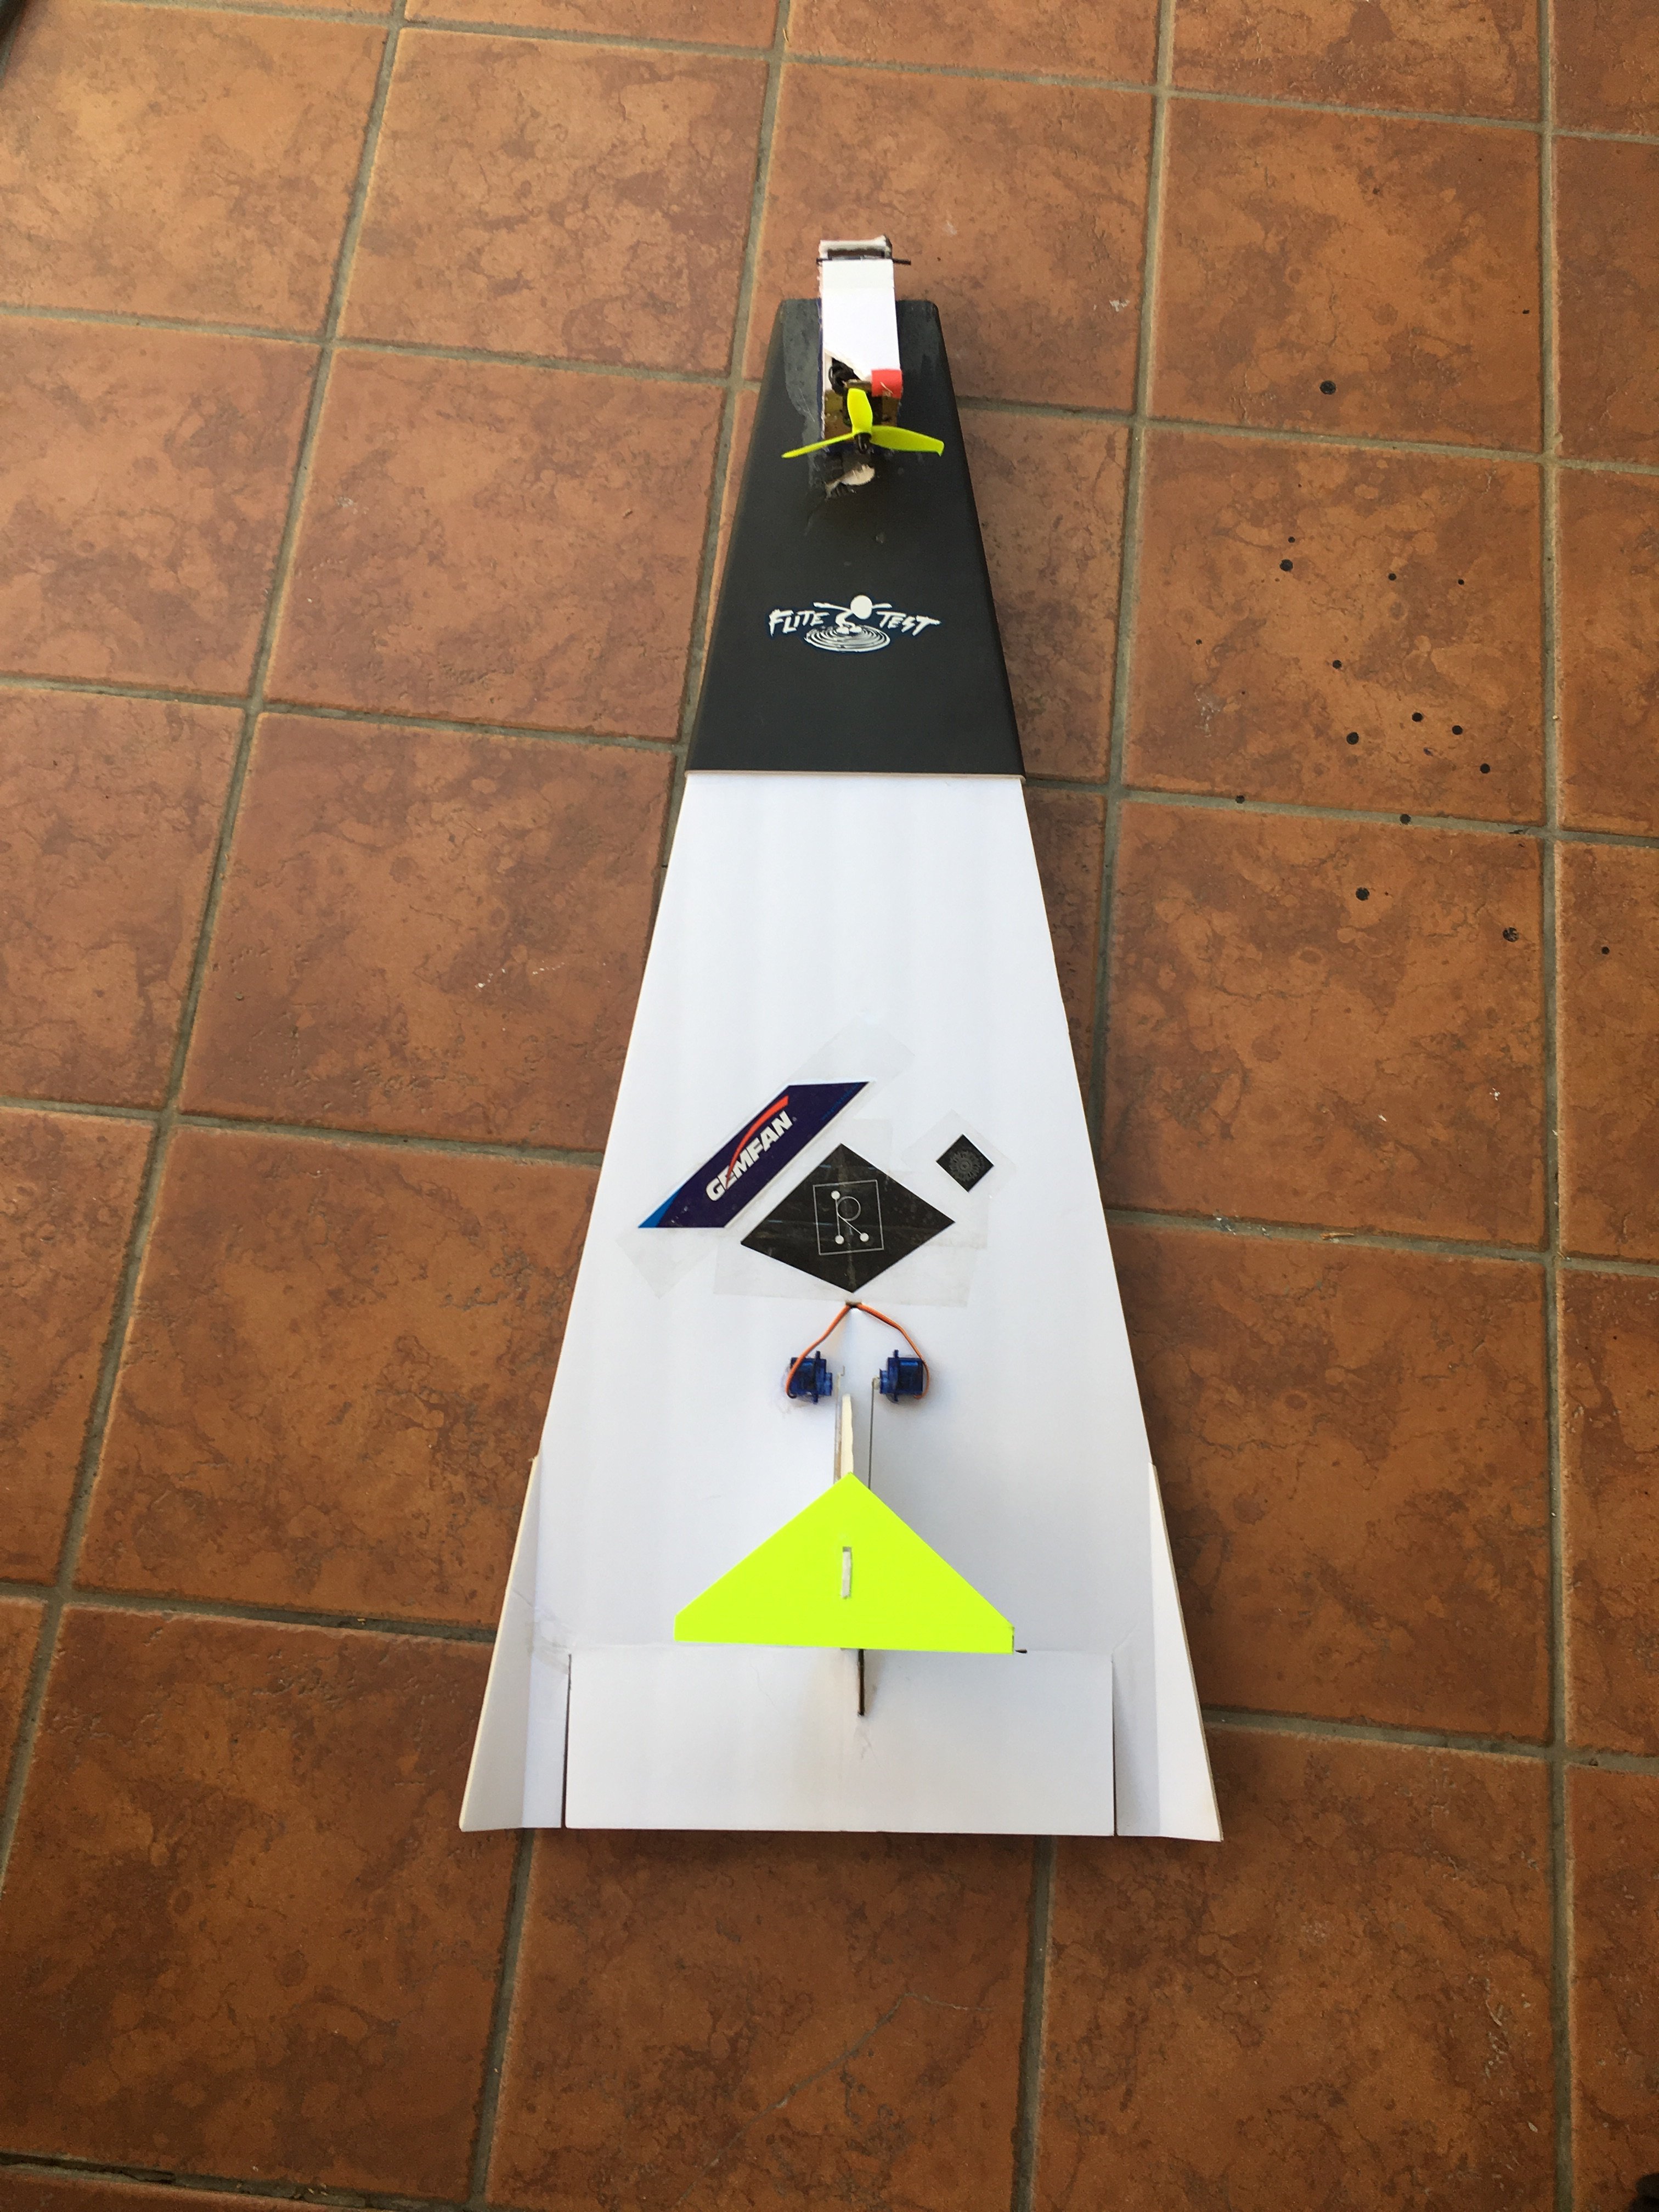
Here is a post of the latest wing reinforcing recommendations for those that fly full throttle into obstacles including the ground!

View of the inlaid CF spar and the 2 Bamboo BBQ skewer sub spars fitted to reduce impact damage or rather to distribute the damage rather than allowing the obstacle to pass through the wing severing it into 2 pieces!

DSCF0034 (3).JPG

I look forward to your adventures, builds, flights and repairs!

Have fun!
 

IanSR

Active member
I made one and it lasted one flight before snapping in half (BBQ sqewers don't make good spars when the offending object is a tree), this was a few weeks back and as I only had on sheet of FT board left I guesstimated one of Bruce's Outlaw 250s which flies much better (same stepped KF concept build in the wing design).

I'll have to wait until I get more FB before building another wing.
 

mayan

Legendary member
Coming back to my promise from yesterday here are somethings that I’d like to see addressed on making the KFM Wing an even stronger airframe than it already is.

Over the last few weeks I put more focus on flying the KFM Wing and have to say that it’s supper fun, fast and already pretty durable to my crashes :). In total I’ve built two already, one that was trashed but ended up being a re-enforcement test dummy :). After which I built version 2 which was re-enforced but not enough I guess :(. Flew the KFM Wing with 35% throttle and even at a 100% on very low passes, and it flew great. I crashed it endless times nose down into the ground at 75-100% throttle, hit a concrete wall with one wing and the plane kept flying great with no major damage done to it. You can check videos of my flying the wing over on this thread: https://forum.flitetest.com/index.php?threads/the-second-part-of-my-journey-the-diary.58013/page-32. Anyhow after a few times of doing this over and over things do break :(. Here are some pictures of the damages I've had with the KFM Wing @Hai-Lee it's up to you to figure out how to re-enforce them :p.

First Version - The part holding the motor broke loose cut a servo wire and did some dents to the wing.
IMG_2927.jpg

IMG_2931.jpg

IMG_2932.jpg

IMG_2936.jpg


Second Version - Crashed into a concrete wall with one wing side, no damage to the wing side do to a BBQ re-enforcer stick that I put on the leading edge, but the motor part did sort of break loose not complete though.
IMG_3332.jpg

Screen Shot 2019-09-11 at 11.52.20 AM.png


And my latest crash, lost orientation and nose dived into the ground at high throttle.
IMG_3564.jpg

IMG_3565.jpg

IMG_3566.jpg


The wing breaking like that has happened to me with the first one I built that why the second one already had re-enforment on the wings sides all the way to the center, like so. Which BTW I don't recommend because it made it hard to pass the velcro straps through, and didn't add any major re-enforment. @Hai-Lee I think I'll do it your way with the BBQ skewer next time :).
fbb6a865-f313-4cd1-aef4-e77965541a71.jpg


I've fixed this wing up already but haven't had the chance maiden it yet after the fix, hope I will on the weekend. You'll be able to check out how I fixed it on this thread The Second Part of my Journey - The Diary later today.

I think the main issue I would address is the motor part breaking off :).
 

Hai-Lee

Old and Bold RC PILOT
Coming back to my promise from yesterday here are somethings that I’d like to see addressed on making the KFM Wing an even stronger airframe than it already is.

Over the last few weeks I put more focus on flying the KFM Wing and have to say that it’s supper fun, fast and already pretty durable to my crashes :). In total I’ve built two already, one that was trashed but ended up being a re-enforcement test dummy :). After which I built version 2 which was re-enforced but not enough I guess :(. Flew the KFM Wing with 35% throttle and even at a 100% on very low passes, and it flew great. I crashed it endless times nose down into the ground at 75-100% throttle, hit a concrete wall with one wing and the plane kept flying great with no major damage done to it. You can check videos of my flying the wing over on this thread: https://forum.flitetest.com/index.php?threads/the-second-part-of-my-journey-the-diary.58013/page-32. Anyhow after a few times of doing this over and over things do break :(. Here are some pictures of the damages I've had with the KFM Wing @Hai-Lee it's up to you to figure out how to re-enforce them :p.

First Version - The part holding the motor broke loose cut a servo wire and did some dents to the wing.
View attachment 142223
View attachment 142224
View attachment 142225
View attachment 142226

Second Version - Crashed into a concrete wall with one wing side, no damage to the wing side do to a BBQ re-enforcer stick that I put on the leading edge, but the motor part did sort of break loose not complete though.
View attachment 142227
View attachment 142228

And my latest crash, lost orientation and nose dived into the ground at high throttle.
View attachment 142229
View attachment 142230
View attachment 142231

The wing breaking like that has happened to me with the first one I built that why the second one already had re-enforment on the wings sides all the way to the center, like so. Which BTW I don't recommend because it made it hard to pass the velcro straps through, and didn't add any major re-enforment. @Hai-Lee I think I'll do it your way with the BBQ skewer next time :).
View attachment 142232

I've fixed this wing up already but haven't had the chance maiden it yet after the fix, hope I will on the weekend. You'll be able to check out how I fixed it on this thread The Second Part of my Journey - The Diary later today.

I think the main issue I would address is the motor part breaking off :).
Apart from the mods already mentioned there are a couple of others that I will get to document later!

First one in to glue a short length of skewer into or on top of the wing TE where the motor cut out is. This is to hopefully stop the prop from cutting into the wing TE at its weakest point should the motor come adrift in future.

The second is to fit a couple of LONG FB wedges as braces in front of the motor mount. For added strength they can be recessed or cut through the top payer of the FB wing. The wedges could have an extra margin of the paper from one side glued over the exposed edge of the FB for extra strength!

As the black FB has a weaker foam cell structure you could even dig out 2 channels through the wing in front of the motor mount all of the way down to the bottom paper layer of paper and fit the wedges into the empty channels. This approach should help to reinforce the weak foam structure with glue and foam cross grain to the direction of the failure by having 4 layers of the glued paper running vertical through the motor mount area. The paper on the wedges would need to either stretch or compress against the glue and foam before failure occurs.

More later if required!
 

mayan

Legendary member
As the black FB has a weaker foam cell structure you could even dig out 2 channels through the wing in front of the motor mount all of the way down to the bottom paper layer of paper and fit the wedges into the empty channels. This approach should help to reinforce the weak foam structure with glue and foam cross grain to the direction of the failure by having 4 layers of the glued paper running vertical through the motor mount area. The paper on the wedges would need to either stretch or compress against the glue and foam before failure occurs.
:unsure: Need more explanation :).
 

Vimana89

Legendary member
The wing on this slender delta uses a customized KFM to join and reinforce it. This plane flew very nicely on maiden this morning despite its ridiculously low aspect. It is a very gentle RET flyer, and very stall proof and forgiving...but I was feeling out trim issues at higher throttle, and I was stupid to turn too sharp too low and went into the nastiest Dutch roll and could not pull up as quick as my smaller models. The nose is a goner and the prop bit into the top of the wing, but the wing itself has only a few creases and no real structural damage on it👍. I am going to carefully remove the remains of the nose and intakes, and replace them, and she should be good to go.
 

Attachments

  • IMG_1088.JPG
    IMG_1088.JPG
    1.6 MB · Views: 0
  • IMG_1092.JPG
    IMG_1092.JPG
    2.1 MB · Views: 0
  • image.jpg
    image.jpg
    1.5 MB · Views: 0
  • image.jpg
    image.jpg
    1.5 MB · Views: 0
  • image.jpg
    image.jpg
    1.4 MB · Views: 0
  • image.jpg
    image.jpg
    1.6 MB · Views: 0

Vimana89

Legendary member
On further inspection, the main cause of this major crash and the massive Dutch roll that caused it during the high g turn was damage to a wingtip from a smaller previous bump, which was also seeming to cause extra trim issues! I let that go and should have inspected better. I saw the small crease there but didn't realize it was ready to rip on the next high G turn! This plane had proven stable and easy to recover, so that extreme a Dutch roll was just uncharacteristic. This makes sense that it was a structural integrity issue. As a RET plane, those wingtips are extra important to my stability and turning. The bamboo skewer reinforcement to this area wasn't long enough, or not the proper way to do it. I'll make sure those are extra strong. I will post progress of the repairs.
 

Attachments

  • image.jpg
    image.jpg
    1.2 MB · Views: 0
  • image.jpg
    image.jpg
    1.1 MB · Views: 0
Last edited:

Vimana89

Legendary member
I know my build is a pretty non-standard KFM, but it is still fun to share my crash and repair experience here, because I have a lot more positive attitude about crashes than I used to. Im a bit mad when it happens, but after I let off some steam I'm good. I filled in the wrinkles on the wing with glue and wiped off with a paper towel. This is probably and amateur method and I saw people talking about stripping paper and re-skin somehow. If somebody might elaborate further on those methods, that would be great.I reinforced the weak points on the wingtips that caused the previous problems. I replaced the nose with a more utilitarian unit without the added intakes. I'm going to try to dial in and fly, but my camera got lost, so unless I find it out in the field today, no video for a little until I get a new one. Any feedback or tips for repair and reinforcement, or how to improve my custom KFM technique is more than welcome👍
 

Attachments

  • IMG_1093.JPG
    IMG_1093.JPG
    1.4 MB · Views: 0
  • IMG_1094.JPG
    IMG_1094.JPG
    2.2 MB · Views: 0
  • IMG_1095.JPG
    IMG_1095.JPG
    1.8 MB · Views: 0
  • image.jpg
    image.jpg
    1.6 MB · Views: 0
  • image.jpg
    image.jpg
    1.5 MB · Views: 0
  • image.jpg
    image.jpg
    995.3 KB · Views: 0

Vimana89

Legendary member
Sorry to blow this thread up with so much stuff. The process is done, repairs are good, and the plane flies better than it did before👍. Could not find my camera out in the field though😫.The extra intakes looked cool, but added weight and drag, so i think this setup is a bit more practical. Well, that was my crash and repair adventure, looking forward to seeing how others handle repairs and rebuilds, and to any tips and advice.
 

Hai-Lee

Old and Bold RC PILOT
:unsure: Need more explanation :).
Sorry for the delay but I have been absorbing the recent events. Anyway I was going to do a drawing but to just take a few pics as I do it was far easier!

A piece of scrap with a 10 mm strip of the foam and paper removed leaving only a single layer of paper which has been wrapped over the exposed foam edge. This was the scrap piece that the motor mount supports were cut from.
DSCF0033 (2).JPG

First motor support piece next to hole through all layers but leaving the bottom paper intact
DSCF0035.JPG

First motor support piece fitted into hole.
DSCF0036.JPG

Second motor support piece next to hole through all layers but leaving the bottom paper intact
DSCF0037.JPG

Second motor support piece fitted into hole.
DSCF0038.JPG

When glued in place they really grab the motor mount and transfer the load onto a far wider area than the original surface glued mount.

Have fun!
 

Vimana89

Legendary member
Sorry for the delay but I have been absorbing the recent events. Anyway I was going to do a drawing but to just take a few pics as I do it was far easier!

A piece of scrap with a 10 mm strip of the foam and paper removed leaving only a single layer of paper which has been wrapped over the exposed foam edge. This was the scrap piece that the motor mount supports were cut from.
View attachment 142827

First motor support piece next to hole through all layers but leaving the bottom paper intact
View attachment 142823

First motor support piece fitted into hole.
View attachment 142824

Second motor support piece next to hole through all layers but leaving the bottom paper intact
View attachment 142825

Second motor support piece fitted into hole.
View attachment 142826

When glued in place they really grab the motor mount and transfer the load onto a far wider area than the original surface glued mount.

Have fun!
That's a very strong looking way to do a basic two piece motor mount(y). There have been a few occasions where I've prototyped low aspect planes like Nutball variants and certain deltas with a tractor configuration(or rear pusher like the wing), and have reinforced the bottom of the wing with a simple spine that would allow me to cut some good channels like that and really embed the mount pieces in there. I've either honestly just glued the support pieces down with no tabs or slots, which is easy to replace and takes all the impact off the motor when it rips off, but the tug from using a tractor regularly wears those out on their own fast without any crash. Either that or smaller tabs and slots, which is as much work as what you show but weaker. This technique is something I'll definitely keep in mind next time a situation calls for it.
 

Hai-Lee

Old and Bold RC PILOT
That's a very strong looking way to do a basic two piece motor mount(y). There have been a few occasions where I've prototyped low aspect planes like Nutball variants and certain deltas with a tractor configuration(or rear pusher like the wing), and have reinforced the bottom of the wing with a simple spine that would allow me to cut some good channels like that and really embed the mount pieces in there. I've either honestly just glued the support pieces down with no tabs or slots, which is easy to replace and takes all the impact off the motor when it rips off, but the tug from using a tractor regularly wears those out on their own fast without any crash. Either that or smaller tabs and slots, which is as much work as what you show but weaker. This technique is something I'll definitely keep in mind next time a situation calls for it.
Done like the above post the motor mount supports not only glue to the motor mount but also glue together the entire 3 layers of the wing around the motor mount area.

Some FB is very weak in the foam cell structure and some versions are actually made with 2 laminated layers of the foam. The supports as shown glue the vertical paper surfaces across all layers almost bonding them into a solid structure. The paper fold over the exposed of the foam actually improves the compression resistance of the supports without adding too much weight!

You could use other materials including ply or even balsa but as the wing was a crash repair it is important to chose a light and adequate material. With luck it should fly again either tomorrow or next weekend!

have fun!
 

mayan

Legendary member
Sorry for the delay but I have been absorbing the recent events. Anyway I was going to do a drawing but to just take a few pics as I do it was far easier!

A piece of scrap with a 10 mm strip of the foam and paper removed leaving only a single layer of paper which has been wrapped over the exposed foam edge. This was the scrap piece that the motor mount supports were cut from.
View attachment 142827

First motor support piece next to hole through all layers but leaving the bottom paper intact
View attachment 142823

First motor support piece fitted into hole.
View attachment 142824

Second motor support piece next to hole through all layers but leaving the bottom paper intact
View attachment 142825

Second motor support piece fitted into hole.
View attachment 142826

When glued in place they really grab the motor mount and transfer the load onto a far wider area than the original surface glued mount.

Have fun!
That mod will go on my next one :). Thank you for the detailed reply :).
 

Hai-Lee

Old and Bold RC PILOT
Some people are never happy!

I had built a replacement wing for when the owner of the repired wing had finished crshing and wanted to have a fresh wing to play with. Well he now wants to have a glider for cliff flying, (he still has some control issues so I decided to finish out the spare wing as a glider. Sadly it is quite heavy and a little small but it can be modified as something to play with quite simply. A purpose built version would be far far lighter!

Anyway the plan is to use a 500 mA 2S battery plugging directly into the Flysky Rx, (a 8.4 Volt version of the iA6B), and 2 servos of course.

Here is the blank awaiting the electrics
DSCF0035.JPG

Here is the roughed out nose pod
DSCF0038.JPG

Nose pod fitted underneath
DSCF0036.JPG

Or the nose pod fitted atop the wing.
DSCF0037.JPG

As I will be extending the keel to support the nose I will be going with the pod atop the wing.

More later as I progress.

Have fun!
 

Hai-Lee

Old and Bold RC PILOT
A little more progress!

Added the lengthened keel/landing skid.
DSCF0035.JPG

Attached the Pod to the wing and skid.
Top view
DSCF0038.JPG

Bottom view
DSCF0037.JPG

Side view
DSCF0036.JPG

Next thing is to start the fitting of electrics but I will wait to see the owner before I get too involved! Additionally this is currently a mock-up and the pod profile may be adjusted prior to the fitting of the electrics, hatch, equipment compartment, and of course the sealing and painting! He will either reject or sign off on it tomorrow.

Have fun!
 

Hai-Lee

Old and Bold RC PILOT
I test flew the bird yesterday our time and it glides but due to the KFM wing it does still loose speed quite quickly. I launched it via a ground run bungee and it glided about 50 metres from a 10 metre release into a 20mph headwind.

I was rather happy! maybe I have invented a sort of airborne golf game:unsure:. Launch it, walk to where it landed and then relaunch it ad infinitum!

Here is the bird as flown with a pic of the simple electrics setup! (The Rx can handle 8.4 Volts as it has an on board regulator).

DSCF0041.JPG

DSCF0036.JPG

DSCF0035.JPG

Have fun!
 

jross

Well-known member
Sorry for the delay but I have been absorbing the recent events. Anyway I was going to do a drawing but to just take a few pics as I do it was far easier!
This is how I mounted my motor on my KFM. Didn't like the way it looked without. That wing has been in the air for 6 months now and has a couple of nicks. Survived a couple of tree landings and subsequent recovery efforts. The trees sustained more damage than the wing.