Making Balsa Dust: Building the Mountain Models Dandy Sport

Billchuck

Senior Member
Thanks to the vile influence of all the balsa peddlers around here, and especially this thread over here, I ordered the Dandy Sport from Mountain Models. It showed up Friday and I got started on my first balsa build today. After a little sanding, a little gluing, and a little more sanding, I ended up with some completed tailfeathers.
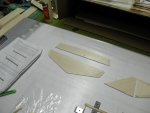
Bill-Dandy-001.JPG
Bill-Dandy-002.JPG

Assembly was clear and obvious. The pieces can only fit together one way. You just sand off the sprue nubs, glue the edges and clamp them together. Preparing the leading edges of the rudder nad elevator was a bit fuzzy, though. "Sand a 45 degree bevel in the leading edge", with no indication of which side of the elevator is "up" or which side of the rudder to bevel. I guess from the instructions that it doesn't actually matter for either, but it would have been nice to make it clear.

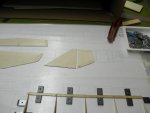
After getting that finished up (for now, it still needs paint or covering) I started on one of the wings. This is pretty clear as well. The parts aren't labeled, but you can easily identify them by size and shape. I cut a piece of scrap balsa off the sheet that held the vertical spar and slotted all the ribs onto it to align them into a block. Some quick work with a sanding block took all the sprue nubs off and cleaned them up. I jigged everything up on top of the plans, test-fit it, then glued most of it up. The lower horizontal spar isn't glued in place yet, I'm waiting for the glue to dry, then I'll flip it over and glue on the lower spar.

Bill-Dandy-003.JPG

More will follow as I make progress.
 

Joker 53150

Mmmmmmm, balsa.
Mentor
Congrats on a great start! The side to bevel doesn't really matter, I'd usually bevel the bottom so it looks better from the top but that's just me.

How is the quality of the cutting? Are you using the SoLite covering from MM? The lightweight structure wouldn't handle the standard heavier stuff well, and the lighter you can build it the better it will fly.
 

Joker 53150

Mmmmmmm, balsa.
Mentor
Oh, and if you think there are areas on the instructions which aren't clear you'd be amazed at what other companies call "instructions"! :). Mountain Models is far above average with their documentation. The Dandy instructions were probably made a decade ago. Some companies just do things right.
 

xuzme720

Dedicated foam bender
Mentor
Normally, the bevel is the same top and bottom, or left and right, on balsa. That means the point of the bevel is centered on the thickness of the control surface instead of at the surface plane. That might be why they don't detail which side to put it on. It shouldn't matter if you do it like the foam builds though.

F4Build-090.JPG
 
Last edited:

Joker 53150

Mmmmmmm, balsa.
Mentor
MM calls it out with a bevel only from one side, possibly because the wood is thin and beveling both sides wouldn't be as effective as it is on larger stock. On these parts I agree with the instructions because it also makes it extremely easy to do a very clean taped hinge on one side. I beveled both sides on my MM Switchback but wouldn't do it like that again.

In reality either way would work. The instructions are good at showing solid old-school basic construction to get the plane in the air.
 

Billchuck

Senior Member
Yes, the instructions call for tape hinges and I figured that meant only one bevel rather than a taper. I think I'll leave it as-is, it shouldn't make much of a difference.

For the covering, I went with solarfilm because of the larger color selection.

It's all laser cut, and so far I haven't seen any issues. The tabs holding the parts to the frame are tiny and easily sanded away.
 

xuzme720

Dedicated foam bender
Mentor
It's a nice looking kit. I didn't know the control surfaces get tape. That's a new for me on a balsa build. But the side really shouldn't matter anyway being that thin.
 

Joker 53150

Mmmmmmm, balsa.
Mentor
I like the 3M Blenderm (?) tape for hinges on the thinner wood. Quick and easy, and it stays very flexible. Hobby King sells a couple different widths.
 

xuzme720

Dedicated foam bender
Mentor
I bought a case (12 rolls) of it a couple of years ago, and I think I might have used 2 rolls so far. That stuff is awesome and goes a long way!
 

Billchuck

Senior Member
More progress, but no photos at the moment. The wing is complete except for covering. Unfortunately, the dihedral did not come out right; when the center is sitting flat, one wingtip is about 1/8" higher than the other. Maybe I can pull it even when I shrink the covering, but I'm not sure. There are a couple things I should have done differently in construction:
  • I should have used a straightedge to ensure the spar was exactly straight when jigging things up, rather than depending on the lines on the plans.
  • I should have measured the angle where the spar bends to determine what the dihedral should have been, and propped both sides up appropriately to hold that angle. I depended on the shape of the parts where the spar center ties together, and I shouldn't have.
It would have been nice for the instructions to tell me what the dihedral angle is supposed to be, or to tell me something like "use a 2" high support X" from the center" or "use a Y" high support at the third rib" to ensure the correct angle.

I will probably order a replacement wing so I can get it right. If nothing else I can use this wing to practice covering. :)

Another thing I need is a dust collector; balsa dust gets everywhere. It should be easy, I just need a box with a fan at the back and a furnace filter at the front. I can set it on my work table right behind the building board and let it draw the floating dust into the filter.
 

Joker 53150

Mmmmmmm, balsa.
Mentor
I'd just use the wing as-is, even with the dihedral a little uneven. This isn't a high-performance plane, it's a slow-fly floater so I'm betting it would work just fine. To even it out once the wing is on the plane you could simply shim one side slightly at the fuselage which would even it out.

For the dust, I'm with you on that...! I try sanding as little as possible, and the better kits usually mean there is less sanding to do in the first place. On areas that traditionally need a lot of sanding, such as leading and trailing edges, I use a balsa plane to remove as much material first before sanding. Shavings are no problem, other than the fact that I track them all over the house after making them!
 

Billchuck

Senior Member
I thought about shimming the wing, and I'll probably do that to get it flying as soon as possible. Unfortunately, I'm a bit of a perfectionist and I want to get it right, so I'll build a new wing afterward.

Piled dust isn't a big deal, I can vacuum that up easily. It's the floating stuff that is an issue, I really don't want to breathe that. It's pretty easy to make a small dust collector, I'll knock together something like this but designed to sit on the table and blow air out the back.
 

Joker 53150

Mmmmmmm, balsa.
Mentor
Floating balsa dust is horrible, I've had difficulty breathing for a few days after inhaling some of it. That box in your link is incredible! Way more involved than I'd ever do, the guy certainly did a great job!

My thought was to simply make a small down-draft box attached to a small shop-vac. It would be noisy, but should pull a lot of dust off the parts. Heck, even simply turning on the vac and leaving the hose near the parts being sanded would help. I'll need ear plugs as the vac is noisy, but I don't spend that much time sanding so it wouldn't be too bad.

Add this to the list of stuff I want to do and SHOULD do, but probably won't get around to doing. :)
 

Billchuck

Senior Member
If you got a box fan and a furnace filter the same size, you could probably just tape the one to the other and set it up right next to your work surface. And it's much less likely to suck away small parts into oblivion. :D
 

Billchuck

Senior Member
I've made some more progress over the last few days, despite having to clear off the work table for Saturday. I needed it for its original purpose, a game table. On the bright side, that means all the other detrius on the table got put away as well so it's not as much of a fight to work now. :)

I finished up the right angle jigs I cut earlier and have put them to use jigging up the fuselage in preparation for gluing. I didn't get any in-progress shots along the way, it's something I forget when I get down into a project. So, here's where I finished up this evening:

Bill-Dandy-004.JPG

The side reinforcements and fuselage formers are glued in place, but the sides are not glued yet. I'll look at again tomorrow evening to make sure I didn't miss anything important, then start gluing.
 

Joker 53150

Mmmmmmm, balsa.
Mentor
I really like those magnetic building boards - someday I need to invest in one! Using the square bar stock is also a great idea, guaranteeing that the side will be nice and straight.
 

Billchuck

Senior Member
My board is. 2'x4' piece of 3/4" MDF from Home Depot with a piece of sheet steel on top. I simply called up a local sheet metal roofing place and asked how much a flat 2'x4' piece was. They told me $10 and when I told them I needed it absolutely flat they cut several pieces and let me take my pick. I used spray adhesive to fix the two together.
 

Billchuck

Senior Member
Today's progress looks just like yesterday, so go look at that picture. :) I glued the fuse sides in place one at a time, returning it to the jig to keep it in shape while the glue dried.

In between, I played with my covering iron and some scrap balsa to get a feel for how covering goes on. I'll start covering the wing soon. Since I want to rebuild it anyway, I won't feel too bad about doing an ugly job on it. It will be a learning experience. :)
 

Billchuck

Senior Member
And as usually happens when I'm working on a project, I get so caught up in working that I forget about the documentation. I realized I hadn't taken any pictures for a while, so here's where I'm at.

Bill-Dandy-005.JPG

Fuse, tail feathers, and control surfaces are all covered. I'm gluing the horizontal stab in place, and the vertical will follow once this is dry. I need to glue in control horns, and such, and do the scariest part: cover the wing.

Bill-Dandy-006.JPG

Because I can't do anything the easy way, I'm going to try to do a two-color scheme: the cream color of the fuse on the top and front of the wing, with dark blue for the back of the underside (from the spar to the back). Maybe I'll screw it up horribly, but hey, I have another wing ordered anyway, so the worst that can happen is that I'll have to build that one before I can fly the plane.

For those who want to give this a try, I missed an important fact. Before you order a motor, figure out where the motor will sit and be sure to get one that will fit. This model uses a stick mount, and the motor bell sits inside the nose of the fuse rather than out front. The motor I bought to use with this plane was too big. I ended up using a left over Blue Wonder from one of the powerpacks that Lazertoys sells. Getting the mount from the other motor to work with this one required some creativity to fabricate an adapter, but it works and it fits.

Tasks left:
Cover the wing (AIEE!)
Mount the control horns
Attach the control surfaces
Rig the servos and remaining control rods
Solder up the connectors on the motor and esc
Build the landing gear

And... that's it. It shouldn't take much once I have the wing finished. We'll see how much I can complete before my holiday travels start.
 

Billchuck

Senior Member
Well, that was quick.

I finished the plane up this afternoon, then took it to the back yard to do some glide testing to make sure everything was in order. I was having fun tossing it into the air and controlling it down, it was working well. Then a gust caught the plane wrong, bringing it down nose first and hard on the cement patio. The battery tray and the motor mount came loose, breaking three fuselage formers in the process.

It's certainly fixable, I just have to cut open the top front off the fuse and glue the various pieces back in place. Unfortunately, I was going to take it with me tomorrow to my Dad's place for the holidays. I don't have time to do everything else I need to do and fix it the plane before I leave in the morning. Le sad.

Photos later, when I'm less annoyed.