Monte.C
...
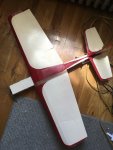
So I got a request for these plans, then I decided I should post them out in the open here, right? This is the first and only plane I've flown so far, and it turned out to be a great trainer.
30" wingspan
1806-2280 motor
850 3S
4 channel
thrust angle 2-3 degrees right, 5-6 degrees down
Plans HERE
Notes & photos on ways to secure the wing HERE
Lots of crashes but that's user error, not the plane's fault! A bunch of bamboo skewers and Gorilla Glue and it still flies like new. Flies like a champ on the 1806 A-type motor. I've tried it with a 2S and it seems like it would fly fine, but I like the responsiveness I get with a 3S.
Pretty good video HERE
It's a simple box fuse with a wing on top, and it's easy to customize any way you want.


I think it needs more tailfin, so I edited the plans to fix that.
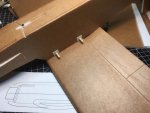
For the wing tie-down I would suggest rubber bands & bamboo skewers. I used an internal structure that I like a lot but it's a little hairy to build, it has to be strong and very precise so the wing doesn't slop around. Here it is on another plane:


The fuselage begs for some reinforcement inside of the sides, right under the wing from in front of the leading edge to behind the trailing edge. You could do this with bamboo. You could use a foamboard doubler in there but that will make battery access harder.
Popsicle sticks glued in should work well to reinforce the wing joints. For me the ideal solution is to laminate another layer of brown paper along the joints on the underside of the wing with medium or thick CA.
If you want help modifying the wing or something, let me know and we can draw it up.
30" wingspan
1806-2280 motor
850 3S
4 channel
thrust angle 2-3 degrees right, 5-6 degrees down
Plans HERE
Notes & photos on ways to secure the wing HERE
Lots of crashes but that's user error, not the plane's fault! A bunch of bamboo skewers and Gorilla Glue and it still flies like new. Flies like a champ on the 1806 A-type motor. I've tried it with a 2S and it seems like it would fly fine, but I like the responsiveness I get with a 3S.
Pretty good video HERE
It's a simple box fuse with a wing on top, and it's easy to customize any way you want.


I think it needs more tailfin, so I edited the plans to fix that.
For the wing tie-down I would suggest rubber bands & bamboo skewers. I used an internal structure that I like a lot but it's a little hairy to build, it has to be strong and very precise so the wing doesn't slop around. Here it is on another plane:


The fuselage begs for some reinforcement inside of the sides, right under the wing from in front of the leading edge to behind the trailing edge. You could do this with bamboo. You could use a foamboard doubler in there but that will make battery access harder.
Popsicle sticks glued in should work well to reinforce the wing joints. For me the ideal solution is to laminate another layer of brown paper along the joints on the underside of the wing with medium or thick CA.
If you want help modifying the wing or something, let me know and we can draw it up.
Last edited:


