
You are using an out of date browser. It may not display this or other websites correctly.
You should upgrade or use an alternative browser.
You should upgrade or use an alternative browser.
Mighty Mini Gloster Gladiator Mk II - Swappable - WWII Biplane Fighter
- Thread starter localfiend
- Start date
Capt_Beavis
Posted a thousand or more times
That is looking good, so when are you going to design that Howard for me?")
That is looking good, so when are you going to design that Howard for me?
Thanks, and Howard? What did I sign up for now?
It's late and time for bed but I think I got everything figured out except for the Canopy. It's looking pretty good so far, but won't be quite right until the canopy is on it. That'l be the project for tomorrow. I think there's and indoor fly in on Sunday, so if the electronics get here, I may finish this one before the BF-109 so I can try it indoors.
Made alignment templates so the BBQ skewers will be easy to install. Gets your wing incidence, stagger, and height figured out without any trouble. The long pieces on top will be cut off and added to the center wing section where they will poke into the fuselage. Should be very strong, no need for foamboard supports.

Finished weight should be right around 190 grams. Might add a few g's in glue and such before it's all done. Plus whatever the canopy weighs. A 500mah 2s will put you well below 250, and you can still probably go bigger. Think hobby king has some 800mah 2s batteries that are 50 grams. A smaller motor should also be an option. This is just one I had in a pod already. It's a 2206 2150kv motor that puts out >600 grams of thrust on 3s with the 6045 prop that's on it. This plane will not need that much power.


Once this is done, if I have time, I may paint it and draw up some decals for it. Should have some aluminum paint lying around somewhere.
I know painting posterboard works. Anyone tried to paint paper?
That is outstanding. Awesome work!
Thanks man. You fly the explorer yet?
Looks like my electronics are here, so I'm going to work on finishing this up tonight. For now, I'm going to be posting up the first set of the build walk-through pics.
Cut out your wing. Poke holes for your BBQ Skewers as marked on plans. Make the two creases on the wing bend lines. Remove paper from everywhere marked. Cut your leading and trailing edge bevels. I'm going about a half an inch on my bevels. Without the paper layer they're very easy to cut. They could also be sanded in. Cut your aileron bevel. Glue on the spar as shown. It's centered between the two wing bend points.
 end points.
Make some practice folds to make sure it all looks good.

Then glue it together. I put glue on the leading edge crease, the trailing edge bevel, and the spar.

Reach in with your knife and cut the spar. Don't cut into the wing, just the spar, as we want the wing to bend a bit.

Squirt some glue into the crack you just made, put the center section flat on the table, and use the provided dihedral gauge. Hold until dried. Repeat for the other wing.

Now were going to do a similar process to glue the two halves together. A bit of tape makes this easy.

Add glue and hold the center sections flat onto the table. The only bends in the top wing are the ones we did above.

Completed Top Wing:

The bottom wing is almost identical, except there's a servo to contend with, and it bends in the middle rather than two places. Use the same dihedral gauge.

Cut out and add bevels to your elevator and rudder. Forgot to take a pic of the rudder, but it's not any different. Refer to the plans for what to bevel.
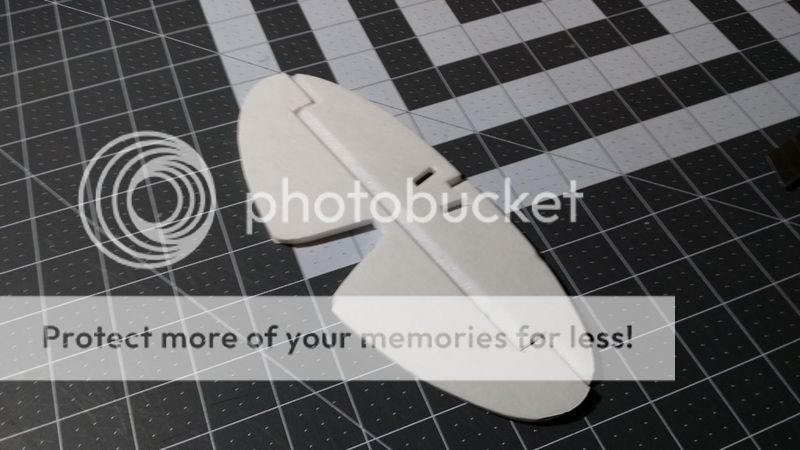
Glue the two pieces together making sure that the vertical stabilizer is straight and at 90 degrees. The slots hold things together pretty well, but it's always best to make sure.

After your wings and tail pieces are finished move on to the fuselage sections:
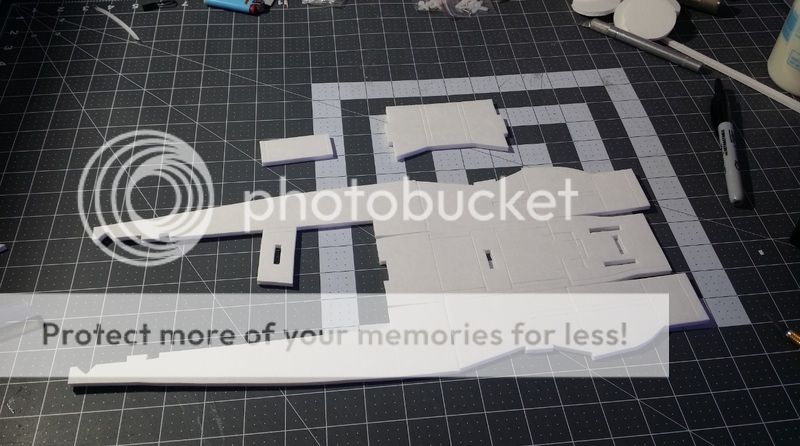
First step is to flip it over and add a bit of tape. There are several pieces that will be discarded, but for now I like to leave them in place to help keep everything square. The tape helps keep them from falling out.

Go ahead and clear out all of your cavities and remove all the paper as shown in the plans. When removing paper, follow the lines on the plans. Cut very shallowly, just enough to get through the paper, you don't want deep cuts where the paper is being removed. Leave the gunports alone for now, they also add strength.

Start adding a bit of a bend to the front fuselage sections. I just use my fingers, with the paper removed it naturally want to curl, help it along a bit until the curve matches the top fuse plate.

Where I cut the paper to remove it, I like to add a bit of tape for extra insurance. Don't know if this is needed or not.

Do some test fitting, then fold one fuse side up and glue it into place. Make sure it's at 90 degrees and that the curves at the front and the back are held in place. This is a B fold. The fuse sides fold "Beside" the middle plate.

Once it's dried I like to go back and add some glue along the joint. Remove the excess with a piece of scrap foam. This is a lightweight build, with a lot of foam removed, the glue helps out when things are this light weight.

Take a strip of blank paper and tape it over the gun port. When the fuse is assembled, you'll pull the foam out of the gunport slot and this paper will be visible in the background.

Cut out and glue the power pod mount. This is also a B fold.

Glue the mount into the front of the fuselage. Also go ahead and test fit your power pod. If you're using a large motor where the wires don't fit through the firewall you'll want to make cuts so things fit now.

If you will be installing the bottom hatch rather than leaving the space between cowl and wing open, cut and glue this support into place. It sits on the nose of the fuse directly below the power pod mount.

Test fit your wing and assembled tail section. The should both just fit into their respective slots. Make sure everything is lining up.

Once stuff looks good glue in the wing, and then glue the rear fuse stabilizer. Use a table to help keep everything square.

Once the stabilizer has dried, glue on the tail. This is your last chance to adjust things so that the wing and horizontal stabilizer are even. You can also now remove the junk pieces from the fuse. The flaps of paper that are left get glued down over the edges of the foamboard. These really add a lot of stiffness.

Cut out and glue in your formers. Their location will be labeled on the plans.

Last edited:
Subcanis
Crash Test Mechanic
Thanks man. You fly the explorer yet?
Nope, nor the Versa. Weather.
Built a Simple Soarer though.
Nope, nor the Versa. Weather.
Built a Simple Soarer though.
Darn. That's the nice thing about this hobby though. If weather shuts you down you can always build. Sounds like you're very well prepared for your first crash, err flight.
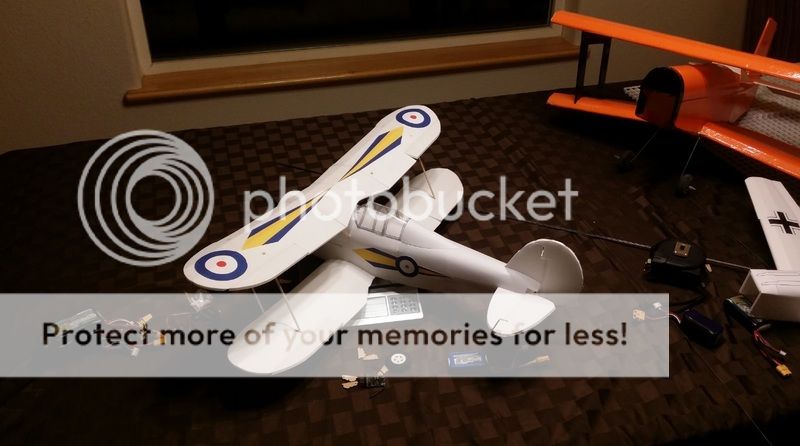
Two backups is the way to do it. Didn't get as much done tonight as I would have liked, but I did get the Canopy figured out and glued the top wing into place. The canopy was a pain but it's figured out now. The final revision will look a bit better than the one pictured, but I had built so many of them tonight that this one is good enough for the prototype. :black_eyed:

This is scale. The top wing was just below the canopy line. Visibility would have been scary for a fighter pilot in one of these.


Next to the Baby Blender, which sadly has a broken bottom wing. Too many landings and it just gave out.
They have essentially the same wing span, but the Chord on the baby blender is a couple inches greater. Wing area on mine is 200 in/sq and the the baby blender is 312 in/sq. Of course, the baby blender without packing tape and before battery weighs over 400 grams. Mine is closer to 460 with a medium power setup.

These weights are with the motor I stole out of my Mini Speedster. It's a 1704 2300kv and 6amp ESC.
203 Grams with 500mah 2s

246 grams with 850mah 3s

No time for paint, and that might curse the maiden anyway.
So, I started drawing up simple decal sets. I have several different ones that I'll be adding to the plans as options.

So, I started drawing up simple decal sets. I have several different ones that I'll be adding to the plans as options.


planebreaker2000
Active member
looks really good so far. Great pics on the build.
looks really good so far. Great pics on the build.
Thanks man. Hoping to make it easy for someone else to build if they want.
Man, you are cranking them out! Nice work. Very interested in how you're making your canopies.
The canopies are made from printable overhead transparencies and hot glue:
http://www.amazon.com/Apollo-Printer-Copier-Transparency-Sheets/dp/B0040YC7FI
For every design I make, I'm drawing up printable canopies made for posterboard and for the clear film. They're really easy to put together and make look good when you don't have to draw or tape your own lines. Once I get the pictures together I'll be posting up how to make this one.
Oh, and I finished the build, and it flies.... Video of the maiden flight is uploading now.
Video is done processing. This flight is with a 500mah 2s battery and the tiny 1704 2300kv motor. Had to add a bunch of nose weight, so the tiny motor isn't really worth it.
Plane may have still been a bit tail heavy, and this motor really doesn't have much power. For the maiden, I only hooked up the lower ailerons. Thought I'd try and see how it would work for people that might not want to hook up the tops.
Ailerons react very slowly, and there's a bit of adverse yaw. Impossible to fly without rudder input. Hooking up the upper ailerons might help, but even that might not overcome the wing design. Probably too much undercamber. On the bright side, I think I inadvertently created a 3 channel Rudder, Elevator, Throttle trainer biplane.
Gonna do some more testing tomorrow with the rudder on the aileron channel and a 2204 motor. If it does well I may end up having two sets of wings. One that will do the aerobatics that I want, and the current ones, for those who want an easy to fly biplane.
Last edited:
Buzzmonster
Member
Look like an interesting project - thanks for sharing. I have an ever growing build list thanks to you guys on this forum.
Put on the top set of ailerons and did some more testing today. There was a bit of wind, which isn't great for something with such a light wing loading. First crash turned into a bunch, but in the end the plane was successful, and it shrugged off all the crashes.
If watching other people crash is entertaining, you will enjoy this. At least until I get stuff figured out, cause it eventually starts flying nicely.
I think 3 channel will work if I increase the rudder size. Which would probably just necessitate making another whole version. Might do that later.
For now, airfoil shape is going to change a bit, and I'm going to increase the size of the ailerons. Those will hopefully make for much crisper roll control. It rolls at scale speed right now, but I want it to do more.
Watch out for that tree!!
Yeah, just couldn't get away from it. Power pod got pushed in after the first crash and made it super tail heavy. It looped, and adverse yaw took over. Pulled hard right and it went left.
Always check your stuff, er, C.R.A.P as FT would say.It will be staying 4 channel, beacuse as you said, the flying is much better. I just remember seeing a request for a 3 channel biplane somewhere on the forum. With a bit of tweaking it could be done, but that will have to come later. I'm swamped with projects.
Made the changes to the wings on the plans. Now I've just got to build them.
Here's what the new plans look like:
Mighty Mini Gloster Gladiator Beta Plans v.3
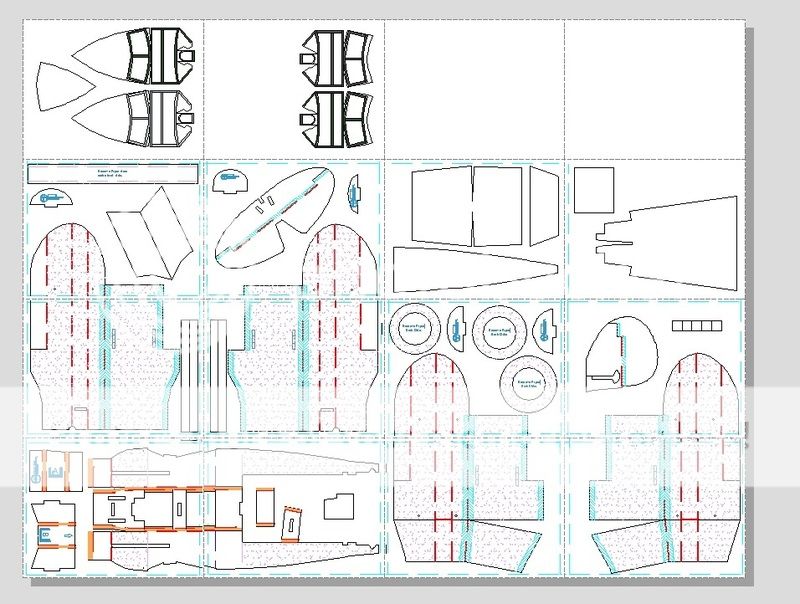
I may have gone overboard on drawing up decals... Got a little something for everybody. Well, maybe 20% of everybody. There were gladiators everywhere.

Here's what the new plans look like:
Mighty Mini Gloster Gladiator Beta Plans v.3

I may have gone overboard on drawing up decals... Got a little something for everybody. Well, maybe 20% of everybody. There were gladiators everywhere.

After some thought, I'm gonna give the current wing shape another chance. It's plenty strong, you only have to look at all my crashes to see that, and it's very light weight. I have the CG dialed in now, and the plane did behave well after that was figured out, only issue was the roll rate was slower than I would have liked.
Added 1.25" to each aileron. If this doesn't improve responsiveness, I'll test out the other wing design.

ETA: Also, a 1300mah 3s fits great and only brings the weight up to 297 grams. With the current wing area, that's a wing loading of 7.5 oz/in2 and a WCL of 6.4. That's still in the trainer wing loading and should fair much better in the wind. Flight times should be great as well.
Last edited:
Similar threads
- Replies
- 10
- Views
- 656
- Replies
- 3
- Views
- 184