
You are using an out of date browser. It may not display this or other websites correctly.
You should upgrade or use an alternative browser.
You should upgrade or use an alternative browser.
Mighty "Mini" PBY-5A Catalina - WWII Flying Boat
- Thread starter localfiend
- Start date
The plane is looking great! You've made me want to design a sea-plane. Maybe a DTFB Icon-A5? or a SeaScout UAV or Bavar-2?
Belive or not last night I was thinking the same about the Icon A5!

Haha! what a coincidence. You want to have a build-off on who can make a better/more scale Icon? Low-key, fun competition.Belive or not last night I was thinking the same about the Icon A5!
Haha! what a coincidence. You want to have a build-off on who can make a better/more scale Icon? Low-key, fun competition.
I wish I could, I don't have that pratice to build from zero.
Haha! what a coincidence. You want to have a build-off on who can make a better/more scale Icon? Low-key, fun competition.
I wish I could, I don't have that pratice to build from zero.
An A5 would be cool. You guys should give it a shot. You don't need experience to start designing. Got to start somewhere, and if it's a horrible failure you've used up some time, a bit of foam, and gained that experience you were after.
Thanks! I'm going to start on it tonight, making some planes. Thinking similar size to the Simple Storch in wingspan?Icon A5: Between the hull design LocalFiend has started and the FT explorer, should give you a great starting point. Even if you couldn't get it scale looking but flies well I'm sure there will be interest in it.
TexMechsRobot
Posted a thousand or more times
Is there a reason why I can't see any of the pictures?
Is there a reason why I can't see any of the pictures?
Dunno man, seems like everything is working fine.
TexMechsRobot
Posted a thousand or more times
Ok. Just me then. At least now I know it's worth spending the time troubleshooting Thanks!
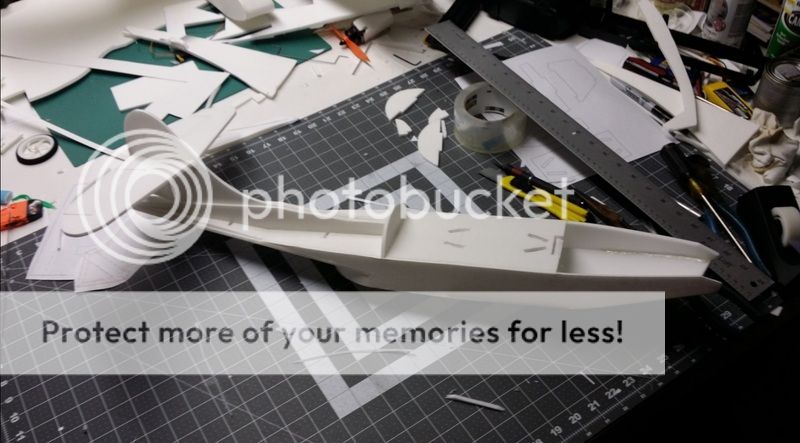
Thanks!Man, that bug I had wiped me out. Been trying to catch up with work (farming just got crazy again), so I haven't had much time for building. I did redesign the tailfeathers when I was sick as the old design was hard to fit together straight. In order to keep it scale I split the vertical stab into two pieces, and I'm doing a split elevator the same way as my previous A6M Zero design. The redesign should keep the build simpler to get square even if there's a bit more pieces to glue.
Here's the split elevator. I use a bit of piano wire bent like so:
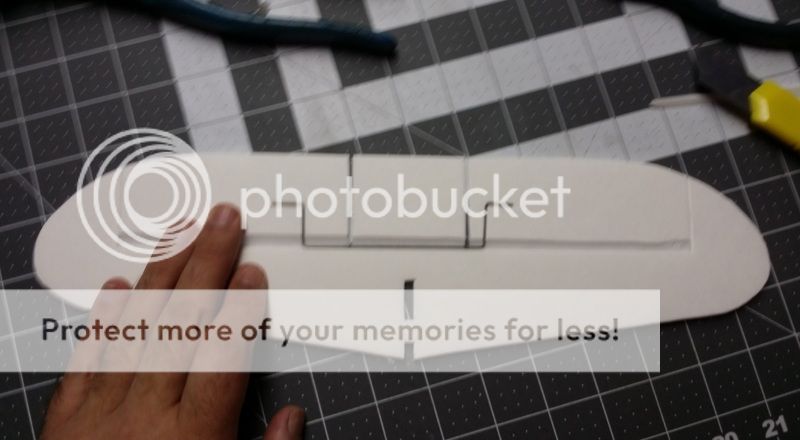
Press down on it gently to make an indentation for cutting. You'll notice one side is offset. That's to leave room for the servo horn.

Cut along the indentation then use the wire to make a groove:
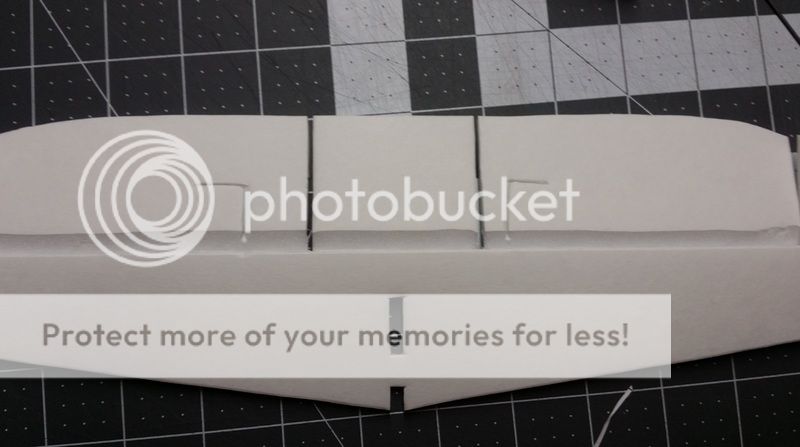
The wire should fit in like so. You want the wire to be all the way back against the hinge line.

Take a BBQ Skewer and make an indentation in the foam on both sides of the wire. I only show one side here.

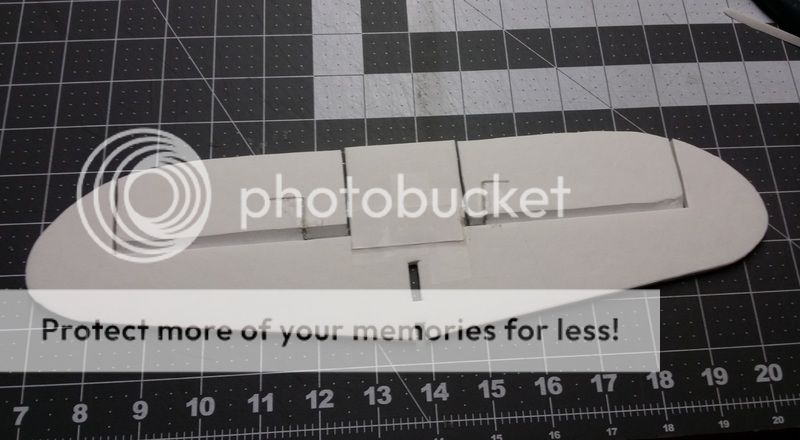
Make sure the elevator moves freely. If the wire hits foam anywhere and stops travel, just compress the foam with a bbq skewer. One it moves freely you can cover up the gap between elevators with a piece of posterboard and tape.
Cut out your vertical stabilizer and make your bevels.

Glue the bottom portion to the horizontal stabilizer. Make sure it's 90 degrees. It will fit together with slots, so that helps with alignment.

Next glue on the top portion. It also has an alignment slot.

Next I add a drop of glue so that the rudder becomes one piece. I also make a groove with a bbq skewer/toothpick.

Glue a piece of bbq skewer/toothpick into the back of the rudder. This keeps things very strong.

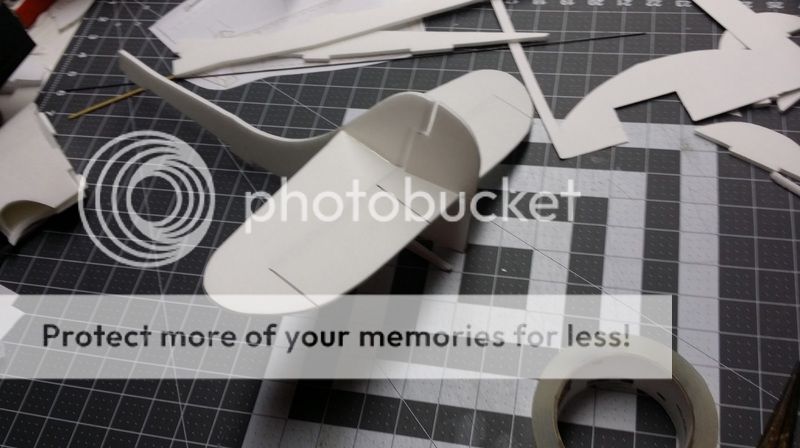
Forgot to take a picture, but there are two side/reinforcement pieces that get glued onto the vertical stabilizer. After you glue those on, the whole thing fits into the slots on the fuse where it can be glued into place.
I also glued the wing tower into place. Unfortunately I made the measurements while feverish and have discovered it needs to move back some. I'll be cutting it off and making another tower.


I'm hoping to make and install another tower tomorrow then I can start working on posterboard for the top deck.
Here's the split elevator. I use a bit of piano wire bent like so:

Press down on it gently to make an indentation for cutting. You'll notice one side is offset. That's to leave room for the servo horn.

Cut along the indentation then use the wire to make a groove:

The wire should fit in like so. You want the wire to be all the way back against the hinge line.

Take a BBQ Skewer and make an indentation in the foam on both sides of the wire. I only show one side here.

Make sure the elevator moves freely. If the wire hits foam anywhere and stops travel, just compress the foam with a bbq skewer. One it moves freely you can cover up the gap between elevators with a piece of posterboard and tape.

Cut out your vertical stabilizer and make your bevels.

Glue the bottom portion to the horizontal stabilizer. Make sure it's 90 degrees. It will fit together with slots, so that helps with alignment.

Next glue on the top portion. It also has an alignment slot.

Next I add a drop of glue so that the rudder becomes one piece. I also make a groove with a bbq skewer/toothpick.

Glue a piece of bbq skewer/toothpick into the back of the rudder. This keeps things very strong.


Forgot to take a picture, but there are two side/reinforcement pieces that get glued onto the vertical stabilizer. After you glue those on, the whole thing fits into the slots on the fuse where it can be glued into place.

I also glued the wing tower into place. Unfortunately I made the measurements while feverish and have discovered it needs to move back some. I'll be cutting it off and making another tower.


I'm hoping to make and install another tower tomorrow then I can start working on posterboard for the top deck.
Man, that bug I had wiped me out. Been trying to catch up with work (farming just got crazy again), so I haven't had much time for building. I did redesign the tailfeathers when I was sick as the old design was hard to fit together straight. In order to keep it scale I split the vertical stab into two pieces, and I'm doing a split elevator the same way as my previous A6M Zero design. The redesign should keep the build simpler to get square even if there's a bit more pieces to glue.
Here's the split elevator. I use a bit of piano wire bent like so:
Press down on it gently to make an indentation for cutting. You'll notice one side is offset. That's to leave room for the servo horn.
Cut along the indentation then use the wire to make a groove:
The wire should fit in like so. You want the wire to be all the way back against the hinge line.
Take a BBQ Skewer and make an indentation in the foam on both sides of the wire. I only show one side here.
Make sure the elevator moves freely. If the wire hits foam anywhere and stops travel, just compress the foam with a bbq skewer. One it moves freely you can cover up the gap between elevators with a piece of posterboard and tape.
Mind if I use this for my Icon-A5 split elevator? looks great!
Mind if I use this for my Icon-A5 split elevator? looks great!
Sure man, go ahead. This is Flitetest. The idea is to build off of what others have done before. It's probably not an original idea on my part anyway, lots of ways to do a split elevator out there.
Thanks LF. I am just starting on the fuselage tonight, getting closer to maiden.Sure man, go ahead. This is Flitetest. The idea is to build off of what others have done before. It's probably not an original idea on my part anyway, lots of ways to do a split elevator out there.
I have some waterproof foam to use for this when you get the plans finalized.
You going to finish the Devastator after this one is done???
Oh man, you got waterproof foam already? Your hard work is paying off. I'm jealous.
On the other hand, your dealer is just handing you samples of their new form of crack. I'm only addicted to one form, so that makes me feel slightly morally superior.
And yeah, I think I'll finish the Devastator after this one.
Oh man, you got waterproof foam already? Your hard work is paying off. I'm jealous.
Yes, I'm pretty blessed to be able to work with these guys.
On the other hand, your dealer is just handing you samples of their new form of crack. I'm only addicted to one form, so that makes me feel slightly morally superior.
Ha! I never really thought of it that way before, good point. Double trouble for me.
And yeah, I think I'll finish the Devastator after this one.
Looking forward to it LF, you are doing an amazing job on all of your designs! Keep it up. Keegan and I started a new project we hope to finish and bring to Flite Fest. More details to follow.
Looking forward to it LF, you are doing an amazing job on all of your designs! Keep it up. Keegan and I started a new project we hope to finish and bring to Flite Fest. More details to follow.
*Fingers Crossed* Pandora?
Similar threads
- Replies
- 6
- Views
- 1K