Mini Guinea build, my practice for something ambitious

Zetoyoc

Elite member
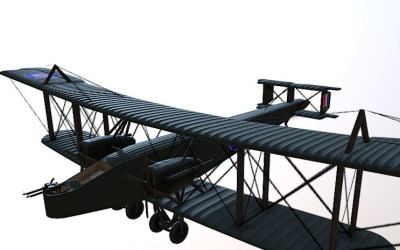
I thought that after finishing the third plane i have yet to fly i might slow down a bit on the building side of things but that doesn't seem likely to happen. So far I have only put one in the air but I am confident the others will fly well and am moving on to crazy aspirations of flight. My current ultimate goal, er, well there are several but the one I am focused on now is to eventually get a WW1 bomber in the air. So far that will have to be completely scratch built from only a 3 view drawing and is multi motor. 2 things i have not done.

HP O-400 3-view small.jpg


So I am going to build the Mini Guinea to get some practice in the multi motor department. I usually just put my head down and work when i get the spare time to do it but i figured id try to document it for fun and will try to post as i make progress. After i do my chores this morning (cleaning 8 fish tanks) i hope to begin by cutting out some foam.

wish me luck :)

-Jesse
 

Zetoyoc

Elite member
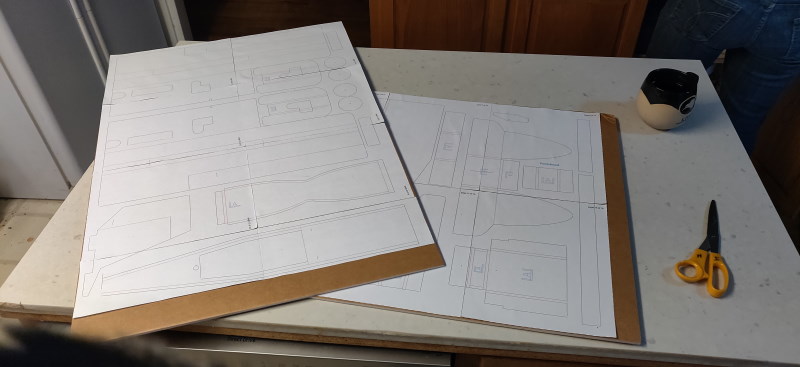
Chores are done, progress has been made. Plans cut out and pasted to foam board. this time i used a bit more glue hoping to not have it come off as easily while i am cutting out the shapes on the saw. It is a fine balance since i still want to easily remove it as i am building it later. So far the simple glue sticks are working well for that.

plans.jpg


To the garage! ok er, kinda cold in here. maybe that is why I seem to be accumulating a lot of scrap foam in this corner. yea. that must be it. :) on the plus side, I should never need to use my fingers again to wipe up excess hot glue when building. .. well I'll probably still use my fingers a bit. But I guess now I have no excuses good excuses for burnt digits.
mess.jpg


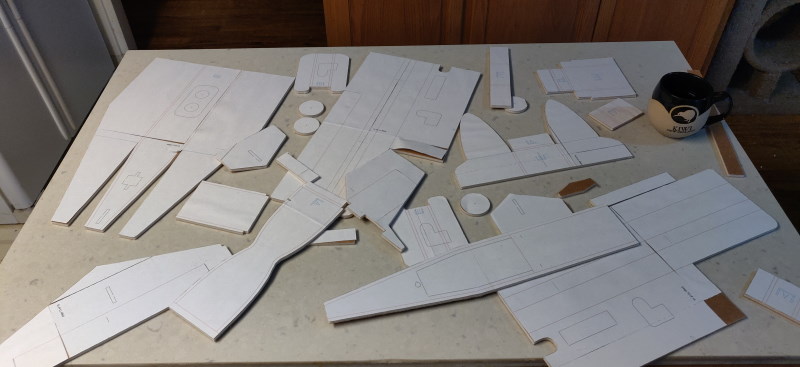
All cut up and ready for the fun part. After I look up problem areas and do some research. I might want to make a few adjustments. I think i remember reading that the wing was a bit weak? the time before having to leave for work is fast sneaking up on me. More might have to wait till this evening.

cut up.jpg
 

Zetoyoc

Elite member
This bomber will be an ambitious build. If you really wanted to go scale @sundown57 has a cool way to string the wings. @buzzbomb has tried his system with much success as well. Might be something you want to look into.

Maybe I can get @sundown57 to do a tips vid on it and post his technique on the Quick Tips thread :unsure:
Ill have to look into that. I have a few ideas bouncing around in my mostly empty skull. either very small holes drilled into the supports, or maybe needle and thread style right through the foam at a glue spot for strength. Actually the prototype may be built without the wires jst to see how it works first. I am still looking at scale. A 1/12 scale would be about 100" wingspan. this scare s me a little, but would be roughly in scale with the DR1. still ill probably scale it to something closer to 60" Hey, I might have to use this to show my math students that this stuff is used in real life :)

-J
 

The Hangar

Fly harder!
Mentor
The mini guinea is a really fun plane to fly and build! So is the big one but... well... it's really big! Since I have the big guinea I have to hold off on the a-10. Have fun.
 

Zetoyoc

Elite member
For your big build, have you seen @willsonman 's 1/12 Gotha build from a few years ago?
https://forum.flitetest.com/index.php?threads/1-12-gotha-g-iv-design-prototype-publish.12292/
Maybe some tips that will help you out when you get there.

What do you use for blades on your scrollsaw for cutting foamboard?

Thank you for the link. I'll be sure to check out that build. I am getting excited about the big build and may not wait much longer to start it. for better or worse :)
I believe the blades on my saw are nothing special. regular tooth about 18 tooth per inch i think. pretty thin front to back for very tight radius cuts. I had thought briefly about putting something else on there but it cuts both the plywood bits and foam well enough I haven't bothered to try any thing else.
 

BATTLEAXE

Legendary member
you aren't allowing yourself two very large planes? I would love to build the A-10 . it is one of my favorites
The A-10 is a cool plane, wide speed envelope. I would have to do it in EDF or BDF format though, 2 wing props just doesn't appeal to me, especially when you have two perfectly good nacelles on the tail.
 

Zetoyoc

Elite member
I got distracted trying to figure out dimensions and scale for the big bomber. I drew up a 60" outline to get a feel for it and I am a bit concerned. first to me it is huge. second the wing ratio being 10:1 makes far a very skinny wing and if i scale it down any more i am not certain it will have much lift. but I am not very experienced in this so maybe the second wing makes it enough. more research needed.
big hp o_400.jpg


no to make progress on the mini guinea
 

The Hangar

Fly harder!
Mentor
I got distracted trying to figure out dimensions and scale for the big bomber. I drew up a 60" outline to get a feel for it and I am a bit concerned. first to me it is huge. second the wing ratio being 10:1 makes far a very skinny wing and if i scale it down any more i am not certain it will have much lift. but I am not very experienced in this so maybe the second wing makes it enough. more research needed.
View attachment 148436

no to make progress on the mini guinea
That is a small wing, but what I worry about is the tail being so small. Enlarge it 15% or 20% Cute cat!
 

BATTLEAXE

Legendary member
Ideally as it sits in the pic, you won't need to change anything on the wing. Being a biplane you will get away with a smaller wing chord because there is two wings. Not only is it something that you will get away with, but it is an advantage, and I will explain why. By a rule of thumb the distance between the top and bottom wing should be anywhere from 80-100% of the wing chord. Any narrower and you will find funny pitch and lift tendencies and deficiencies, has something to do with low pressure and high pressure air mixing between the wings thus equalizing out and losing lift efficiency. The smaller the wing chord the less distance you need between the two. They have to be separated enough to create lift each on their own. If that make sense.

I will say though that @The Hangar is right, I would enlarge the tail feathers by at least 20% to start with. Rule of thumb there is that the horizontal stabilizer should be 25% of the wing, and the vertical stabilizer should be 50% of the horizontal stabilizer. This is just a standard, usually when real planes are scaled down to model size the designer will tend to increase the size of all these tail surfaces by 15-20% of the original to get the proper authority in flight as a model. To take it even further and try not to confuse, based on a lever being a simple tool, usually a longer tail moment between the trailing edge of the wing to the leading edge of the tail feathers, allows for respectively smaller tail surfaces. Give me a lever long enough and I will move mountains kinda mentality.

Does this help?
 

Zetoyoc

Elite member
Ideally as it sits in the pic, you won't need to change anything on the wing. Being a biplane you will get away with a smaller wing chord because there is two wings. Not only is it something that you will get away with, but it is an advantage, and I will explain why. By a rule of thumb the distance between the top and bottom wing should be anywhere from 80-100% of the wing chord. Any narrower and you will find funny pitch and lift tendencies and deficiencies, has something to do with low pressure and high pressure air mixing between the wings thus equalizing out and losing lift efficiency. The smaller the wing chord the less distance you need between the two. They have to be separated enough to create lift each on their own. If that make sense.

I will say though that @The Hangar is right, I would enlarge the tail feathers by at least 20% to start with. Rule of thumb there is that the horizontal stabilizer should be 25% of the wing, and the vertical stabilizer should be 50% of the horizontal stabilizer. This is just a standard, usually when real planes are scaled down to model size the designer will tend to increase the size of all these tail surfaces by 15-20% of the original to get the proper authority in flight as a model. To take it even further and try not to confuse, based on a lever being a simple tool, usually a longer tail moment between the trailing edge of the wing to the leading edge of the tail feathers, allows for respectively smaller tail surfaces. Give me a lever long enough and I will move mountains kinda mentality.

Does this help?
Thank you, That is good information for thought. The tail may look proportionally small due to it also being a bi-wing as well as being a fair distance from the cg. I do think it still wise to enlarge the tail especially since that seems to be the way air seems to scale at this size . I think i may make a few different tails on mock up to test how they all react.
bomber box.JPG


I might have to make a separate thread or re title this one. a lot more bomber has gone on in here than my mini guinea :)
 

BATTLEAXE

Legendary member
I might have to make a separate thread or re title this one. a lot more bomber has gone on in here than my mini guinea :)
I know you said the tail is a box style but now that I look at it in this pic, you may be right. You have literally 2 Hstabs and 3 Vstabs and a long tail moment. It might be a case of half of one, six dozen of the other. Given this is a slow fly design and a long tail moment you might be able to get away with the original scale of the tail feathers. The larger the tail surfaces the more weight you add to the end of the lever making the airframe tail heavy, yet being a slower flying plane you may need more surface area to hold the tail level. You know what I mean?

Here is what I suggest. Build the plane to completion and build 2 sets of tail feathers, one at the original scale like you have drawn out and another at 20% larger. Install the 20% larger one first but just tack it on with a couple dots of hot glue, ,or just enough to hold it on but not to much to remove it with minimal damage to the fuse. Then set it up with everything to power up, minus the prop. Get it balanced and do a controlled chuck glide test, even maybe have someone at the other end to catch it if need be. See if it does a controlled glide or it ends up being tail heavy. If it is tail heavy it will pitch up and stall, usually falling to one side or the other. If it flies straight and relatively level into the other persons hands , you know you are on the right track. If it does end up tail heavy trade off to the original size tail feathers and try again

If it does glide well then trade off the tail feathers to the original scale size ones and see how it glides then. The idea is to use the smallest one you can get away with without sacrificing flight performance. Make sense? Remember that you can always change the size of the airframe but air molecules always stay the same size. That's why larger planes fly easier then smaller lighter craft, they just have better penetration and authority in the air.
 

willsonman

Builder Extraordinare
Mentor
OK, since @Tench745 mentioned my build, I'll chime in with the things I learned on the Gotha design and build.

First, Do not be concerned with the lift of a short-chord wing. These WWI era bombers were designed for maximum lift. On top of the long span, you have TWO main wings here. There is plenty of lifting area. I used the undercambered tip FT design as a means to help stabilize the airplane and it does work and I would recommend it.

Second, The tail design should consider a few things. If you want it to fly more scale, keep the scale outline. Again, these airplanes were originally designed to be stable... but really only in a straight line. ANY WWI era bomber will not be a bank-and-yank kind of airplane. Because it is short nose-coupled, the tail will always act like a fulcrum and the wide span will not want to roll fast unless you way oversize the ailerons. So, my advice is to consider your own pilot skills. If you are not yet comfortable using a rudder to make your turns this one will want to make WIDE turns and generally fall in altitude on those turns, unless you way oversize the tail to about 60% over the scale size.

Third, Because of the wide span and short chord, focus on your spar design. The Gotha really needed the spar to be beefed up. The prototype had VERY floppy wings. I had to use fiberglass and epoxy on the foam spars in addition to the paint sticks where the wing outer sections met. Granted it was a 1/12 scale model at just over 77" span but I've read far too many stories of folks pushing their FT Storch too far (another example of short chord wide span) and the wings gave applause mid-air. Ply could be used but at the great expense of weight.

Fourth, do not, I repeat, DO NOT use the tail incidence of the 3-view. The reason is that the majority of the 3-views of these bombers keep the H-stab in-plane with the downward taper of the fuselage. CHECK IT against the datum of the fuselage AND the incidence of the wing. Try to keep it neutral or ever so slightly negative (leading edge slightly lower than the trailing edge).

Fifth, use the guy wires. The large wings will want to twist on each other. Reference how I did this on my Gotha. It provided an immense amount of rigidity that otherwise would have been absent.

There are many more notes I can give on flying WWI planes in general as they are not typical aircraft. Mostly, they need to be flown all.the.time. Mainly on landing. They need to be flown into the ground when landing as the short nose generally makes them want to nose-over. Notice on the Gotha how I hinged the nose for the battery. This served as a means to easily replace the nose but also provide a weak point to give when the nose came over so the plane would not entirely flip.

Lastly, I want to say that building a WWI airplane is probably one of THE most rewarding flight experiences. They just have a look and presence that other eras cannot match. It is soooooo much fun and rewarding to do so.
 

Zetoyoc

Elite member
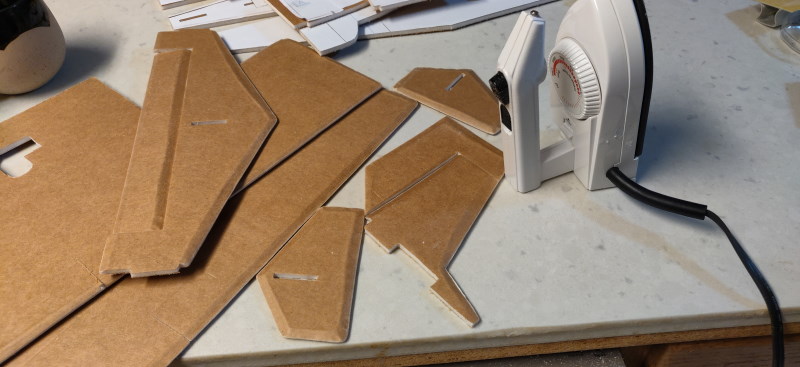
got a bit busy at the thing I do to trade my time for money i get to trade for plane parts. I managed to put some paint on a scout i hope to maiden in a few days and figured since i told @BATTLEAXE id try the ironing technique he so kindly made a video about, that I should give it a go. I actually had a lot of fun doing it. more than i thought i would. I had it in my mind it would be another tedious step before the fun building part. but nope it was a nice relaxing task while listening to some music. the cats thought i was nuts but they think that about a lot of things i do. I can tell where i started and where i ended. i did improve a bit as i went. Ill likely do this on the next build as well.

ironing.jpg


i did notice after taking the photo that i forgot to do the aileron bevels , but the iron is cold again put away and I am too lazy to get it back out. I am done for the night I think.

-J