Mini H-Quad BlackOut Build Log | Greg2B

Greg2B

Senior Member
So today I finally received my Blackout H-Quad in the mail. Yea!!!!

IMG_3202_50p.JPG

Then I went through all of the smaller bag to check out all of the items and it was all there. I was missing my T-shirt so I'll have to contact Blackout about that. The awesomeness of having the quad blinded me to this until I was writing this.

IMG_3211_50p.JPG

I also of course got more props since you can never have enough and added them to my prop collection.

IMG_3218_50p.JPG IMG_3222_50p.JPG

After all that I went and found all of the gear that I hope to put in the build. I ordered the ARF so I got the ESC and motors with the bundle.

IMG_3225_50p.JPG

Tiger MN1806 2300kv (I believe, they just say blackout on them:))
BS 12amp SimonK ESC from Hobby King (with white heat shrink, it wont be a blackout quad, it will be a ZebraOut Quad...)
Orange 6ch Reciver DSM2(need a real spektrum but will have to save up for that. I might switch to my generic micro 6ch reciver I have on my other quad.)
Acro Naze32

FPV Gear
ImmersionRC 5.8gHz 600mw Video Transmitter
ImmersionRC 5.8 GHz SpiroNET Antenna
Sony Super HAD CCD 600TVL IR Block


I've learned from reading FinalGlideAus Build Log on Mini-H that I’m missing a few things like liquid electrical tape and/or a 12v step up regulator. But if I understand it all correctly the board outputs 12v this so I should be able to power the camera it from the board with no problem right?:confused:

I could also use a Male to Male Coaxial Cable but I'll probably just mount my Vtx in a way that works without it. Also an OSD might be handy but I will have to look into that later when I have more funds. I don't plan to customize the quad as much as he did to his and will keep it as simple as I can for my skill level right now.

I went ahead and built the frame to get an idea of how it is put together here are are some pics though nothing special.

IMG_3227_50pv2.JPG IMG_3239_50p.JPG

IMG_3231_50p.JPG IMG_3234_50p.JPG

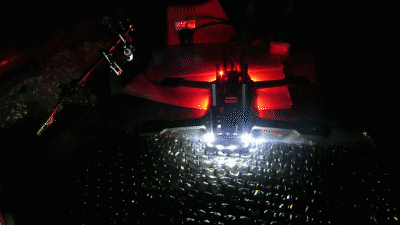
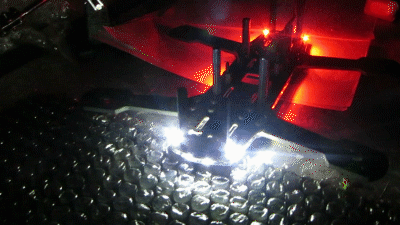
Also I had to solder something on the quad so here are some more pic and some gifs I randomly made. It looks so cool with the lights on.:cool:

IMG_3244_50p.JPG

IMG_3246_50p.JPG

FrontRUnUp_v1.gif
SideTurn_v1.gif


Initially I was super excited for this quad to come in then once I was laying everything out I became a bit intimidate about building it. I think it's the circuit board that has me a bit off since my soldering skills are still pretty raw. I have soldering wires to wire and bullet connectors down down but a board seems harder to me since I haven't done it as much except to disassemble my turnigy micro quad. I think though that I will be able to put this together without to many issues I hope.:rolleyes:
 

FinalGlideAus

terrorizing squirrels
You'll be fine Greg, just take it slowly and do some practicing on soldering before you commit too much on the min H. Make sure you cover the solder points on the PDB with liquid electrical tape otherwise if you land in moist grass you will short things out and damage the components.

You can solder the Camera you got direct to the PDB as it runs off 12v but there is the chance you will get lines through the video signal due to the dirty power supply. That is why I went through the IRC vtx. This is not a big drama though. Just solder it direct to the PDB and if you do get lines just buy a filter for it or just make one like this
https://www.youtube.com/watch?v=xDUoxsMpfYQ

I would highly recommend putting in an extension coaxial antenna cable. This is because in a crash the antenna takes quite a hit and if it is connected direct to your VTX it is likely that the connector will break off the VTX as it is connected direct to the PCB. If that happens you are not only grounded but also up for another expensive VTX.
 

trigger

Senior Member
+1 on the electrical tape. I fried an ESC because I didn't do it right away.

The other advantage of powering your camera through a step-up regulator, is that you will have to freedom to switch to 4S in the future.
I am in the process of modifying mine to do just that (but it's working fine with the camera directly connected to the PDB, with a 3S battery).
 

Greg2B

Senior Member
I had the chance to work on it a little bit more today. For some reason I had the idea that I could use small 2mm bullet connector to connect the wires and esc's and just wrap the extra wire on top of the arm and cover it all. After stripping the wires a bit, tinning the wires, and doing all of the bullets connectors with shrink wrap for one arm. It turned out I didn't have enough wire for a neat fold with the bullet connectors.

IMG_20140618_140106.jpg

I then tired this again, though only on one wire this time (I slightly learned), but with the wire cut really short so it would fit on the arms. It turns out it still wasn't short enough for it to be flat on it...

So I said what ever and just just soldered the motor wires direct to the esc's. I have some fear when ever I've attempted this before mainly because if screw up then I need a whole new esc.

IMG_20140618_174813.jpg

But is seems everything went right this time and it even spins in the right direction when I tested it in baseflight with the battery connected. I'm hoping I can get the directions right on the first try for each motor. There should be some way for me to test this before connecting it to the board.
 

FinalGlideAus

terrorizing squirrels
It looks like you've soldered motor 2 in that picture. If it is spinning the right way then solder motor 3 the same. Then for motors 1 and 4 just cross two of the motor wire and all will be good. If it is reversed if using BLHeli FW you can reverse motor direction in the setup page. If using SimonK you can flash reverse direction FW.

I wouldn't recommend using bullet connectors on those motors.
 

baddox

Senior Member
It looks like you've soldered motor 2 in that picture. If it is spinning the right way then solder motor 3 the same. Then for motors 1 and 4 just cross two of the motor wire and all will be good. If it is reversed if using BLHeli FW you can reverse motor direction in the setup page. If using SimonK you can flash reverse direction FW.

I wouldn't recommend using bullet connectors on those motors.

I second the recommendation to not use bullet connectors. You can just solder everything up directly, making sure to use the same wiring order for two diagonal motors, then the reverse ordering (just swap any two of the wires) for the other two diagonal motors. If you happened to wire everything up the opposite of what the Naze32 is expecting, you can reverse the yaw direction in Baseflight if you're using the stock Naze32 firmware. I had to do that. It's really simple and works perfectly. I can't verify it right now, but I believe you'll want to open the CLI in Baseflight and type "set yaw_control_direction=-1". I can verify that for sure in a day or two if you need me to.
 

Greg2B

Senior Member
Yesterday I spent pretty much the whole day working on my quad and by night time I was able to do a quick indoor and night outside(3:00+) flight test of it.
It flies really well as far as I can tell and a bit surprised it worked with and issues. I have noticed a few things that I need to address though as I finish the build.

Space...there is none of inside of the quad. I realized that while trying to put my bit orangeRX inside, I had to pop it out of the case and heat shrink it to fit it inside easily. Also the cords that connect it to the FC are a pain and almost got destroyed by the prop when the poped out of place a bit (3:45 in video). I will have to make sure everything is tied down.

IMG_20140622_010513.jpg
Liquid Electrical tape is messy. I did a test on a dead ECS to see how it spread but when I was applying it to my camera it still went all over the place. I even used a smaller brush then the one it comes with. It looks like I covered some pins of the connector ports for the camera ports so I may have to get another camera which sucks. I should have looked up a tutorial on how to use it first. I will be using even a smaller brush next time I use it.


IMG_20140622_010332.jpg

I was planning to power the camera for now from the board with the JST port I hooked up to the front and power the Vtx from the back JST port. I did test it out before the whole tape issue and it does work. Now I just have to decide how I want to connect the video line. I was thinking of just using JST and just using the red line since I wasn't sure if I wanted to connect it directly but I may do that seeing how much space the JST ports take up inside. Any thoughts?
 

Greg2B

Senior Member
Okay so I should have looked at some videos first. After watching this video https://www.youtube.com/watch?v=3HTa3QGc4FQ and seeing how he was able to remove it I tried the same on my camera ports using my exacto knife and remove the tape from inside the port. I tested it all out and the camera and osd still still works to adjust the camera.

I also took another look and the board and I re-notice the video port on the board. I'm assuming this is to bass the video signal to the back. I think I'm going to test this and if it work I may use it and if I need to use a filter I will since I ordered one just in case.
 

FinalGlideAus

terrorizing squirrels
Yes the video trace is for the video signal. I didn't use it because my vtx is up the front to balance the copter.

I'm surprised you ran out of room. I was thinking the body needed to be smaller because of the wasted space!

I always order my flight controllers without the pins soldered so I can customize the install for the copter I'm building. My pins are al on the bottom and facing inwards with only the pins I am using soldered on.
 

FinalGlideAus

terrorizing squirrels
Also, there are two holes each side of the battery lead solder pads. That is for a ziptie to act as a strain relief, otherwise the battery lead will fatigue at the solder pad over time and break. Unfortunately the ziptie holes don't work as they're in the wrong spot. To fix this I soldered to battery lead to the solder pads further in and the the ziptie could do its job.
 

Greg2B

Senior Member
Yeh I ran out of space quite quickly it seems. I must be using larger components even though I'm trying to strip things down as small as possible. One thing I know I have to do after trying to put the fpv gear on is cut some of the excess wires that I've just been tieing up. That should give me some more room by the Vtx. I actually decided not to use the board trace for video and just connected it directly to the Vtx signal wire.

The issue I seem to be having now is my board cam plate wont fit in the slot it supposed to on the board. I tried to use a flat screw drive to get some more space but no luck so far. I did notice this earlier when I put the frame together to test it out but I though I could squeeze it together. Carbon fiber doesn't like squeezing... I also might have damaged my camera in the squeezing so I have to be a bit more careful. The top plate slides in nicely but the bottom not so much.

I see what you mean about battery lead solder pad, I did a quick LOS test flight today and they are a bit bent out of place already. Crashing a few times in testing didn't help either:rolleyes:. So I may try the zip tie even though I don't have it solder in the best place for it.
 

FinalGlideAus

terrorizing squirrels
I've heard a few guys say the camera plate won't fit in the PDB. The solution is to "carefully!" File the slot in the PDB. There is a bit of playing room before you get to the copper trace on the PDB but do it slowly.
 

Greg2B

Senior Member
It flies...like a mini tank. I put it through 8 batteries yesterday (6fpv) and it was a blast.


This video is a edit of my first two flights so I didn't take it to hard on it but the second video I'm making I attempted a few things one of which got me stuck in a tree:rolleyes:. It seems as long as I don't get caught on high plants or branches I can recover as long as I have space. But how do you keep it clean? Mine is messy with grass stains already, I should not have used white heatshrink on some parts.

I still need to do a few things to before the build is completed the way I would like it to be.
  • Get the right Coaxial Cable so I can mount the antenna on top.
  • Remount the Vtx with the zipties flat(or use rapstraps(which are awesome)) so I can place the batteries on top better.
  • Resolder the power cable since it is starting to show it's being stressed.
  • ​Apply liquid electrical tape on everything.


I'll probably wont do any of this still tomorrow when it's supposed to be raining and I wont be able to fly anyway. Also I seem to have damaged my camera port where the osd controls go so I can't change them. Luckily I did a quick setup before I broke it somehow but I guess I will need to get a new one eventually.

Thanks for everyone's helps so far.
 

trigger

Senior Member
You don't keep the quad clean : grass (and dust) is the proof that you're actually using it :)
That's why we recommended liquid tape on any exposed electrical connection.

For the power cable, there's actually 2 holes that are there so you can ziptie the cable to the PDB (strain relief). They are not located at the best position, but it can be worked around. See FGA's build log : http://forum.flitetest.com/showthre...Quad-Build-Log&p=106087&viewfull=1#post106087 (fourth picture)
 

FinalGlideAus

terrorizing squirrels
Well done mate, you'll be screaming around at full throttle in no time.

You gotta choose if you want a pretty and clean hangar queen quad or a dirty racer. I prefer the racer as it's much more fun :).
 

Greg2B

Senior Member
Just thought I would update this thread with some of my latest videos while still waiting for some parts to finish the build.

Attempted to make an obstacle to fly through, was only able to navigate it once.

Cars are fair game to fly over if their in your drive way. Didn't actually make it over my first time but I edited that one out this time;).

and part 2 of my first flight which is pretty boring minus being able to keep some consistent flying speeds at the end.