MiniacRC Mighty Mini P47 Thunderbolt

CapnBry

Elite member
@CapnBry That’s wonderful man!!! Glad the instructions are sufficient so far and thanks for posting the stl, this community is awesome!
Yeah! I have only had one "Wait... what am I doing?" moment which is where you said that the slightly larger of the two hatch formers goes to the front but I didn't know which end was the front. I skipped forward in the video real quick to see. If that's the only question I'm going to have on this whole build and I've never done this before, then the instructions must be top notch. One minor issue in the plans: in the tiled plans you have Fuselage Mold F twice, but the one on page A6 (Mold E) is labeled correctly on the full size page.

Lunch break! I also quickly messed around with creating 3D printed versions of the formers, since cutting curves on small parts can be a little perilous for me.
DSC06547.JPG


It would definitely save a lot of time but the tradeoff is weight. All the DTFB formers are 0.4-0.7g each. Printed in ABS with 10% hex infill and 1x 0.6mm perimeter they weigh up to 2.3g. That would add 12-16g of weight to the plane which would be OK for a larger build but this whole thing only weighs 137g so far with 2 of the servos so that's a significant increase.

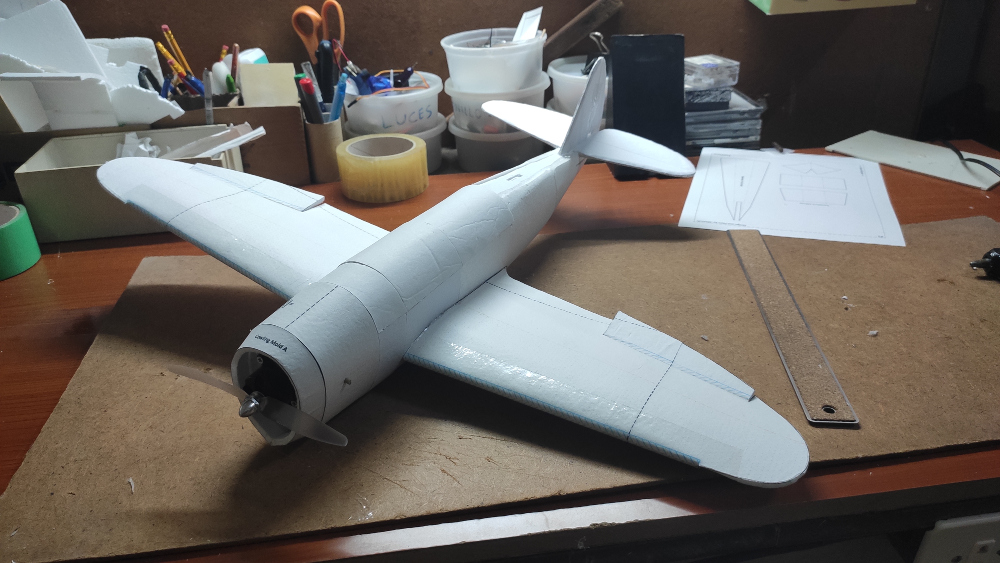
I was able to remove the cowl from my build with a little denatured alcohol and an eyedropper to break down the glue. Heck yeah, right side up!
DSC06538.JPG


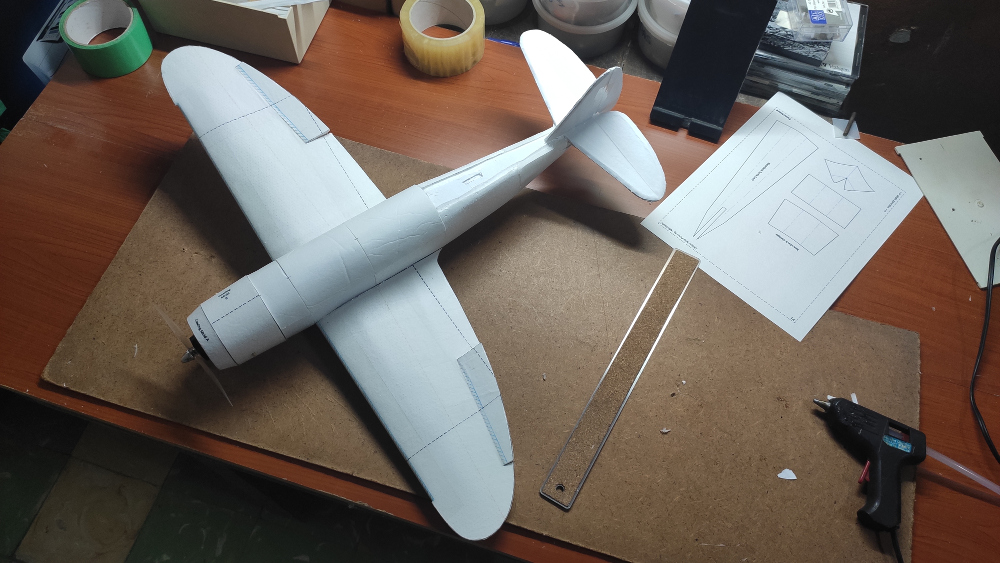
I had a little bit of a rough time with the larger mold pieces. A tip I would give to new people is to jump forward and do the hatch first, since the smaller size makes the molds easier to form and give you some practice before getting to the fuselage. It didn't come out too bad though.
DSC06542.JPG


To smooth them out, I considered getting some body filler or super-light spackle but it seemed easier to just coat the seams with paper and some spray glue. I think I'll be able to sand out some of the wrinkles that came from me being overzealous on the curve in the front too. I should have just done like I did near the tail where I just cut strips from the scrap mold paper.
DSC06546.JPG
 

CapnBry

Elite member
I can't believe it is already Tuesday and I thought I'd be done with this on Saturday! My elevator has a bit too much glue in the hinge or something even after taking a second go at cleaning it out, so the little bamboo skewer wasn't cutting it for linking the two halves. I 3D printed some little torque transfer bars. It is 2.5mm thick and about 0.45g. I printed 4 in different infill amounts and patterns and perimeters to see which would be strongest. They were all about the same apart from the gyroid fill one, which was only slightly worse than the rest, but also the lightest. I think gyroid just needs a slightly higher percentage of infill or more area for the pattern to gain full strength. I used the one with 50% grid infill and it is more more strongly connected to the driven side of the elevator than with the skewer.
DSC06552.JPG

I really got lucky with the placement of everything inside, since the CG is juuust slight back from where it should be and there's not a chance I can move anything apart from the battery, which can only move 2-3mm. It is a 1300mA 3S so it is pretty big for a mini. I used some scrap foam to center the servos since the elevator pushrod would run into the center bit running down to the tail. For the rudder, I didn't use the hole in the side of the fuselage, I just ran it directly out the back of the fuselage, so I'd wait until you build the thing before you cut the slots to put pushrods.
DSC06562.JPG


The razorback canopy just did not want to stay glued on. The paint is krylon colormaxx satin Italian olive and the glue would just come off like I tried to glue to plastic wrap. A combination of perseverance, CA, hot glue and white glue and I think it is going to blow right off when I punch the throttle. It looks eh, OK I guess but I am really pleased with the way covering the seams between the molds came out.
DSC06556.JPG


So there we go, 393g all up weight which is way way way more than the 290g in the plans, although my battery is 120g and I have the rudder servo so that's an extra 11-15g too. The 5x3.5 prop on the 2205 2300KV motor only puts out 410g of thrust on 3S so that's probably not going to be enough for Maximum Fun. FlySky FS-iA6B receiver and 4x SG90 knockoff servos round out the build.
 

mayan

Legendary member
I can't believe it is already Tuesday and I thought I'd be done with this on Saturday! My elevator has a bit too much glue in the hinge or something even after taking a second go at cleaning it out, so the little bamboo skewer wasn't cutting it for linking the two halves. I 3D printed some little torque transfer bars. It is 2.5mm thick and about 0.45g. I printed 4 in different infill amounts and patterns and perimeters to see which would be strongest. They were all about the same apart from the gyroid fill one, which was only slightly worse than the rest, but also the lightest. I think gyroid just needs a slightly higher percentage of infill or more area for the pattern to gain full strength. I used the one with 50% grid infill and it is more more strongly connected to the driven side of the elevator than with the skewer.
View attachment 136304

I really got lucky with the placement of everything inside, since the CG is juuust slight back from where it should be and there's not a chance I can move anything apart from the battery, which can only move 2-3mm. It is a 1300mA 3S so it is pretty big for a mini. I used some scrap foam to center the servos since the elevator pushrod would run into the center bit running down to the tail. For the rudder, I didn't use the hole in the side of the fuselage, I just ran it directly out the back of the fuselage, so I'd wait until you build the thing before you cut the slots to put pushrods.
View attachment 136306

The razorback canopy just did not want to stay glued on. The paint is krylon colormaxx satin Italian olive and the glue would just come off like I tried to glue to plastic wrap. A combination of perseverance, CA, hot glue and white glue and I think it is going to blow right off when I punch the throttle. It looks eh, OK I guess but I am really pleased with the way covering the seams between the molds came out.
View attachment 136305

So there we go, 393g all up weight which is way way way more than the 290g in the plans, although my battery is 120g and I have the rudder servo so that's an extra 11-15g too. The 5x3.5 prop on the 2205 2300KV motor only puts out 410g of thrust on 3S so that's probably not going to be enough for Maximum Fun. FlySky FS-iA6B receiver and 4x SG90 knockoff servos round out the build.
That looks pretty :).
 

CapnBry

Elite member
Maiden went PERFECTLY... if the goal was to crash it into the ground and break apart on launch.

I gave it a toss and it rolled left and I couldn't recover. I did a frame-by-frame analysis to verify that the control surfaces were moving and in the proper direction and it looked fine. The throws on the ailerons are ~24 degrees on the left ~22 degrees on the right so maybe this isn't enough for launch, or I didn't give it a hard enough toss. One wing broke off and ripped off all the paper on the side molds to halfway back to the tail. Prop was broken and the cowl got a chunk broken out, some minor damage everywhere else.

I'll fire up the hot glue gun at lunchtime and get it all back together again, up the throws a bit, and try again. EDIT: Added 5g of weight to the nose to bring the CG to 30mm, upped all the throws to 27 degrees. Added some right roll trim for good measure. No joy. It almost survived the second toss so I taped everything back together in the field and launched with full power and more right trim. It almost flew but did not and took the wing off again. The power pod has also gone soft. The foam on the top has crushed in a bit so the motor can tilt up and down, and the skewer holes are getting elongated so there's a mm or two of slop back and forth. I'll glue it all back together again this evening and try with a 6x4.5 prop (the only 6" I have) and hope it isn't too much for the ESC, although with flights this short I think it will be fine. ;)

EDIT2: And with a 6x4.5 prop, it rolled all the way to inverted as soon as it left my hand and smashed into the ground at even a greater rate of speed, smashed the nose off, broke the prop, and the power pod skewer ripped a good 10mm gash in the nose. Looking at the film it was upside down 0.6 seconds from when my fingers were still on it. Looks like with full aileron I was able to stop the roll but at that point I was upside down and pulling back on the stick so we know what happens there. Flight terminated at T+0.966seconds.
 
Last edited:

nesteffe

New member
Sorry you are having so much trouble CapnBry, but I do admire your perseverance. I have been having a similar issue with my P-40 that I just built but not as extreme, I was just getting stalls shortly after takeoff, most likely because I misread the specs on the motor I had grabbed out of my spare parts box. It is only able to put out 50-60% of the plane's AUW in thrust... no wonder it was hard to hand launch while also holding the transmitter :) Since 0.5:1 TWR wouldn't be super fun anyway I went ahead and ordered a new motor, but I now have to decide whether to just glue up my smashed up wing and cowl as best I can or rebuilt from scratch, so I feel your pain. Hopefully you find your issue and get it sorted out, that P-47 looks like it would be a blast to fly and I want to build one also!
 

Boberticus

Active member
Got the spar cut out of fiberglass at work today for my maiden this weekend, just got to glue it in and attach the wings to the fuselage...

I noticed a small typo, in the large sheet its correct, but in the tiled sheets there are two fuselage mold skin Fs and no mold skin E. Pretty easy to see which is which though, just thought id point it out.

this is a spectacular set of plans, this has to be added to the store, i love these foam skin on frame designs, and to make it swapable!?!?!?!?!?! frigging awesome you've done a amazing job here Maniac, this was a absolute pleasure to build, thank you for filling my last two weeks of evenings with fun. :)

I like your wing design alot better than Mr Overstreet's techniques, its a logical evolution of the classic FT wing, it feels a heckava lot stronger, still looks super nice, and the build is familiar, straight-forward, and rather easy to do. To keep the open ended wings so it still allows for good stall characteristics is just icing on the cake, and id bet simply modifying the bottom of the wing for a closed wingtip could make for different flight characteristics/sport wing. I truly hope this technique gets adopted by the community, it feels like a advance in technology :D

i beveled the bottom wing panel's trailing edge to make the wing more aerodynamic, and i added a yaw thrust vectoring engine mount up front https://www.thingiverse.com/thing:2384230, I haven't weighed the AUW yet but should be around 450 grams, with a racestar br2205 motor spinning a 5045 5 blade prop, and a 1.5mah 3s battery. 550gs of thrust, but the motors and Esc will support 4s, and I've got a couple 850mah batteries on the way that should push thrust close to 1000 gramns!

this might be the prettiest plane I've ever built...i gotta take some pics before i javelin it into the ground :/
 

Boberticus

Active member
Pics as promised. Slippery wings and thrust vectoring!!! now i can go crash it, i have proof it existed at one point :D

I"ve got two shoulder centering roller dials on my transmitter so heres how I've set it up. Elevator and Ailerons on right stick, Rudder is hooked up to the right shoulder roller, Throttle and Thrust vectoring is on left joystick, and the left shoulder roller is a positive mix between the two yaw systems.

Directional controls are all on the right hand, so i can set the throttle and forget it, and I should be able to both throw fully each way with both rudder and thrust vectoring on the left shoulder, and by using left stick and right shoulder, I can throw them opposite each other and "crab"... theoretically of course, well see how this does in the real world :)

the thrust vectoring system is exactly the size of the inner fuselage box, so you do have to cut it into the box and hot glue it in, but if this thing works well Im going to try to resize it to fit just like a swapable pod.
20190830_194255.jpg
20190830_194309.jpg
20190830_194541.jpg
20190830_194651.jpg
20190830_194009.jpg
 

Baker57

New member
Am I missing something with this build? I have built the mini P47, but have had to add a bunch of extra weight to the front of it to get the center of gravity in the right spot. Is this normal, or should I attempt to rebuild? I’ve got the battery all the way to the front of the power pod, right behind the motor. Using 5g servos from the flitetest power packs. Something just seems to be off. Any help would be appreciated.
I have added at least an ounce of weight to the front of the fuselage cover, and at least another 3 ounces into the PowerPod. I will have to check the total weight in the morning, but seems very front heavy to me. I have built the Alpha jet, and it flies great and seems much lighter than this plane.
 

Boberticus

Active member
I'm pretty sure the CG is in the right spot, at least it flies nice when you balance it where its called for.

The front of the cover isn't that far from the center of gravity, you might have added weight without changing the balance much, maybe cutting open a three sided square and folding open a temp panel in the cowling and putting the weight you've put in the cover up there, then resealing again with hot glue might help? just increasing the distance that weight is from the cg will increase its effectiveness, and there is alot of sealed up blank space in that pretty nose.

Depending on where they are now and how easy it is to move them, you might try re-mounting your servos and Rx closer to the nose, just stick in the battery and move everything as far forward as you can and re-cut your control arms. this might be a pain though, i certainly cant move the servos on mine i put them way back on the vertical tail stab where i cant get to them.

Im fairly certain that this isn't meant to be a light floater though. At 290 grams the wing loading (weight to wing surface area) is 12.6 oz/sqft, mine is 450g(19.5 oz/sqft) and CapnBry was 390g(16.9 oz/sqft). The Alpha jet is around 10oz/sqft, so you looking at a plane that has anywhere between 30-95% higher wing loading than that one.
 

CapnBry

Elite member
Yeah I eventually figured out the problem with my build one I hung it up in the CG testing sling. What's it called, a Jenny Rig? I can't find the name of it, but a sling made of rope and a plumb bob handing from it. My CG was behind the recommended placement by a good 5mm or more. Once I had it properly balanced it flew great, although it was really really beat up from my failed attempts to make it fly tailheavy. I've been meaning to come back and post a video of it flying as expected, but iiiii seem to have lost the video file. It was a fantastic flyer but with my paint scheme and it being so small I had a hard time maintaining orientation and ended up crashing it pretty bad a few more times.

I needed to add a lot of weight up front, like 20-25g if I remember correctly and I went with a smaller 800mAh 3S battery that would fit entirely forward of the CG.
 

MiniacRC

Well-known member
@Baker57 , sorry to hear of the trouble. My first few prototypes faced this problem as well :(
Unfortunately it came down to packing the esc below the powerpod inside the cowling and pushing the battery as far forward as possible. It could also be overuse of glue in the rear portion but that's an unfortunate consequence of how much detailing is back there. On the most recent builds, I was able to get it to balance great with the stock F pack.
This one is a heavy plane but feels extremely light in the air with the slippery elliptical wing, and glides good too. The CG problem in general is a consequence of the wing being so far forward on the original plane. I moved it back before releasing the plans but in general the issue seems to persist compared to a plane like a p40 that has a more rearward-located wing. Hope your P47 flies well, thanks for building it! :)
 

cdfigueredo

Elite member
Hey guys, I love this plane, and the design work is amazing. I love a plane that flies well and looks good in the air.
Yesterday I printed the plans and I plan to start building it tonight using my wheatboard.

I was thinking, if not there would be a way to build an interchangeable turtle deck? This way, we could have both models in one. we would have to build 2 hatches with their respective turtle decks and hold them with magnets.
What do you think? Any ideas?
 

mayan

Legendary member
Almost ready to fly... this plane is so easy tu build. :D.
Unfortunately mine looks like the frankenstein monster :sick:. It's made of wheatboard, foamboard and EPP. literally scratch build.
I hope it flies well. :rolleyes::rolleyes::rolleyes:
Looks great! Really good work!
 

MiniacRC

Well-known member
Hi @cdfigueredo just saw this, sorry.
Great build! I'm not able to figure out how we could integrate the turtle deck into the hatch to get the model-choice you suggested. But if you figure something out please let us all know!
This mini does require a significant dose of power! A 2204 on a 5x5 may feel a little anemic but I can't say for sure, it might be just fine! I know that a 2205 2300 on a 6*4 prop was more than enough for unlimited vertical.
Also, most importantly the thrust angle should be rightward rather than left. This is to counteract the inertial and aerodynamic effects of the prop spinning counterclockwise (looking at the nose of the airplane holding it facing toward you). Otherwise the forces may add and torque roll the plane violently on take off! :(
 
Last edited: