Well.. most likely. I am getting my plotter this week and will start testing. As long as I can get a quality product out of it, then kits will be coming!
I'll do my engine mounting like this (wooden firewall. The one you see is a template).
Then bend the outside of the boom to the firewall and glue.
I glued what I think are two reinforcements to the inside of the boom but had to adjust the firewall to fit.
I am not sure this is the way it should be done but for me it works.
MAIDEN FLIGHT VIDEO!
Flight report. The p-38 tracks very well and easy to fly, hand lauching was too easy (much better then i was expecting) made the maiden before this video so i had some bad nose heavy issues during the flight video so youll see alot of pitching.
Flaps! how can i put it... there awsome! But youll still need some power on landings. Starting testing them at 3:00min in video.
Ruff landing do to the small battery i was using so flight was short and ran out of power (poof battery too). 1800 4s. And that being said i landed in very wet grass during this video and my airframe was still bare foam board resulting in flight failure and crash in second video to come.
Really sorry to hear about the crash. Looks like it was flying really well before the failure. Can you elaborate on what failed? And on your setup for the successful flights (cg, throws, expo, and such)? Hopefully it isn't a total loss but the ending of that second video seemed pretty rough.
it's alive.. It's alive IT'S ALIVE! and you didn't install a $3 battery alarm :black_eyed:. But wow man, sure looked steady on that video. Sure hope it's rebuildable.
Really sorry to hear about the crash. Looks like it was flying really well before the failure. Can you elaborate on what failed? And on your setup for the successful flights (cg, throws, expo, and such)? Hopefully it isn't a total loss but the ending of that second video seemed pretty rough.
The failure was caused from me landing in the very wet grass during the first video. Really didn't seem to bad so i went for another run after drying the airframe.
During the second video i all of the sudden lost aileron control, on inspection of the crash remains i found the left aileron paper seam was wet and half of it was torn away which resulted in the left spin dive. Airframe was a Total lose. The 100ft dive to the ground structurally damaging the whole airframe
CG that nic placed in the plans seems to be right on. I had a fun time getting it balanced tho it took some time. It was rather too nose or tail heavy but i was able to get just right.
Ailerons on low rates at 12-15degrees was all that was needed for calm flight so stick with the Ft gauges.
Elevator- i tend to keep high no matter what so on lows its was around 20 degrees
Flaps- with great lift without any ballooning effect 45degrees
No going to give my high rates cause i normally run the between 80-100%on rates. I fly by feel. Flaps still stay at 45. And i allways run 30% expo
Motor- turnigy D3530 1100kv- 350watts each, still overkill for the build if you want a lighter setup
ESC- Hobbyking 30amp esc, shocking but they stay cool and run great.
Props-10x5apc
Servos- turnigy 10g mg. Ailerons, flaps and elevator
Battery- nano tech 35-70c 1800 4s
it's alive.. It's alive IT'S ALIVE! and you didn't install a $3 battery alarm :black_eyed:. But wow man, sure looked steady on that video. Sure hope it's rebuildable.
Yeah she fly wonderful. Much better then expected and hand lunch was very easy, thought it would be a handful.
Battery alarms whats that haha. No i run timers and i was right on time but was pushing it alittle. No worries it wasent that poofy alls good. And the landing was still good in my book, just wish i landing it on the road instead
Post a pic! So you splice out the power on one ESC and Y'd it to your flap line and rudder, then sent just the signal wires for those 6 servos to your RX?
Post a pic! So you splice out the power on one ESC and Y'd it to your flap line and rudder, then sent just the signal wires for those 6 servos to your RX?
Practically its real easy. Cut the proper red wires just after the plugs and connect (solder). edit: just from one ESC! (the left one) and from the two Y cables that go to the flap line and rudder line.
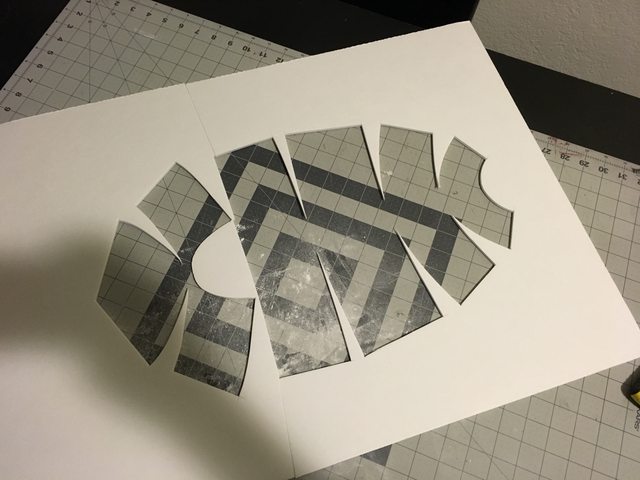
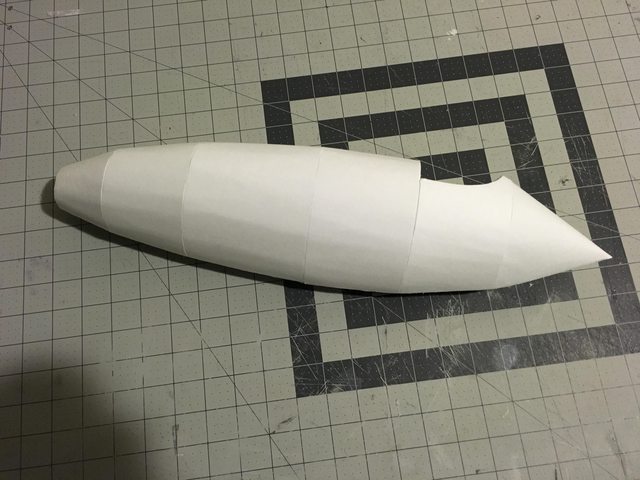
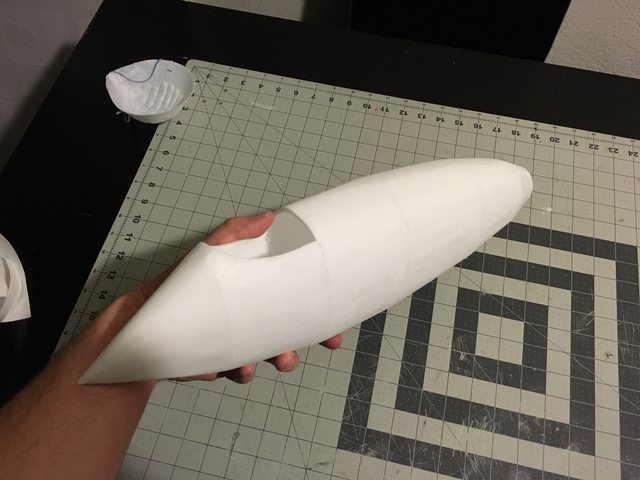
Working on a second nose design. The layered method I worked on first is very strong and has perfect shape but it's time consuming to build (4 hours or so). This method is a single sheet of foam and can be built in about an hour.
With the outside paper still on. You could leave it this way if you wanted.
Paper removed and light sanding.
The single layer is very light weight and would work perfect for a slow fly nnP-38.


.jpg")
.jpg")