Power pod redesign

Pougnagna

New member
Hi All!
Even before finishing my 1st ever plane, a Tiny Trainer, the second unit is already cut and waiting for most mistakes done and hopefully not reproduced.
So as everything is almost going according to the plan, let's start to deviate.
I've purchased a motor that doesn't fit into the power pod, so was born the 1st frame.
Then, after some minor fixes (such as mandatory down / right angles), came the time to fix the battery inside the Mole (yes, I plan to dig a hole on 1st flight).
So with no power pod but a frame, where to fix the 84 gr of 3S 850 mAh electrical can? ON A REDESIGNED FRAME of course.
A few more than 10 grams of proud PLA frame ready to bond firmly 495 gr of thrust and estimated 300 gr max of Mole. I don't know if it will only moves in the air, nor fly.
Ladies and Gentlemen, here it is.
Screenshot_20190620-202648__01.jpg

Under the frame is laying the battery.

My questions to you are:
1. What do you think about this in general?
2. Any big issue already obvious or sure to come?

Thank you in advance for your kind advice.

Sorry to be brief, sent from my phone.
 

OliverW

Legendary member
Hi All!
Even before finishing my 1st ever plane, a Tiny Trainer, the second unit is already cut and waiting for most mistakes done and hopefully not reproduced.
So as everything is almost going according to the plan, let's start to deviate.
I've purchased a motor that doesn't fit into the power pod, so was born the 1st frame.
Then, after some minor fixes (such as mandatory down / right angles), came the time to fix the battery inside the Mole (yes, I plan to dig a hole on 1st flight).
So with no power pod but a frame, where to fix the 84 gr of 3S 850 mAh electrical can? ON A REDESIGNED FRAME of course.
A few more than 10 grams of proud PLA frame ready to bond firmly 495 gr of thrust and estimated 300 gr max of Mole. I don't know if it will only moves in the air, nor fly.
Ladies and Gentlemen, here it is.
View attachment 134081
Under the frame is laying the battery.

My questions to you are:
1. What do you think about this in general?
2. Any big issue already obvious or sure to come?

Thank you in advance for your kind advice.

Sorry to be brief, sent from my phone.
The area where the motor mounts should be solid.
 

Bricks

Master member
The angles are going to be a very weak spot unless bracing is added and even then it will be in an area where you do not want structural weakness. As mentioned above having a solid firewall is stronger.
 

Hai-Lee

Old and Bold RC PILOT
Hi All!
Even before finishing my 1st ever plane, a Tiny Trainer, the second unit is already cut and waiting for most mistakes done and hopefully not reproduced.
So as everything is almost going according to the plan, let's start to deviate.
I've purchased a motor that doesn't fit into the power pod, so was born the 1st frame.
Then, after some minor fixes (such as mandatory down / right angles), came the time to fix the battery inside the Mole (yes, I plan to dig a hole on 1st flight).
So with no power pod but a frame, where to fix the 84 gr of 3S 850 mAh electrical can? ON A REDESIGNED FRAME of course.
A few more than 10 grams of proud PLA frame ready to bond firmly 495 gr of thrust and estimated 300 gr max of Mole. I don't know if it will only moves in the air, nor fly.
Ladies and Gentlemen, here it is.
View attachment 134081
Under the frame is laying the battery.

My questions to you are:
1. What do you think about this in general?
2. Any big issue already obvious or sure to come?

Thank you in advance for your kind advice.

Sorry to be brief, sent from my phone.
It will work OK but there are a few concerns I will raise with you!

The bottom of the frame is open and so there is nothing to stop the bottom from collapsing inwards until AFTER the motor is fitted.

Secondly and perhaps more serious is the lack of any diagonal bracing of the front in the case of a ground impact especially on the bottom of the motor mount screws. Ideally for rigidity and to stop the bottom of your sculpture from breaking on the bottom behind the motor mount I would recommend a diagonal brace from the forward bottom to the top of the next vertical member, (one on each side). This is so that if you land a little roughly the entire structure does not snap the motor completely off.

Just a thought!

Have fun!
 

FDS

Elite member
I would make sure you have a light motor. 850 3s is also quite a bit of battery for a TT if you want slower, floaty flight characteristics. I use this motor in my minis, it’s light, fits the standard firewall and with a 6x4apc prop can go plenty fast on 2s with a little 500mah pack. You get about 5 mins flight time with the small packs, 7 mins with an 850 2s. On 3s it will go very fast and fully vertical.
I wouldn’t recommend making a heavy, powerful TT for your first flights, you want it as light as possible and as forgiving and slow flying as possible.
 

Pougnagna

New member
Thank you all for your wise advices!

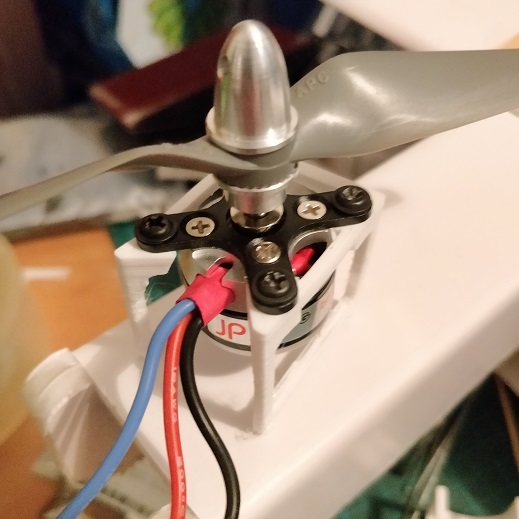
Here is the v3 prototype already holding the motor (3D printed some days ago, so before writing this thread and reading your comments):
IMG_20190620_234036.jpg

As you can see, bottom side is open due to cables. I think the X bracket should be able to take the role of a square front frame. But I can still modify this portion.

Here is a link to full stress test (thrust and 50 kg impact): Report.
Please note that I consider the motor and the X bracket as a full assembly, and the forces applied by and to prop shaft (thrust and impact) are applied to the white frame's front face in simulation (o_O). Tell me if not clear.

Theorical model doesn't show that I've already glued the reinforcement nose pieces (the above picture does). That's why this frame is 30 mm wide only, and my guess was that 10 mm thick glued foam will help to absorb most of the impact. But for this I clearly need to make a stronger connection between frame and fuselage, as the prop shaft will transfer impact to the frame which will transfer it to the fuselage (sorry if thinking out loud).

Stronger may mean heavier, so I've to work about the best ratio weight/strenght.

@Spacefarer
Drilled plywood would of course work perfectly, but IMO this way to do fits better to actual motor's bracket design because of cooling (plus I'm having fun to do it ;)).

A reinforced version as @Hai-Lee has suggested is already on the workbench.
 
Last edited:

Pougnagna

New member
@FDS
I would make sure you have a light motor. 850 3s is also quite a bit of battery for a TT if you want slower, floaty flight characteristics. I use this motor in my minis, it’s light, fits the standard firewall and with a 6x4apc prop can go plenty fast on 2s with a little 500mah pack. You get about 5 mins flight time with the small packs, 7 mins with an 850 2s. On 3s it will go very fast and fully vertical.
I wouldn’t recommend making a heavy, powerful TT for your first flights, you want it as light as possible and as forgiving and slow flying as possible.
Sorry, I was editing my post all along the day because I'm @ work, so I didn't saw your reply.
I will follow the way you recommend and continue this frame in parallel.
Many thanks.

We keep in touch.
 
  • Like
Reactions: FDS

Bricks

Master member
What you may find out is the X motor mounts are not very rigid on impact they will bend (and possibly break ) not a big deal, just remove the mount from the motor and put on a flat surface and flatten back out with a hammer. This is one of the reasons for using a completely flat motor mount.
 

tomlogan1

Elite member
Not meaning to hijack your thread, but for many planes, the power pod has caused the bbq skewers to lengthen or rip out the holes when your landing is a bit too vertical. I have taken the power pod ( for minis only) and put a fourth side (top) and used velcro to fasten it to the plane. Maybe someone else has done this before me, but I hope it will be successful and will allow me to rebuild the fuselage without the existing bbq skewer holes or having holes in the future. Any comments for or against welcomed.
 

OliverW

Legendary member
Not meaning to hijack your thread, but for many planes, the power pod has caused the bbq skewers to lengthen or rip out the holes when your landing is a bit too vertical. I have taken the power pod ( for minis only) and put a fourth side (top) and used velcro to fasten it to the plane. Maybe someone else has done this before me, but I hope it will be successful and will allow me to rebuild the fuselage without the existing bbq skewer holes or having holes in the future. Any comments for or against welcomed.
I personally would not do that. I would use pieces of a gift card to reinforce the holes so they won't tear
 

Keno

Well-known member
Your ideas designs are creative. Thanks for your post as the learning curve is a ________. Stay with it and happy flying.