Ridge Runner motor glider soaring adventure

CapnBry

Elite member
Last week ended with some pretty awful weather here, wind gusting up as high as 40kt so flying has been a no-go. I had been seeing some weirdness in the servos that would come and go. You could actually see it in the blackbox logs as the gyros would suddenly show a lot of noise so I've used the time to try to work out what's going on. The servos would just jitter back and forth, sometimes a small amount, sometimes a lot (3mm maybe?). I tried a buncha stuff:
  • Put torroids on the power input and the servo wires, individually and all of them.
  • Use a second 3A 5V power supply BEC for the servos only.
  • Use a second battery to power the servos (with the ground wires linked)
  • Put capacitors on the 5V line, from 100uF to 3500uF
  • Put a supercapacitor on the 5V line, 1F.
  • Make a new servo cable to connect to the flight controller, thinking I must have gotten the wires shorting.
  • Twist the servo wires to make them more resilient to noise.
  • Change the CH1 and CH2 inputs to switches on the transmitter so they always output 1500us, to make sure the jitter wasn't coming from gimbal sampling errors.
None of these had any effect whatsoever on the jittering, and viewing on the oscilloscope I'd see 10ns of PWM jitter when they weren't doing it, and 40ns when they were. Nanoseconds, not microseconds, so that's 0.04us of jitter in the control signal which should not even register as being something different. Eventually, I found it!

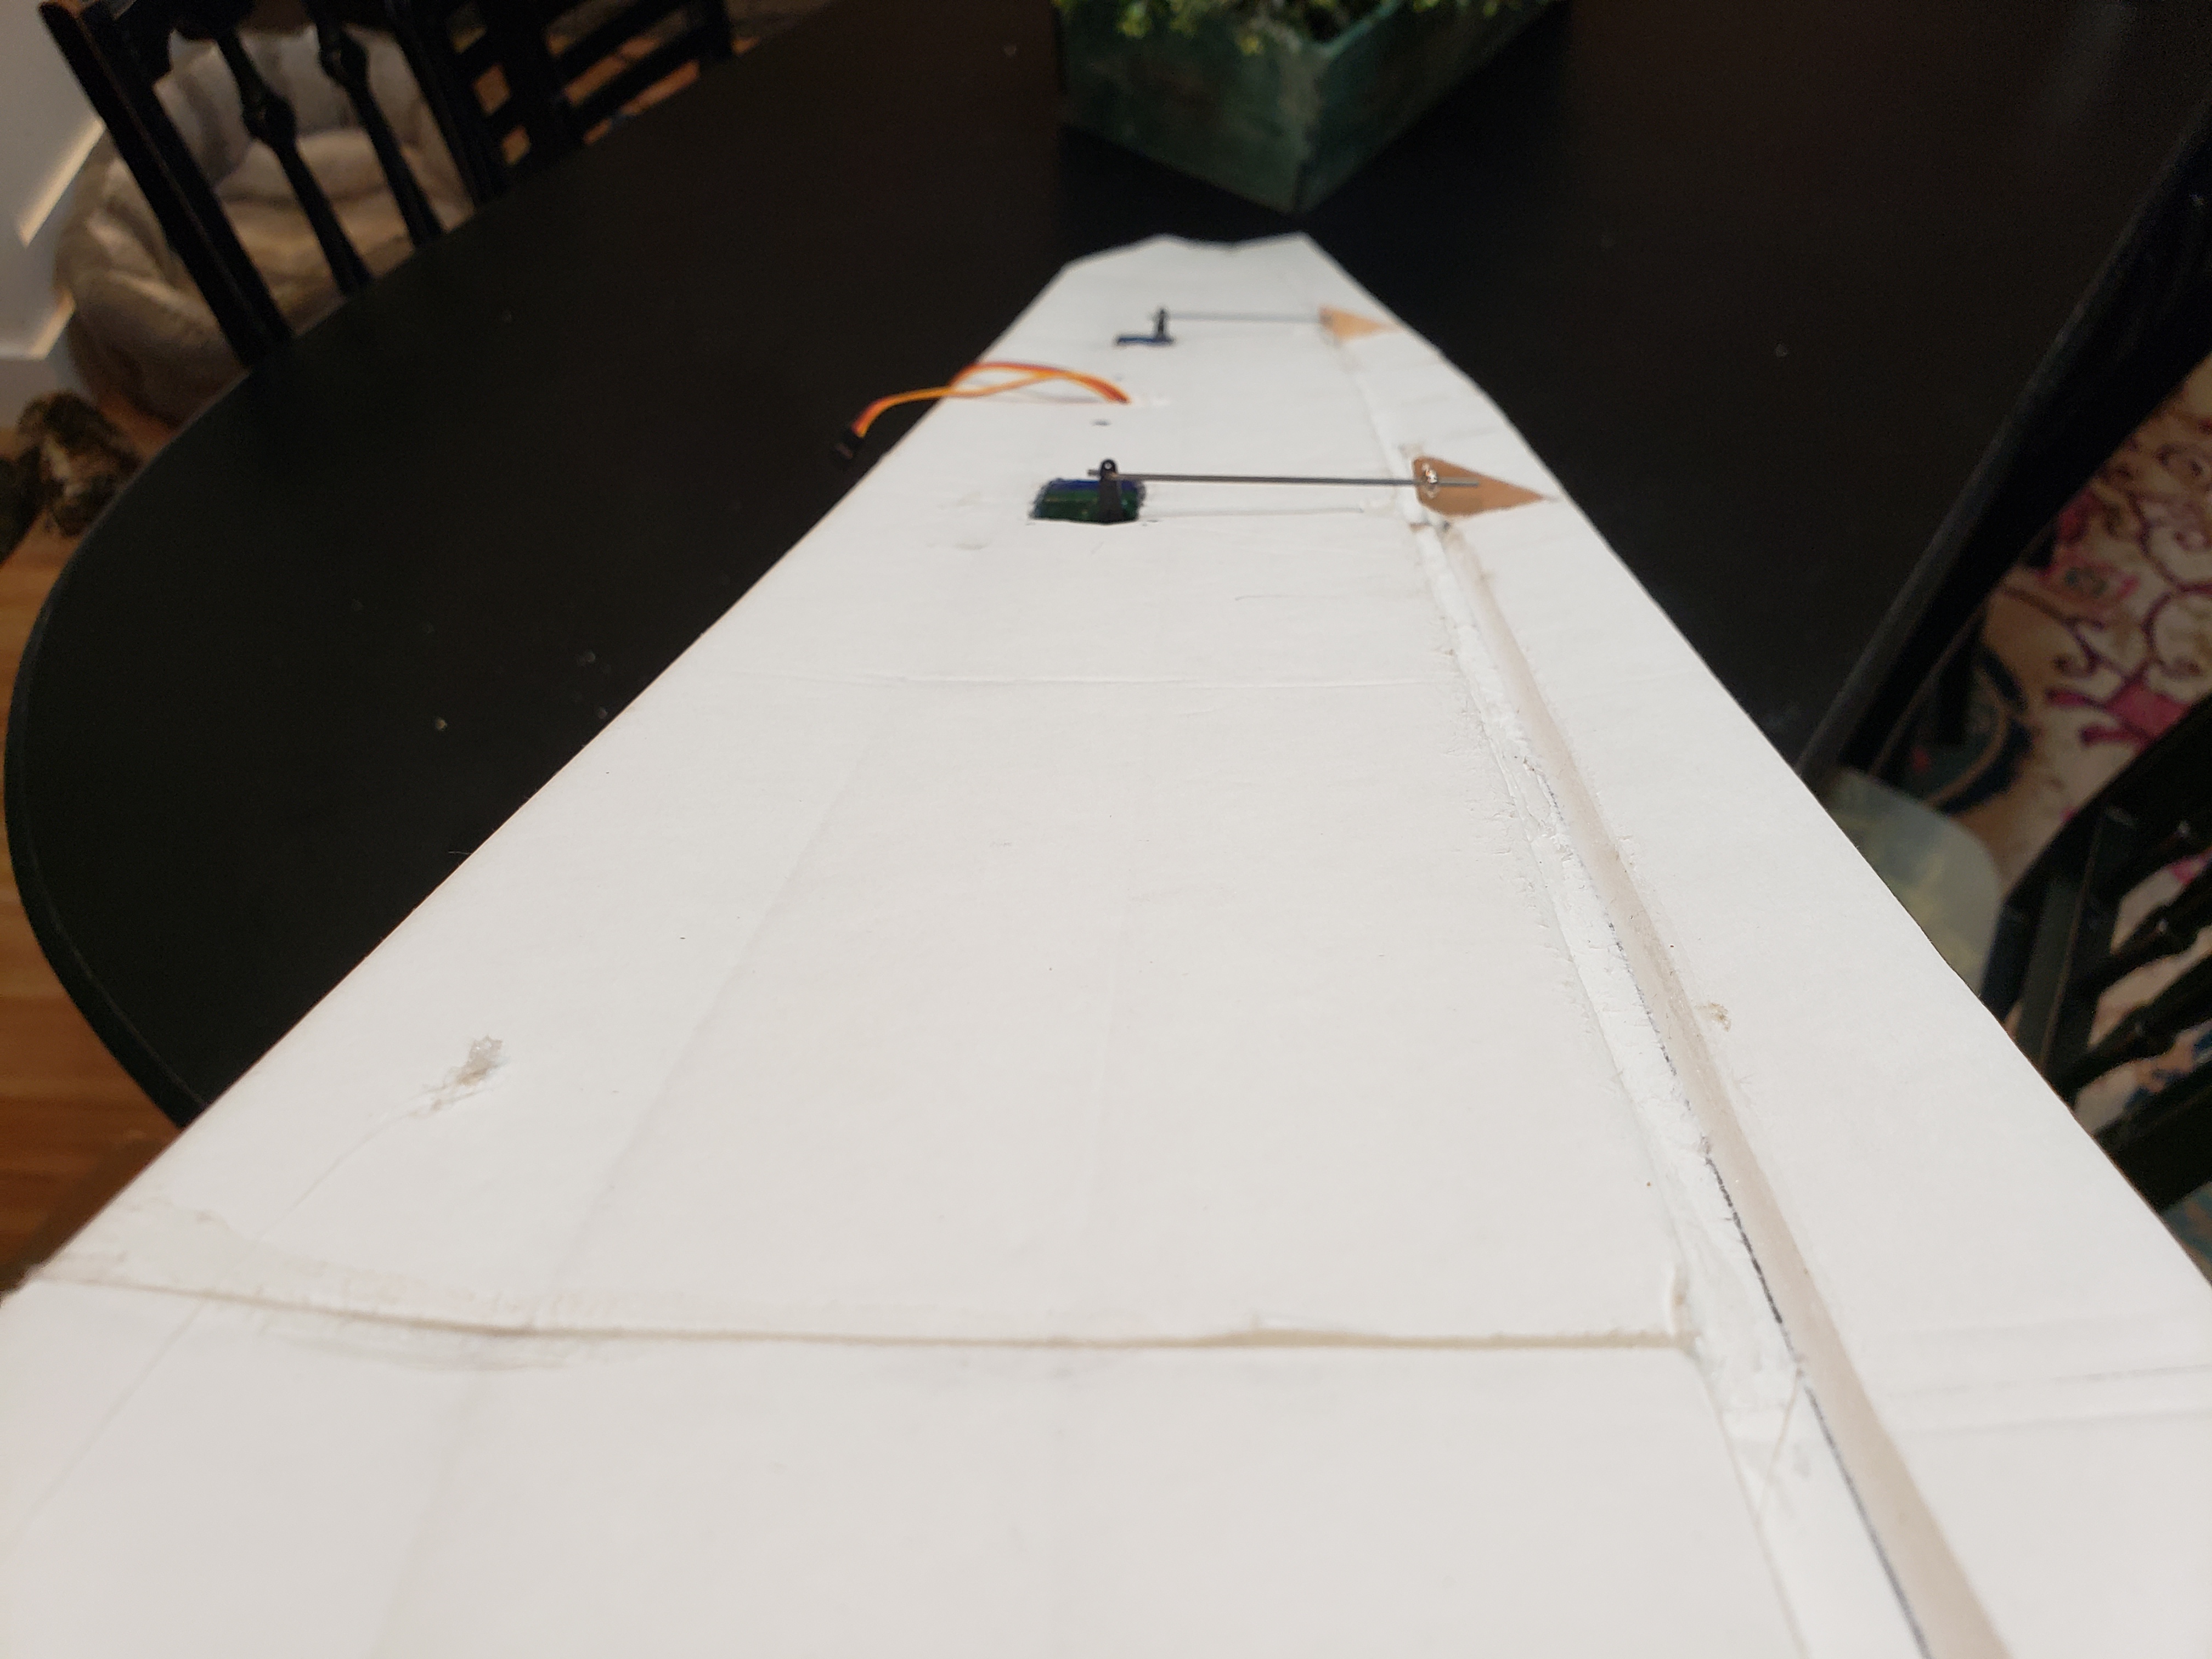
Turns out when the FrSky R-XSR receiver is anywhere near the servo wires, they start moving on their own. The closer the wires are to the receiver, the more they move. This is sort of a problem when the servo wires have to go somewhere and everything is within 25mm of any other thing due to how thin the fuselage is. Even the shielded portion of the antenna wires seems to cause it to some degree. I've never experienced this before, and I've built a dozen different planes with all the components just sort of shoved in there wherever they fit. I think the bare receiver plus the super-thin servo wires (I'd swear these are like 30AWG, so wee) induced interference. I have worked around this slightly by pushing the receiver up into the top corner and running the servo wires along the bottom and holding them down there. You can still hear the servos moving slightly, but the control surfaces aren't moving enough to see. I also used the ole ziptie+heatshrink trick to make some little masts to move the active elements further away.
DSC06361.JPG


Wow that foam looks worse in each successive photo. You may also notice that the top of the fuselage is cut behind the antennas. Oh that's just because in all my servo testing, I ended up hooking one of the servos up with the 5V and GND wires reversed and apparently that's not a good thing and I had to cut the fuselage and break the glue up with some denatured alcohol to get the servo out to replace it.

I managed to fly twice on Sunday, 25 minutes each flight on 600-750mAh of battery despite not being what I'd think was a good thermal day. Just cruising around with no throttle I'd be at 100m, then a few seconds later I'd look over and I'd be at 110m and really have to force the nose down to keep it from climbing. 10km of distance traveled, with a max of 305m from home (EDIT: the disarm screen said 452m max but the highest I see in the video is 305m). Pretty good for the generic $14 AIO 25mw FPV camera from Amazon. Definitely making me think more seriously about getting my license to use a more powerful transmitter.
PICT0007.AVI_snapshot_00.54_[2019.04.23_09.21.41].jpg
 
Last edited:

CapnBry

Elite member
@CapnBry - I am really enjoying your thread - a master of the electronics - I am learning so much!
Thanks! I was sort of pulling my hair out about the servos so it was important to me to record my experiences for posterity. I also wrapped the receiver in kapton tape except for the antennas' brass U.FL connector, then wrapped the whole thing in aluminum foil and used heatshrink to squeeze it tight. The intention was to shield the receiver using the antenna ground connection. It worked, but the connection between the foil and the antenna was spotty so it would only work if I gave it an extra squeeze and then it would eventually just stop making contact. I should have just soldered a ground wire onto the PCB and then wrapped that with the foil but I was too lazy to remove all the kapton to do it.

I'm still trying to get the PID tuning down to get iNav to work 3-channel. Every day I go out there with a new set of PID parameters and am pretty close to calling it good enough. I've got "Stabilized Roll" attached to the rudder servo and it works well enough that I can do Return To Home and Failsafe and navigate back to the launch area, but it still waggles a bit. It makes FPV flying in Angle mode while gliding a little uncomfortable because you rock side to side a lot. Angle mode is nice because it keeps the nose level for you and it is easy to see when you're in lift because the variometer shoots up. What you lose is knowing how much elevator pressure it is using to keep you up, so you'll stall without any warning.

I've found that lower feed forward gains (labeled as the D term in iNav configurator, but is FF for fixed wings) work better, as what would be the accurate feed forward for 80% deflection and 120 degrees/second (103 feed forward) is way too much because the glider accelerates in roll very quickly so it always way overshoots the target roll rate. I also tried it with 137 roll feed forward (90 degree/second) and it was worse, so I've gone 137 -> 103 -> 80 -> 60 -> 30 -> 20 and that seems about right. That means the controls are a little sluggish to get into a turn, but it's a 1.5m glider so I don't need it to be able to win a dogfight or anything. I'm currently at roll PID = 10, 12, 20 with a leveling strength of 10 (down from 20) and a roll rate of 120.
 

CapnBry

Elite member
And I'm pretty amazed at what kind of range you can get on stock RC gear. I've got your standard FrSky Taranis Q X7 transmitter standing in a field with trees within 30m of me, and the cheapest AIO 25mW FPV camera ($14) on Amazon that had the Video In and Video Out separated.
PICT0007.AVI_snapshot_00.54_[2019.04.23_09.21.41].jpg


over 900m from home and I've got a pretty ok signal still. It drops out completely every couple of seconds but it is enough to fly by, especially with iNav because when things start going poorly you can just flip a switch and have it come back. Lowest RSSI I saw on the receiver was 45, which is my "low" threshold for where the transmitter starts warning me.

iNav navigates like a drunken pilot when you force it to fly 3-channel, in a way I can't seem to tune out just yet. When it needs to make more than a 90 degree turn, it will do about 170 degrees, then come back a little too far and sort of oscillate back and forth along the way.
Annotation 2019-04-25 111725.png


Instead of loitering in a circle, it zig zags along the loiter zone edge as well.
Annotation 2019-04-25 112042.png


It's great fun to fly as an FPV cruiser with the power on in Angle mode, which adds the appropriate amount of down elevator to compensate for throttle / wind. When you get to where you want to be, just cut the power and coast around looking for lift in manual mode for excellent stick feel. There's no worries about stalling you'd get when cutting the throttle with a normal throttle to elevator hard-coded mix, which doesn't compensate for speed. I could definitely use more downthrust on the motor mount next time though. I had to use the motor a lot today because I went out early, but I still went 9.67km on 1007mAh over 23 minutes.

Next phase is the "dump money on it" phase. Ordered:
  • Foxeer Monster V3 Pro mini camera. I must have spent a dozen hours looking at different cameras.
  • VAS Diamond 2.4GHz antenna for the transmitter. Curious to see if this makes any difference in signal strength for this R-XSR or my Flysky receivers.
  • RP-SMA mod kit for the Taranis. Of course, you've got to desolder the original antenna. Bleh.
  • Pair of Foxeer Lollipop 2 5.8GHz antennas. We'll be switching from linear polarization to RHCP. That may actually reduce my range, but also reduce multipath interference?
  • Still need to get a cheap VTX to go with the camera, although I might just wire it to the AIO's VTX board.
 

CapnBry

Elite member
It is a lot of fun! I have done two more iterations on tuning and it flies good enough that I may not make any further changes. I flew yesterday for 30 minutes of under 700mAh of power, floating around for a total distance of 11km. I managed to actually find two real thermals in that time and used them to climb from 60m up to 120m, cruise around, then come back to them and ride up again. When cruising, I'm flying between 16-20kph which is ridiculously slow but with a sink rate of <0.5m/s. The sad part is that I start to lose FPV signal if I drop below around 55m and I get full dropouts around 45m thanks to all the trees around my field, so the real flyable range is only 60-120m and it turns out that's a pretty tight envelope. I feel like I'm always micromanaging my altitude.

I just found out I forgot to insert the SD card into the flight controller all the way so I don't have any logs for my last three flights, but I do have some FPV video including me intentionally flying inverted this time. I still can't get my brain to hold onto the fact that when the aircraft is inverted, I need to be looking at at least 60% sky in order to not be severely pitched down (as opposed to normal flight where the screen is 75% ground or more). It only needs about 25-30kph of speed before flipping inverted becomes trivial, but it is actually harder to do when under power because managing the model's desire to climb under power and roll it without stalling is something my fingers still haven't learned yet.
PICT0004.AVI_snapshot_02.10_[2019.04.28_08.52.17].jpg


I've got to start thinking about how I'm going to get the upgraded FPV gear in there next. The big thing is the weight. I'm replacing a 5g AIO with 22g of parts-- the new antenna alone weighs almost as much as the entire setup now. I think I can move the GPS receiver to the back and the wires are long enough to be able to offset the extra weight.

Overall I am pretty pleased because it is a really slow cruiser that doesn't get out of range fast and lasts longer than I care to fly at a time. It's not going to get any distance records like a lot of endurance FPV fliers do, but I am having a great time flying around the conservation around my neighborhood learning how to find and track thermals.
 

CapnBry

Elite member
Been a while! I had the model apart almost all of last week trying to squeeze all the equipment in. The VTX I bought (AKK X2M) is pretty terrible in that sitting on a desk with a blower fan pointed right at it, the 25mW setting puts out 13-14mW, 200mW is about 140mW, and 500 and 600mW both are around 350mW. I had bought a Wolfwhoop Q3-Pro that was a lot closer to spec, however after testing, I made the cable wrong and put the 5V OUT in the VBATT IN position and instantly fried it. I would have bought another one of those but the price had jumped up on Amazon by 20%. To keep it from overheating itself directly into oblivion, I just ziptie it to the nose of the model with a little 3D printed reinforcement behind the foam.
DSC06391.JPG


I also had one 5g servo left so I figured why not make a roll stabilized camera? The antenna I had purchased was also a straight connection so I also 3D printed a little right angle bit. Running the VTX through the Omnibus F4 Pro flight controller at VBATT (instead of 5V) somehow also messed up the current sensor. I found the fix called the "Club24" which is to just run a wire to bypass the input voltage selection jumper. Worked great although now my current reads 6% lower than it did before. Not a big deal to fix this in the configurator.

It's also pretty busy inside now. I moved the GPS back behind the rear rudder and elevator servos to help balance the weight, which is now 470g (with 125g 3S 1400mAh battery). I upped the prop from 5x3.5 to 6x4 because the 405g of thrust wasn't going to cut it any more. It now really wants to roll right when under power and at max power (~13A, 60kph), forget about making a left turn without going almost full rudder. I'm not sure if the wind was playing heavily into this today or if it is just thrust angle.
DSC06395.JPG


I also got my Amateur Radio License, Technician Class because apparently even the 25mW VTX was illegal to use. Took just 3 nights of studying and reading a book and I think I missed one out of 35 on the test, and you're allowed to pass with 25 out of 35. Haven't had a chance to really test it out because it keeps raining here, but I can fly up through the woods to the backyard at my house ~900m away and still have decent video signal on the "200mW" output power. It drops out completely if I nose up or down real hard and the antenna top or bottom points at me. The EV800D goggles even stop recording it drops off so hard. The new camera has a much better picture in detail, color, and the woods aren't just greyish green blobs any more. I bought the 2.5mm lens and it is a little narrower than I'd like. Is the setup worth costing 3x as much as the cheapie AIO? Eeeeeee well I'm not getting 3x the fun out of it, that's for sure.
PICT0002.AVI_snapshot_01.27_[2019.05.06_15.15.52].jpg
 

Attachments

  • Antenna90-ZipTieBack.zip
    16.2 KB · Views: 0

CapnBry

Elite member
This leg of the adventure is coming to a close. I haven't flown any other model as much as I have this one, duration-wise. Each flight about 30 minutes of floating along and finding thermals around the neighborhood, and I've flown it 3-5 times per week since we started. I need the parts to put in my Galleon DT (ZOHD Talon GT Rebel clone) so I'm going to have to cut into the Ridge Runner.

The tail and fuselage have held up really well, and they look about as good as the day I made them. The wing has slowly gained flex in the center section and is a bit floppy now. On hard turns I swear there's about 30-45 degrees of total wing bending going on. If I built this again, I would make the center section straight and just do the polyhedral of the wingtips. I think between the tip angles and the center flexing a bit, there's plenty of self stabilization. I'd also add a little more down thrust to the motor although it's not terrible to fly manual currently, it could be a little more tame under power.
 

Whistlinginthedark

Junior Member
Great posts! I've built two of the Ridge Runners and I'm working on a third. On the first 2 I widened the fuselage in the middle similar to yours and made the wings flat. I put ailerons in one version of the flat wings and it's now my favorite plane to slope! I want to make a powered version such as yours. How much of the nose did you remove?
Thanks for the great thread!
Darin
 

CapnBry

Elite member
Thanks! I had made a 30.5mm x 38mm firewall for mounting the motor and I just slid the firewall down the fuselage until it was the same size, then cut there. I've attached the stl and source for the nose pod if that helps at all. It needs more down thrust for sure but I stink at getting the angles right so I'm not sure if the source file would work with larger thrust angles without drilling out the holes a bit.

I had been considering doing another with the center dihedral removed and leave the bit in the wingtips, since it has too much now for sure, but hadn't considered doing it completely flat with ailerons. I bet you're getting some great efficiency of out of that setup and would love to see some pictures.
 

Attachments

  • RidgeRunner-Pod.zip
    19.3 KB · Views: 0

Whistlinginthedark

Junior Member
Here are a few pics of the wing. As I mentioned its flat (no dihedral). I modified the plan by moving the wing tip section connection. The top surface is uninterrupted all the way to the wing tip. As a result, the underside is separated along the chord and glued together when folding over the top half. I had to do it that way so I could extend the length of the ailerons.
I'm still experimenting with additional wing configurations and aileron size/position along with further fuselage modes in the center/front section.
This version works quite well on the slopes. I'm using differential throws and I get a really good roll response.
 

Attachments

  • 20190905_202935.jpg
    20190905_202935.jpg
    2.4 MB · Views: 0
  • 20190905_202859_003.jpg
    20190905_202859_003.jpg
    3 MB · Views: 0
  • 20190905_202838.jpg
    20190905_202838.jpg
    3.3 MB · Views: 0

CapnBry

Elite member
Here are a few pics of the wing. As I mentioned its flat (no dihedral). I modified the plan by moving the wing tip section connection. The top surface is uninterrupted all the way to the wing tip. As a result, the underside is separated along the chord and glued together when folding over the top half. I had to do it that way so I could extend the length of the ailerons.
Oh wow that looks great, and good idea on how to extend the aileron. Did you do anything to reinforce the wing?
 

Whistlinginthedark

Junior Member
Yes, I put a 5mm carbon fiber tube right in front of the aileron servos that extends to just past the joint on the bottom of the outer wing.
 

CapnBry

Elite member
Yes, I put a 5mm carbon fiber tube right in front of the aileron servos that extends to just past the joint on the bottom of the outer wing.
Oops. I read this post from my phone and forgot to say thanks. It makes sense about adding a CF tube. I gotta pick up some of these since they seem ubiquitous in these larger wing builds and I always regard them as "high end" parts. As light as my 3D printed reinforcements but like 100x stronger.