Simple Scout - Vintage Vibe

PoorManRC

Master member
My FT Simple Scout #1 is finished. I took it out to the field for a photo shoot. Didn't do a maiden yet. Our October club meeting is coming up next week so I wanted to make sure it was in one piece for the Show & Tell. Scout #1 is 3 channel. Scout #2 is 4 channel. #1 has the pushrods and servos installed on the outside of the fuselage while #2 has them inside. Direct link to the post explaining the external pushrods HERE. Watch the youtube video of the external pushrods in action HERE. Visit my blog to see tips for Foam Board R/C Modelers HERE.
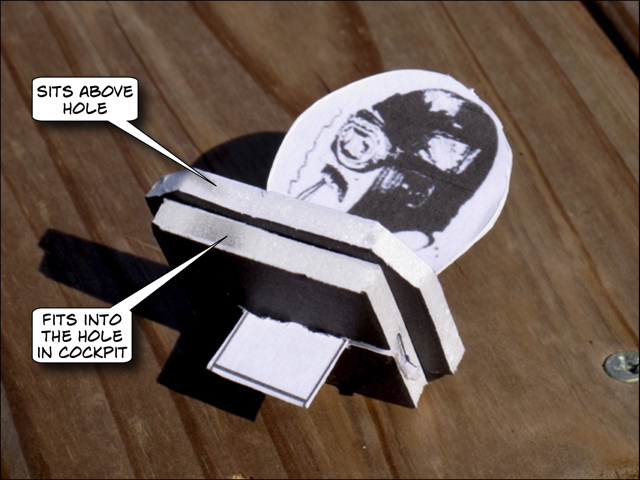
Looks GREAT! That really worked out. I too was wondering about the balance... Particularly where on the Wing it balances.
AWESOME! 👋👋👋👋👋
 

checkerboardflyer

Well-known member
Good question. In the build video Josh said that to get proper balance he placed the front of his 1200 mAh battery even with the firewall. To get a balance slightly nose down I needed to place my 1100 mAh battery about one inch behind the firewall. Why is that? Here is my thinking. The back half of the fuselage being built with balsa sticks is lighter than the foam board that would have been there. That's the only way I could explain it. Here's the snag. I weighed the Scout and it came out w/o battery to be 16 oz. But if you look at the specs for the Scout it states that the weight w/o battery is 15 oz. And that is with the complete foam board fuselage. I dunno. Let me know what you think.
 

checkerboardflyer

Well-known member
very nice - retro and cool too - looking forward to the maiden! :D
Thanks! Pretty happy with the way it turned out. Made a few mistakes, but I am building another, #2. The idea is to learn from #1 and make a better version. One problem is the glue leaking from the turtle deck in front of and behind the cockpit. Going to see if I could use double sided tape for that instead of hot glue.
 

PoorManRC

Master member
Good question. In the build video Josh said that to get proper balance he placed the front of his 1200 mAh battery even with the firewall. To get a balance slightly nose down I needed to place my 1100 mAh battery about one inch behind the firewall. Why is that? Here is my thinking. The back half of the fuselage being built with balsa sticks is lighter than the foam board that would have been there. That's the only way I could explain it. Here's the snag. I weighed the Scout and it came out w/o battery to be 16 oz. But if you look at the specs for the Scout it states that the weight w/o battery is 15 oz. And that is with the complete foam board fuselage. I dunno. Let me know what you think.

FliteTest is being optimistic with their specs?? I dunno...
That's an interesting question. 😲
 

checkerboardflyer

Well-known member
The Scout #1 looked unfinished without a pilot figure. So I came up with a solution similar to one I used before with the FT Old Speedster. Check that post out HERE. There is a hole in the foam board that is the top of the fuselage in the cockpit. I used a couple of pieces of foam board to make a base, then cut a slot for the profile pilot head to fit in. You may or may not want to glue the pilot in permanently. More tips and resources for R/C Foam Board Modelers HERE.
 

Attachments

  • 1-wingtip-fbf.jpg
    1-wingtip-fbf.jpg
    270.9 KB · Views: 0
  • 4-pilot-top-bottom-fbf.jpg
    4-pilot-top-bottom-fbf.jpg
    288.3 KB · Views: 0
  • 5-pilot-top-bottom-side-fbf-fbf.jpg
    5-pilot-top-bottom-side-fbf-fbf.jpg
    269 KB · Views: 0
  • 6-cockpit-hole-fbf.jpg
    6-cockpit-hole-fbf.jpg
    282.1 KB · Views: 0
  • 7-pilot-seated-fbf.jpg
    7-pilot-seated-fbf.jpg
    243.9 KB · Views: 0

PoorManRC

Master member
That's pretty cool Bill. Simple, cheap solution. Part of me wants to do this...
But I'm so OCD, and Scale Model driven (beyond rational!!), that I'm still holding out to be able to afford a couple of 3D Pilot Busts to go in my over detailed Cockpits!!

It even sounds ridiculous writing that out. I've been a Finescale Modeler since the late 70's... Even the Planes I'm building now I consider woefully inadequate and undetailed...

It's a sickness I believe! 😲
I think your idea is perfectly acceptable, looks GREAT, adds Scale detail, and is best of all - light!! 👍👍
I should really try this. It'll look right in the Air, right?
I've got everything I need except a working Printer.

Besides my self ranting, that Scout represents some excellent Modeling skill, and you did a great job!!
 

checkerboardflyer

Well-known member
That's pretty cool Bill. Simple, cheap solution. Part of me wants to do this...
But I'm so OCD, and Scale Model driven (beyond rational!!), that I'm still holding out to be able to afford a couple of 3D Pilot Busts to go in my over detailed Cockpits!!

It even sounds ridiculous writing that out. I've been a Finescale Modeler since the late 70's... Even the Planes I'm building now I consider woefully inadequate and undetailed...

It's a sickness I believe! 😲
I think your idea is perfectly acceptable, looks GREAT, adds Scale detail, and is best of all - light!! 👍👍
I should really try this. It'll look right in the Air, right?
I've got everything I need except a working Printer.

Besides my self ranting, that Scout represents some excellent Modeling skill, and you did a great job!!
Thanks Carmine. I have been building balsa model airplanes for many years, so some of the skills that I have acquired have helped me with foam board. If you are a fine scale modeler you probably have high standards for workmanship. The problem with foam board for me is that I usually have ragged edges and not so clean joints no matter how I try. I need to keep telling myself "It's only foam board, it's only foam board."
 

checkerboardflyer

Well-known member
Pilot Alternative: Several years ago Sig Mfg. sold three old time kits that had profile pilots as part of the kit. You can still buy the kits or just the pilot figures directly from Sig. You can order online. Click HERE to visit the Sig replacement parts page. Then view the parts for the Antionette, Demoiselle, or Deperdussin. The Demoiselle comes with complete body. The others just come from the waist up. Direct link to the blog post HERE. More tips and resources for foam board R/C modelers HERE.
 

Attachments

  • sig-profile-pilots-fbf.jpg
    sig-profile-pilots-fbf.jpg
    180.8 KB · Views: 0

checkerboardflyer

Well-known member
Finally got the internal servos and pushrods finished on FT Simple Scout #2. Check the youtube video. Also some pics below. Included is a pic of the pushrod guide that I installed in the fuselage. I used this method instead of the one shown on the video. The method shown on the video with the foam board keepers bends the pushrods and puts tension on them. So the servos need to work more. More tips for R/C foam board modelers HERE.


Attachments

  • 1-guides-fbf.jpg
    1-guides-fbf.jpg
    187.4 KB · Views: 0
  • 2-left-side-elevator-fbf.jpg
    2-left-side-elevator-fbf.jpg
    174.2 KB · Views: 0
  • 3-rudder-bottom-fbf.jpg
    3-rudder-bottom-fbf.jpg
    171.8 KB · Views: 0
  • 4-rudder-right-side-fbf.jpg
    4-rudder-right-side-fbf.jpg
    164.3 KB · Views: 0
Last edited:

PoorManRC

Master member
Finally got the internal servos and pushrods finished. Check the youtube video. Also some pics below. Included is a pic of the pushrod guide that I installed in the fuselage. I used this method instead of the one shown on the video. The method shown on the video with the foam board keepers bends the pushrods and puts tension on them. So the servos need to work more.

Looks GREAT Bill!! 😎 I like that solution for the Pushrods.
I'm just waiting to be able to afford the Balsa, and I'm ready to start mine! 😉