Standard FoamBoard Hinge weakness

Hai-Lee

Old and Bold RC PILOT
I have been building FB model aircraft for about 3 years and a member of this forum for about 2 years, (the times may be slightly erroneous because my watch battery has gone flat:rolleyes:). In that time I have been plagued with control surface hinge issues REGARDLESS of whatever I had done to lock them down and protect them from water and the like.

Well today I was working on an FT Mini Scout courtesy of a buzzbomb challenge, (Thanks for that @buzzbomb ). When I decided it was time to investigate the hinge issue once and for all. It has been driving me crazy for years. I do like puzzles but really hate those puzzles that are far too simple. The hinge issue was one of those far too simple puzzles:mad:. The way the brain works sometimes is frustrating!

The problem was/is simply one of fatigue! Simply put a simple bevel hinge is flexible even if sealed with glue, tape, or even ironed. Control surfaces generate forces that move the aircraft, (remember for every action there is an equal and opposite reaction), and so these forces are also trying to separate the control surface from the structure. Well consider that at the hinge line the bevel supporting foam decreases from maximum FB foam thickness, (5mm) down to zero at the actual hinge line. Now add to this that the bevel itself is single sided with respect to the supporting paper laminate. The foam, (the only support for the connection of the control surface to the Wing or Fin), is not only somewhat flexible but also compressible. Any glue you apply to seal the hinge, (due to the applied forces), will eventually fail or crack.

See the pic below:
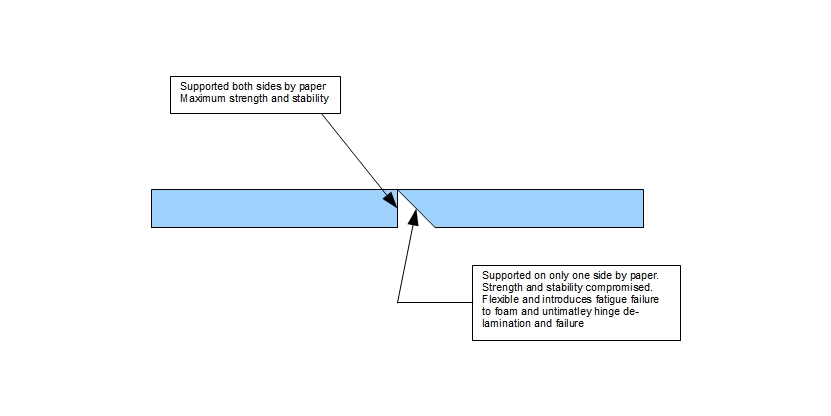
Hinge weakness.jpg

OK! After identifying the issue what is the simplest solution. Sure I could add different hinges which would be more long lived but then that is not what FT is all about! The solution was just to look at what other hinges look like. I tried to distribute the weakness, (it must hinge after all), to both sides of the hinge joint and provide the maximum support to the control surface that I could. Basically I just cut the hinge, or made the bevel/s differently.

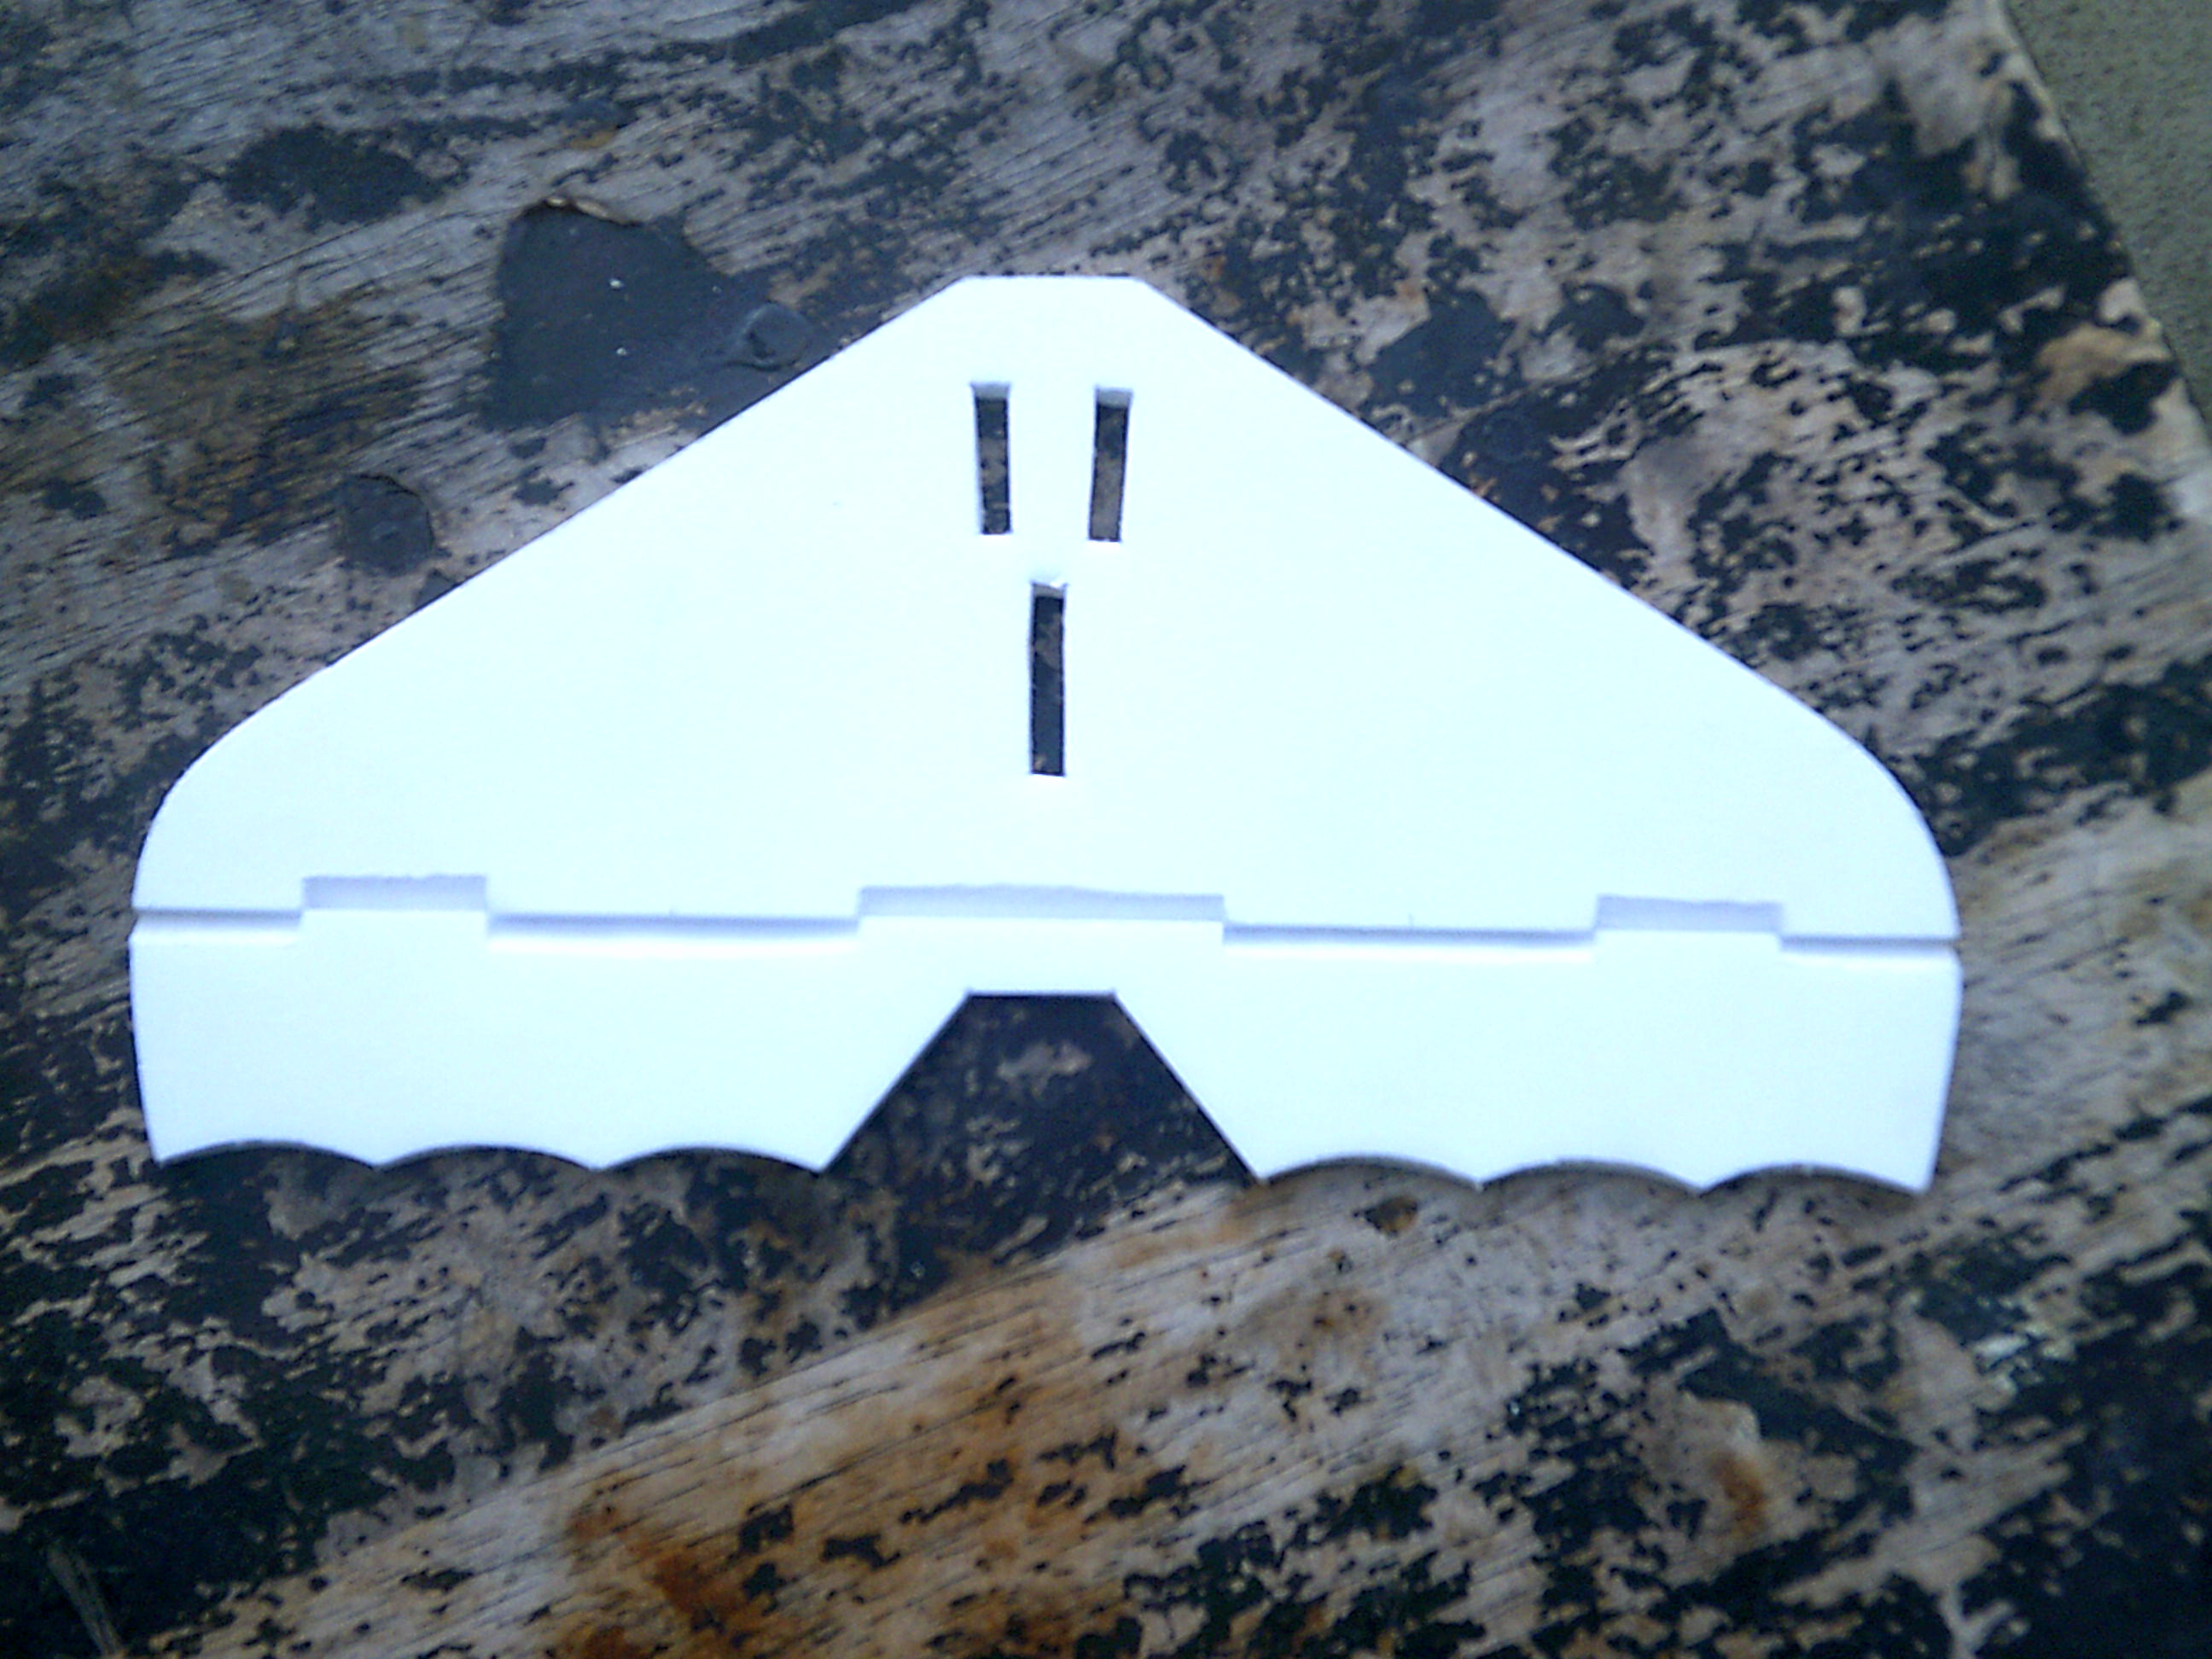
Standard Mini Scout Horizontal tail:
Standard Hinge.jpg

The different hinge bevels now!
Compound Hinge.jpg

It might look like a lot of additional work but it only took me around 3 minutes to complete and that is nothing compared to the time it took to cut out, check, and clean up the fin before being satisfied that it the best I can make it. Instead of a long unsupported hinge line that is subject to fatigue failure and even to the control surface curling up at the ends I now have a hinge line that has a maximum unsupported length of 25mm. I also checked the whole tail for flexibility from side to side and it flexes up and down less than a standard bevel hinged tail.

More support, Less flex, less fatigue, Longer life, and less flutter if the bird ever moved fast enough, I think it is worth the extra effort ESPECIALLY if the hinge line is quite long!

It takes a little more time and effort but I intend to recover that time by not having to rebuild the bird in a year or two because the elevator is falling off! You still apply the tape to the top of the hinge and still seal it of course. A photo of my actual tail can be supplied for the next day or two if required, After that it will be consumed in a Mini Scout.

Have fun!
 

Arcfyre

Elite member
It takes a little more time and effort but I intend to recover that time by not having to rebuild the bird in a year or two because the elevator is falling off!
Have fun!

I really like what you did here and I will likely include it in my next build. I would state however that the vast majority of the DTFB foam models out there don't last a year or two... Just speaking from personal experience. :)
 

Hai-Lee

Old and Bold RC PILOT
I really like what you did here and I will likely include it in my next build. I would state however that the vast majority of the DTFB foam models out there don't last a year or two... Just speaking from personal experience. :)
Most of mine have not but since getting a decent radio system my crashes have decreased so markedly that I recently had to replace my FB Ugly Stick due mostly to the elevator starting to fall off and the Ailerons, flaps, and Rudder being not far behind. Sadly I didn't use this hinge method but I definitely will next time, (if I live that long:unsure:). Early morning dew is the plane killer here!

Have fun!
 

buzzbomb

I know nothing!
Hai-Lee, I love the fact you're joining the Challenge! Took you long enough!

This was my first thought: "I'm not getting your tail, though. I can see what you did, but the actual hinge line is still just one straight line of paper."

That didn't seem right. Why would you post that? So read, re-read and then studied your diagram and pictures. I get it! That's really good. The additional foam on the moving surface helps to keep it from flexing! It's like you added a spar to the elevator!

That's really good. That's genius, mate! Four Thumbs Up for that one! (y)(y)(y)(y) Why the heck did nobody think of that before?
 

Hai-Lee

Old and Bold RC PILOT
Hai-Lee, I love the fact you're joining the Challenge! Took you long enough!

This was my first thought: "I'm not getting your tail, though. I can see what you did, but the actual hinge line is still just one straight line of paper."

That didn't seem right. Why would you post that? So read, re-read and then studied your diagram and pictures. I get it! That's really good. The additional foam on the moving surface helps to keep it from flexing! It's like you added a spar to the elevator!

That's really good. That's genius, mate! Four Thumbs Up for that one! (y)(y)(y)(y) Why the heck did nobody think of that before?
Funny thing is that it is so simple and the gains are obvious from the moment it is done! On the plans for Laser or other cutting machines all you need to add is a few "Score" lines around 14mm long, one at each of the points on the hinge line where the hinge bevel changes sides! If the builder wants to make the standard hinge bevel then the score cuts on the side without the bevel as effectively sealed when the exposed foam is wiped over with a seal of glue! Minor plan alteration massive strength gain!

Anyway it also works for ailerons, flaps, Spoilers, Elevons, and rudders!

Here is the Rudder for the Mini Scout!

DSCF0021 (2).JPG


Have fun!
 

Dante

Active member
I recently heard about the tape weave method which I intend to try as I have a terrible time with Bevel cuts. https://www.flitetest.com/articles/tape-weave-hinges

Have not tried it yet but might be a better option for those of us with beveling deficiencies.
I have tried it and it works, but it adds a lot of weight and up to 15 mins per hinge.
Sometimes I will just still bevel the edge, then put the cheapest packing tape you can find(light) on each side (like the paper, and across the bevel. This usually works pretty well
 

Hai-Lee

Old and Bold RC PILOT
I recently heard about the tape weave method which I intend to try as I have a terrible time with Bevel cuts. https://www.flitetest.com/articles/tape-weave-hinges

Have not tried it yet but might be a better option for those of us with beveling deficiencies.
I am not that good doing bevels either especially those long ones for Ailerons and elevators but doing short bevels - 2 inches long, are actually easier and my hand doesn't wander as much with a short bevel. I have more than once had to replace a horizontal tail because I sliced through the hinge trying to do a long bevel!

Just something to try sometime!

have fun!
 

kilroy07

Legendary member
Interesting idea... :unsure:
As you mentioned bevel hinges can be a little weak (although I think the plane with the most hours in my hanger right now might have 20 hrs of flight time...)

I tried something new on one of my last builds, taking a covering iron to foamboard.
At first I just was using it to roll the edges on the leading edges and taper the trailing.
It works GREAT!
Well, as I said... on my last build I tried it on the ailerons as well.
I got to tell you it is my new favorite skill!

When the hinge gets ironed it compresses and fuses the paper to the foam. The result is that the control surface is far stiffer than one that has been bevel cut.
IMG_8361[1].JPG
And probably stiffer than the stabilizing surface it's attached to!

I wouldn't skip the glue reinforcement step though (you might still see de-lamination from the non-ironed side.)

If you don't already have an iron, swap meets are a great place to find used ones (or Ebay... I picked my two as a set for under $20)
If you do have one give it a try and give your feedback. (y)
 

Lufthouse

Member
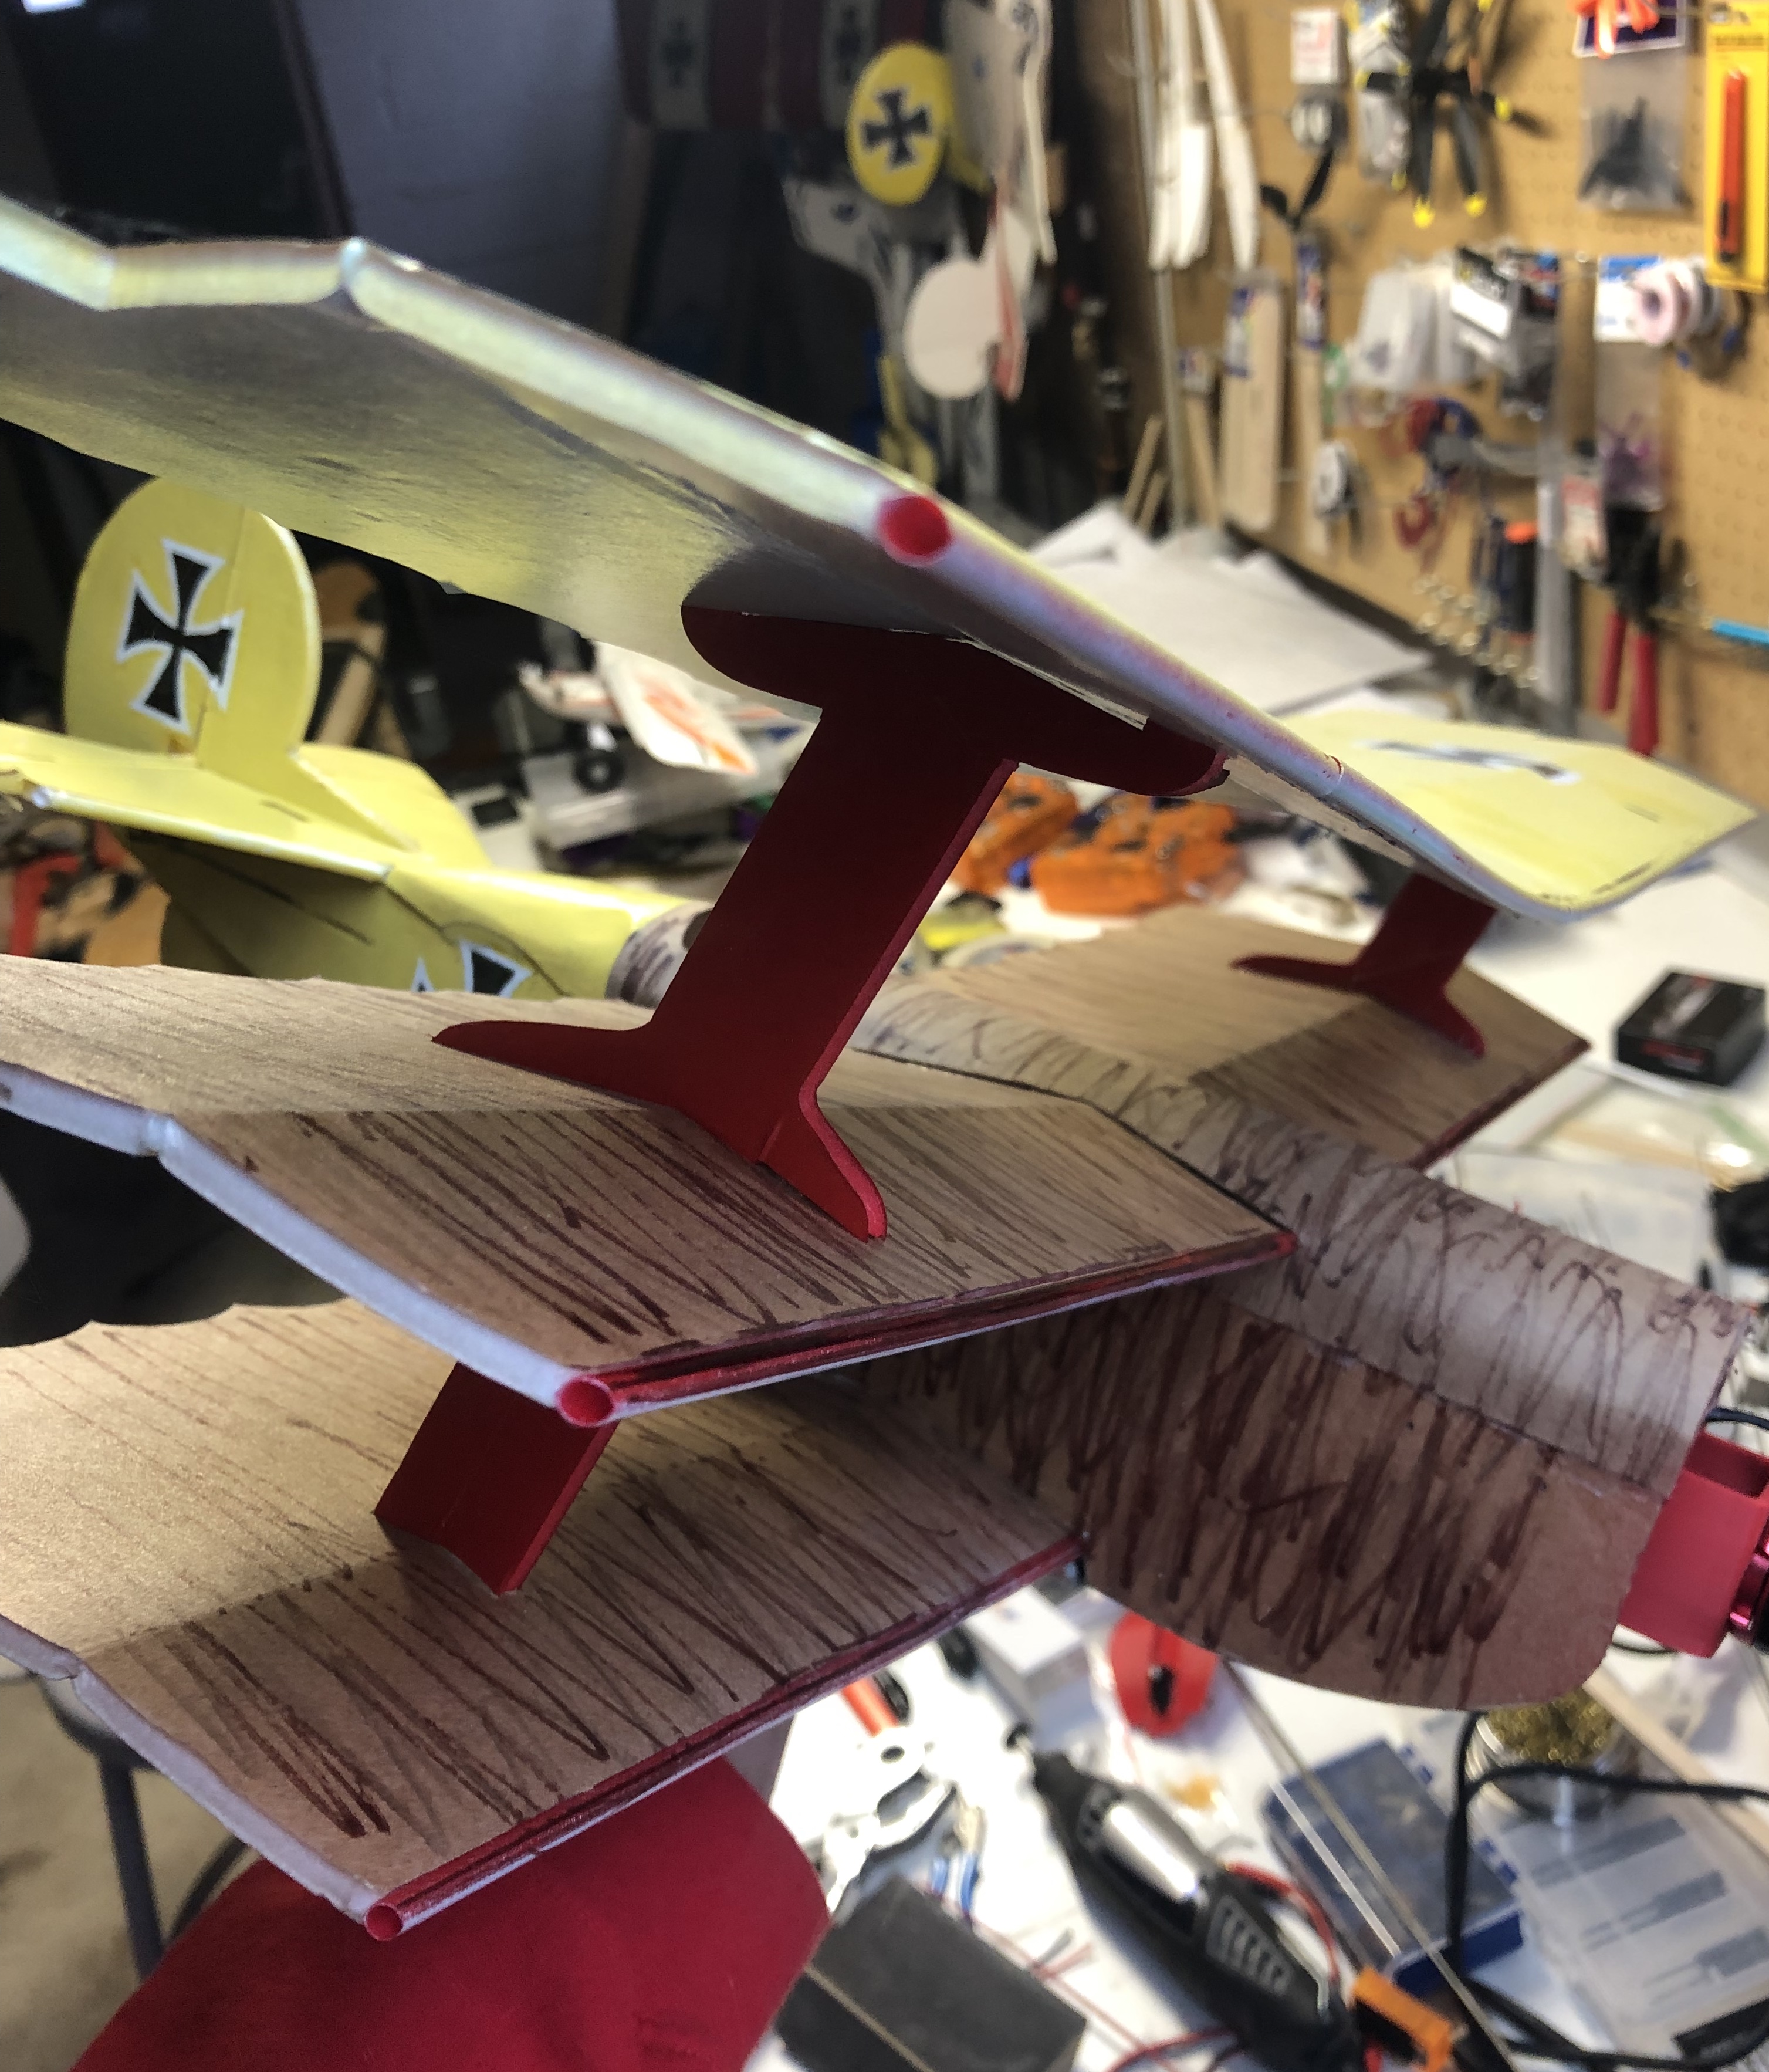
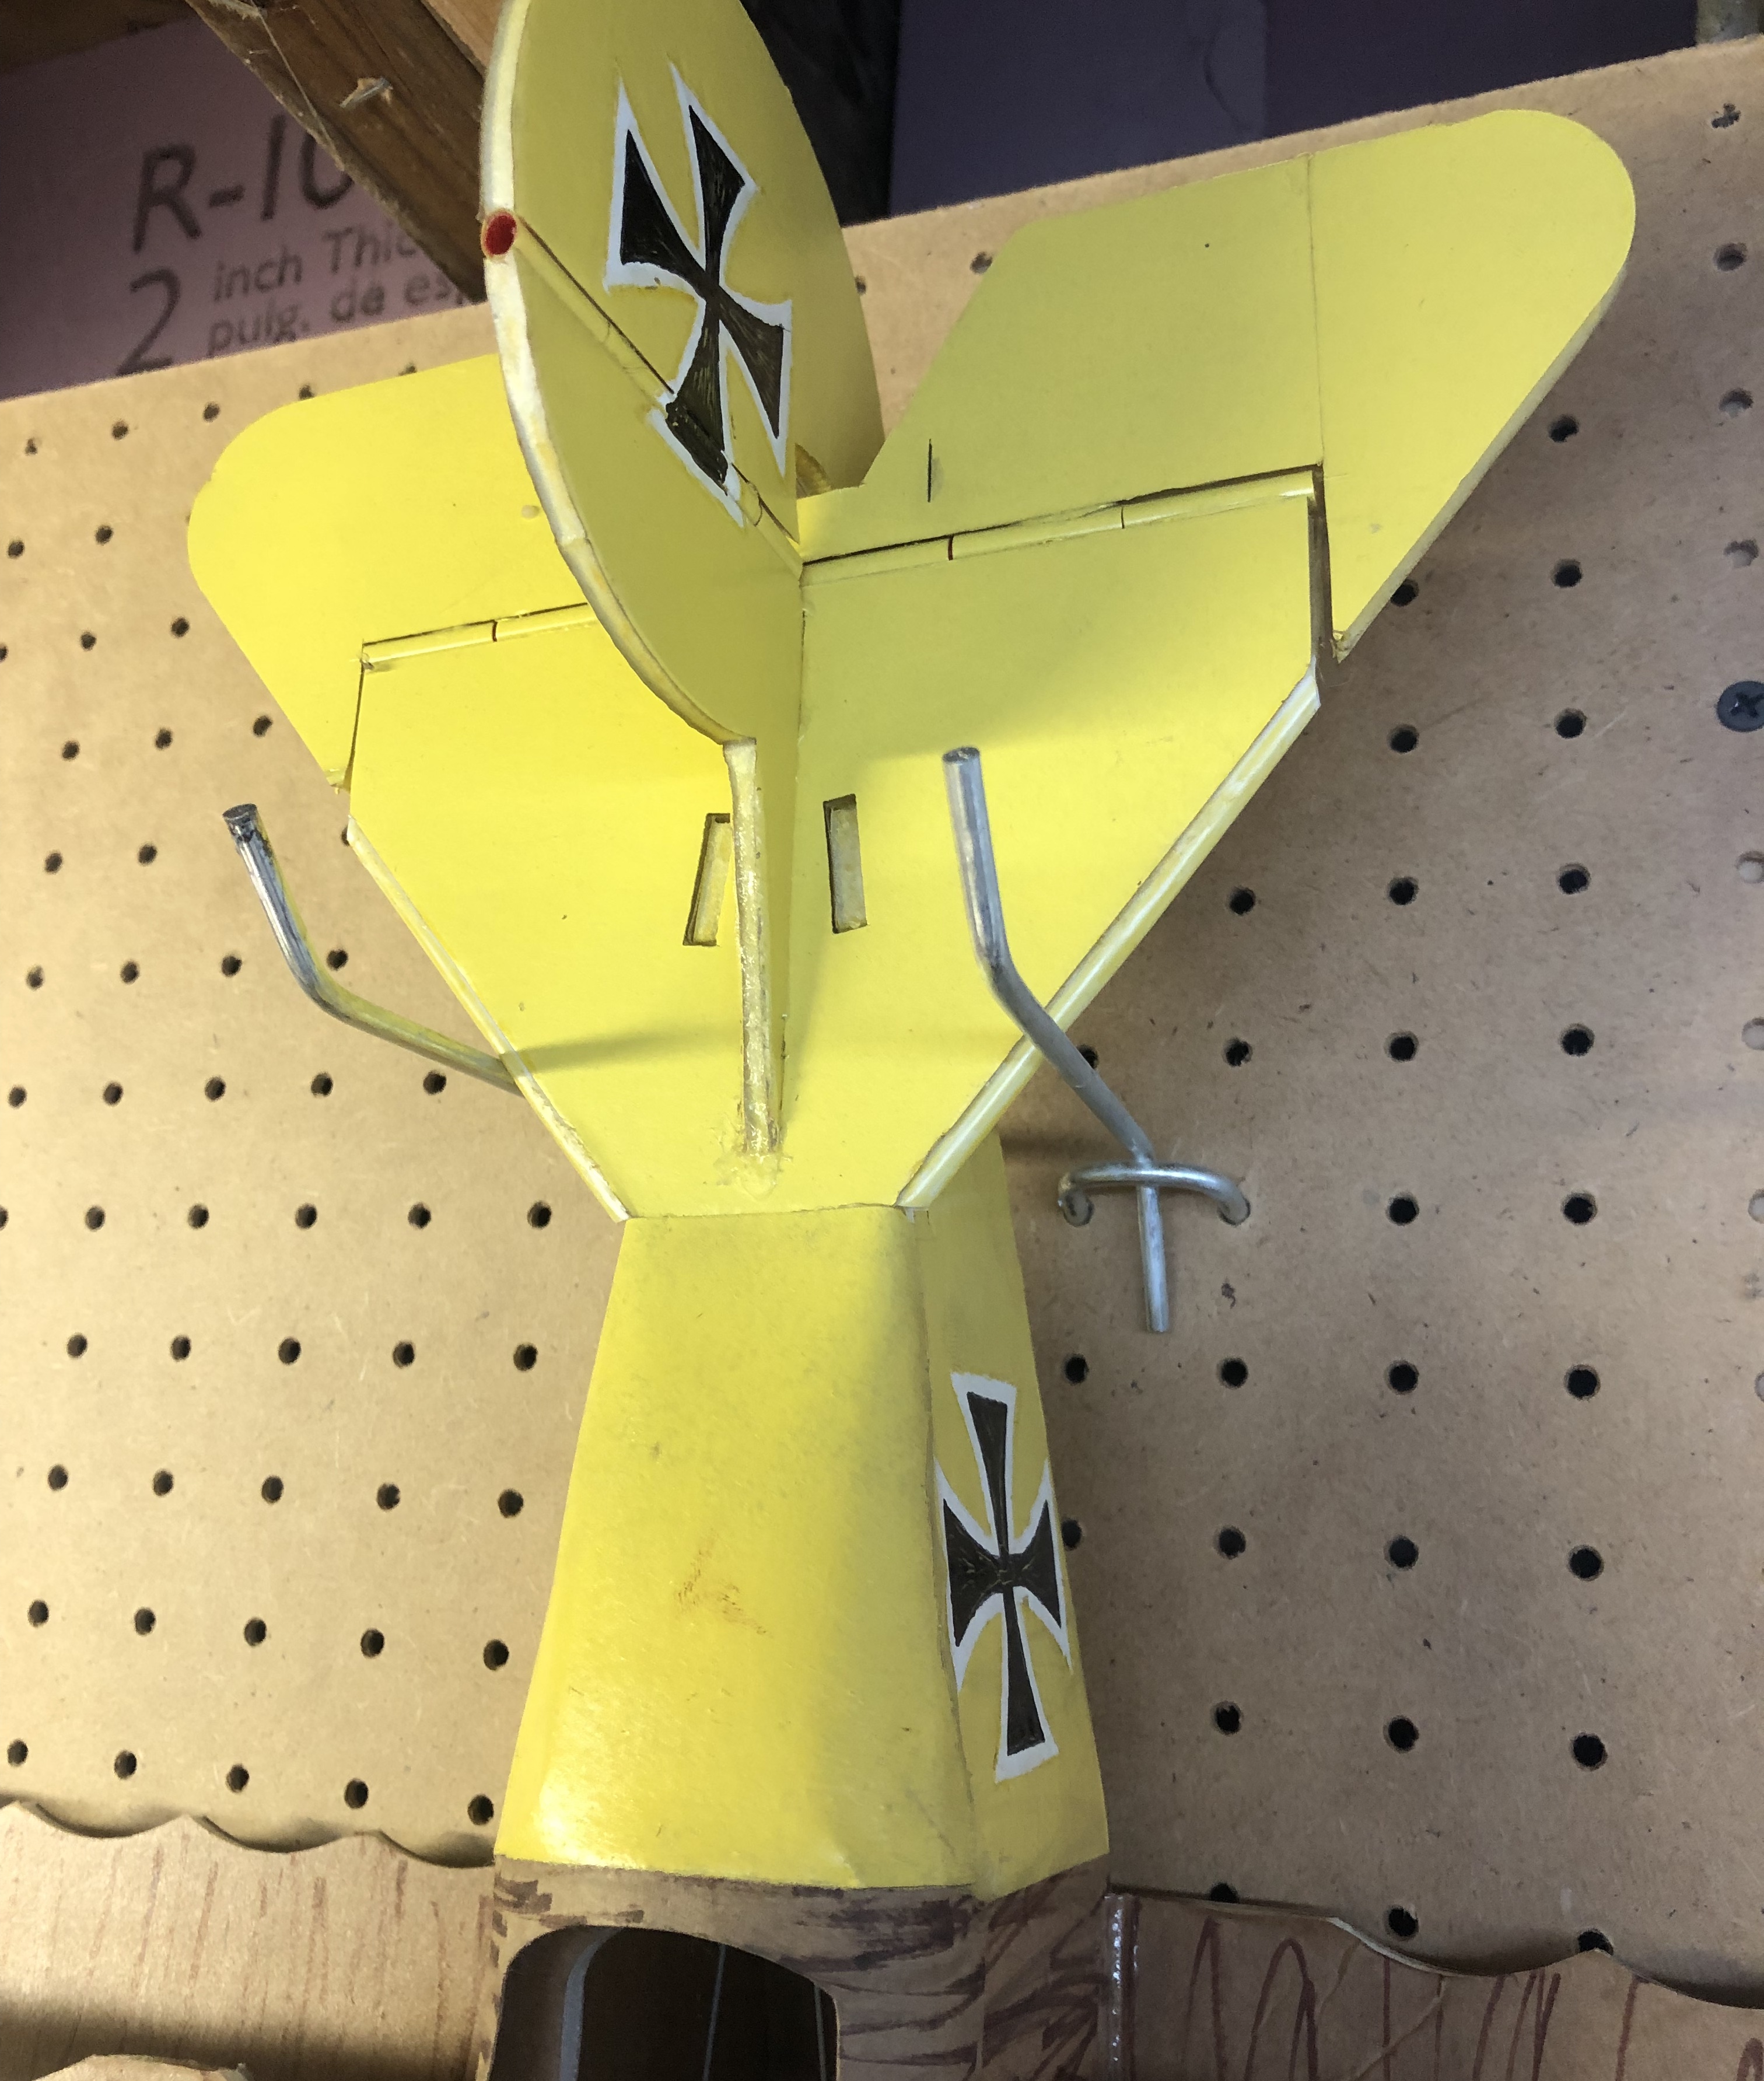
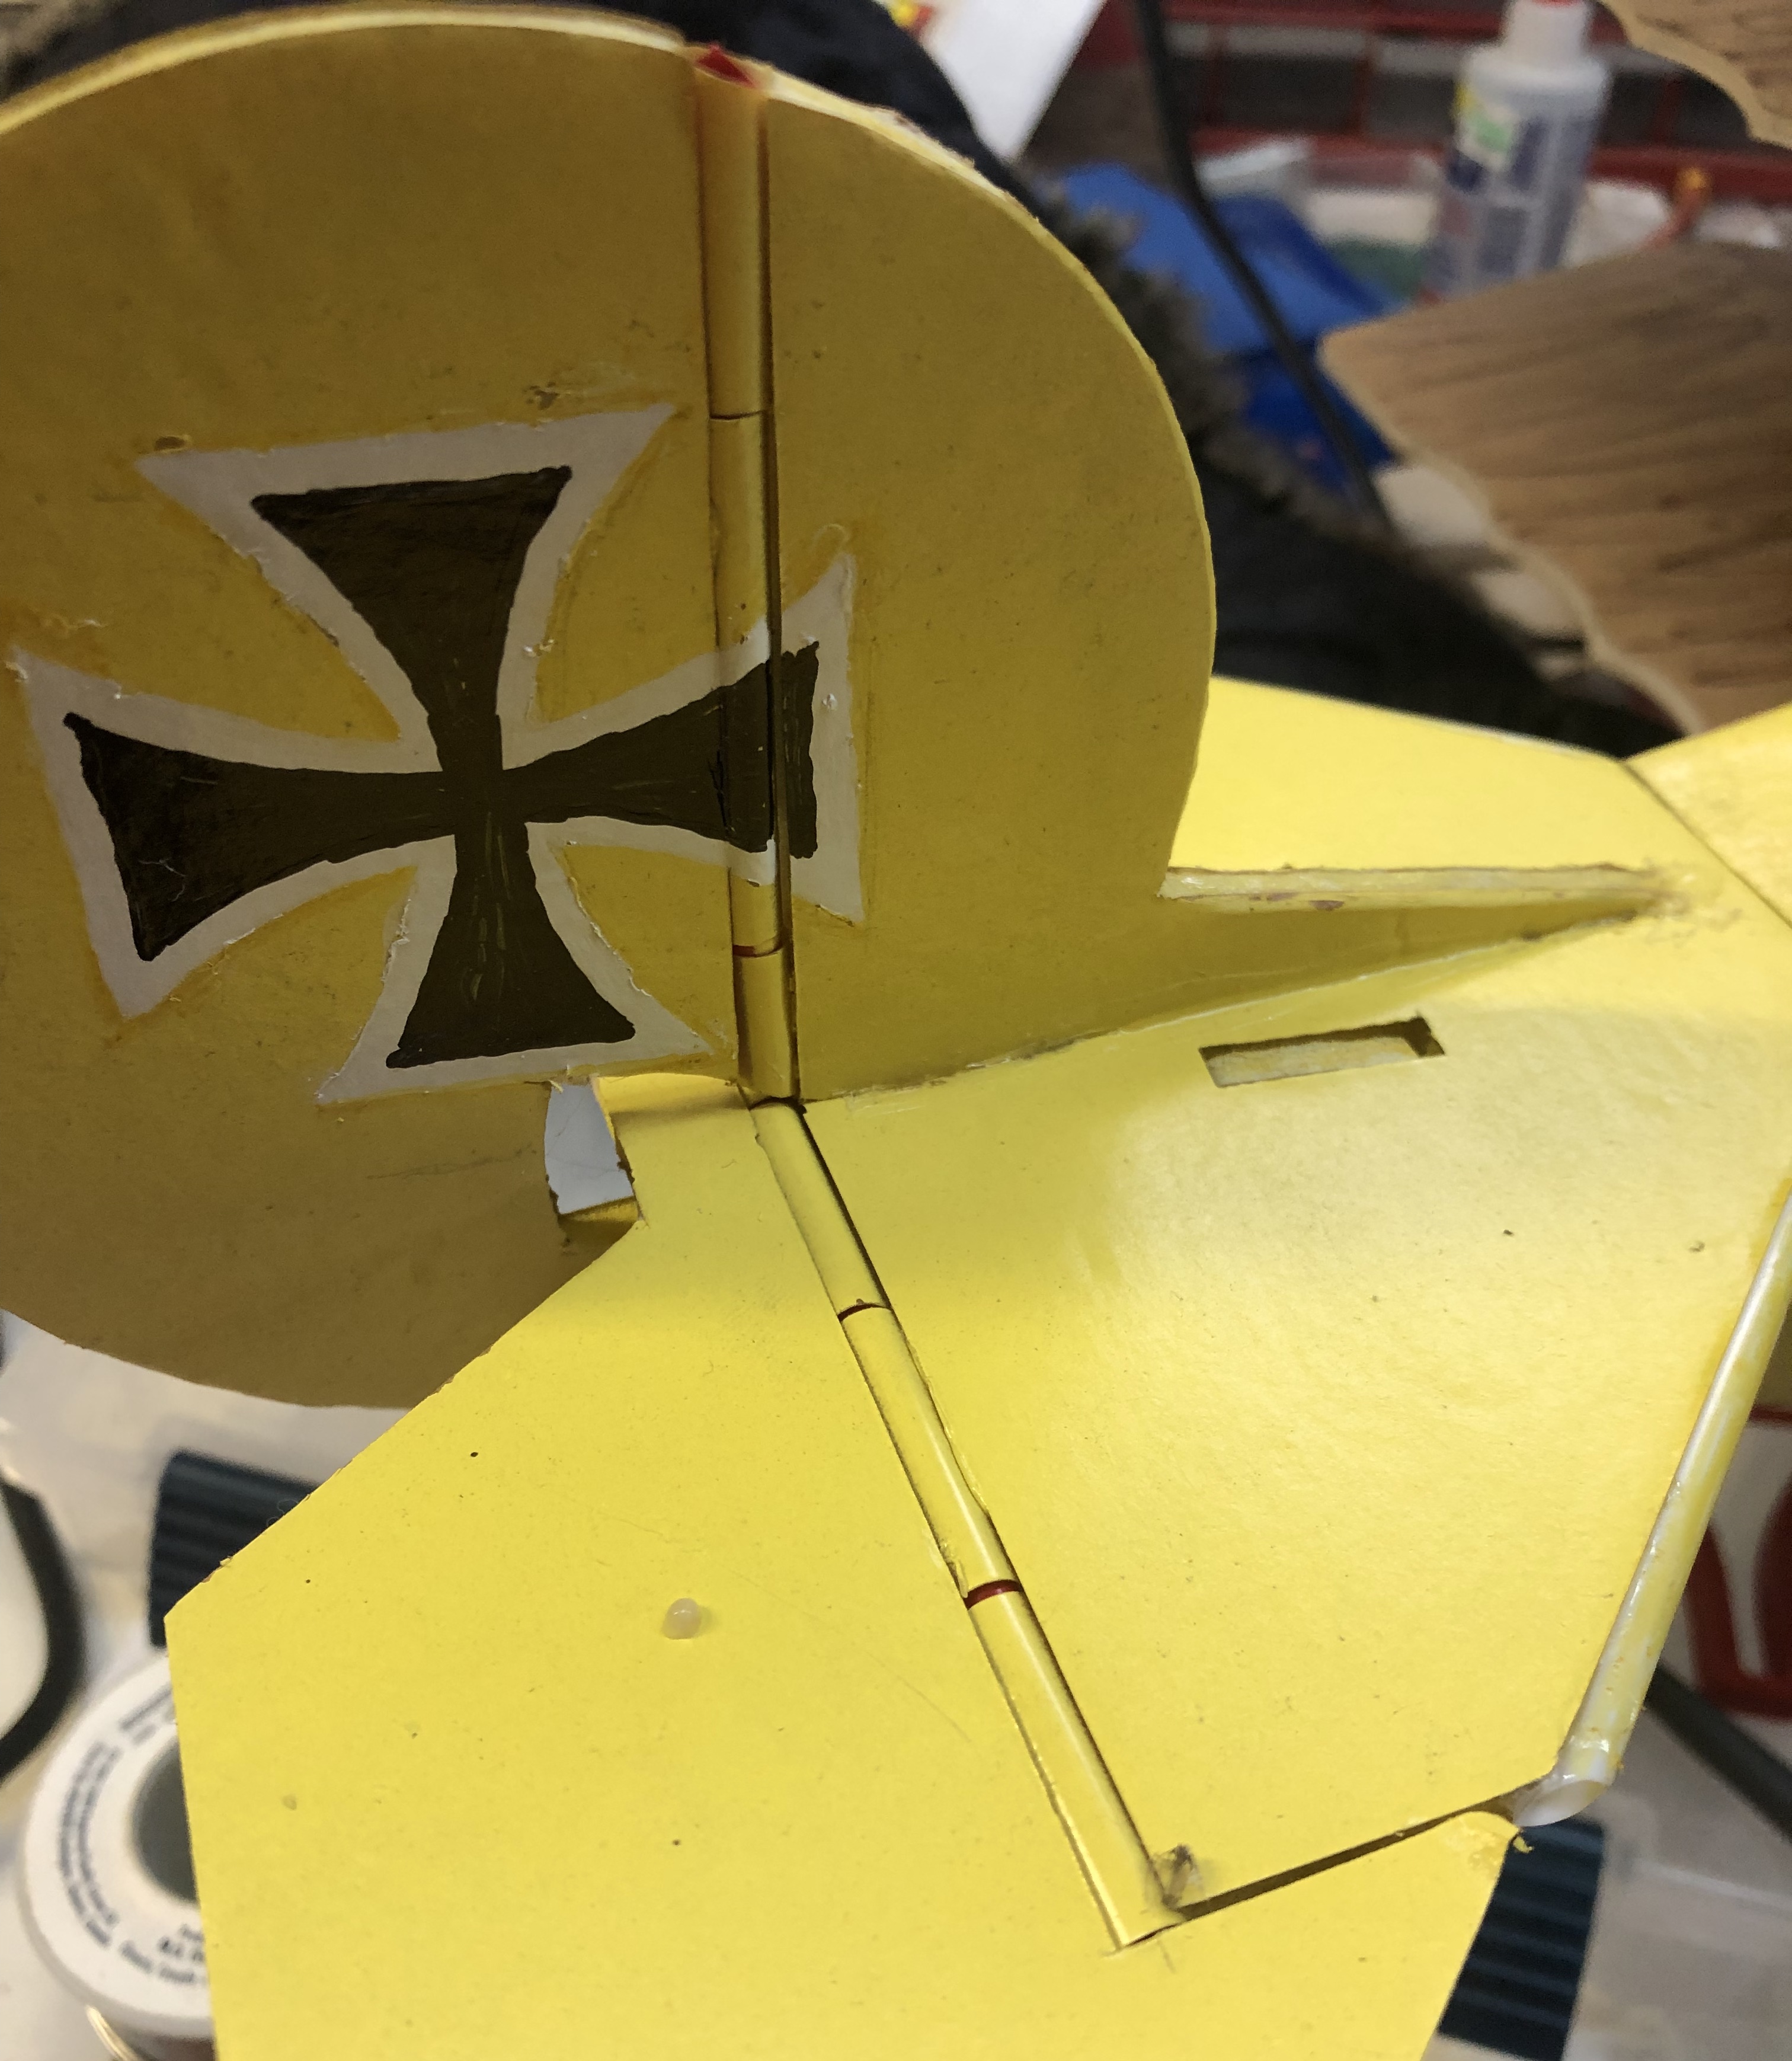
This seems like the perfect spot to show you guys my favorite hinge method, and possibly get some others involved in the search for the perfect straws! I use drinking straws to make piano hinges. Finding two diameters of the straws that fit together perfectly and that fit the foam board, has been an ongoing effort. Let me say though, that the reward is most definitely worth the effort .
1415F07C-82C2-47D7-9D26-86249A0C965C.jpeg
5ACF0E73-1888-4D1B-A166-0B815EC4C692.jpeg
552FA645-9695-4825-83BC-EBD28CA1649F.jpeg
F988C0F2-DBB4-4644-A9A6-775BF53DAA5E.jpeg
B66662ED-CD9D-4E7A-A270-75F3F21E06A1.jpeg
F4DAC395-50C1-4ED9-A927-0162ECB9D26F.jpeg
C25AC90E-15DA-4BA4-A82D-C2E389B51022.jpeg
638FB9BE-8890-47DB-8B37-4A606FF556BE.jpeg
453B9DF5-F56C-4A24-B15E-52FA5528AFAC.jpeg
THIS HINGE IS BULLET PROOF, it’s light, and it makes a control surface that is so free moving, that even the tiniest servos move it with easy. I also use the straws for leading edges, it makes those much more durable as well.
 

Keno

Well-known member
Many good ideas here, good read. If you are having problems with cutting bevels, here is how I do it: On side I want to cut I make my first cut on my hinge line. I then score cut, cutting only the paper, back from the hinge cut the same distant as the thickness of the foamboard. This offers you a line for your cutting blade to follow. cutting down to the bottom if the first cut. I then finish my 45 degree cut with a fine sanding foam block. I also use paper tape on the back side of the hinge cut. The tape I use is either paper medical tape (although a bit fuzzy) . Now Duck Tape has come out with a paper tape that Is smooth in all colors and patterns. Anyway it works for me. None of my hinges has failed me so far.
 

Tench745

Master member
This seems like the perfect spot to show you guys my favorite hinge method, and possibly get some others involved in the search for the perfect straws! I use drinking straws to make piano hinges. Finding two diameters of the straws that fit together perfectly and that fit the foam board, has been an ongoing effort. Let me say though, that the reward is most definitely worth the effort . View attachment 125985 THIS HINGE IS BULLET PROOF, it’s light, and it makes a control surface that is so free moving, that even the tiniest servos move it with easy. I also use the straws for leading edges, it makes those much more durable as well.

That certainly looks sturdy. I would be a little concerned about the straws releasing from the glue, but I doubt in reality it would be much of a problem.

You could also do simple tape hinge. The hinge and bevel are cut just like any other FT plane, but instead of using hot glue to reinforce you use tape. (image stolen from RC Groups.) If you want an even more flexible hinge, just cut the control surface away entirely and use tape on both sides to reattach.
 

kilroy07

Legendary member
THIS HINGE IS BULLET PROOF
Are you tacking (gluing) the red straw in? Or have you not had any issues with it backing it's way out?

How in the world did you get the one for the Dr.1's elevator in there? (I would think with the horn balance on it, that would make this method problematic.) Curious because I might do another Dr.1 here in a bit and might try your method! (y)
 

Hai-Lee

Old and Bold RC PILOT
Thank you for the validation that the standard FB hinge has a definite weakness, (or else there would be no need for an alternative.

The other methods mentioned above definitely work. Plastic straws looks nice but I wonder about friction in the long term and that here plastic straws are soon to be banned totally!

I have used the hinge made with tape in the past but the long span of very thin foam along the hinge line and all of its fatigue and flexibility issues still leave the joint weak, flexible, and still unable to resist the control surface trying to curl over time.

The ironed hinges whilst attractive and actually causing the line of the hinge ironed to become quite rigid it still does not actually supply any support for the hinge long term. The curling of the control surface can still lever the paper hinge apart over time!

I am sure that there are a number of methods to hinge a control surface on FB but I was looking for a easy to do, simple, and fast solution that could reuse the current FB technique where possible and be able to be used for laser cutting and possibly used in making FT supplied planes stronger and better value all for little to no additional cost.

Whilst I will admit that i have not tried the straws method I have tried the ironing, (well roughly, and the tape method which is almost as old as Aero-modelling itself. In addition I have tried sewn balsa strips, Pin hinges as used in balsa models, and even iron on film hinges but the area of weakness and focus of applied forces still was unsupported.

People say that they like to support FT where possible but sadly all of the alternates for hinging the control surfaces are unlikely to ever be adopted by FT and so will never appear in the kits supplied to constructors. I invite people to grab some scrap FB and try the hinge mentioned as the initial subject of this thread for themselves and compare its performance against the original hinge cutting technique! If it is an improvement then perhaps even FT could evaluate it performance. To adopt all FT would need to do is to include it in the build video on future kits as well as a minor addition to the score run of the cutter itself.

Great ideas for hinges I will admit and some quite inventive but I am just trying to improve what I have found to be an issue with the existing technique to improve the FT product going forward!

No affront or upset intended towards anyone or their hinge techniques!

Have fun!
 

Lufthouse

Member
Are you tacking (gluing) the red straw in? Or have you not had any issues with it backing it's way out?

How in the world did you get the one for the Dr.1's elevator in there? (I would think with the horn balance on it, that would make this method problematic.) Curious because I might do another Dr.1 here in a bit and might try your method! (y)
Seems like something I should try. Lufthouse, where do you get your straws?
So far for the outside straw, I have been buying umbrella straws from Hobby Lobby. They are perfect. I also special ordered an entire sample assortment of straws from a manufacturer, and also found a perfect one in there, but is special order only, and I need to buy thousands. The inside straw is easier. It’s a coffee stir straw from Kwik Trip gas stations here in Wisconsin, but I have also found it to be a common diameter in many longer coffee stir straws. As far as the DR1 elevator, I had to cut it, install the hinge, then glue the elevator back together. You can see the cut line on the left side of the elevator in one of the pics.
 

Lufthouse

Member
So far for the outside straw, I have been buying umbrella straws from Hobby Lobby. They are perfect. I also special ordered an entire sample assortment of straws from a manufacturer, and also found a perfect one in there, but is special order only, and I need to buy thousands. The inside straw is easier. It’s a coffee stir straw from Kwik Trip gas stations here in Wisconsin, but I have also found it to be a common diameter in many longer coffee stir straws. As far as the DR1 elevator, I had to cut it, install the hinge, then glue the elevator back together. You can see the cut line on the left side of the elevator in one of the pics.
I don’t tack the inside straw in. It stays put very well. I’ve never had one back out so much as a mm. I’ve probably built 6 models now with these hinges. Never a single problem with anything.