Hi everyone!!
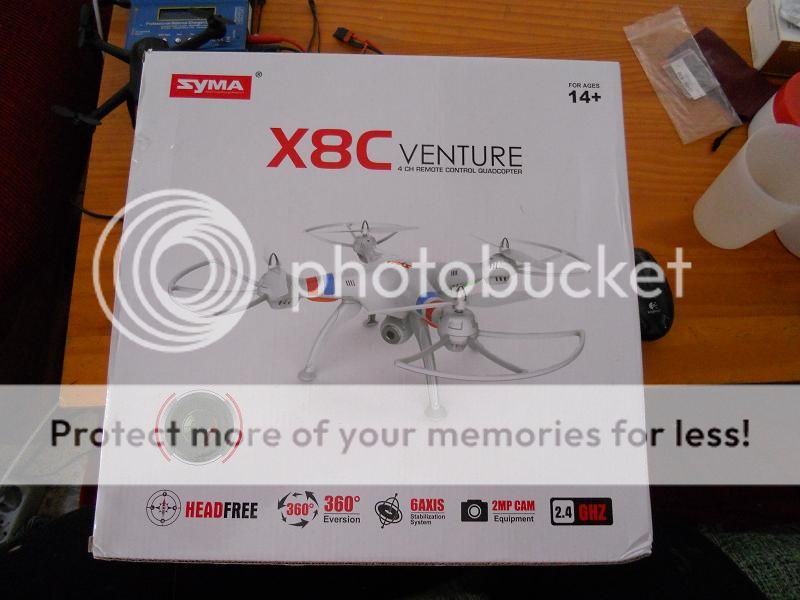
Today I get to bring to you the review of the Syma X8C from Gearbest
http://www.gearbest.com/rc-quadcopters/pp_152100.html
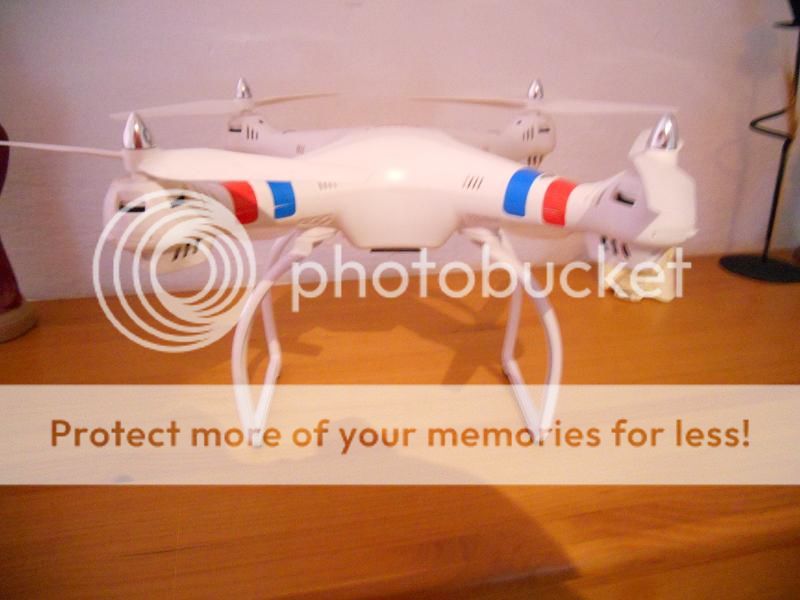
This is a very interesting quadcopter, as it is the same size and general design as the DJI Phantom, but at a fraction of the price. Compared to the DJI it is very simple of course, as it doesn’t add all the “bells and whistles” of things like barometer, magnetometer, GPS, and doesn’t even have a “return to home” system of any kind. The electronics has also been very much simplified using an all-in-one control board with built in ESCs, brushed geared motors and a much lighter and simplified construction. It also has much less flight time than the DJI model, but then when we compare that it has only a 2000mAh battery compated to the Phantom’s 5000mAh…
But in spite of these simplifications, this quad is a firm bet for Syma, making a quad that almosts leaves behind the “toy” category, getting into the “hobby” one almost completely, even getting somewhat into the “AP” category also. This quad is a great option for anyone that has started out with small toy multirotors, bridging that gap towards something of a larger calibre without breaking the bank.
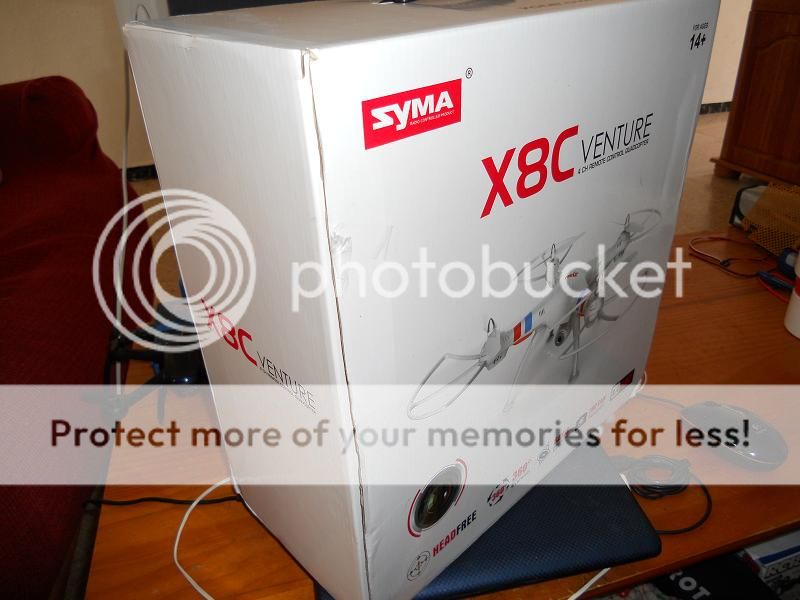
As soon as I received it through the post I was impressed with the time and effort invested in finding the right packaging, something often overlooked. Being a rather large quad (350 class) with a full size transmitter, the traditional packaging of “everything on the same level” would result rather large, elevating the transport costs in the case of some transport companies. The box itself is rather simple, but dead to the point, with a large photo of the quadcopter and the most important information at the bottom of the box, and on the side the same simplistic general design too.
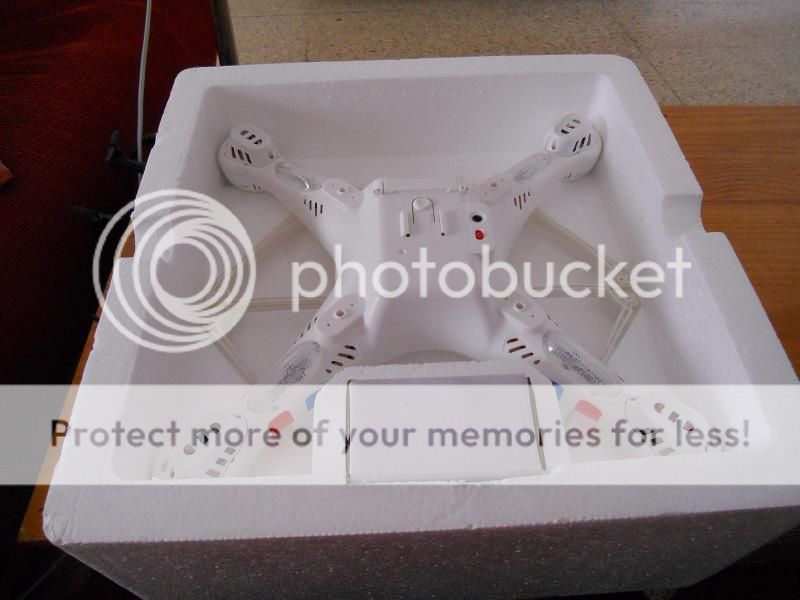
Inside the outer box is the typical molded polystyrene protection box with the new quadcopter taking up the place of honour, and a small box containing a power supply unit. Under the main quadcopter body are the four prop guards.
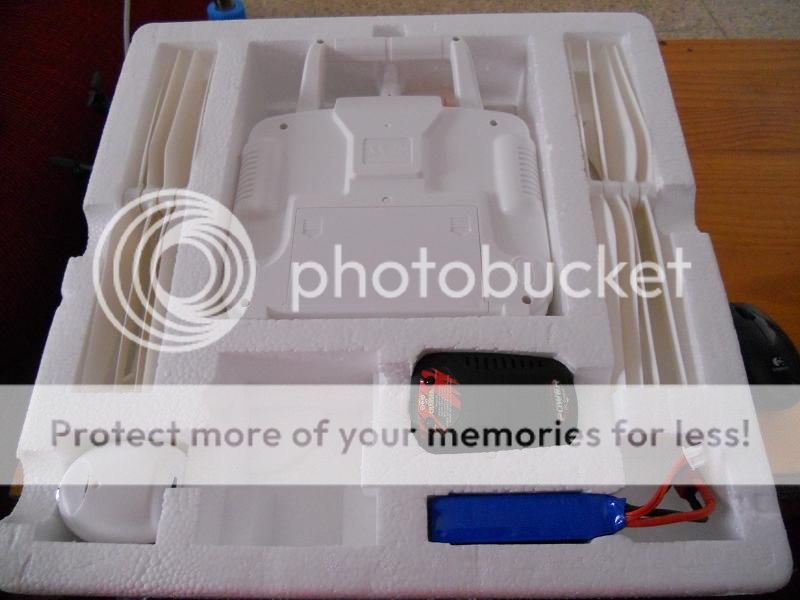
On the underside of the inner box are the transmitter, the props (8 in total), the landing gear, the charger, the battery, the camera and a small bag of screws with a small screwdriver, along with the other small parts.
The transmitter is very similar to others of the Syma X5xx range of quadcopters, although it stands out in its white with red trim. It is comprised of the standard 2 gimbals, 2 shoulder buttons, the left to change from low to high rates and also to activate Headless mode, the right to activate the flip mode, and a bottom screen displaying information like what rates are activated and the state of the gimbals. One thing that this transmitter has which is a small detail but a huge bonus is the eyelet to catch on a transmitter neckstrap, making it a whole lot more comfortable to use out in the field.
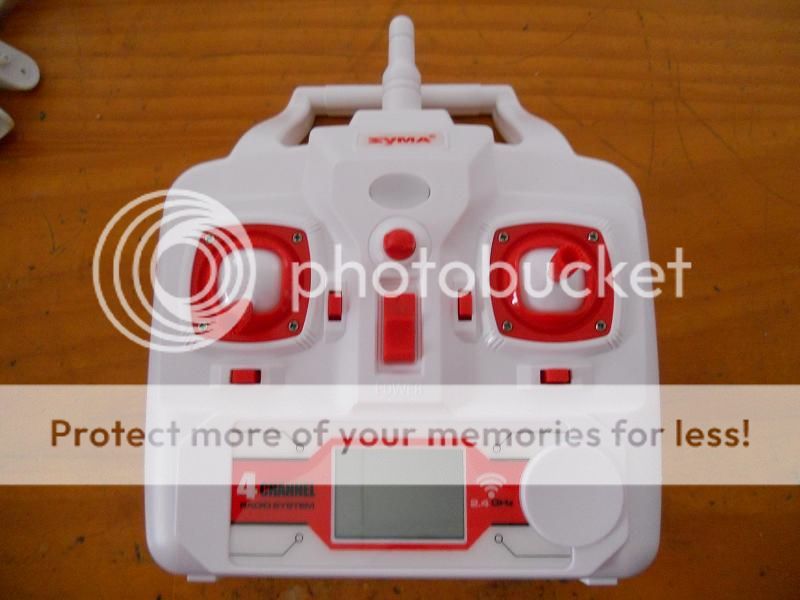
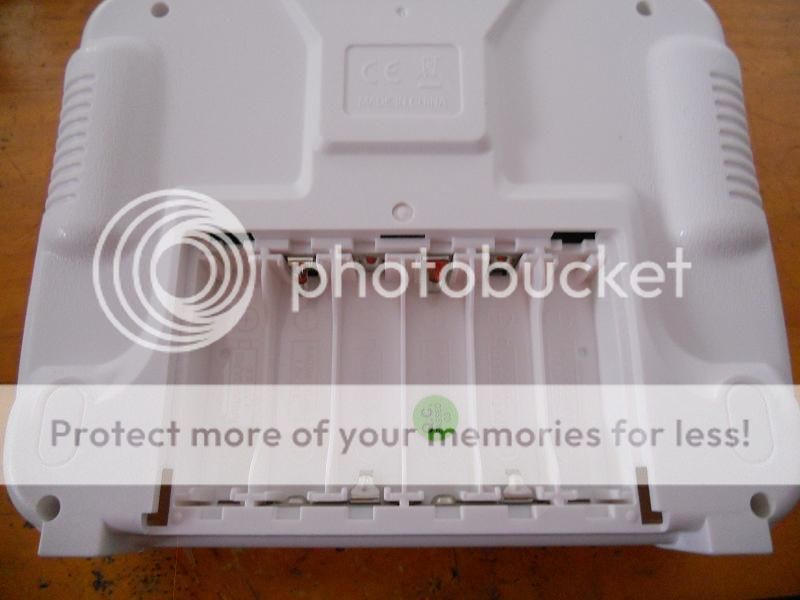
On the back of the transmitter you find the typical battery cover, and one curious thing is that there is space inside for 6 batteries, although the transmitter itself only uses 4 AA type batteries. It seems that the transmitter was originally designed to be used with more power hungry setups, and Syma just took advantage of the mold to use on this transmitter, removing the metal contacts from the 2 outer battery slots.
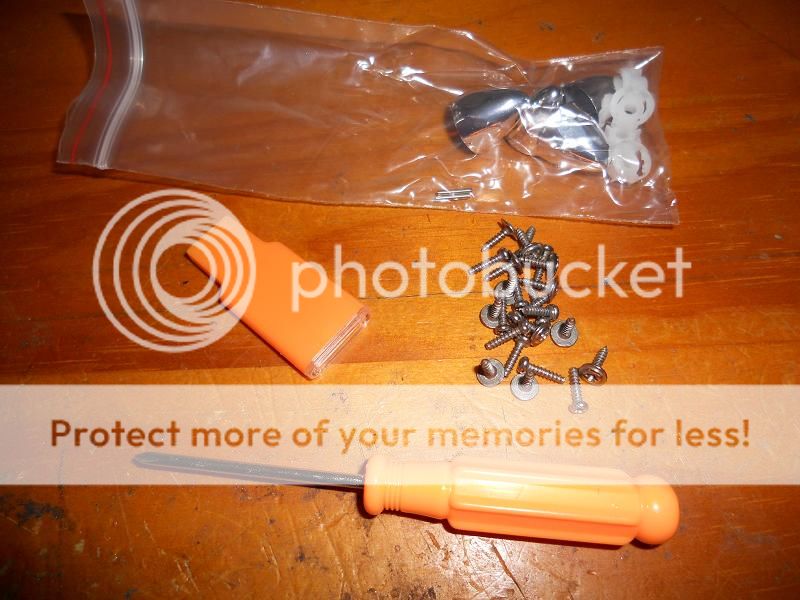
Inside the bag of small parts are all the screws needed for mounting the legs, prop guards and other things together, as well as plenty of spares of all these. There is also the small screwdriver for fitting it all together, as well as a USB microSD card reader which is something very useful and often missing from most models… something very much needed by people that are just starting out in the quadcopter world!!
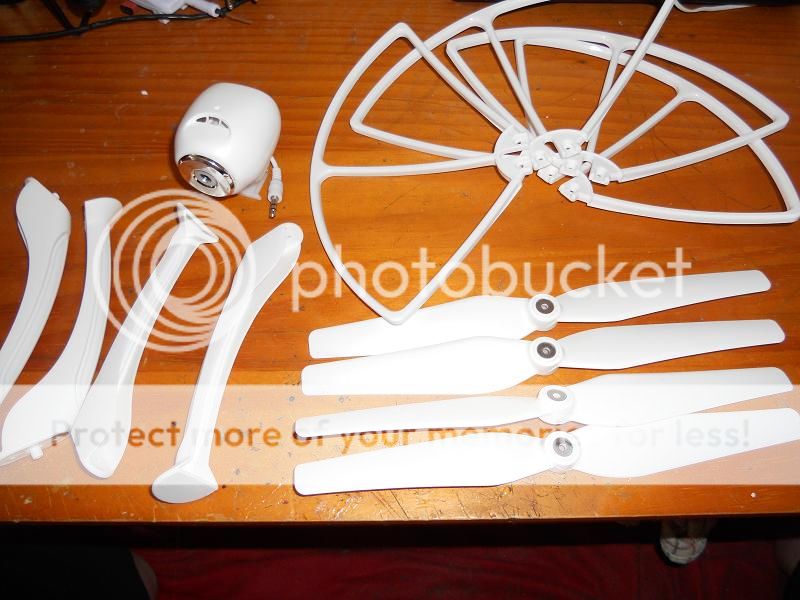
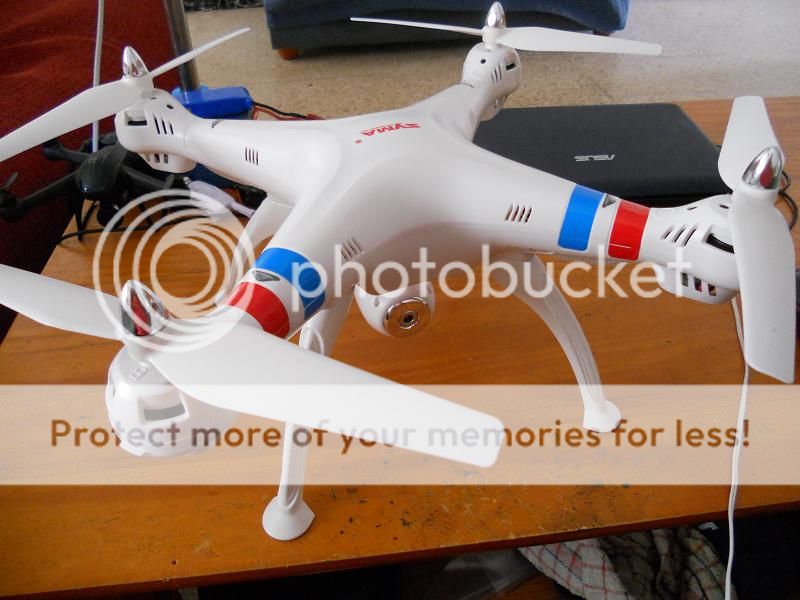
The props are about 9” in size, so they are quite large and efficient to use on this brushed, geared system. The camera is a 2mp one which is pretty standard in toy RTF quads nowadays, and is in fact the same camera that you get with the Syma X5C-1, with the cable changed and enclosed inside a secondary case that permits changing the angle of the camera to get different footage. The landing feet are 4 independent ones that come out on an angle, running just under each of the 4 arms, this means that some people will see them on their cameras should they use a GoPro or a Mobius (seeing as this quad is capable of lifting both these models) if it is set in the centre of gravity, and will be a nuisance to the image… but it’s worth noting that the system and size is exactly the same as the DJI Phantom system, making the Phantom landing skids compatible with the X8C, and they don’t get in the frame when using one of these cameras. You can find the legs pretty cheap on Ebay, both the standard version as also the extended legs. This detail, whether accidental or on purpose by Syma, is a great move on their behalf.
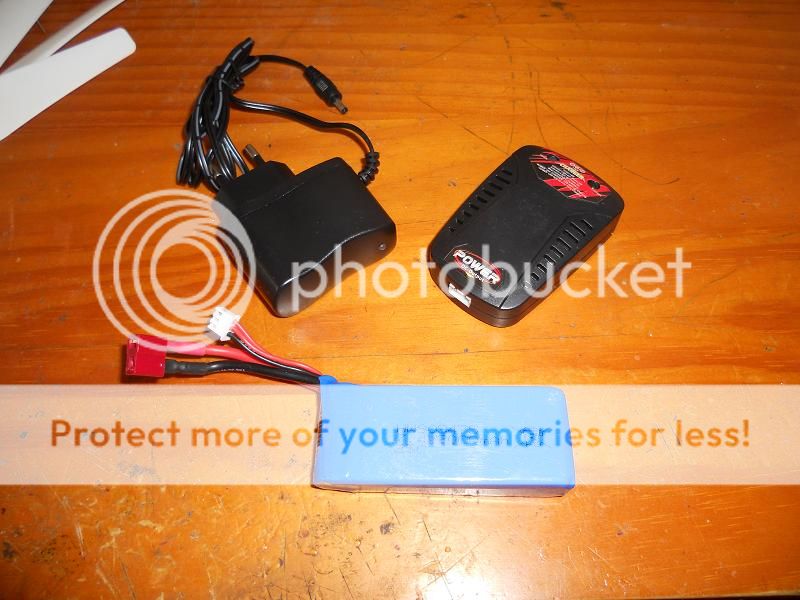
The power system includes a balance charger with its power supply unit. It is a good option to have for when you’re starting out, as having your batteries properly balanced is very important on the long run. Those that already have smart chargers would prefer to use those I’d dare say, as the charger that comes with the quad unfortunately takes nearly 3 hours to charge the batty from empty to full!! So it’s good to start off with, but know it would be best to invest later on in something better. The battery is very interesting, as it is marked as a 2S 2000mAh 25C battery that weighs only 104.8g (just under 3.7oz) and is of quite a compact size, measuring the same width and height roughly as a Turnigy 2S 2200mAh 20C, and yet measures almost 20mm less in length than the Turnigy. After a few tests with my smart charger I completely discharged the new battery and charged it up from scratch, findint that the actual capacity of the battery is 2147mAh, putting it almost on the par of the Turnigy, which turned out to be a very pleasent surprise, as it uses the usual typical 14AWG silicone wire with a Deans type connector that I already extensively use, which means this light, high capacity battery can be used on a number of my models. I’m not sure if it will live up to the advertised 25C rating it has printed at this point, but I’m very eager to try it out.
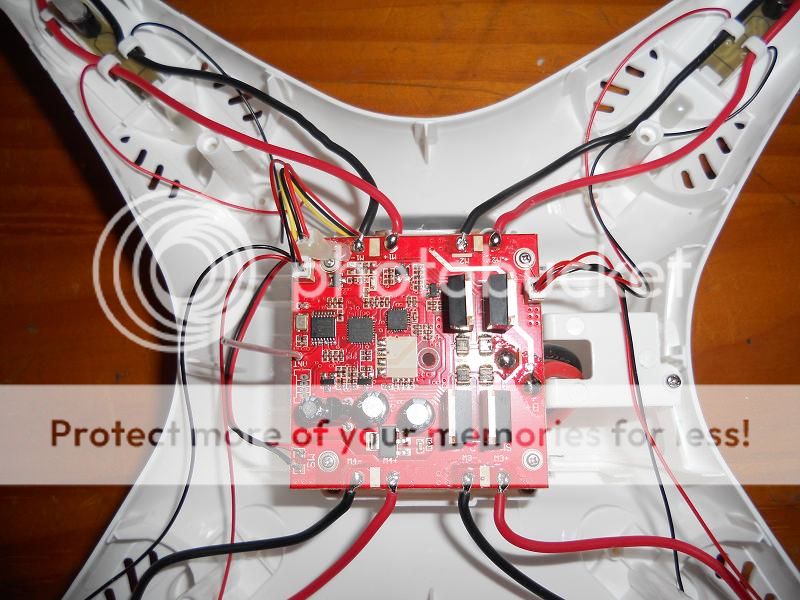
Before putting the quad together, I decided to take it all apart to see how the internal construction is. The plastic is very firm and rigid,and everything seems well placed inside to fit neatly in its place. There are a total of 16 screws holding the 2 halves together, but you must remember also to cut the stickers on the forward arms to separate the 2 halves. There are an aditional 4 pieces you have to remove to reach some of those screws, which are the motor covers, and each one of these is itself held on by another 2 screws. Inside everything seems well thought out with all the wiring neatly sorted into their places with good quality cable going to the motors, smaller gauge wire for the LED clusters on each arm, and all going to a central control board, which boasts a secondary board for the on-off button and the camera jack socket.
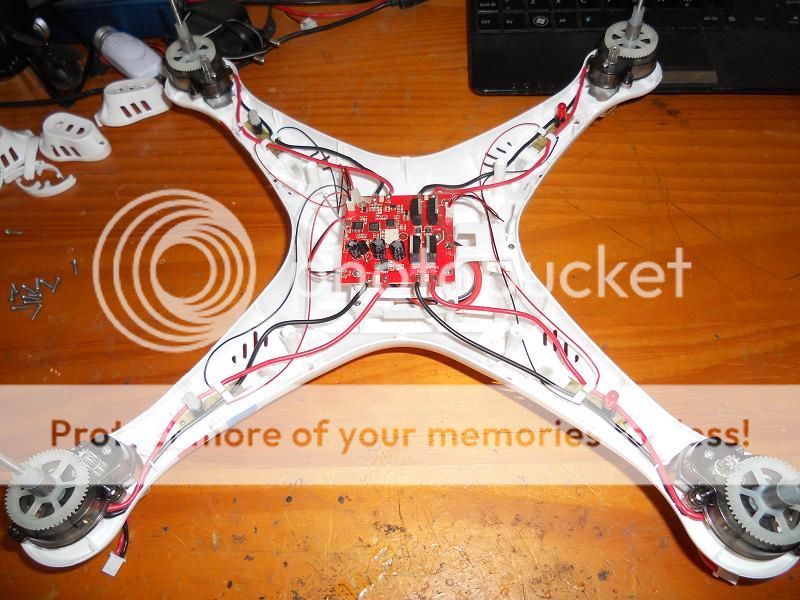
The board is a lot larger than the Syma X5SW board, although it comes with the same common elements. On top of the typical receiver, decoder and 6 axis stabilization circuits, it also has a 3.7V power regulation circuit to feed the camera with, which of course adds to the overall size of the board. The soldering points seem very well made and the components all appear to be pretty good too, with no obvious cold solder points or bad quality soldering.
The motors are large and seem pretty good, using a very well designed and protected gearing system instead of a direct drive, allowing them to turn much larger props. The gears are well housed away from dust and dirt, yet still remain well refrigerated from the airflow from the props themselves. It seems someone took their time to design an efficient system to get the most from these brushed motors without sacrificing their lifespan. The motors themselves even come fitted with small SMD type capacitors to help filter out any parasitic noise from the wiring, so someone certainly did their homework!!
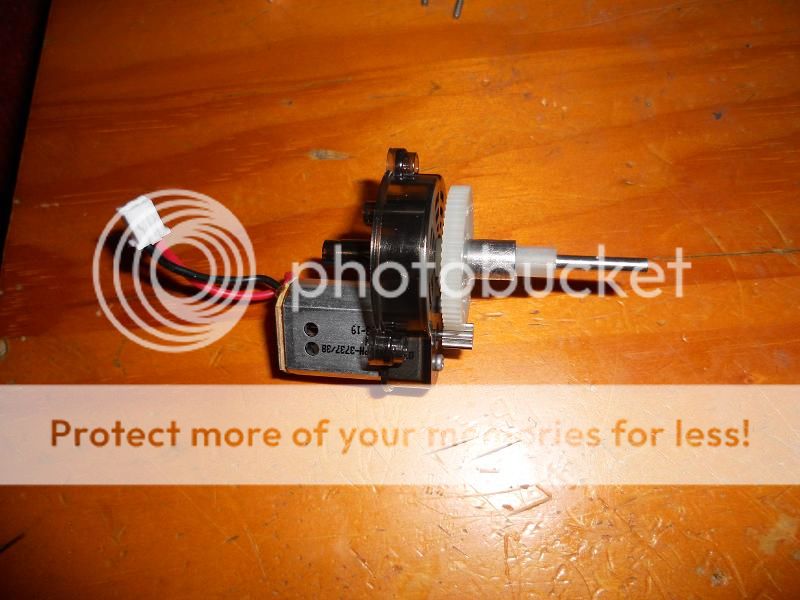
The motor mounting system has also been well designed not only for its general working but also for replacing parts should you need to change a motor. To change one of the motors you don’t even have to take the whole quad apart. Just remove the motor cover, unplug the motor from its base with the handy plug system it brings, remove 2 screws from the top side, and the motor slips out from its housing. This makes the whole system a real “plug and play” on the workbench!!

Before putting the 2 halves back together, I had to sort one thing out that is my little pet hate of these types of multirotors, which is to swap the LEDs around to the way the colours SHOULD go, green on the front and red on the back. The LEDs are connected to the main board via a plug system, so you don’t even need soldering skills to do this!! Just unplug the LED groups, unscrew the clusters, and swap them around, it’s that simple!! Each cluster consists of 3 LEDs… 2 SMD type LEDs facing down to shine out through the plastic windows on the bottom of the quad, and one standard type LED facing upwards which fits into a small triangular shaped window on the upper cover, meanign that it has small orientation LEDs on the top as well as the bottom, making it easy to know which way it’s facing at night even before you take off!!
Once the 2 halves are back together, I proceeded to fit the lansing legs, which was a very easy system indeed, and the props… this is where I found it rather interesting. Instead of the normal “stab on” system of toy grades, or the screw caps of hobby grade, this system has a hexagonal part coming up from the gear which the prop fits onto very nicely. In the middle of this is a fixed metal spike with a hole going through it.
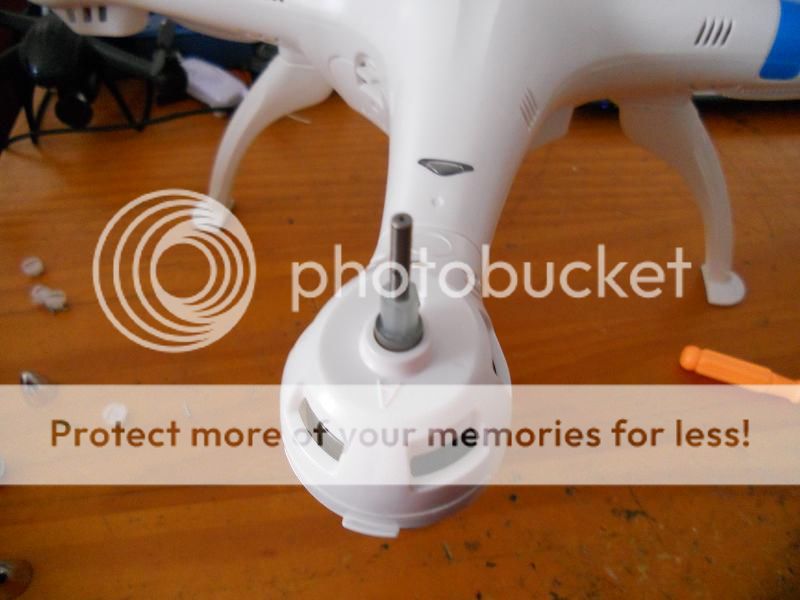
Once you have fitted the prop in its place, you have to add a small nylon piece on top, then a metal bar through the spike, then the nylon piece turns 90º to lock into place. Then you just have to put on the plastic cone ontop which is for aesthetic reasons more than anything, but this piece remains fixed, not like other quads where it turns with the prop. It is quite a curious system they have devised here for this quad, and it works very well. The small nylon pieces and the bars are easy to lose, so a complete spare set comes in the plastic bag together with the screws.
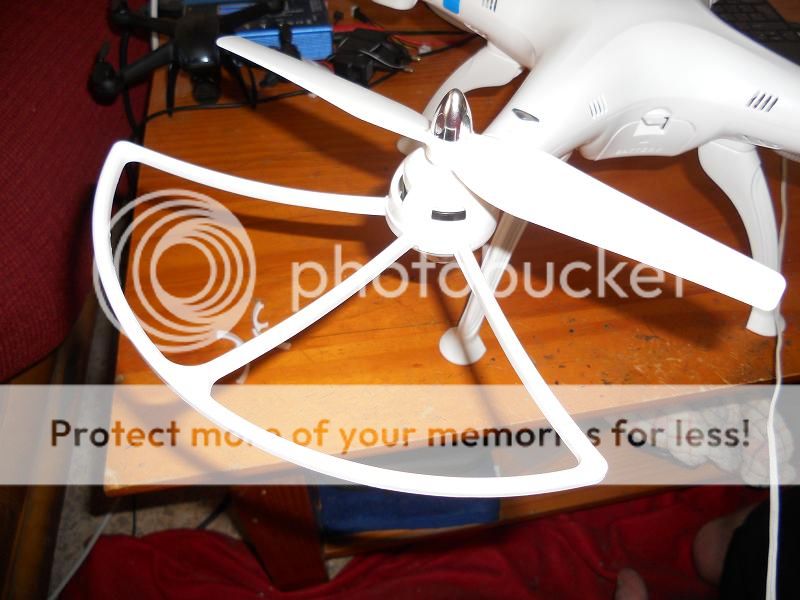
The prop guards also have an interesting mounting system, as each arm has a resort in the side for it to slip into and fix into place with 2 screws from underneath. If you decide to not use prop guards, rather than just leaving the slot open for dust to get into, and leaving it rather ugly, Syma have included some small covers that slip into the slots to cover them up and give the quad a nice finish. It’s a nice little detail they thought of here.
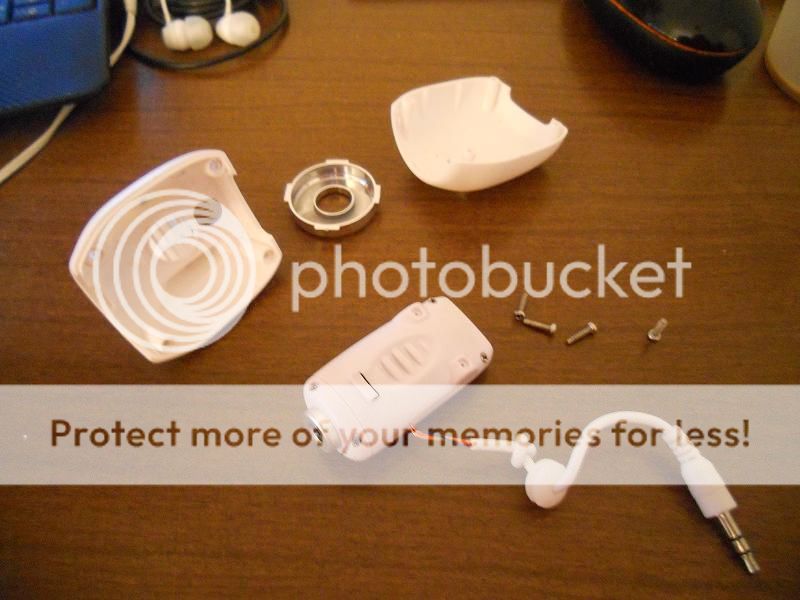
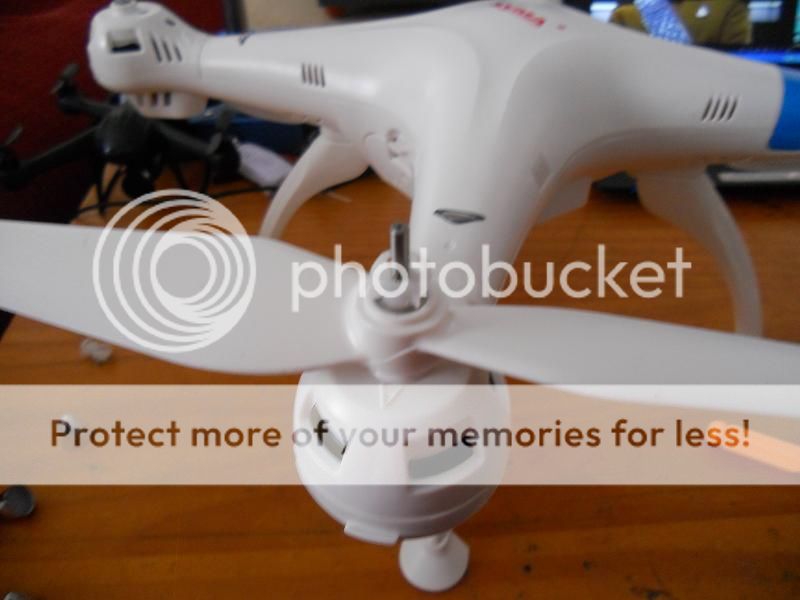
Finally, the only thing left is to fit the camera in the slot under the belly of the aircraft, and plyg in the 3.5mm jack that comes with it, a very different system than what comes on the other Syma models.
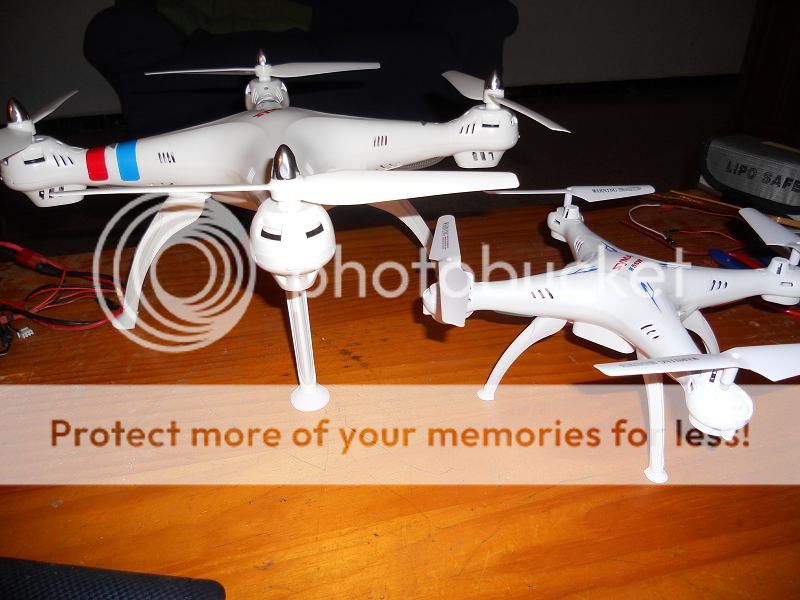
I compared it to its smaller sibling, the X5SW, and as you can see most of the things are the same, just scalled up enormously. But even details like the battery compartment and the general design have been kept constant in this larger model. When I got the X5SW it didn’t seem like a small quad at all, but now I see it next to the X8C it seems tiny in comparisson!
I weighed the X8C complete without the battery and no prop guards, and it weighs in at 483g (just over 17oz), which with the battery added brings it to a total weight in flight of 588g (20.74oz), making it the heaviest quad in my collection so far, and I really have high hopes for this quad, that its brushed motors really live up to the quads needs. People say it’s capable of lifting a GoPro, and if this is true, then it really is impressive for these motors on a quad with this weight to lift all that. It’s a shame I can’t put that to the test as I still don’t have anything in the lines of a sports cam
So all that’s left now is to try it out outside to see how it handles in the air as well as how the camera captures, but that will be in the next part of this review. For the moment, I like this quad very much!! It seems to be very well made, with a lot of small details seen to rather than being overlooked as per what usually happens, and it retains a very noticeable design which is in the norms of what people are looking for in a basic AP platform. I hope these impressions last!!
Today I get to bring to you the review of the Syma X8C from Gearbest
http://www.gearbest.com/rc-quadcopters/pp_152100.html
This is a very interesting quadcopter, as it is the same size and general design as the DJI Phantom, but at a fraction of the price. Compared to the DJI it is very simple of course, as it doesn’t add all the “bells and whistles” of things like barometer, magnetometer, GPS, and doesn’t even have a “return to home” system of any kind. The electronics has also been very much simplified using an all-in-one control board with built in ESCs, brushed geared motors and a much lighter and simplified construction. It also has much less flight time than the DJI model, but then when we compare that it has only a 2000mAh battery compated to the Phantom’s 5000mAh…
But in spite of these simplifications, this quad is a firm bet for Syma, making a quad that almosts leaves behind the “toy” category, getting into the “hobby” one almost completely, even getting somewhat into the “AP” category also. This quad is a great option for anyone that has started out with small toy multirotors, bridging that gap towards something of a larger calibre without breaking the bank.
As soon as I received it through the post I was impressed with the time and effort invested in finding the right packaging, something often overlooked. Being a rather large quad (350 class) with a full size transmitter, the traditional packaging of “everything on the same level” would result rather large, elevating the transport costs in the case of some transport companies. The box itself is rather simple, but dead to the point, with a large photo of the quadcopter and the most important information at the bottom of the box, and on the side the same simplistic general design too.
Inside the outer box is the typical molded polystyrene protection box with the new quadcopter taking up the place of honour, and a small box containing a power supply unit. Under the main quadcopter body are the four prop guards.
On the underside of the inner box are the transmitter, the props (8 in total), the landing gear, the charger, the battery, the camera and a small bag of screws with a small screwdriver, along with the other small parts.
The transmitter is very similar to others of the Syma X5xx range of quadcopters, although it stands out in its white with red trim. It is comprised of the standard 2 gimbals, 2 shoulder buttons, the left to change from low to high rates and also to activate Headless mode, the right to activate the flip mode, and a bottom screen displaying information like what rates are activated and the state of the gimbals. One thing that this transmitter has which is a small detail but a huge bonus is the eyelet to catch on a transmitter neckstrap, making it a whole lot more comfortable to use out in the field.
On the back of the transmitter you find the typical battery cover, and one curious thing is that there is space inside for 6 batteries, although the transmitter itself only uses 4 AA type batteries. It seems that the transmitter was originally designed to be used with more power hungry setups, and Syma just took advantage of the mold to use on this transmitter, removing the metal contacts from the 2 outer battery slots.
Inside the bag of small parts are all the screws needed for mounting the legs, prop guards and other things together, as well as plenty of spares of all these. There is also the small screwdriver for fitting it all together, as well as a USB microSD card reader which is something very useful and often missing from most models… something very much needed by people that are just starting out in the quadcopter world!!
The props are about 9” in size, so they are quite large and efficient to use on this brushed, geared system. The camera is a 2mp one which is pretty standard in toy RTF quads nowadays, and is in fact the same camera that you get with the Syma X5C-1, with the cable changed and enclosed inside a secondary case that permits changing the angle of the camera to get different footage. The landing feet are 4 independent ones that come out on an angle, running just under each of the 4 arms, this means that some people will see them on their cameras should they use a GoPro or a Mobius (seeing as this quad is capable of lifting both these models) if it is set in the centre of gravity, and will be a nuisance to the image… but it’s worth noting that the system and size is exactly the same as the DJI Phantom system, making the Phantom landing skids compatible with the X8C, and they don’t get in the frame when using one of these cameras. You can find the legs pretty cheap on Ebay, both the standard version as also the extended legs. This detail, whether accidental or on purpose by Syma, is a great move on their behalf.
The power system includes a balance charger with its power supply unit. It is a good option to have for when you’re starting out, as having your batteries properly balanced is very important on the long run. Those that already have smart chargers would prefer to use those I’d dare say, as the charger that comes with the quad unfortunately takes nearly 3 hours to charge the batty from empty to full!! So it’s good to start off with, but know it would be best to invest later on in something better. The battery is very interesting, as it is marked as a 2S 2000mAh 25C battery that weighs only 104.8g (just under 3.7oz) and is of quite a compact size, measuring the same width and height roughly as a Turnigy 2S 2200mAh 20C, and yet measures almost 20mm less in length than the Turnigy. After a few tests with my smart charger I completely discharged the new battery and charged it up from scratch, findint that the actual capacity of the battery is 2147mAh, putting it almost on the par of the Turnigy, which turned out to be a very pleasent surprise, as it uses the usual typical 14AWG silicone wire with a Deans type connector that I already extensively use, which means this light, high capacity battery can be used on a number of my models. I’m not sure if it will live up to the advertised 25C rating it has printed at this point, but I’m very eager to try it out.
Before putting the quad together, I decided to take it all apart to see how the internal construction is. The plastic is very firm and rigid,and everything seems well placed inside to fit neatly in its place. There are a total of 16 screws holding the 2 halves together, but you must remember also to cut the stickers on the forward arms to separate the 2 halves. There are an aditional 4 pieces you have to remove to reach some of those screws, which are the motor covers, and each one of these is itself held on by another 2 screws. Inside everything seems well thought out with all the wiring neatly sorted into their places with good quality cable going to the motors, smaller gauge wire for the LED clusters on each arm, and all going to a central control board, which boasts a secondary board for the on-off button and the camera jack socket.
The board is a lot larger than the Syma X5SW board, although it comes with the same common elements. On top of the typical receiver, decoder and 6 axis stabilization circuits, it also has a 3.7V power regulation circuit to feed the camera with, which of course adds to the overall size of the board. The soldering points seem very well made and the components all appear to be pretty good too, with no obvious cold solder points or bad quality soldering.
The motors are large and seem pretty good, using a very well designed and protected gearing system instead of a direct drive, allowing them to turn much larger props. The gears are well housed away from dust and dirt, yet still remain well refrigerated from the airflow from the props themselves. It seems someone took their time to design an efficient system to get the most from these brushed motors without sacrificing their lifespan. The motors themselves even come fitted with small SMD type capacitors to help filter out any parasitic noise from the wiring, so someone certainly did their homework!!
The motor mounting system has also been well designed not only for its general working but also for replacing parts should you need to change a motor. To change one of the motors you don’t even have to take the whole quad apart. Just remove the motor cover, unplug the motor from its base with the handy plug system it brings, remove 2 screws from the top side, and the motor slips out from its housing. This makes the whole system a real “plug and play” on the workbench!!
Before putting the 2 halves back together, I had to sort one thing out that is my little pet hate of these types of multirotors, which is to swap the LEDs around to the way the colours SHOULD go, green on the front and red on the back. The LEDs are connected to the main board via a plug system, so you don’t even need soldering skills to do this!! Just unplug the LED groups, unscrew the clusters, and swap them around, it’s that simple!! Each cluster consists of 3 LEDs… 2 SMD type LEDs facing down to shine out through the plastic windows on the bottom of the quad, and one standard type LED facing upwards which fits into a small triangular shaped window on the upper cover, meanign that it has small orientation LEDs on the top as well as the bottom, making it easy to know which way it’s facing at night even before you take off!!
Once the 2 halves are back together, I proceeded to fit the lansing legs, which was a very easy system indeed, and the props… this is where I found it rather interesting. Instead of the normal “stab on” system of toy grades, or the screw caps of hobby grade, this system has a hexagonal part coming up from the gear which the prop fits onto very nicely. In the middle of this is a fixed metal spike with a hole going through it.
Once you have fitted the prop in its place, you have to add a small nylon piece on top, then a metal bar through the spike, then the nylon piece turns 90º to lock into place. Then you just have to put on the plastic cone ontop which is for aesthetic reasons more than anything, but this piece remains fixed, not like other quads where it turns with the prop. It is quite a curious system they have devised here for this quad, and it works very well. The small nylon pieces and the bars are easy to lose, so a complete spare set comes in the plastic bag together with the screws.
The prop guards also have an interesting mounting system, as each arm has a resort in the side for it to slip into and fix into place with 2 screws from underneath. If you decide to not use prop guards, rather than just leaving the slot open for dust to get into, and leaving it rather ugly, Syma have included some small covers that slip into the slots to cover them up and give the quad a nice finish. It’s a nice little detail they thought of here.
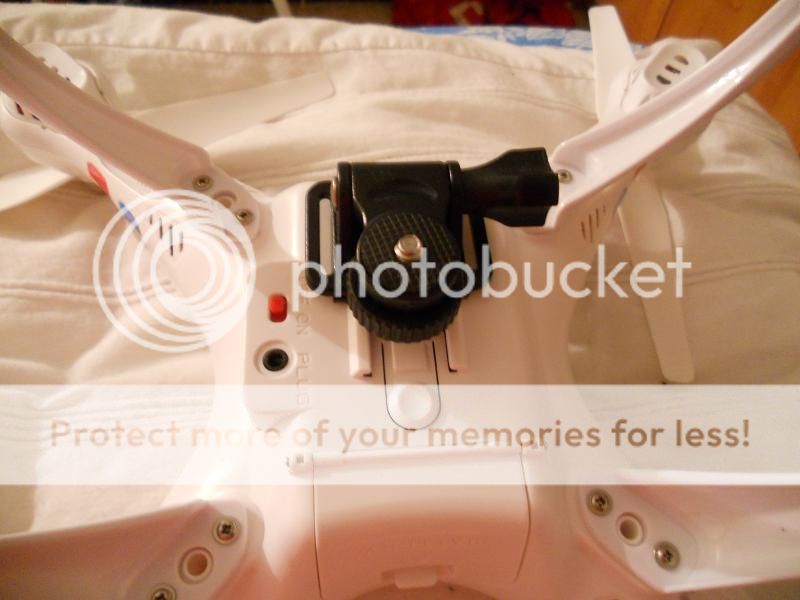
Finally, the only thing left is to fit the camera in the slot under the belly of the aircraft, and plyg in the 3.5mm jack that comes with it, a very different system than what comes on the other Syma models.
I compared it to its smaller sibling, the X5SW, and as you can see most of the things are the same, just scalled up enormously. But even details like the battery compartment and the general design have been kept constant in this larger model. When I got the X5SW it didn’t seem like a small quad at all, but now I see it next to the X8C it seems tiny in comparisson!
I weighed the X8C complete without the battery and no prop guards, and it weighs in at 483g (just over 17oz), which with the battery added brings it to a total weight in flight of 588g (20.74oz), making it the heaviest quad in my collection so far, and I really have high hopes for this quad, that its brushed motors really live up to the quads needs. People say it’s capable of lifting a GoPro, and if this is true, then it really is impressive for these motors on a quad with this weight to lift all that. It’s a shame I can’t put that to the test as I still don’t have anything in the lines of a sports cam
So all that’s left now is to try it out outside to see how it handles in the air as well as how the camera captures, but that will be in the next part of this review. For the moment, I like this quad very much!! It seems to be very well made, with a lot of small details seen to rather than being overlooked as per what usually happens, and it retains a very noticeable design which is in the norms of what people are looking for in a basic AP platform. I hope these impressions last!!