Tiny Trainer Mod

Henry

Member
This is my modification of the Tiny Trainer.

The Tiny Trainer is a great design except for a few minor things that I found frustrating;
1. Trying to juggle the multipart fuselage was a pain when setting up or doing repairs in the field and
2. The fuselage wasn’t wide enough to fit everything in tidily especially when you threw in a battery alarm and all the servo wires for the four channel wing.

I had no plans to use it as a glider so I modified the fuselage to be one piece.

File 5-03-17, 2 06 34 PM.jpeg

The wing tie downs can now be glued in place making them stronger and by retaining the width at the nose the rest of the fuselage was wider so there’s plenty of room inside.
File 5-03-17, 2 09 08 PM.jpeg

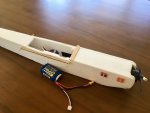
The popsicle stick in front of the wing is to strengthen an area that seems to get a lot of damage.

There is enough room for the battery to go inside under the wings.

File 5-03-17, 2 07 26 PM.jpeg

I expected removing the nose and moving the battery back under the wing would have made it tail heavy but oddly it is a bit nose heavy, at least with my build.

I'm very happy with the mod. It flies well, is easy to work on and seems more resilient to my heavy "landings".

Here's a PDF with the modified fuselage.

Tiny Trainer Mod.pdf
 
Last edited:

xMeox

Member
Nice! I mostly flew mine with motor too, so I never really used the glider nose.

If your cg is that much off you could move the wing a little bit more forward in your next build.
 

Henry

Member
The CoG wasn't too far off but I might try your suggestion. I really need a lever calculator to take the guesswork out of this stuff i.e. if I move the CoG how much weight do I need at what point to compensate.
 

FoamyDM

Building Fool-Flying Noob
Moderator
Henry,
This is where math and excel can help. however, you need to know where some important things are, like wieghts of all parts although... and there are some great Cg calculators online.

I want to say I am a noob with plan CoG. but I deal with balancing forces as an engineer all the time. (in my field, if it's imbalanced it moves, if it moves... people die.) This is Half my wheel house.

OK, I may have had a ureka moment. Thinking out loud here - we really only move one thing, the battery. we should be able to put in two things, first the Plane weight the non-battery CG test angle, then again with the battery, (wt and location) from these two, we should be able to determine exactly where the battery should be centered.

or... from the 1/3rd chord legth drop a line. also draw a line perp from the bottom of the foil the battery needs to move the distance as measure along the elevator line. I'll have to try it and let you know. (can't do it here at work.) :eek:

This looks to be end-all be-all on CG determination. from
CG_Article1.jpg
 

Henry

Member
That plumb bob is genius. I built a stand for checking CG but hanging it from string is brilliant.
 

Davjed

New member
IMG_1408.JPG I modified mine by placing the Rx on top of the fuselage and covering it with a boxy cockpit. Hasn't seem to make any difference and the servo wires are easy to get to. Battery is easily installled below the motor.
 

JimCR120

Got Lobstah?
Site Moderator
The string idea sounds nice but where to afix the string. Of course the nose is easy on a single prop tractor, but what about the tail?
 

mikeporterinmd

Still Learning
I put the servos in the rear as suggested by many people. That left plenty of room in the center for the receiver and wiring for either four or three channel flying. Balance with a 3-cell was pretty easy. The plane is somewhat nose heavy unless the battery is pushed in pretty far. A fairly ideal situation. The plane is a little heavy, but there is quite a bit of wiring in it and the receiver is somewhat heavy as well. Waiting for a nice day to maiden number two Tiny Trainer. I decided to make another one because it is an ideal "keep in the car plane."

Mike
 
Last edited:
These are some cool ideas. I ended up using velcro to keep the power pod in place. It actually works really well. It saves props if I have a hard landing. I really need to build another Tiny Trainer. I still fly my original one that is almost 2 years old. Mine flew much better as a 3 channel plane. The 4 channel didn't fly too well with the extra weight from the servos.
 

rcpilot.hun

New member
Hi!

Please help me. I tried yesterday flying of FT Tiny Trainer. It was a bit heavy, because of I had not smaller motor-battery-ESC. I decided, that I will build it in "double" size. I halved the tiled A/4 plans, so I got double sized fuselage-wing-powerpod-etc parts.

My question is: shall I double THICKNESS of wing spars? The width and lenght are double sized, but the thickness of Depron foam is 6 mm.... Shall it have to be 12 mm thick???

rcph
 

Craftydan

Hostage Taker of Quads
Staff member
Moderator
Mentor
Since the original spar was 5mm thick, laid flat, then spar in a 200% FTTT would need to be 10mm thick. Doubling your 6mm depron for the spar should work well.

Everywhere else, single thickness should be fine -- if something seems flimsy add on some packing tape to stiffen things up a bit. Cutting the relative "thickness' of the material should move the natural balance forward, which will help tremendously in keeping the weight down.

Don't forget to cut your slots at half their thickness, with the cut-outs on the outside edge of the hole. The tabs that are too long can be trimmed, but adding material back into a hole is . . . complicated.

Also, keep in mind: the scale may have been doubled, but the area is a square of that. Your span has doubled, but your wing surface is 4 times larger. That means 4 times the lift, but also 4 times the drag. Not sure what power system you're planning to use, and you probably won't need 4 times the power to fly, but you will need more than double. The glider-version of the tiny trainer seems happy with 50-75W, so you're probably looking at needing around 150-200W to get similar performance. For the "speed wing" version, you'll want closer to 250W or more.
 

rcpilot.hun

New member
Thank You very much, Crafty Dan !!! ;)

The motor, which I have is A2212-13, it is a 150W one... The fact is, that the original FT Tiny Trainer's weight was double that the prescribed value, but this motor pulled the plane very well!

rcph

...you're probably looking at needing around 150-200W to get similar performance...
 
Last edited:

usafflyer1

New member
This is my modification of the Tiny Trainer.

The Tiny Trainer is a great design except for a few minor things that I found frustrating;
1. Trying to juggle the multipart fuselage was a pain when setting up or doing repairs in the field and
2. The fuselage wasn’t wide enough to fit everything in tidily especially when you threw in a battery alarm and all the servo wires for the four channel wing.

I had no plans to use it as a glider so I modified the fuselage to be one piece.

View attachment 83375

The wing tie downs can now be glued in place making them stronger and by retaining the width at the nose the rest of the fuselage was wider so there’s plenty of room inside.

View attachment 83377

The popsicle stick in front of the wing is to strengthen an area that seems to get a lot of damage.

There is enough room for the battery to go inside under the wings.

View attachment 83376

I expected removing the nose and moving the battery back under the wing would have made it tail heavy but oddly it is a bit nose heavy, at least with my build.

I'm very happy with the mod. It flies well, is easy to work on and seems more resilient to my heavy "landings".

Here's a PDF with the modified fuselage.

Tiny Trainer Mod.pdf
Do you still have the drawing file? Link is not available now. Thank you.