Top Flite F8F Bearcat 0.60 size (Red Box Rescue)

willsonman

Builder Extraordinare
Mentor
For those who follow my YouTube channel You are in the know. So let me fill you in on this build and we will dive right in.

I picked up this mostly built Top Flite Red Box F8F Bearcat at SEFF 2018 for $75. Needs finishing and some love. With my recent hiatus due to selling my home, purchasing a new one and subsequent move, I've had to put off my P-51 build until next build season.

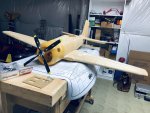
This kit went out of production years ago but I was fortunate to get this model along with it's original build plans. Thankfully, I could also source scans on the internet and print off a couple of copies for building things that need done. Originally constructed for a glow engine, the original builder also deviated from the plans by building out the tail control surfaces using solid wood. Since this is intended to be a quick build I had considered just rolling with them but the scale modeler in me was under distress as the ribs not being there would really bother me and I always try to save every ounce of weight in a tail. So, here is what I'm essentially starting with:
IMG_9399.jpg IMG_9400.jpg
You can see that I've got a 4-blade prop on-hand that I intend to use for this project. There are holes in the original cowl that need to be fixed as well. This model has had a lot of sunlight exposure over the years, leading to yellowing of the canopy and plastic cowl. This also makes the plastic brittle. Rather than mess around with the canopy, I was able to source a new one from ParkFlyer Plastics for $7. No-brainer there. The cowl will be reinforced with fiberglass and epoxy on the inside and the holes filled with bondo. The cowl is exactly the same as the one Top Flite provided for their 60-size Corsair. The cylindrical profile is incorrect and there are accounts on the web from the original designer on how to modify the cowl to get the proper tapered shape. I'll cover that when I get there.

Pretty straightforward rescue build here. I'll build it out per the plans with retracts and flaps. As flight accounts reveal a fairly nasty tips stall at lower speeds, I intend to keep her nose-heavy and the flaps are a bit of insurance of lift on landing speeds. I am considering covering film on this one but as usual, I'm leaning toward the more complicated... fiberglass finish with paint. It's just more resilient in the summer sunshine but it usually leaves me wanting panel lines and rivets. I'm hoping I can resist that urge and just have a flying model that works and is stress-free.

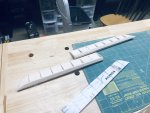
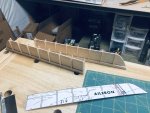
I've started construction of the wing control surfaces. There were none built so cutting out templates from the printed plans, I've pulled out my scrap balsa stash and started construction on the ailerons.
IMG_9404.jpg IMG_9407.jpg
Standard Top Flite construction technique used here. Nothing fancy or uncommon. I've done this same thing with the flaps. While there are no cross-section profiles for the flaps, I've left the leading edges of them flat and I'll be using some offset hinges that should work just fine and not require any further shaping.

Up next is re-making the elevators and rudder per the plans. I may get the cowl going with the glass just to give it some good cure time. As I'm unfamiliar with the temperature fluctuations and humidity content of my new basement workshop, It seems reasonable that I may end up with a learning curve on my fiberglass layups.

Chime in with comments and suggestions on parts you'd like me to cover in more detail. I'm super excited to be building again and sharing the build with the community is one of my favorite parts.
 

Robyle3

Active member
Aha! The bear is my fav allied fighter, I'll be looking forward to seeing this done.

(Hypothetically) If you were to add panel lines, would you paint them, or etch them? I have no ideas how to work with glass so that detail intrigued me.
 

willsonman

Builder Extraordinare
Mentor
The way I do panel lines is fairly easy. I first make sure my finished surface is ready for paint. Any and all glass work and filler needs to be done. I use 1/64" chart pak tape. I apply the tape on the airplane wherever a line is to be made. I then apply three light coats of primer over the lines/tape and wet sand back until the tape is exposed again. Once the tape is removed, you are left with visible and tactile panel lines with minimal weight gain. From there, any paint applied keeps these lines as long as you do not go too heavy with the paint. An airbrush is preferred as rattle cans can go on quite heavy depending on the formula and brand that you use.
 

willsonman

Builder Extraordinare
Mentor
The prop is a 14x8x4 from FMS as far as I can tell. I was thinking maybe MotionRC but I'm not entirely sure. I purchased it as a possible static prop for my P-47 but the diameter was a bit silly... too small.

I got the elevator main construction completed. I need to add a bit of balsa for the trim tabs as well as some stock for where the control linkage goes. A balsa block goes at the tip and then final sanding to shape. I did not capture a picture of the old ones but they had cutouts for rudder throw... the thing is, the rudder would not even interfere with the elevators in any way due to their placement forward of the rudder. Again, use your friggin references.
IMG_9408.jpg
 

wilmracer

I build things that fly (sometimes)
Mentor
I did not capture a picture of the old ones but they had cutouts for rudder throw... the thing is, the rudder would not even interfere with the elevators in any way due to their placement forward of the rudder. Again, use your friggin references.

That doesn't sound like a John mistake. He must not have done the prior work himself
 

Robyle3

Active member
The way I do panel lines is fairly easy. I first make sure my finished surface is ready for paint. Any and all glass work and filler needs to be done. I use 1/64" chart pak tape. I apply the tape on the airplane wherever a line is to be made. I then apply three light coats of primer over the lines/tape and wet sand back until the tape is exposed again. Once the tape is removed, you are left with visible and tactile panel lines with minimal weight gain. From there, any paint applied keeps these lines as long as you do not go too heavy with the paint. An airbrush is preferred as rattle cans can go on quite heavy depending on the formula and brand that you use.
That is remarkably clever
 

willsonman

Builder Extraordinare
Mentor
That doesn't sound like a John mistake. He must not have done the prior work himself
I don't think John did this. Pretty sure he picked it up at a swap meet somewhere and just never got to completing it.

That is remarkably clever
Not my idea. I've seen many methods used over the years. This one, I stole from John Morgan, and I'm fairly certain he stole it from someone else.
 

willsonman

Builder Extraordinare
Mentor
First up, a shot of a completed aileron/flap.
IMG_9425.jpg

I completed the elevators. Shaping made loads of balsa dust... just a friendly reminder that a respirator is your friend here. It was hilarious to compare the elevators that came with the aircraft. Shape, size, and lack of effort were very apparent.
IMG_9423.jpg

With that, I drilled holes for the elevator control linkage, which is internal, and then cut slots for the pin hinges. Alignment of each side is basically lined up, not perfect, but good enough. The tips of the H-stab were not cut at the right angle per the plans so I had to correct that as well as sand the proper taper.
IMG_9424.jpg

I started framing out the rudder. This is the last control surface to be constructed. It is the same construction as the other surfaces. The covering will come next. I'll use some covering I have on-hand and then shoot some primer on it. I'm out of my preferred covering (Solartex) but regular film covering should be fine.
 

willsonman

Builder Extraordinare
Mentor
Wrapped up the rudder last night. I added some balsa to the base of the rudder as reinforcement for the control horn. This wraps up the construction of the control surfaces so I'll move on to covering them. It will serve as a bit of protection against bench rash. Time to work on the cowl and start modifying the wings for retracts.
IMG_9427.jpg
 

F106DeltaDart

Elite member
Control surfaces are looking good!
The prop is a 14x8x4 from FMS as far as I can tell. I was thinking maybe MotionRC but I'm not entirely sure. I purchased it as a possible static prop for my P-47 but the diameter was a bit silly... too small.
Ah, ok. The 14" prop is good. I've had some issues with their 17" prop throwing a blade on motors over 300kv on 6S, so wanted to check. Ended up replacing it with a much pricier varioprop.
 

willsonman

Builder Extraordinare
Mentor
I've got a 16" 3-blade prop from MotionRC on my Dauntless. Perfect operation. It's the prop for their corsair. Absolutely zero issues with it.
 

F106DeltaDart

Elite member
I've got a 16" 3-blade prop from MotionRC on my Dauntless. Perfect operation. It's the prop for their corsair. Absolutely zero issues with it.
I use two of those props on my Tigercat and completely agree. Solid, with no issues. I've only ever had issues with the FMS 17" from their 1700mm P-47 and Corsair.
 

willsonman

Builder Extraordinare
Mentor
And here we find one of my very much exposed weaknesses. I've just never been all that great at the iron on coverings. Solartex has made me look like a pro but other films have really made me struggle over the many years I've been in the hobby. Ugh... Ailerons and rudder are done.
 

Attachments

  • IMG_9430.jpg
    IMG_9430.jpg
    2.3 MB · Views: 0

willsonman

Builder Extraordinare
Mentor
No images today. Boring stuff accomplished over the weekend.

I got more control surfaces covered and only the flaps remain. I wanted to start on the cowl and brought out my fiberglass supplies. It has been a while since I used my stash of resin and it had gone cloudy again. Off to the stove I went with a stick and the metal jug of resin. I heated it over the stove slowly for about 30 minutes while stirring. This dissolves the resin crystals back into the resin. White chunks dissolve and you are left with e clear solution of slightly amber color. I used 80-grit paper to rough up the surface inside the cowl and cut cloth pieces to cover the respective holes. A cheap brush was used to mix and apply resin to the cowl. Cloth was laid down and more epoxy applied to wet out the cloth. I tried to apply some plastic wrap over the application but it was difficult due to the dry air making static a real problem. At any rate, the layup is curing out and will likely take more than 24 hours since the basement is rather cold. I'm hopeful that the dry winter air will keep the cure from flashing out. Longer cure times make this a problem but the longer cures generally are harder and stronger.

Up next will be an application of bondo to the outside to fill the holes, using the fiberglass backing as an anchor point. It's all stinky business so make sure you use a respirator in the immediate area and also well-ventilated.
 

Joker 53150

Mmmmmmm, balsa.
Mentor
To cure epoxy in the winter around here can be a pain as well, so I've often used a small halogen clamp-light aimed at the part and placed close enough to let the heat warm the epoxy. A regular lightbulb would also work and consume less electricity. With a bigger part I've also used pink fan-fold foam-board to create a temporary tent around the part and light to help hold the heat in, basically creating a small heat-box.
 

willsonman

Builder Extraordinare
Mentor
Yes, I've contemplated making a heat box over the years I've been doing this. I've just never done it... mostly out of laziness but also due to the infrequent nature of my layups. I prefer to use sanding sealer/ WBPU wherever I can for finish work. It's just so much easier to work with.
 

willsonman

Builder Extraordinare
Mentor
Checked on the cowl and while it seemed cured there were a couple of spots that were not entirely hard yet. I decided to move on to a brief afternoon distraction...

IMG_9434.jpg

I picked this little bugger up for a purpose. With all the IMAC style flying I've been doing, I thought it would be interesting to try more precise flying with a non-aerobatic airplane of a warbird variety. I've always found it beneficial to approach things small and then go larger. Bigger does fly better so if I can hone my skills on something small then going bigger makes life easier. I've also had a wanting to go back to this kind of airplane for a couple of seasons now. Simple 3S 2200mAh pack that I can throw in my car and does not take 10-30 minutes to assemble at the field. I've got two packs to chuck this thing around so it should be some good fun. Assembled in 30 minutes and spent 10 minutes setting up in the radio and setting throws. Even got a new picture downloaded for it in my radio.
 

willsonman

Builder Extraordinare
Mentor
Since I've never covered this kind of technique in any of my builds on this forum I'll cover this in as much detail as I can. So, buckle up...

Starting with the cowl in its fiberglassed state, sand the interior and perimeter of the area you are going to fill with Bondo. This creates surface area for the bondo to adhere to. It's thick stuff so you want to increase the mechanical adhesion to maximize your chemical adhesion.
IMG_9438.jpg

Per the directions, you want an amount of bondo 3" in diameter and 1/2" thick. I use cardboard since it is disposable and use my compass to draw out a 3" circle as a visual reference.
IMG_9439.jpg

I used a paint stirrer to pull out a bit of bondo at a time to fill the circle and then laid the indicated 3" strip of hardener from the tube. Use a timer on your phone to mix for the full 2 minutes, as instructed.
IMG_9440.jpg IMG_9441.jpg

This is far more material than we need but it's insurance since this will start to turn into a putty consistency after another 5 or so minutes. Using the same stick, I filled the holes and cracks to the point where I was fairly confident that there were few air bubbles. I apply the mix at the perimeters first to make sure the bondo gets into the corners and then add more to build up the hole. By the time I had filled all of the spots on the cowl, the mix was getting stiff and putty like. At this stage you can sort of shave off excess if you have a lot. This saves sanding time but do it carefully since it is still pliable and can pull the mix out of your hole. Of course I'm using gloves during all of this.
IMG_9443.jpg

After this, I let the stuff harden for another good 15-20 minutes to fully set. Use the bathroom, grab a drink, check your email. Whatever. Then start sanding with 80-grit sandpaper. This grey version (not the pink kind) sands quite easily. It makes a holy mess and make sure you use a RESPIRATOR. You do NOT want to breathe this stuff in. You will eventually start to see the edges of your holes or cracks and then you can use a less heavy-handed sanding motion. At this stage, start sanding in the direction of the curvature of the part. Continue sanding until flush and feel the surface with you fingers to make sure there is no bulge and the surface is even.
IMG_9446.jpg IMG_9445.jpg IMG_9447.jpg IMG_9444.jpg

I used a razor blade to trim up the bondo and fiberglass at the edge of the cowl and then sanded this edge to make a continuous edge. I then sanded the interior of the cowl smoother so that it would mate easier with the mounting ring.
IMG_9448.jpg

Unfortunately, I'm not quite done with the cowl but I'll cover that in another post. I hope that this is helpful for folks out there dealing with 2nd hand aircraft that either have damage, or have been cut for glow or gas engines. Out-of-production kits/ parts can be frustrating to say the least. This was literally less than an hour's worth of work here, including prep and cleanup time. In the end, between the glass, epoxy, and bondo, I probably spent less money than to buy a new part anyway.
 

willsonman

Builder Extraordinare
Mentor
OK, so the cowl shape is wrong.

The cowl included in the Bearcat kit was exactly the same as the one included in the Corsair kit. The difference being that the Bearcat has a tapered cowl and the Corsair has a cylindrical cowl. Referencing the plans, we can clearly see that the taper is there and not per the included part. Click on the image and you can see the measurements. Adobe PDFs are great for this.
cowl measure.jpg

So, if the difference is about 1/2 inch, I'll cut out a triangle on each side of the cowl and glue the cowl back together. I want to note that this is not a novel idea. I've found references elsewhere online to those who have spoken to the original designer and this was their exact instruction to complete the correct shape of the cowl. I'll also note that I've referenced pictures and 3-view drawings and confirmed that a taper from the top/bottom view is not apparent and so only the side view is the necessary modification.

With that said, There will need to be additional bondo work performed once modified to round out the sides and inner lip of the cowl, as well as use some glass to reinforce the joint on the interior. It will essentially involve a repeat of steps outlined previously so I'll simply cover the modification and end result moving forward.