
You are using an out of date browser. It may not display this or other websites correctly.
You should upgrade or use an alternative browser.
You should upgrade or use an alternative browser.
*Unofficial* FT Simple Cub
- Thread starter SP0NZ
- Start date
-
- Tags
- simple cub swappable trainer
TooJung2Die
Master member
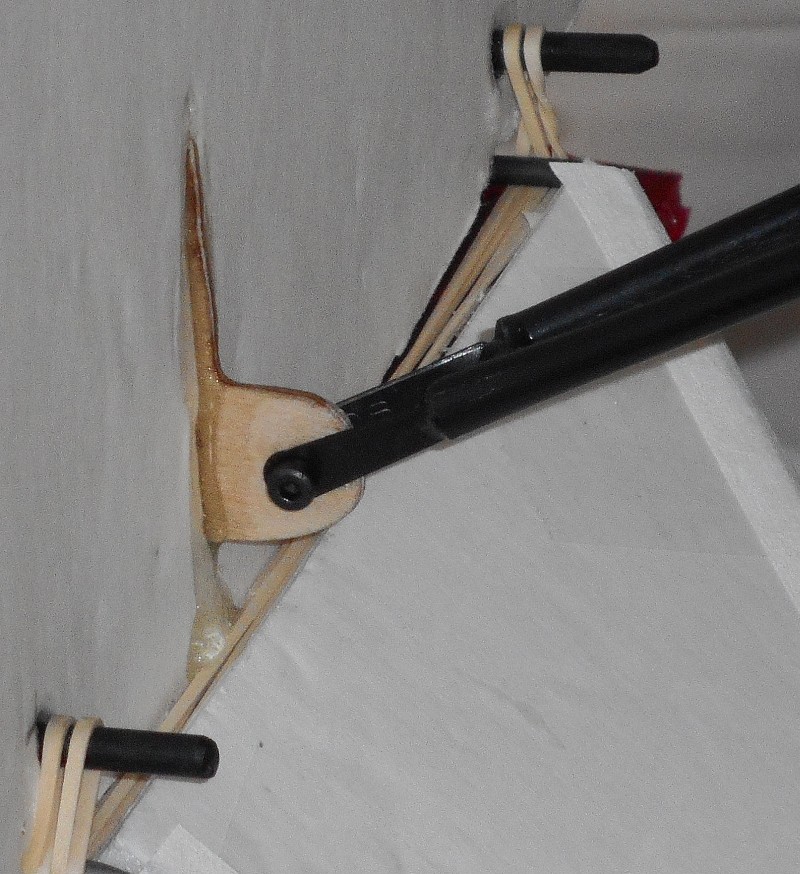
BHOFM, I couldn't tell from your photos on RCG how you made the wing removable with the struts.
Forster
Slow, low and dirty.
Where did you get the cylinder heads?My Simple Cub is getting close to a maiden! Yay!
View attachment 90713 View attachment 90714 View attachment 90715 View attachment 90716 View attachment 90717 View attachment 90718 View attachment 90719
Earl Turner
Member
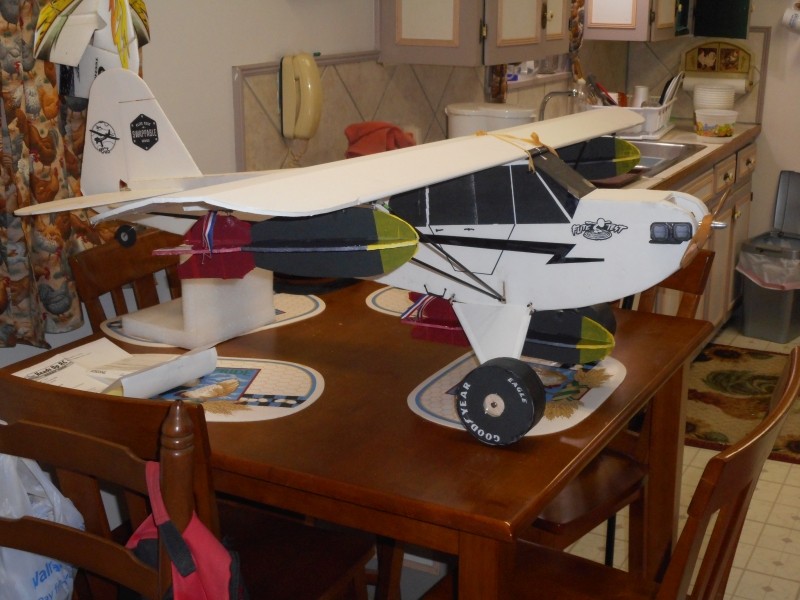
Here is my fleet - 3 simple cubs - a J2, a PA 18 super cub on floats and an almost finished E2 - still to do the landing gear details & wing struts. Hope to fly them soon when the weather allows. Also in the picture, my FT Pietenpol, Peanut-scale J2 and Stevens Pietenpol under construction - what a month!


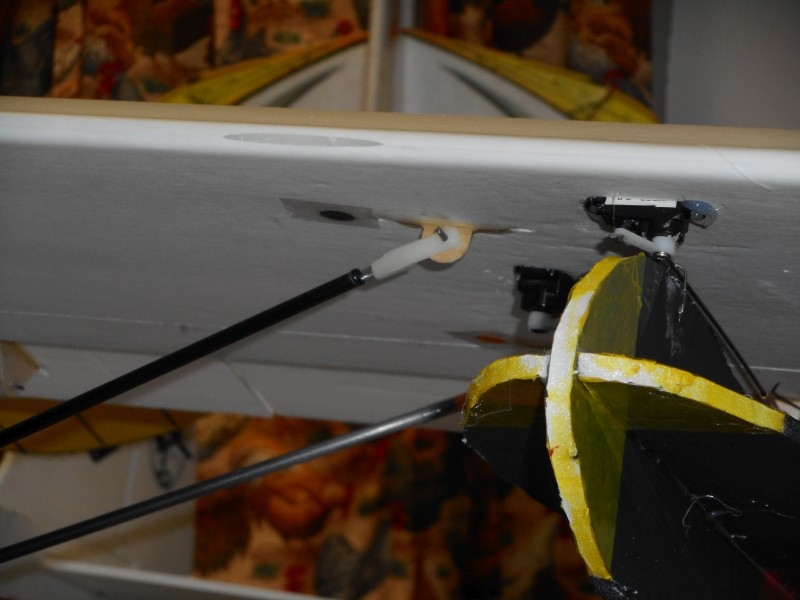
Servo Arm Question?
Hey, I've been watching the vids for a couple of years now, and I finally jumped in and bought the Simple Cub. This is my first foam board build. I have a question, and I have searched for it, but been unable to find an answer.
In the build video, Josh uses the shortest arms for the servos with only 1 hole when centering them. Later in the vid when he is installing them, he puts the control wire in the middle holes on the servo arms. So my question is, which one's are correct? Thanks for your help.
TooJung2Die
Master member
I put the wire in the servo arm hole that is the same distance from the pivot point as the hole in the control horn to the hinge.
I put the wire in the servo arm hole that is the same distance from the pivot point as the hole in the control horn to the hinge.
I found the ailerons were way too sensitive and moved the wire so I had the least amount of movement. Now it is still twitchy but tamed with some expo and rate changes. Flies more like a cub and not an Edge 3D plane.
Forster
Slow, low and dirty.
I moved mine so I could achieve the throw gauge movement for low rate with the amount of movement provided by the servo. I think I used the middle hole as well. My plan (if I ever find a minute to finish the ailerons) is to set the low deflection up as the regular rate and cut back 20% for the low rate while I'm getting used to the airplane. I'm admittedly not much of a pilot so I throw caution at everything.Hey, I've been watching the vids for a couple of years now, and I finally jumped in and bought the Simple Cub. This is my first foam board build. I have a question, and I have searched for it, but been unable to find an answer.
In the build video, Josh uses the shortest arms for the servos with only 1 hole when centering them. Later in the vid when he is installing them, he puts the control wire in the middle holes on the servo arms. So my question is, which one's are correct? Thanks for your help.
Forster
Slow, low and dirty.
I've seen lots of landings that nosed over. I'm using 1.5M Timber wheels and plan to mount them about 1.5" forward of the normal position for rough fields (all I fly from really).FT SIMPLE CUB MAIDEN
That has been my experience as well and like you have been upping the wheel diameter to accommodate bumpy fields. Had not though about Timber tires but will give that a try this season. I have also had issues with the landing gear mount. I like the plane well enough to build another, but this time I will use to ply reinforcement around the gear slot and use 3d printed gear mounting instead of the foam board. Btw, Nice paint scheme.
Forster
Slow, low and dirty.
I'm in the process of learning by destruction with my Cub (#2 is already on the bench). I have the timber tires and built the steerable tailwheel with modeling plywood (just cut it to fit the taper with the hole aligned at the rudder pivot point, doubled the ply where the wire goes through to 1/4", and hot glued the wire to the rudder - so it goes rudder, plywood mount, trails about 1.5" and wheel) and I mounted the front wheels using the original wire and slot, but using plywood on both sides the wire. For Cub part deux, I'm going to make a slotted plywood sandwich of sorts to mount the gear wire in. The plan is to cut two 1/8" sections that fit the current gear slot and pieces of plywood 1/4" wide and the length of the slot (tapered at the bottom where the landing gear wire comes out). That gets epoxied together to form the gear mount and then gets mounted in the fuselage slot. I'll bend the landing gear wire so the outside of the wire fits inside the hole created by the 1/8"x1/4" spacers and extends 1/16" above the top of the plywood mount. Once the wire is inserted, I'd zip tie the gear wire in the plane just to hold it in. That way if the gear wire needs repair or replacement I can cut a zip tie and pull it. On my current Cub I bent the wire slightly forward to save props during grass field landings. That seems to make it balance better too.That has been my experience as well and like you have been upping the wheel diameter to accommodate bumpy fields. Had not though about Timber tires but will give that a try this season. I have also had issues with the landing gear mount. I like the plane well enough to build another, but this time I will use to ply reinforcement around the gear slot and use 3d printed gear mounting instead of the foam board. Btw, Nice paint scheme.
FTNoob18
New member
Here are some pictures of my recent build of the FT SIMPLE CUB. My printed and glued on engine graphic looks great, shocks made from straws, and number temple which i spray bombed. entire plane was spray bombed. Tailwheel was a lego wheel which I upgraded to a 1/2"foam wheel now. Used a Coat Hanger for the landing gear and the dowel rods slide up and down inside the foam. 1000mah and 1300mah 3s batteries I will be using. Still have not flown it yet but looks great on the wall!
.


.


Last edited:
FTNoob18
New member
Next up is the Dr1 mighty mini triplane almost finished and the mighty mini corsair I just started. Getting lots of rain here in NC< so more time to build! I enjoy building more than flying ") View attachment 104660
View attachment 104661
View attachment 104660
View attachment 104661
View attachment 104660
View attachment 104661Forster
Slow, low and dirty.
Couple of flights yesterday, some observations and some questions.
1. The timber 1.5M wheels worked great, even using the under diameter landing gear wire provided in the kit. With the B powerpack and a 1000mah battery I seemed to have plenty of power.
2. Full length Ailerons need way less movement for maiden flights with novice pilots (personal opinion).
3. I wouldn't mind another set screw on the engine mount. Mine came loose yesterday and fortunately I could hear it and land the plane before the engine came loose.
Questions:
Any opinions about splitting the flaps and ailerons or just using outboard ailerons?
Anyone using aft mounted tail servos? (Rather than the traditional mounting under the wing)
As an aside, after dialing back my aileron rates on the Cub I did the same thing to my Champ S+ which makes it much easier to fly in expert mode (due to my otherwise lacking ability).
Last edited:
Forster
Slow, low and dirty.
Did you seal the foam edges of your Cub before painting (with hot glue) or just poly and paint?Next up is the Dr1 mighty mini triplane almost finished and the mighty mini corsair I just started. Getting lots of rain here in NC< so more time to build! I enjoy building more than flying
Receiver Question
I have looked, but I have not been able to find an answer to this. I am new to flying and this is my first FT plane. I have a lemon receiver and I am not sure how to mount it. Can someone show me a pic of their receiver mounted in the power pack? Also what did you mount it with? Thanks
I have looked, but I have not been able to find an answer to this. I am new to flying and this is my first FT plane. I have a lemon receiver and I am not sure how to mount it. Can someone show me a pic of their receiver mounted in the power pack? Also what did you mount it with? Thanks
I mounted mine alongside the inside of the fuselage with self-adhesive velcro. You can place it on the power pod as well (behind the ESC).
Thanks for the help.
Forster
Slow, low and dirty.
Sure. Don't know what your previous flying experience is, but the Simple Cub (with standard control throws) can be a handful at first. If you're using it as a trainer you can dial down the ailerons and rudder for the first couple flights (I think my ailerons are 1/2 the low gauge setting) to make it more "cub-like". I plan on using expo settings at some point and adding flaperons into the mix (about 1/2 flap) for landing. I don't need any help with take-offs, with the B pack motor, a 9x4.7 ARES prop and 1000mah battery this thing can take off in a couple of feet on grass (I'm using Timber 1.5M wheels).Thanks for the help.
Last edited:
Similar threads
- Replies
- 6
- Views
- 438
- Replies
- 5
- Views
- 979