I didn't get to go to Drone Nationals, and quite honestly I would have been non-competitive at my skill level because I am still learning quite a bit. Ever since Drone Nationals I have been inspired to work on my skills and I am usually flying and/or building during most of my free time.
As I mentioned I have been building like crazy. I believe the last build thread I posted here was for my Blackout Mini-H quad: http://forum.flitetest.com/showthre...Quad-w-BrainFPV-build-log!&highlight=brainfpv
Since then I have converted my Twitchity Acro Quad to carry FPV gear for racing, I have also built a Flying Cinema Tankito30 Carbon, Two different different Tweaker180's (one with 1806's one with 2204's), and I currently have an Armattan Morphite V2 (with 5" arms) on the bench halfway built. That's not including the Impulse RC Alien 6" frame which should be here in a couple weeks. Between all these frames, the 2204 powered Tweaker gets the most flight time, followed by the Tankito, and the Twitchity Acro Quad.
The Blackout I have not flown in months! And that left me considering whether I should keep it since I've had the Alien 6" on pre-order and I knew it would be here soon.
So today the decision has been made to keep it, but I am going to rebuild it. This build is going to be heavily inspired by Califrag's lowrider build, which he flew to a 3rd place finish at Nationals. If you haven't seen his Blackout, here is the link to his blog post: http://forum.flitetest.com/entry.php?439-BOSMH-BlackOut-Super-Mini-H-Quad-Lowrider-Build-Log
This is going to be a full rebuild, I won't be using hardly any of the stuff from my original blackout build, except frame pieces.
The Goal: Build a Lowrider Blackout for MultiGP 3S Spec Racing.
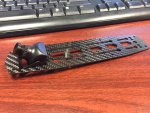
Construction: the frame will be comprised of mostly stock Blackout Mini-H quad carbon plates, with the exception of the top plate being modded slightly to accommodate the fpv camera. Readily available hardware and standoffs will be used to complete the build, and some unique parts will be 3D printed to hold various components. I will make the 3D printed part files (.stl) available on thingiverse to anyone who wants to try their own build.
Electronic Specs:
STEP 1: Passing the point of no return!
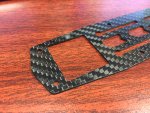
Originally I was going to dremel the hole in the top plate, but after some thought I decided to let on of my buddies mill it out. It only took about 5mins to chuck it up on the mill and cut the hole, and it came out very cleanly. Make sure if you cut carbon to wear a mask and use a vacuum! Eye protection would probably also be a good idea.


I'll post up measurements of the hole and its position later. We pretty much just centered it and made it wide enough to clear the fpv camera bracket. Length wise it is just long enough to clean up the existing holes that were already in the top plate.
Thankfully, I believe this is the only irreversible modification to the Blackout frame pieces that I will need to make. Now that the hard part is over, onto hardware/nuts/bolts/standoffs next. I placed an order for these parts and I will update the thread when they get here with more details and pictures as I begin mocking up component placement. For the moment the plan is to space the top plate 15mm off the PDB, whereas the stock Blackout frame uses 35mm standoffs. This is a significant reduction in height and should bring the mass of the battery closer to the center of rotation for the frame.
Stay Tuned....
As I mentioned I have been building like crazy. I believe the last build thread I posted here was for my Blackout Mini-H quad: http://forum.flitetest.com/showthre...Quad-w-BrainFPV-build-log!&highlight=brainfpv
Since then I have converted my Twitchity Acro Quad to carry FPV gear for racing, I have also built a Flying Cinema Tankito30 Carbon, Two different different Tweaker180's (one with 1806's one with 2204's), and I currently have an Armattan Morphite V2 (with 5" arms) on the bench halfway built. That's not including the Impulse RC Alien 6" frame which should be here in a couple weeks. Between all these frames, the 2204 powered Tweaker gets the most flight time, followed by the Tankito, and the Twitchity Acro Quad.
The Blackout I have not flown in months! And that left me considering whether I should keep it since I've had the Alien 6" on pre-order and I knew it would be here soon.
So today the decision has been made to keep it, but I am going to rebuild it. This build is going to be heavily inspired by Califrag's lowrider build, which he flew to a 3rd place finish at Nationals. If you haven't seen his Blackout, here is the link to his blog post: http://forum.flitetest.com/entry.php?439-BOSMH-BlackOut-Super-Mini-H-Quad-Lowrider-Build-Log
This is going to be a full rebuild, I won't be using hardly any of the stuff from my original blackout build, except frame pieces.
The Goal: Build a Lowrider Blackout for MultiGP 3S Spec Racing.
Construction: the frame will be comprised of mostly stock Blackout Mini-H quad carbon plates, with the exception of the top plate being modded slightly to accommodate the fpv camera. Readily available hardware and standoffs will be used to complete the build, and some unique parts will be 3D printed to hold various components. I will make the 3D printed part files (.stl) available on thingiverse to anyone who wants to try their own build.
Electronic Specs:
- Flight Controller: SPRacing F3 Acro
- Motors: Cobra 2204 2300kv
- ESC's: FVT Little bee 20A w/BLHeli
- Battery: 1300mAh 3S (considering Tattu 75C)
- Props: HQ 5045 Bullnose
- FPV Cam: Sony 600TVL cased cam
- VTX: UBAD 200mW Race Band
- Antenna: VAS Airblade LHCP
- RC RX: some sort of Futaba S-BUS to keep wiring simple
- RC TX: Futaba 14SG (my defacto transmitter of choice for all builds)
STEP 1: Passing the point of no return!
Originally I was going to dremel the hole in the top plate, but after some thought I decided to let on of my buddies mill it out. It only took about 5mins to chuck it up on the mill and cut the hole, and it came out very cleanly. Make sure if you cut carbon to wear a mask and use a vacuum! Eye protection would probably also be a good idea.


I'll post up measurements of the hole and its position later. We pretty much just centered it and made it wide enough to clear the fpv camera bracket. Length wise it is just long enough to clean up the existing holes that were already in the top plate.
Thankfully, I believe this is the only irreversible modification to the Blackout frame pieces that I will need to make. Now that the hard part is over, onto hardware/nuts/bolts/standoffs next. I placed an order for these parts and I will update the thread when they get here with more details and pictures as I begin mocking up component placement. For the moment the plan is to space the top plate 15mm off the PDB, whereas the stock Blackout frame uses 35mm standoffs. This is a significant reduction in height and should bring the mass of the battery closer to the center of rotation for the frame.
Stay Tuned....


