Experimenting with Resin printing (MSLA) for detailed parts

jhitesma

Some guy in the desert
Mentor
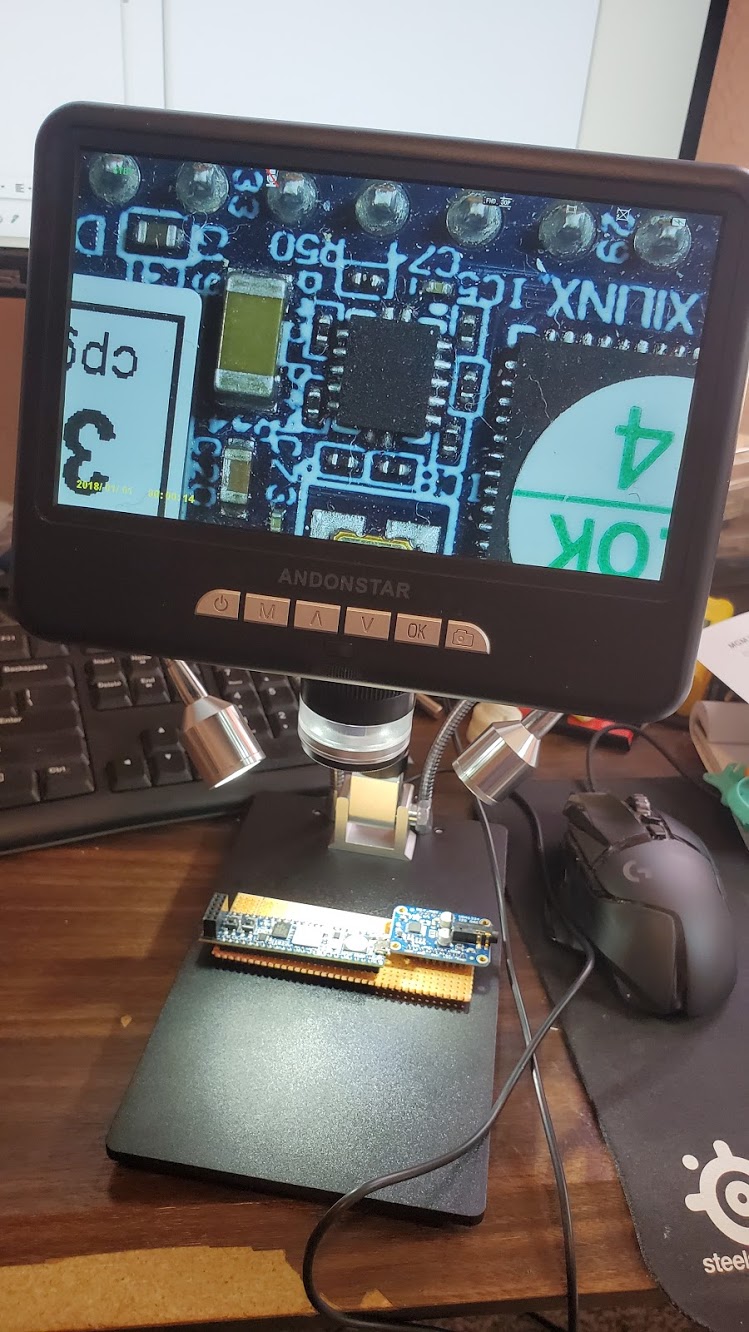
Ok, thought I was done for a few days...but got a new toy today. I got a cheap 7" video microscope off Amazon to help with some of the really fine SMT soldering I've been doing.

20200723_152510.jpg


And with all these 3d printed pieces sitting here I just had to toss a few under scope and found them facinating.

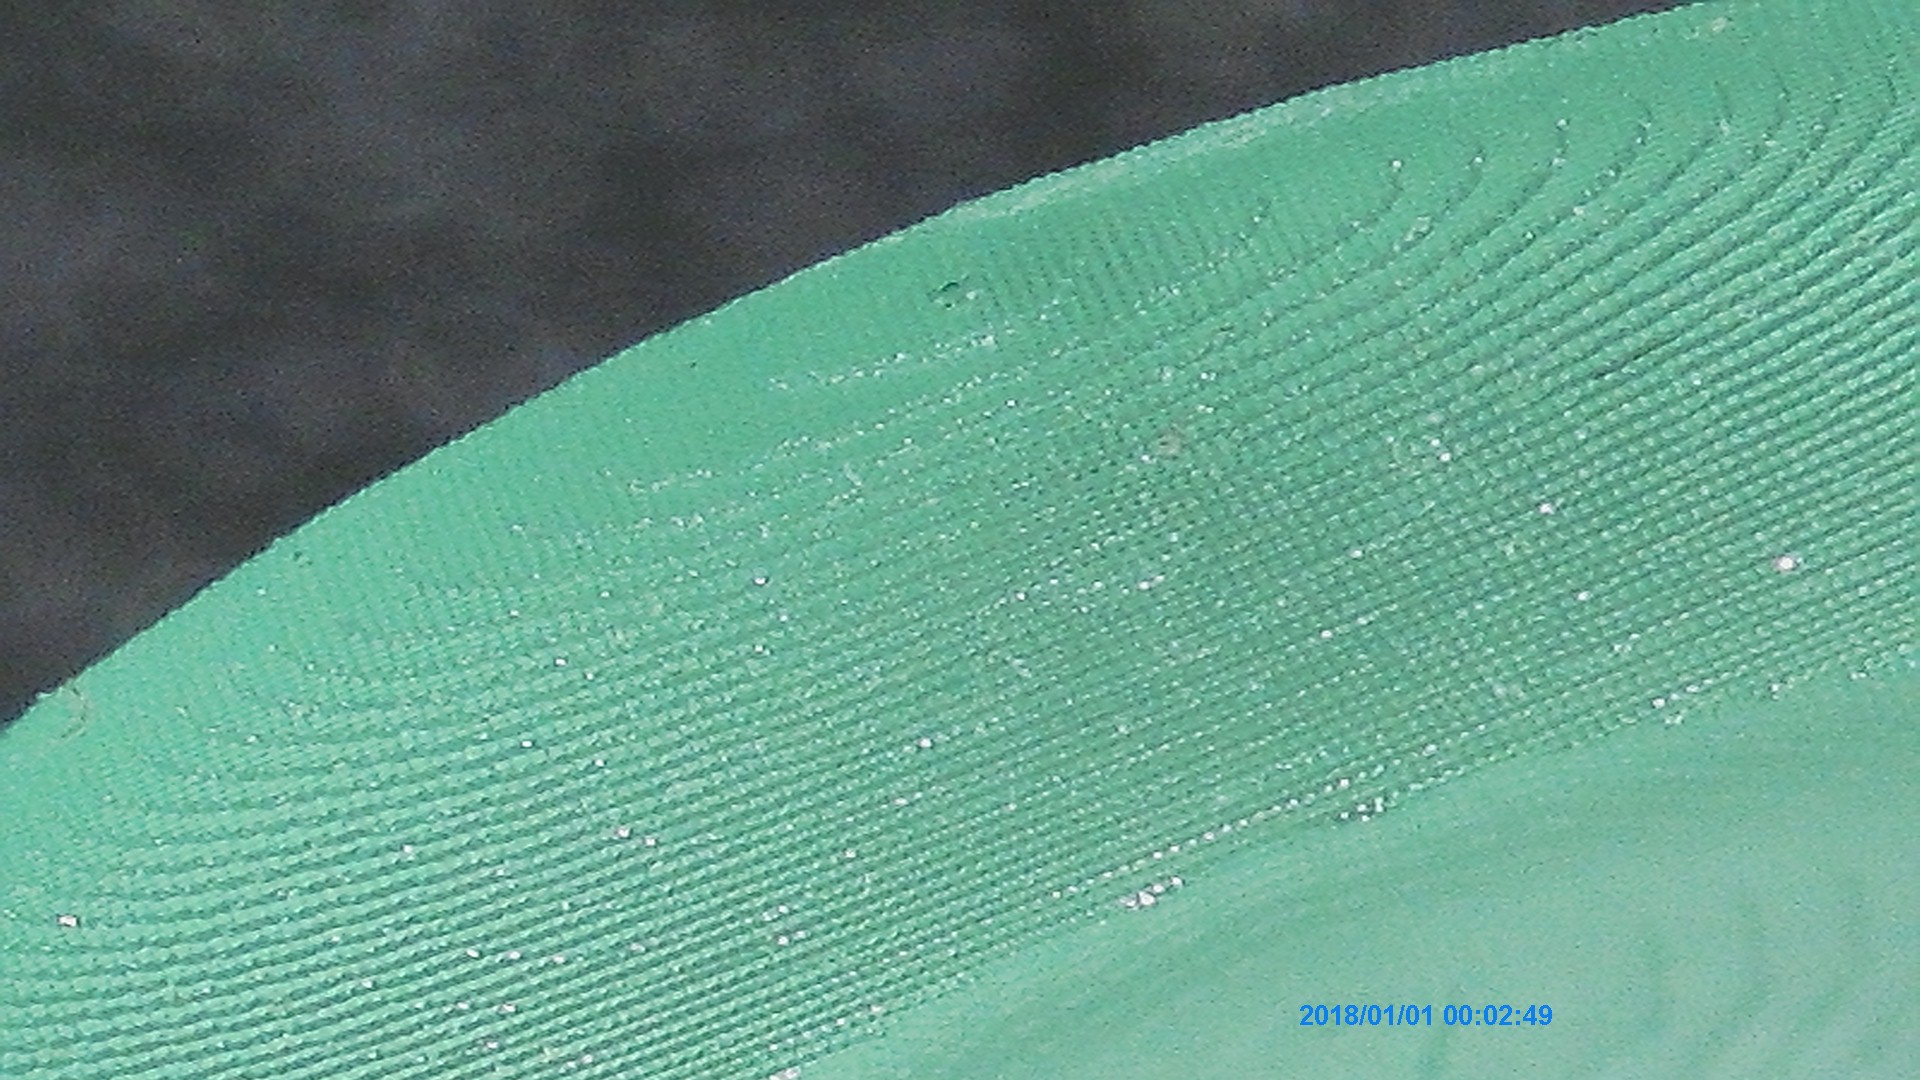
IMG180101-000343-000013F.JPG


You can actually see the individual pixels of the LCD screen!

IMG180101-000249-000012F.JPG


Amazing that a piece that looks and feels so smooth can be so rough up close.

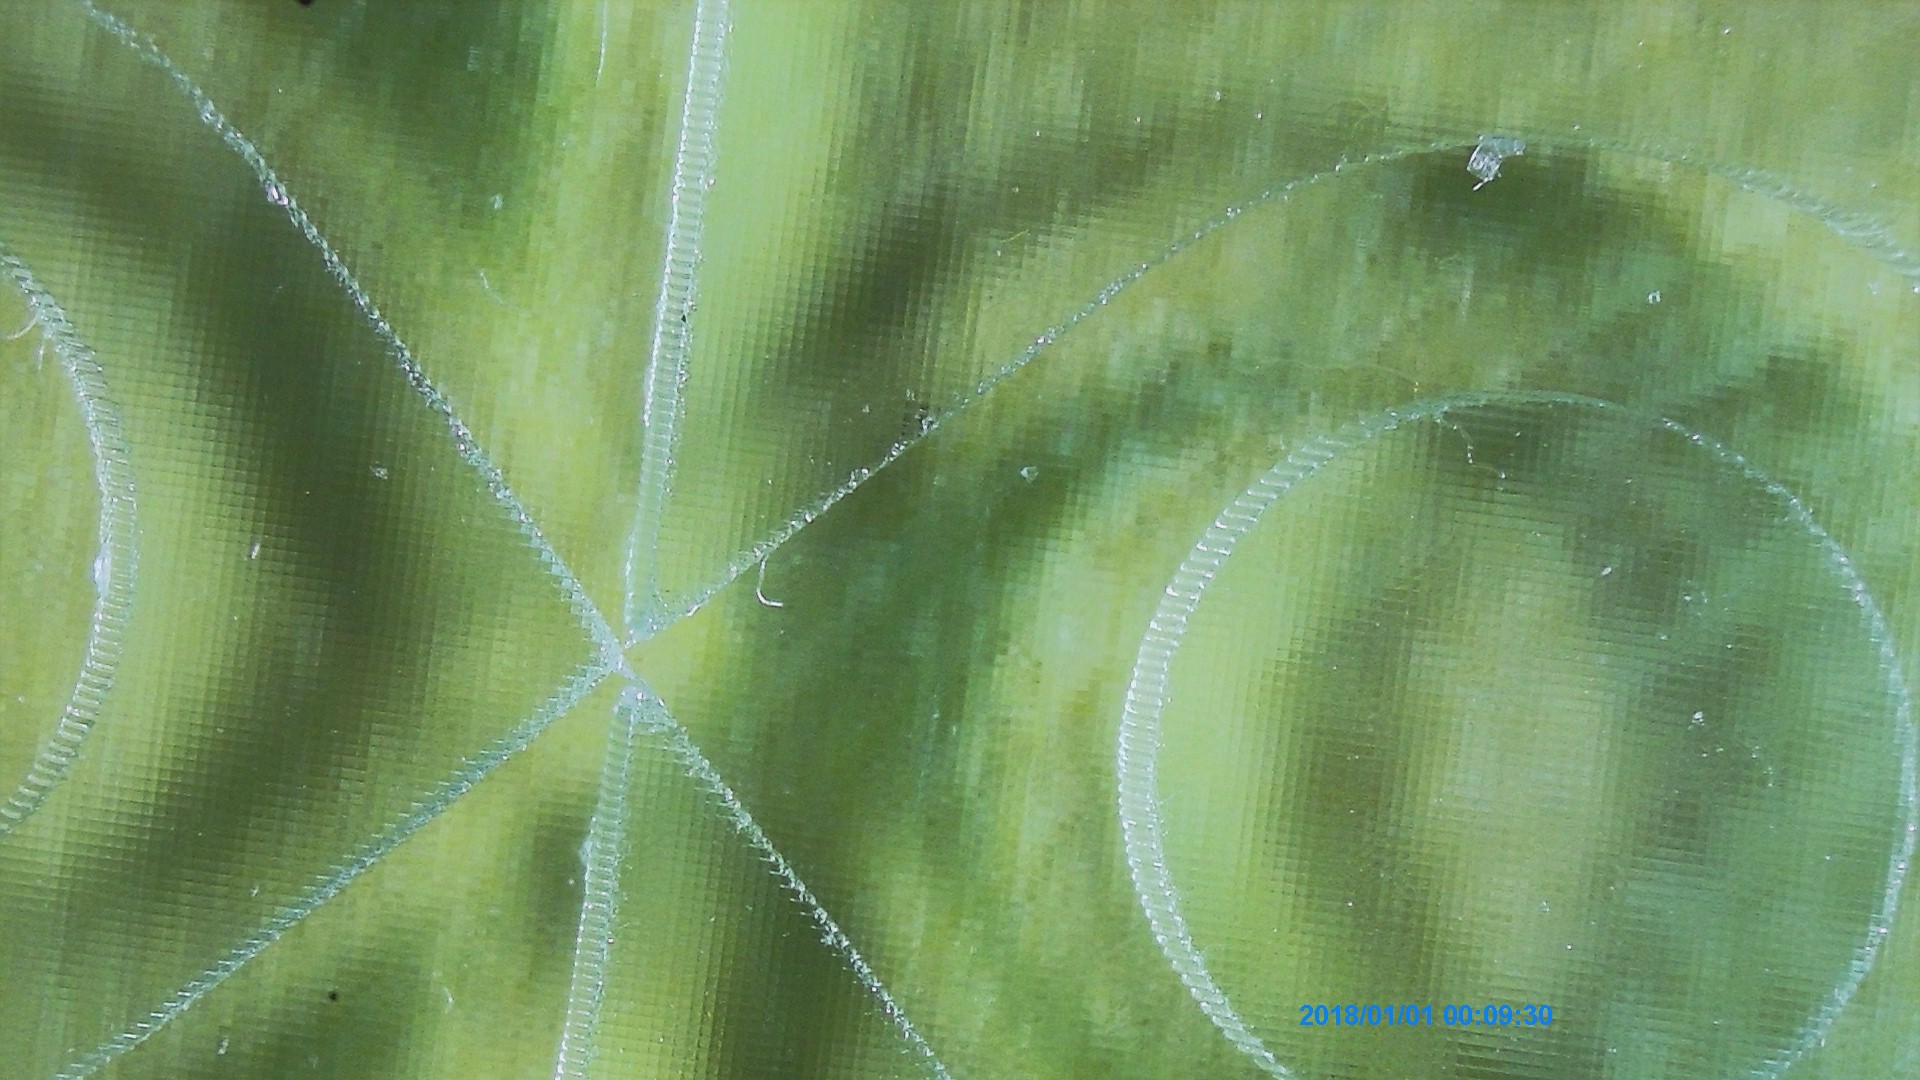
IMG180101-000931-000002F.JPG


I couldn't see this at all even with my magnifier and zoom on my camera. But under the scope it's really noticable and I found it pretty fascinating so figured it was worth sharing!
 

LitterBug

Techno Nut
Moderator
I need one of these scopes for soldering everything. My old eyes are not what they used to be, and I find myself soldering by feel and checking by taking pictu4es with my phone.
 

jhitesma

Some guy in the desert
Mentor
I need one of these scopes for soldering everything. My old eyes are not what they used to be, and I find myself soldering by feel and checking by taking pictu4es with my phone.

Yeah, My attempts to age backwards have still not been successful. I had lasik back in 98 or 99 and loved being without glasses - but about 3 years ago my astigmatism came back and my doctor suggested glasses just for night driving. I'm still 20/20 and can pass a drivers eye exam without glasses but the astigmatism makes things a bit less sharp. It's worst at night since my pupils are larger than the area that was corrected with the lasik so I get uncorrected light in around the edges when it's dark.

About 13 years ago I picked this up on a whim for about $10 in the checkout line at a Frys electronics:

20200727_223114.jpg


I mostly used it as a light - but I was starting to do more and more SMT work so figured the magnification may come in handy. But I wound up using a $20 webcam instead which gave me more magnification...but had so much delay it was really tricky to solder with:
i-BhfDkxj-X3.jpg


But over the years I started using the little white magnifier for magnifying as much as light. I liked that it helped block solder smoke from getting in my eyes but mostly was just starting to be able to put my pride aside and admit that the magnification helped me solder better as much as the light did.

The about 4 years ago my wife got my this for Christmas:
20200727_223128.jpg


And I love it. I use it to inspect printed parts, I shoot through it to get close up shots of things. The light is great for working under...and it's just generally a great upgrade from my little $10 plastic cheapie. More light, more magnification, better optics (though still not great), and easier to reposition.

Both of these magnifiers are also the main trick I use to get good clear photos in my posts.

So...the scope is pretty much a natural progression :D

Oh - and Psyborg, I have to be honest...it was her grandparents who got her the microscope. They were so impressed with how much she enjoyed the telescope they got her that they figured the microscope would be a hit as well. And sure enough she really enjoys looking at all kinds of things with it. She even pulls it out to show her friends from time to time. It's a surprisingly nice scope too.
"AmScope M150C-MS" - $100 on Amazon. The mechanical stage isn't the best....but that was kind of a bonus, everything else about it blew me away.

We're actually a 3 scope family now. We also have this one I built last year:

20200727_224504.jpg


Which is a really cool 3d print. The main body/stage actually prints as one piece and uses flexures for positioning. I'm still working on getting the electronics to work right. Mostly we use it without the steppers and just adjusting the X/Y/Z manually. But when the steppers work it even has autofocus. There's a RaspberryPi 3 in the base and it uses a modified pi cam as the sensor (with the stock lens removed and a different lens mounted in a 3D printed fixture. The project is here: https://openflexure.org/projects/microscope/ I actually need to check if they fixed the bug that was frustrating me with the steppers....(the code doesn't compile right in recent versions of arduino for some reason and when it does compile it comes out wrong and drives the steppers wrong causing them to get WAY too hot with some people even reporting them melting the body of the scope. They've also improved the design a bit since I made this so I should do another print one of these days. (Oh, and it's upside down from a "normal" scope. The lens is down in the bottom and the light is on top.)
 

bracesport

Legendary member
@jhitesma - I have been meaning to read this thread for a while now - todays the day - awesome stuff does not say enough about what you are up to - I have been printing ABS and PLA for a few years and for the most part has worked for me - last week I saw my first resin printer in action and now I am keen to see what I can do on that (if they let me)!! :)
 

jhitesma

Some guy in the desert
Mentor
@jhitesma - I have been meaning to read this thread for a while now - todays the day - awesome stuff does not say enough about what you are up to - I have been printing ABS and PLA for a few years and for the most part has worked for me - last week I saw my first resin printer in action and now I am keen to see what I can do on that (if they let me)!! :)

Glad to hear you're enjoying it and it's helpful!

Today I'm finally testing the Siraya Fast grey resin that I got last week. One thing I've learned - switching resins is a much bigger pain than switching filaments on FDM. It's not hard...it's just messy and tedious. Pouring out any leftovers through a filter to save - then rinsing the vat with alcohol, then scrubbing it out with alcohol to try and get the bits of resin hiding in corners...but doing it gently enough you don't scratch or damage the FEP film. It's the #1 reason I'm glad I have two resin printers and am starting to rethink my plan to sell one of them :D

The Siraya Blu is impressive resin. I've also done a few tests with post-processing some of the pieces I've printed with it to make them more clear. It sands well with 400 grit paper which leaves a smooth frosted look - and a light spray of polyurethane then gives it a good gloss finish and brings back the transparency.

It's hard to see in photos and my examples aren't great...but...:

Right off the printer (the texture and scratches are because that's what my build plate's surface is like):
20200728_095448.jpg


After wet sanding with 400grit it was almost opaque it was so frosted - but after hitting it with a bit of spray poly:
20200728_095503.jpg


Unfortunately some dust landed on it while it was drying...and I touched it before it was fully dry...so the finish is pretty lousy. Plus the glare of the light makes it hard to show how clear it is. But it's actually a big improvement. You can see from the bevel around the screen though that my sanding wasn't very even! (this piece had warped a bit while curing making sanding tricky)

It's also hard to tell from those two photos but there's a noticeable color difference...which I've confirmed is from curing time. The Blu is more aqua when first cured - but if given sufficient time in the UV then it looses the greenish tint and becomes more blue. Those two side by side show it better - (the poly didn't really affect the color - they look about the same before and after that)

20200728_100158.jpg


The top one had less time in the UV.

With some more time and care very transparent parts could definitely be achieved. But even right off the printer their optical qualities are way better than FDM:

Here's that same project powered up and with the lens over the LED's printed in clear PETG:
20200728_100545.jpg


And same thing with the lens in Siraya blu:
20200728_095536.jpg


With the FDM lens it works....and you can tell which colors are on...but you can't really tell the position of the LED's and since there are more than one with the same color on this that's kind of important. With the SLA lens you can easily see the actual LED's. In fact I'm half tempted to try and design some actual light pipes to redirect the LED's out to little circles on the top of the case....but that's a bit more tedious than I have time for right now :D

But...the Siraya Blu is also finicky. I found that it doesn't need the excessively slow lift speeds they suggest - I was able to get successful prints with the default fast lift speeds of the Sonic mini. But - I still kept the higher lift distance suggested because the Blu is such a viscus resin. Even with the temp in my shop turned up to the mid 80's (as suggested for blu) it flows like syrup. Which is probably why they suggest the higher slower lifts - to give it time to flow back in.

My last print in it ran the vat "dry" but you can tell from the print that the slow flow of the resin was noticable in how it failed:
20200728_095551.jpg


Other prints I've had fail due to running out of resin usually one side was fine and there was a noticeable slope since the resin would pool on one side of the printer. This time the failure is more spotty due to the resin not flowing as much.

The Siraya Fast grey on the other hand....it's possibly the least viscus resin I've bought yet. Flows like water. I've only done one quick exposure test (and there's another waiting for me to evaluate when I get time to go out there and check on it) but it also seems to print well and is definitely less brittle than the Phrozen aqua green, the anycubic black, and the elegoo water washable grey. I haven't done enough prints in the elegoo ABS like to say for sure on it...I need to get that into a printer again soon and do more testing on it.

But I can already see why people like the Siraya fast. It takes a bit more exposure than the Phrozen aqua (still determining how much more) but it still prints quick, cleans easily, and flows great.

Oh, and for those who are curious. The little project used as a test in this post is a MMDVM hotspot for DMR digital radio. I designed the case for it earlier this summer when I got an itch to try out DMR. I had to add so many vents to it because of how hot the pi-zero and modem board run...it still runs hotter than I'd like...but no hotter than it does without a case. And printing the case in resin instead of PLA it looks more like an injection molded part than a printed one...plus I was able to use fillets instead of chamfers in a lot of places to give it the look/feel I was hoping for. With FDM I had to use chamfers because fillets on the top/bottom of the case just don't print as cleanly.
 

jhitesma

Some guy in the desert
Mentor
So the siraya fast seems pretty nice...but despite being an "ABS Like" resin still seems to be a bit more brittle than I'm used to.

I was so impressed with how the spool for my little flying prop thing came out printed in BLU I thought it would try printing one of the props. I found one that was sized down so it would fit on the little resin printer and gave it a go. I didn't use the BLU for it - I used the fast since it was still a 7 hour print in fast. And it came out pretty nice. There were two small issues - 1) one side was slightly truncated because apparently I didn't quite have it fully in the usable space of the printer and 2) the supports left a bit more scarring than I would have preferred. But the fast sands very easily so retouching those wasn't a big deal.

I was a bit nervous about whether or not the fast would be strong enough to survive the high G's of being launched with a 2204 quad motor...so I got out the pull cord launcher to try hand launching it first. I've launched these inside many times and usually they just fly up to the ceiling...spin around up there for a bit then fall gently to the floor.

Well...this one being smaller was also considerably lighter. So it flew a bit better than I had expected. Even with the hand launcher it spun up and took off faster than the bigger heavier PLA ones usually take off from the motorized one. It zoomed straight up to my ceiling and hit hard enough to instantly disintegrate:

20200803_112904.jpg


Oops.

FWIW - Immediately after I tried launching the PLA versions the same way and no matter how hard I pulled I could not them to spin anywhere near as fast as this little guy did.

So...now I really want to try it again outside and see just how well this can actually fly when it doesn't have a ceiling about 5 feet above it to slam into :D

Guess I need to pour out a bit more resin and get it goign. Considering mixing some blu or tenacious in there for a bit of extra strength too though....
 

jhitesma

Some guy in the desert
Mentor
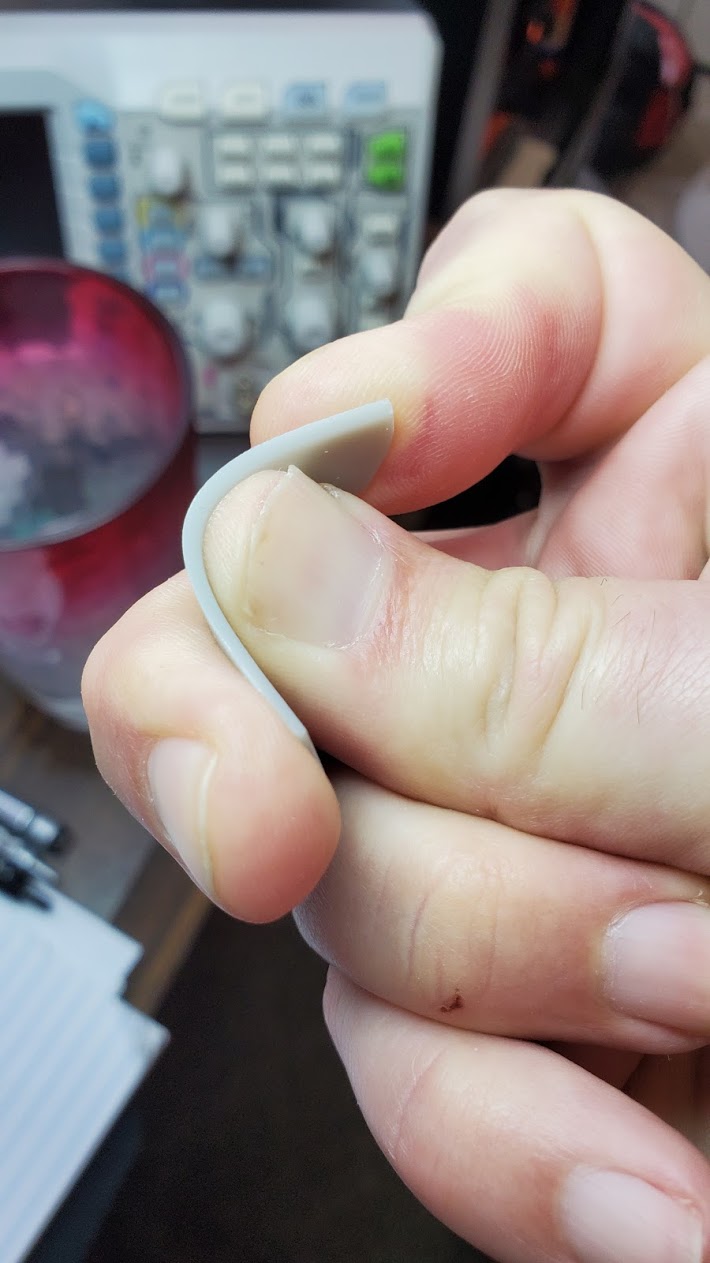
Oh...and for reference...this ABS like resin isn't all that brittle. Here's the blade I found being tested after that mishap:
20200803_113715.jpg


I was able to bend it over 90 degrees before it snapped. Considering that standard resin only makes it 2-3 degrees before snapping that's pretty impressive to me.

I've also noticed - almost all of my prints seem to get more brittle as time goes on even without additional UV exposure. Some thin exposure tests that have been sitting on my desk for 2 weeks are now crazy brittle and any attempt to bend them however slightly results in them shattering. Though the tenacious test print is still completely pliable.

I just mixed up 30ml of tenacious to 90ml of fast and restarted the propellor..so we'll see in about 7 hours how it comes out and if it survives any better. But I'll do some test flights outside before I risk letting it fly into the ceiling again!

Still not sure how much of the damage was due to the resin just being more brittle than PLA - or due to the higher velocity it left the launcher at. Considering how much more flexible and resilient the resin seems compared to PLA ( Could never bend a PLA part that much!) I'm thinking the higher speed had more to do with the failure than then strength of the resin.
 

LitterBug

Techno Nut
Moderator
I found my props and hubs. Need to give them another go at the field. Last time I got about 80-100 feet.
 

jhitesma

Some guy in the desert
Mentor
Yeah, I still want to make a new launcher for it that's easier for my daughter to use. The pull cord she can't do because her arms aren't long enough. And the way I rigged the motorized one wasn't friendly for her ( You had to hold the handle and a battery in one hand then manually turn a servo saver up to max then down to zero quickly with the other.) I want to make a pistol grip with a trigger that can hold a good battery and when you pull the trigger have an arduino send the servo signal to max power for 2-3 seconds then cut it to zero automatically. I just keep putting off actually doing it. I wanted to try and fit it all in the existing handle...but there's no way a sufficient battery will fit.
 

jhitesma

Some guy in the desert
Mentor
So reprinted with some fast/tenacious blend the prop came out pretty nice. You can see it's only a little bit smaller than the PLA ones but it's designed in a way that uses a lot less plastic:

20200804_124230.jpg


The FDM one is 23g while the SLA version is just 13g, almost half the weight.

This is both good and bad. It's good because it seems to let this one launch a lot quicker and gain altitude faster. But it's bad because it doesn't store as much energy. The PLA ones when they plan continue to spin on the ground for some time - the SLA version is always out of spin by the time it lands.

Hard to say if it launches any higher or not though....it's really windy today so getting consistent launches is impossible and I'm getting way more lateral than vertical movement.

After a few launches and landing on concrete it did break in the same way the PLA ones do for me. One of the blades cracked where it meets the hub. Easy enough to repair with a drop of CA, and no worse than the PLA versions. Though I'm surprised that with it's lighter weight and extra flexibility compared to the PLA version that it broke at all.
 

LitterBug

Techno Nut
Moderator
So reprinted with some fast/tenacious blend the prop came out pretty nice. You can see it's only a little bit smaller than the PLA ones but it's designed in a way that uses a lot less plastic:

View attachment 176361

The FDM one is 23g while the SLA version is just 13g, almost half the weight.

This is both good and bad. It's good because it seems to let this one launch a lot quicker and gain altitude faster. But it's bad because it doesn't store as much energy. The PLA ones when they plan continue to spin on the ground for some time - the SLA version is always out of spin by the time it lands.

Hard to say if it launches any higher or not though....it's really windy today so getting consistent launches is impossible and I'm getting way more lateral than vertical movement.

After a few launches and landing on concrete it did break in the same way the PLA ones do for me. One of the blades cracked where it meets the hub. Easy enough to repair with a drop of CA, and no worse than the PLA versions. Though I'm surprised that with it's lighter weight and extra flexibility compared to the PLA version that it broke at all.

The ones I printed are 18g each and are 3 bladed. Fewer blades should be more efficient. At any rate, I've got all the stuff to throw on my A450, and will have to give them another go soon. :) Although it might be better to use my F550 hex since it is 6S capable and these are only 980KV motors..... Maybe I should print MORE :). Maybe print different number of blades to see which ones go higher....
FreeProps.jpg

Cheers!
LB
 

jhitesma

Some guy in the desert
Mentor
Yeah, I did 3, 5 and 6 blade PLA ones when I originally made this a few years back. The 3 blade one didn't survive an errant flight into the side of my truck (and thankfully didn't leave much of a scratch on the already well worn truck.) So all I have left are the 5 and 6 blade versions and 6 was the easiest to grab.

I didn't notice a big difference in flights between the 3 different versions I used initially. That was part of why I made the motorized launcher - we wanted to have a more consistent way of launching so we could better determine which flew best...getting more powerful launches was just a nice side benefit :D

I only went with a 5 blade version for the SLA because that was what I found on line so I didn't have to do one myself. I haven't found good source files for the central hub and haven't felt like designing my own yet. But I really want to make one with actual airfoil blades to see if that helps.

I'm also still finalizing the knobs for this radio I've been building. I had to switch to a different rotary encoder for the frequency knob:
20200803_140955.jpg


The one on the left is a cheap $11 chinese knock off encoder - I had to make a spacer to get it to mount and it was still huge and didn't respond correctly electrically so I gave in and ordered the name brand encoder on the left which runs $35. But they have different size shafts and the cheap one had a nice bearing supported shaft that turned with basically no resistance while the expensive one has a damped shaft so the feel it totally different - so I had to redesign my knob:
20200803_223720.jpg


I decided that a taller knob would be easier to grab and have a better feel...but the new encoder doesn't have a D-shaft so getting the size just right is a bit trickier. I also decided that printing it solid no longer made sense due to it's size. Which gave me an excuse to learn how to do sectional views in Fusion 360:
unnamed (1).png


Still - the quality I can get off these printers continues to blow me away:

20200804_162626.jpg


Admittedly that's after a little bit of post-processing. I lightly sanded the top with some wet 400 grit paper and then gave it a light coat of urethane to shine it up a bit.

The bottom where the supports were I don't bother to clean up and it's UGLY. If I want some more heft to the knob I can always use the holes to fill it with something heavy:
20200804_162514.jpg


But I love the way the knurling prints and the feel it gives the knob!
20200804_162506.jpg
 

PsyBorg

Wake up! Time to fly!
So reprinted with some fast/tenacious blend the prop came out pretty nice. You can see it's only a little bit smaller than the PLA ones but it's designed in a way that uses a lot less plastic:

View attachment 176361

The FDM one is 23g while the SLA version is just 13g, almost half the weight.

This is both good and bad. It's good because it seems to let this one launch a lot quicker and gain altitude faster. But it's bad because it doesn't store as much energy. The PLA ones when they plan continue to spin on the ground for some time - the SLA version is always out of spin by the time it lands.

Hard to say if it launches any higher or not though....it's really windy today so getting consistent launches is impossible and I'm getting way more lateral than vertical movement.

After a few launches and landing on concrete it did break in the same way the PLA ones do for me. One of the blades cracked where it meets the hub. Easy enough to repair with a drop of CA, and no worse than the PLA versions. Though I'm surprised that with it's lighter weight and extra flexibility compared to the PLA version that it broke at all.


Think small block vs big block.... It looks like the grey one has a more aggressive pitch Id say lessen the pitch and go for rpm on launch with the lighter material. heavier more pitched blades will carry the momentum but light and quick is the way to go on these I think.

Looks like you are at a 4 to 4.5 pitch. maybe drop down to a 3 to 3.5 or maybe less depending on results.

BTW falling is super easy to do.. its that sudden stop at the end that messes everything up. ;)
 

LitterBug

Techno Nut
Moderator
Yeah, I did 3, 5 and 6 blade PLA ones when I originally made this a few years back. The 3 blade one didn't survive an errant flight into the side of my truck (and thankfully didn't leave much of a scratch on the already well worn truck.) So all I have left are the 5 and 6 blade versions and 6 was the easiest to grab.

I didn't notice a big difference in flights between the 3 different versions I used initially. That was part of why I made the motorized launcher - we wanted to have a more consistent way of launching so we could better determine which flew best...getting more powerful launches was just a nice side benefit :D

I only went with a 5 blade version for the SLA because that was what I found on line so I didn't have to do one myself. I haven't found good source files for the central hub and haven't felt like designing my own yet. But I really want to make one with actual airfoil blades to see if that helps.

I'm also still finalizing the knobs for this radio I've been building. I had to switch to a different rotary encoder for the frequency knob:
View attachment 176389

The one on the left is a cheap $11 chinese knock off encoder - I had to make a spacer to get it to mount and it was still huge and didn't respond correctly electrically so I gave in and ordered the name brand encoder on the left which runs $35. But they have different size shafts and the cheap one had a nice bearing supported shaft that turned with basically no resistance while the expensive one has a damped shaft so the feel it totally different - so I had to redesign my knob:
View attachment 176390

I decided that a taller knob would be easier to grab and have a better feel...but the new encoder doesn't have a D-shaft so getting the size just right is a bit trickier. I also decided that printing it solid no longer made sense due to it's size. Which gave me an excuse to learn how to do sectional views in Fusion 360:
View attachment 176391


Still - the quality I can get off these printers continues to blow me away:

View attachment 176392

Admittedly that's after a little bit of post-processing. I lightly sanded the top with some wet 400 grit paper and then gave it a light coat of urethane to shine it up a bit.

The bottom where the supports were I don't bother to clean up and it's UGLY. If I want some more heft to the knob I can always use the holes to fill it with something heavy:
View attachment 176393

But I love the way the knurling prints and the feel it gives the knob!
View attachment 176394
That's a really nice looking SDR project.
LB
 

jhitesma

Some guy in the desert
Mentor
Think small block vs big block.... It looks like the grey one has a more aggressive pitch Id say lessen the pitch and go for rpm on launch with the lighter material. heavier more pitched blades will carry the momentum but light and quick is the way to go on these I think.

Good analogy. It's kind of like a CP heli - the bigger the circle the more thrust...but there's also a lot of energy stored in those blades and the bigger they are the more energy they store up like a flywheel. And honestly the extra energy stored in the PLA blades doesn't really help it fly any better since it's just expending that energy when it's on the ground.

Unfortunately I have no easy way to adjust the pitch. The only released designs I've found are all STL only which means they're just a mesh can't really be edited accurately anymore. One of these days I'll probably redraw the hub so I have it as a proper geometric part I can work with directly. Then I can create any pitch or profile of blade I want. Just...needs to come to the top of the project queue :D
 

jhitesma

Some guy in the desert
Mentor
That's a really nice looking SDR project.
LB

Thanks, it's a slick little radio. The radio itself is a Hermes Lite 2 (http://www.hermeslite.com/ ) which I bought almost 2 years ago. This is just a controller for it that runs on a raspberry pi and makes for a nice physical interface. The controller only supports two VFO's but the HL2 itself can support up to 6 simultaneous receivers on any band with different software. There's even a firmware for it that gives up TX and bumps it to 9 receivers (I think there was a version that did 12 at one point but I may be remembering wrong.) It's only 5w tx but I also have a 50w amp I built to go with it. Even so with FT-8 on HF 5w is enough to literally work the world. It's not a particularly cheap radio (the radio runs about $300, the amp is another $300 if you want more power) and the interface I've spent probably about $200 on (counting the rasbpi and touchscreen) but it's a full raspberrypi 4 with touchscreen so it kind of doubles as an extra computer which makes it a bit easier to justify :D
 

jhitesma

Some guy in the desert
Mentor
So this is getting a little out of hand I have to admit :D

New addition to the resin madness today. No, not another printer! I got one of the new Elegoo Mercury wash and cure stations:

20200805_163406.jpg


There are basically 3 wash and cure stations out there right now. (Ok, formlabs has some but they're priced out of this discussion and are really designed to work with the ultra expensive form labs printers.)

Prusa CW1 - $700. (Only $600 if bought in conjunction with their SLA printer!) Ouch...that's more than I paid for both of my printers! And it's wash container doesn't even have a way to seal to store your wash liquid. It is a stainless tank though which is nice...but...have to say much like Prusa's SLA it's just too expensive to be competitive with no major benefits over much more affordable options.

Anycubic Wash and Cure - $250 I've mentioned this before and the rave reviews it gets. It uses a plastic tank that can seal and is way more affordable. I was seriously considering one when I ordered the Sonic Mini. They've even gone on sale for $180 which really had me tempted. (They're on sale again right now for $180...probably because of the Mercury being more available.)

Elegoo Mercury Plus - $120. Yeah, cheapest out there by far. And it's got a nicer display than the anycubic. But...it's brand new and hard to get because it sells out almost immediately when stock is available. I lucked out and happened to check Amazon just when a new batch went up for sale. It wasn't supposed to be here until Friday but Amazon decided to surprise me and shipped it early!

Note - there is a cheaper Elegoo Mercury without the plus. It's basically just a UV lamp in a box. It doesn't do washing as well as curing.

It's a little smaller than the Mars Pro and has the same styling. The two machines next to each other would look like a good pair. I had to cheat and put it around the corner because my little cart is full with the two printers. And since both printers and this require the top to be lifted off to put things in and out I can't put any of them on a lower shelf.

20200805_163425.jpg


Note it does have a lid for the tank so you can safely store your alcohol in it without worrying about evaporation. It comes with a couple of parts to make it flexible to use. There's an acrylic plate with a smaller metal plate attached which attaches magnetically to the base for the curing operation:

20200805_163439.jpg


A special hook designed so the Mars/Mars Pro build plate can be attached and the parts/plate can be washed before being removed from the plate:
20200805_163446.jpg


And a basket that can be used for parts already removed from the plate - making it usable with any printer.
20200805_163455.jpg


It seems pretty well made, and the controls are very simple and easy to use. Just push some buttons to set how long to wash...then hit go. Half way through the wash it switches directions. Then pull out the tank, put in the plate and let your part cure - again pushing the buttons to set the time and then letting it go.

It has a light sensor that detects the presence of the lid and won't operate without the lid on. At first I thought there was something wrong since any button I pushed just beeped but other than the time changing they wouldn't do anything. I couldn't even get it to change from wash to cure mode or cure to wash mode. Then I put the lid on and it all worked. I had to investigate how it sensed the lid since I saw no switches or magnets and found the little IR sensor on the back that appears to work as a proximity sensor since my hand was equally good at triggering it.

Hard to say how effective it is...I only did one part in it so far. I gave the part an initial rinse in my normal "Dirty" denatured alcohol bath so I won't gunk up the alcohol in this as quick then gave it a 3 minute wash cycle. Not sure if this was long enough or not. Then gave it a 5 minute cure.

It's worth noting that it was a lot more UV led's than the anycubic...not sure how much more UV it actually puts out...but it looks like a better setup overall.


The part is ok...but...I rushed and didn't let the alcohol dry fully before starting the cure and I'm not sure if the wash was long enough...so there are some shiny spots on the print. Both poor washing and not letting it dry can cause that...but...it may also be because this was a mix of fast and tenacious that's been sitting in the vat for two days so maybe they weren't well mixed and some areas got more of one type of resin than another. Further experimentation is required.

20200805_215405.jpg


This part BTW is a chute I designed for my coffee grinder. It's a $1,200 commercial grinder I got used for $70 from a guy who used to run an espresso trailer and was retiring. His wife listed it for sale cheap because the base was broken and doesn't fully attach to the machine anymore. The stock setup on it wastes more coffee each time I used it than I would use in a day. So I designed this to replace it and help guide the grounds as they came out. It's not perfect...but it works ok.

Oh, and that color shift part way up? (I printed it upside down...with the bottom against the build plate no supports) That's where I worried that the resin in the tank was getting a little low and topped it up with more Siraya fast grey. So the mix of tenacious suddenly got much lower.

20200805_215417.jpg


I may try giving it a bit more cure time...but I actually want it in black anyway so I may print in that first and give the wash/cure another go with longer settings.

I've been using a PLA version of this on the grinder for almost 2 years, it replaced one I had carved out of wood. I don't really need to replace it but it's getting a bit grungy from the oily coffee grounds running over it and I figured a SLA one would look a bit nicer so I gave it a try on here.


So far I like the wash and cure...wish I had been able to get it when I got the printers...would have saved me some tupperware containers. I'm a bit concerned about how this print came out...but I think it was a combo of the resin and me being rushed...so I'll probably run this in black overnight and see how the wash/cure does on that tomorrow.