
French
Construire Voler S'écraser Répéter
The following journey is one of joy, pain, and expense. Continue reading if you think you can handle it. It’s clear my micro “Mogwai” has been wet, has been in bright light, and has been fed after midnight. We all know how this story goes...
Early this summer, I was bit by the micro brushless craze after watching this video on the Eachine Lizard 95. I jumped into the 2” scene head first. My new $120 micro was on the way on the slow boat from China, literally. Once it finally arrived, my first real change (because I rarely can leave things alone) was to replace the circular polarized antenna with a longer dipole for durability. I also always reverse my motor/prop direction to hopefully reduce prop wash.
Then came my first real maiden. I shouldn’t have forced it in the tall wet grass. Never get your Mogwai wet! Something clearly went wrong with the new antenna, as I was having video issues. Crash! The reversed props quickly filled the esc/fc/receiver stack with tiny shards of wet, soggy grass. But I was determined to keep flying. Well keep crashing as it turned out. So wet it killed the camera and reset all settings on the flight controller (I’m assuming the boot pads shorted from the wet grass). That night I pulled everything apart the micro for the first, but definitely not the last, time to try and remove some of the gremlins.
Luckily, I was able to get the FC and escs working well again. I even convinced myself to invest in some silicone conformal coating (while expensive, a wise investment). I ordered a second AIO camera. Then came the failsafe issues. The eachine FrSky receiver in the mini cube stack started regularly failsafeing. Time for something more reliable, a FrSky XM+!!!
Around mid-summer, new micro frame caught my eye. It was mpbiv’s XLR-2. Man, was it sexy.

It was a tight re-build, as the XLR was designed for a shorter stack. I ended up having to flip the FC to get everything to fit. The small camera mount on the XLR has the AIO camera precariously rubber banded to a small tight carbon plate. After a few crashes, I decided it would be a great idea to split the camera from the VTX. Now, I generally consider myself a very good solderer, but having to solder five 24 awg wires to reconnect this AIO was a huge pain. Ultimately, I killed the AIO. RIP. Time for the third AIO. That patient’s transplant went much better, and I was back to flying again.
Until ... the bright lights and poor image quality of an AIO camera left me longing for more. I was ready for better video. I deserved better video. It was time for a RunCam Micro Swift. However, it can’t fit on the XLR. The perfect excuse to try a new frame")
This time, the Atmospheric Adventures Aeolus was chosen with a clear TPU canopy.

I chose the VTX03 for a 25,50,200 mW transmitter from RaceDayQuads. The first one had a defect, and the vendor was quick to replace it. With the replacement installed, I set off to remaiden this micro again. The RunCam Micro was a huge improvement (even if the DVR and YouTube compression kill the final video). The first little cruise around the neighborhood resulted in a dislodged antenna, no video, and another crash. After ordering another VTX03 and antenna, I had some great flight and decent crashes. I was enjoying the micro more than ever!!!
My last flight last after those videos resulted in cut and bent antennas on my XM+. While it’s generally easy trimming antennas to the 1/4 2.4ghz wavelength (31.23mm), everything is tougher on a micro. Especially on a micro with a tiny canopy. It must have taken 15 minutes to feed the antennas back into the tubes correctly.
Saturday after I completed the antenna maintenance, I decided to go for a little slow stroll down the street with a 950 mah 2S. I normally fly with a 450 mah 3S, but the 2S was all I had charged. The weather was so nice!!! This 950 mah doubled the dry weight of the micro, but should result in easy 7+ min flights. But then....
I clipped a power wire. Crashed straight onto the road, and I think, bound up a motor or two. I couldn’t take off to limp home, so I started the walk-of-shame we’ve all had to do. It may seem odd that I didn’t know whether one or two of the motors were seized from the crash. However, as I walked to the micro, I nervously watched a car approaching.
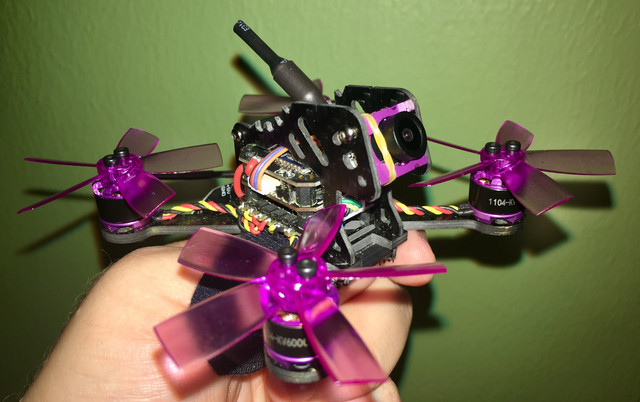
Thankfully, it appears to have only clipped one of the corners. Both rear motors are completely seized, but it didn’t even break my Gemfan 2040 triblades!!! I think I’ve officially settled on a new prop for this micro. The hit-and-run resulted in another damaged antenna. Luckily, I already had all my supplies on the kitchen table.
So now I have Emax 1106 7500kv red bottoms on the way for my micro. Here’s hoping that I can finally keep it in the air!!!!
Lizard 95 -$120
Conformal coating - $20
AIO #1 - $20
XLR-2 - $15
XM+ - $15
AIO #2 - $20
Aeolus - $30
RunCam Micro - $35
VTX03 #1 - $14
VTX03 #2 - $14
Red Bottoms - $52
——————————
Flying my brushless micro wherever I want - Priceless
(ps - Thats more than I’ve spent on either of the 5” I’ve built)
Early this summer, I was bit by the micro brushless craze after watching this video on the Eachine Lizard 95. I jumped into the 2” scene head first. My new $120 micro was on the way on the slow boat from China, literally. Once it finally arrived, my first real change (because I rarely can leave things alone) was to replace the circular polarized antenna with a longer dipole for durability. I also always reverse my motor/prop direction to hopefully reduce prop wash.
Then came my first real maiden. I shouldn’t have forced it in the tall wet grass. Never get your Mogwai wet! Something clearly went wrong with the new antenna, as I was having video issues. Crash! The reversed props quickly filled the esc/fc/receiver stack with tiny shards of wet, soggy grass. But I was determined to keep flying. Well keep crashing as it turned out. So wet it killed the camera and reset all settings on the flight controller (I’m assuming the boot pads shorted from the wet grass). That night I pulled everything apart the micro for the first, but definitely not the last, time to try and remove some of the gremlins.
Luckily, I was able to get the FC and escs working well again. I even convinced myself to invest in some silicone conformal coating (while expensive, a wise investment). I ordered a second AIO camera. Then came the failsafe issues. The eachine FrSky receiver in the mini cube stack started regularly failsafeing. Time for something more reliable, a FrSky XM+!!!
Around mid-summer, new micro frame caught my eye. It was mpbiv’s XLR-2. Man, was it sexy.
It was a tight re-build, as the XLR was designed for a shorter stack. I ended up having to flip the FC to get everything to fit. The small camera mount on the XLR has the AIO camera precariously rubber banded to a small tight carbon plate. After a few crashes, I decided it would be a great idea to split the camera from the VTX. Now, I generally consider myself a very good solderer, but having to solder five 24 awg wires to reconnect this AIO was a huge pain. Ultimately, I killed the AIO. RIP. Time for the third AIO. That patient’s transplant went much better, and I was back to flying again.
Until ... the bright lights and poor image quality of an AIO camera left me longing for more. I was ready for better video. I deserved better video. It was time for a RunCam Micro Swift. However, it can’t fit on the XLR. The perfect excuse to try a new frame
This time, the Atmospheric Adventures Aeolus was chosen with a clear TPU canopy.
I chose the VTX03 for a 25,50,200 mW transmitter from RaceDayQuads. The first one had a defect, and the vendor was quick to replace it. With the replacement installed, I set off to remaiden this micro again. The RunCam Micro was a huge improvement (even if the DVR and YouTube compression kill the final video). The first little cruise around the neighborhood resulted in a dislodged antenna, no video, and another crash. After ordering another VTX03 and antenna, I had some great flight and decent crashes. I was enjoying the micro more than ever!!!
My last flight last after those videos resulted in cut and bent antennas on my XM+. While it’s generally easy trimming antennas to the 1/4 2.4ghz wavelength (31.23mm), everything is tougher on a micro. Especially on a micro with a tiny canopy. It must have taken 15 minutes to feed the antennas back into the tubes correctly.
Saturday after I completed the antenna maintenance, I decided to go for a little slow stroll down the street with a 950 mah 2S. I normally fly with a 450 mah 3S, but the 2S was all I had charged. The weather was so nice!!! This 950 mah doubled the dry weight of the micro, but should result in easy 7+ min flights. But then....
I clipped a power wire. Crashed straight onto the road, and I think, bound up a motor or two. I couldn’t take off to limp home, so I started the walk-of-shame we’ve all had to do. It may seem odd that I didn’t know whether one or two of the motors were seized from the crash. However, as I walked to the micro, I nervously watched a car approaching.
Thankfully, it appears to have only clipped one of the corners. Both rear motors are completely seized, but it didn’t even break my Gemfan 2040 triblades!!! I think I’ve officially settled on a new prop for this micro. The hit-and-run resulted in another damaged antenna. Luckily, I already had all my supplies on the kitchen table.
So now I have Emax 1106 7500kv red bottoms on the way for my micro. Here’s hoping that I can finally keep it in the air!!!!
Lizard 95 -$120
Conformal coating - $20
AIO #1 - $20
XLR-2 - $15
XM+ - $15
AIO #2 - $20
Aeolus - $30
RunCam Micro - $35
VTX03 #1 - $14
VTX03 #2 - $14
Red Bottoms - $52
——————————
Flying my brushless micro wherever I want - Priceless
(ps - Thats more than I’ve spent on either of the 5” I’ve built)
Last edited:
