Quick and clean Aaron! Do you like the Scout better than the Cub? We may end up building one of the two for the UND R/C club and I want to get a community census for which is preferred.

You are using an out of date browser. It may not display this or other websites correctly.
You should upgrade or use an alternative browser.
You should upgrade or use an alternative browser.
*Unofficial* FT Simple Scout
- Thread starter SP0NZ
- Start date
BridgeInspector
Flite Test Groupie
Well done, I think I passed you when you were going out for your maiden, I should have stayed. You had a heck of a wind to contend with. Can you tell me what motor and prop you are using?
I'm just starting my build with a "B" mt2213/935kv. But I am finding the video mentions A or B and web site suggest conflicting B or C power options. I'd like to make sure the mt2213 will do the job. Thanks
Here is my setup:
Bought the kit at FFS store tent. Everything else was from my stash.
Emax servos left over from FT powerpacks
NTM 2826 1200kV that was $5 at HK (it is a bit bigger than a B motor but not quite C)
Turnigy 30a plush
China hobby 1000mah 3s
Orange DSM2 6ch rx - worked ok as not a lot of flyers in the air
8x4.5 - could easily use 9x6
I would think your mt22123 should work fine, use a 10x4.5 on 3s. I believe many motors will work as long as you size the battery accordingly, smaller motor (A to B size) = smaller battery(800-1300mah) and larger motor(B-C size) = large battery (2200mah+).
BridgeInspector
Flite Test Groupie
Quick and clean Aaron! Do you like the Scout better than the Cub? We may end up building one of the two for the UND R/C club and I want to get a community census for which is preferred.
Thanks Keegan!
For flight performance, I would go Simple Scout.
For learning to fly, I would go the Simple Cub.
Granted I built the Scout as a 4 channel with half recommend dihedral and the Cub as 3 channel so that may bias me a bit on there flight abilities.
Overall, I would lean significantly more towards the Scout.
Does anyone have a link to printable stencils for the red baron paint scheme?
I have done some for the Mini DR1. You only have to scale up. I can Share if you are interested.
Winglet
Well-known member
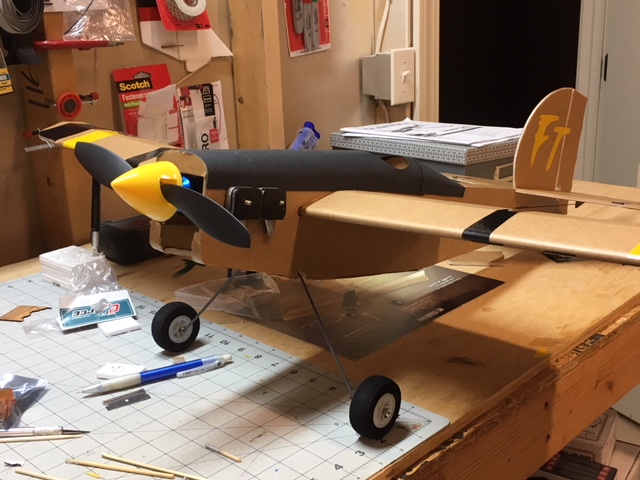
Ready to fly my new Simple Scout
Hasn't flown yet but was certainly a lot of fun to construct. I spent about 3 evenings with Josh Bixler building it. This is a very very well designed airplane and kit. I know its gonna fly great!
Hasn't flown yet but was certainly a lot of fun to construct. I spent about 3 evenings with Josh Bixler building it. This is a very very well designed airplane and kit. I know its gonna fly great!
Attachments


NewLn
New member
I am considering building one of these using the free plans. This would be my first build so tell me how the free plans work. Do I just print them all out on 8.5x11 pieces of paper then tape them all together. Once I do have them printed out, should I stencil the plans onto the foam board or cut through the paper and the foam board? If I do print them out in the wrong size, can the plans be scaled up or down as long as the whole thing is the same size? Sorry for all the noob questions, Thanks for the help!
Last edited:
Mac82
Foam scraps? I got plenty
I am considering building one of these using the free plans. This would be my first build so tell me how the free plans work. Do I just print them all out on 8.5x11 pieces of paper then tape them all together. Once I do have them printed out, should I stencil the plans onto the foam board or cut through the paper and the foam board? If I do print them out in the wrong size, can the plans be scaled up or down as long as the whole thing is the same size? Sorry for all the noob questions, Thanks for the help!
Printing them out like that is one way. Another is to save it on a flash drive and take it to an office supply place and have them print it out on one or two sheets.
I'm cheep and have a lot of grey packing paper so I just put the plans up on my tv screen and hand copy them
Here is my setup:
Bought the kit at FFS store tent. Everything else was from my stash.
Emax servos left over from FT powerpacks
NTM 2826 1200kV that was $5 at HK (it is a bit bigger than a B motor but not quite C)
Turnigy 30a plush
China hobby 1000mah 3s
Orange DSM2 6ch rx - worked ok as not a lot of flyers in the air
8x4.5 - could easily use 9x6
I would think your mt22123 should work fine, use a 10x4.5 on 3s. I believe many motors will work as long as you size the battery accordingly, smaller motor (A to B size) = smaller battery(800-1300mah) and larger motor(B-C size) = large battery (2200mah+).
not sure this is entierly riht, from everyting ive read larger motors can handle more power meaning they can run larger props producing more thrust and drawing more current. So yes a larger motor could possibly need a larger battery for the same flight times.
on the mini arrow, theres 2 motor sizes 1806 and 2204. on thew 1806 ive used both the 850 and 1000mah bnattery. which gives upto 10 minutes on the larger battery. theres no space for anything larger .
now this is where i think alot of people get confused me included as 1 place says this and 1 place says that. must get a watt meter
josh yoder
New member
When you get the plans printed out, use spray adhesive to glue them to posterboard. This makes them much easier to work with.
Hell2Go
Member
I am considering building one of these using the free plans. This would be my first build so tell me how the free plans work. Do I just print them all out on 8.5x11 pieces of paper then tape them all together. Once I do have them printed out, should I stencil the plans onto the foam board or cut through the paper and the foam board? If I do print them out in the wrong size, can the plans be scaled up or down as long as the whole thing is the same size? Sorry for all the noob questions, Thanks for the help!
The best way I've found is to print them on 8.5x11, choose actual size in printer options, not fit. Thanks to Sponz's great efforts, there are little circles with cross lines at the edges to line them up. Tape them over where the parts is, front and back. Then I cut out the small parts leaving about a half inch around the part, and big parts with big curves, I lay on my cutting mat (a must have from walmart) and cut out the parts with an exacto knife on the outer edge of lines. THEN I lay my pattern on the foam board holddown and use a metal scribe, or skinny awl and punch a little hole at the intersections and ends of all the straight lines. Small curves, I just punch a hole every few mm to define the shape, and then last I will trace the big curves with a pencil, lightly. The holes help hold the pattern in place. After ALL important reference holes are punched, set the pattern along side for reference and connect the dots. The side you are marking is usually on the inside of the plane when you fold it up, keep that in mind for reference marks that you need after its assembled and poke those particular points all the way through. Then cut out parts with exacto knife. first cut is just through the top paper only then do consecutive cuts to get all the way through. Get a 12 inch and 36 inch metal rulers to guide your straight cuts. Freehand the curves, multiple cuts are mandatory for nice curve cuts. THAT'S the hardest part to master.


I love those wheels. Looks like the bottoms of soda cans. What is the tire material? Do you have a thread on the wheels?
They will look very appropriate on the Simple Scout! Also, the Scout finish is stellar! Nice work.
.jpg")
BridgeInspector
Flite Test Groupie
Quick Flight this morning
FT Simple Scout flight filmed with Mavic Pro
https://www.facebook.com/aaronblake/videos/10155233901038111/
FT Simple Scout flight filmed with Mavic Pro
https://www.facebook.com/aaronblake/videos/10155233901038111/
Similar threads
- Replies
- 8
- Views
- 392
- Replies
- 1
- Views
- 320
- Replies
- 9
- Views
- 924