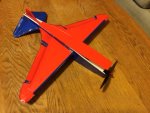
Baby Bugatti

FoamyDM

Building Fool-Flying Noob
Moderator
Good ol' Build Time.

So after falling asleep with my 4yr old who insisted I snuggle... how to resist that. I woke up around midnight wide awake.
I had the parts cut
IMG_0802.JPG
I decided to start putting it together. As I got my glue gun ready, I told myself I'd be remiss to not tape it. Debated a Blue vs. Red So I taped it up.
IMG_0803.JPG
Then I started gluing it together. and for me, this is my first "Speed Wing" style wing construction. I shaped the empennage too. I was watching experimental airline airfoil construction. and made the tape on top and bottom touch in the back. I am REALLY excited
Here are a few pics of the near finished product. I still need to add servos, and horns. The red is the underbelly. I think I will add a white star near the wing tips and 2 angled stripes.
IMG_0805.JPG
IMG_0807.JPG
IMG_0808.JPG

at 3:30am I called it quits. (taping takes a while post-cutting, but is so worthwhile.)

I'm not sure how the mid7night's hatch works so I left the bottom unglued until I figure How I want to do it. :confused: Thanks for the great looking plane. Can't wait to see what comes of it's maiden.

Anything on the throws expo. or should assume 12° and 30% expo?

I could see adding Button landing gear to this one.

I might add yellow patches with black and white stripes to make it look from the underbelly like it went to plaid.
 

Attachments

  • IMG_0802.JPG
    IMG_0802.JPG
    106.6 KB · Views: 0

Mid7night

Jetman
Mentor
Whoa, HA! Awesome! Good call making the bottom red, BTW ... orientation at distance is not great with mine all-blue... and I like the plaid idea. :p

The bottom 'hatch' is essentially the front half of the bottom fuse piece, the paper-removed portion. The rear part that still has paper on it gets glued down, and the front half can either be pinned or taped shut.

I personally like more expo than most, but something similar to the Baby Brit or Baby Baron should give you an idea. Certainly, small throws are more than effective on this bird.

Those button retracts are amazing! I'm definitely gonna look closer at that. :)

EDIT: Just checked on the retracts...they're not available anymore. But that means you'd also need a rudder for takeoff (likely), plus retract servos...it'd be tight to fit all that in there, but certainly cool.
 
Last edited:

FoamyDM

Building Fool-Flying Noob
Moderator
Plaid

Plaid.JPG

Awesome I was worried I had the hatch on the wrong side... I think I'll magnetize the hatch. Thanks for the response

I was looking at using a water bottle cap, some dissection pins for the axle. Maybe make a mold for some epoxy for the main arm. make the rest from plastic card. I'm just no good with little stuff. but I have a few birds I want this in, so, I'll have to try it.

I'll be taping the top corners, now that I know I build it correctly.
 
Last edited:

rockyboy

Skill Collector
Mentor
Love seeing more of these Baby's showing up in the world!

I managed to get mine cut and mostly assembled today. Love how it all fits on a single sheet - very simple build :)

2017-03-14 15.03.13.jpg

Not sure what color I'm going for on the top yet - the blue's all look really nice, but I don't think I have any rattle can blue on the shelf at the moment. It's too darn windy to paint outside tonight anyway, but I'm going to try a curved checkerboard / plaid pattern on the underside when I get back to this :p

2017-03-14 18.25.19.jpg
 

Mid7night

Jetman
Mentor
This is awesome guys! I love that this is getting built by other people....come to think of it, I think this is the first of any of my designs/plans to ever be built by anyone else. Kinda cool. :cool:

I went back to the field on my way home today with a fresh 2-cell and 3-cell for comparison. The video is exporting now, and it'll be over an hour before it's done, but the upshot is this: You may want to maiden on a 2S, just to get used to it and trim it out, but this baby comes ALIVE on 3-cells! At least, that is if you're using the same MT1806 2280Kv motor and 5x5E prop setup (or similar).

I flew back-to-back test runs, only variable being the battery. A 950mAh 2S vs a 610mAh 3S. They weighed about the same, so I don't think mass difference is much of a factor, but HOLY COW this little bugger SCOOTS! :D

It will happily saunter around at half throttle on 3S, but punching the throttle is SOOO satisfying! It is just beggin' to go to Plaid! :p

Stay tuned...I'll report back when the video is finished and uploaded. :)
 

rockyboy

Skill Collector
Mentor
I know just what you mean about the excitement of seeing a design come to life in someone else's workshop. A very cool feeling indeed. :cool:

I've got a 2204 2300kv in the drawer I was going to throw in it with a 5x5E on 2S at first. Need to double check the final weight and thrust calculations, but I have lots of prop options handy that will go with that motor.

Rather that wait for the wind to die down tonight, I pulled out some of my new Ironlak Sugar "graphic artist" (aka graffiti artist) spray paints to try. Love the paint! Goes on smooth, great coverage, and no eating of the foam!! Also doesn't stink, very low overspray, but it is a bit pricey.

2017-03-14 23.57.09.jpg

Planning on laying down some thin black stripes and then a trans red checker board pattern to create a plaid on the bottom yellow wings and body... should be interesting. :)
 

JimCR120

Got Lobstah?
Site Moderator
I'm too lazy to print a tiled version, so I just sent the plans over to staples for printing... $3.59 is money well spent to not deal with taping together tiled pages in my mind :)
Not lazy. It's efficient. And now it's what I will adopt for my next printed plans. Well worth $3-$4.
 

willsonman

Builder Extraordinare
Mentor
No paint... I like to have mine fly before I do that.

Took time to 3D print a firewall and control horns. Worth it too. Saved me a lot of headache trimming ply.
 

Attachments

  • IMG_3522.JPG
    IMG_3522.JPG
    1.6 MB · Views: 1
  • IMG_3523.JPG
    IMG_3523.JPG
    1.8 MB · Views: 13

rockyboy

Skill Collector
Mentor
Not lazy. It's efficient. And now it's what I will adopt for my next printed plans. Well worth $3-$4.

I was also happy that the heavy bond paper it printed on was thick enough to be used like a poster board template. So a double time savings - no need to deal with tiling, and no need to make a separate set of templates for replacement parts :)

No paint... I like to have mine fly before I do that.

Took time to 3D print a firewall and control horns. Worth it too. Saved me a lot of headache trimming ply.

There is certainly wisdom in flight before finish work. But the crashes are much prettier if it's in color :p

I haven't experimented with 3D printing control horns and firewalls yet. The last time I visited the laser cutter I did a bunch in ply, but stock is running low. Did you grab a particular set of files off Thingiverse, or mock some up yourself in a modeling program?
 

Mid7night

Jetman
Mentor
Coming along great! Sheesh, I really need to stop buying gliders and replacement parts, and just save up for a 3D printer already. :p Those little firewall and horns are slick!
 

willsonman

Builder Extraordinare
Mentor
And they took very little time to print as well. No drilling needed. For the control horns, my rods were a larger diameter so I just heated the rod with a flame and melted out the hole a little.
 

willsonman

Builder Extraordinare
Mentor
Got two flights in! This thing is a real peach. No video. There was one other older guy at the field and he has tried to get me video in the past and it has not gone well.

All I had for a battery of this size was a 850mAh 3S. It was a bit bulbous on the under side like a mustang scoop but she flew like she did not care. Threw her into the 10MPH wind and she was off straight and then started to dive like she was nose-heavy. Perfect! Plenty of elevator control and she did loops and rolls just fine and really had no bad habits. On the downwind legs she ate up the sky quite fast and I really liked how she would just go where she was pointed. I have no reservations in recommending this to anyone. Very easy build on the stupid cheap and just a pussycat to fly. There are a couple of additions I would like to see Ben make to the plans.

1) A throw gauge
2) a more traditional crosshair style CG mark rather than a green reference line.
3) a better hatch closure system. While the nose is fairly tight I think it can be done with some cleverness.

Other than those Items I think this is something the FT guys would easily be able to throw onto their store with lots of folks having success.

I only hope my 1/6 scale version does just as well.
 

Aviator08

Flagstaff,AZ
Well Sir, you amaze me.... here I am following your thread on the C-17 (which looks very cool), while trying to do some details to the TriMotor to get it ready for FF West, and you go and sneak in another very cool build. Now I'm going to have to pause and build one of these Baby Bugatti's. How in the heck am I suppose to get all my stuff ready when you distract me like this?! :black_eyed: Wonderful build! Are you going to fly it in the demo pylon race?
 

Mid7night

Jetman
Mentor
willsonman: Great! SO glad to hear you had a great first flight experience. An 850mAh 3S sounds perfect, trouble is just finding one thin enough to fit inside. I ordered one of these, I'll let you know how it fits when it arrives later this week. The gauges and CG marks you mention are simple refinements, I'll include them in the next set of plans.

I totally agree; the battery/hatch layout could be done better. I'll noodle on it tonight and see what I can come up with. :)


Aviator08: The theme of this project was "distraction", so... Mission Accomplished! :p
 

RAGII

Member
If I could make one other request on the plans it would be to add a scale. I am lucky enough to have a CNC to cut plans, but often when I need to convert the pdf file I need to re-scale it. Having a scale on the plans helps with this.

With the rate I am finding cool planes to build I might need another case of foam. :D