Inq'd FT MM DR-1 Triplane Parts

Inq'd FT MM DR-1 Triplane Parts v1

Please log in to download

Inq

Elite member
Inq submitted a new resource:

Inq'd FT MM DR-1 Triplane Parts - 3D Printed Cowling, Side Fairings, Wheels and Machine Gun for DR-1

Parts include the cowling, side fairing, wheels and machine guns.

437451_08531898d18f4fb555f0071abe3fba23.jpg

Read more about this resource...
 

Inq

Elite member
Suggested Cura Settings

Please use Cura 5.1 or newer. It will make a difference! I used these settings, but if you have different ideas... please let me know what worked for you. If you have any questions, just shout out.

Cowling
I printed it front face down. Although I dislike using supports, I couldn't figure an orientation that was better without them. In the face down position, it only puts supports for a minimal portion. I also used 3 wall thicknesses, but most of it will be constrained to one wall thickness in the sides since it is a solid model. Total weight using ABS is 6 grams.

Side Fairings
I used the Spiralized Outer Contour mode does a really nice job. Total weight for the pair using ABS is 7 grams.

Wheels
Layer height = 0.2mm
Wall thickness = 1.2mm
Top thickness = 1.0mm
Bottom thickness = 0.0mm
Pattern = Concentric
Infill = 0%
Support = ZigZag, 10%
Adaptive Layers = checked
Adaptive layers Max Vari = 0.05
Adaptive layers variation step size = 0.01
Total weight for the (4) halves = 21 grams with the supports and after support removal is 15 grams.

Guns
I printed these vertical with Brim build plate adhesion so they wouldn't get knocked over.
Wall thickness = 0.4 mm
Top/Bottom thickness = 1mm
Infill = Cubic, 15%
Total weight for the pair is 3 grams.
 

Inq

Elite member
I can't really help on getting a random motor centered in the cowling. I imagine it'll take some fiddling with the FT power pod and various people putting in P-factor and down thrust angles. YMMV! I used a 3D printed motor mount for a A2212, 2300KV motor. As I'm learning, that's not the standard one.
 

Mr NCT

Site Moderator
Suggested Cura Settings

Please use Cura 5.1 or newer. It will make a difference! I used these settings, but if you have different ideas... please let me know what worked for you. If you have any questions, just shout out.

Cowling
I printed it front face down. Although I dislike using supports, I couldn't figure an orientation that was better without them. In the face down position, it only puts supports for a minimal portion. I also used 3 wall thicknesses, but most of it will be constrained to one wall thickness in the sides since it is a solid model. Total weight using ABS is 6 grams.

Side Fairings
I used the Spiralized Outer Contour mode does a really nice job. Total weight for the pair using ABS is 7 grams.

Wheels
Layer height = 0.2mm
Wall thickness = 1.2mm
Top thickness = 1.0mm
Bottom thickness = 0.0mm
Pattern = Concentric
Infill = 0%
Support = ZigZag, 10%
Adaptive Layers = checked
Adaptive layers Max Vari = 0.05
Adaptive layers variation step size = 0.01
Total weight for the (4) halves = 21 grams with the supports and after support removal is 15 grams.

Guns
I printed these vertical with Brim build plate adhesion so they wouldn't get knocked over.
Wall thickness = 0.4 mm
Top/Bottom thickness = 1mm
Infill = Cubic, 15%
Total weight for the pair is 3 grams.
Thanks for sharing these. Your DR1 is a thing of beauty.
 
Last edited:
  • Like
Reactions: Inq

Inq

Elite member
Thanks for sharing these. Your DR1 is a thing of beauty.

Please share yours in pictures and video somewhere... here or in a build thread. I'm no Red Baron... I'd really like to see it fly.
 
Last edited by a moderator:

Aslansmonkey

Well-known member
Used your cowling, fairings and guns. Printed in LW-PLA with gyroid infill (really low, like 10%). The cat "Pilot" was printed with our resin printer.

Haven't flown it yet but it was fun to build.
 

Attachments

  • DR1_1.jpg
    DR1_1.jpg
    2.4 MB · Views: 0
  • DR1_2.jpg
    DR1_2.jpg
    2 MB · Views: 0
  • DR1_3.jpg
    DR1_3.jpg
    1.5 MB · Views: 0
  • DR1_4.jpg
    DR1_4.jpg
    1.3 MB · Views: 0

Inq

Elite member
Used your cowling, fairings and guns. Printed in LW-PLA with gyroid infill (really low, like 10%). The cat "Pilot" was printed with our resin printer.

Haven't flown it yet but it was fun to build.
Very nice. I think it turned out better than mine!(y)
 

Mr NCT

Site Moderator
Should have it flying as soon as the glue on the cowl dries. Really like how it dresses it up.

IMG_4409.JPG IMG_4410.JPG
 
  • Like
Reactions: Inq

paperXwings

New member
Hey all.
I just got back from picking up parts for my scratch build DR-1. All in this cost me like $60 (CAD). Did I get rolled, or does this seem about right? The Cowl doesn't look great, but I've never had anything printed before. I assume I just need to sand it. Any advice is appreciated!
IMG_4226.jpg
IMG_4227.jpg
 

Inq

Elite member
Sorry to hear that. 3D Printing Services are extremely expensive and you are the first person I've ever heard of actually using one, so I'm not surprised at that price or the quality of the parts you received. I don't know about Canada, but my small, rural town has a 3D printer at the local, public library and would charge several dollars to print those parts and would have done a better job. Unfortunately your service didn't use the instructions provided above in #2 to give the best parts. However, if you have expectations of any 3D printed part looking like an injection molded model kit part, you'll need to adjust your expectations. They will always have the layer lines and do require sanding.

The cowling is particularly difficult to print because of its shape, however, I designed it to be scale to the real thing, and not to be easy to print. It is unfortunate that they used what is called a Raft which is typically used on poor quality printers that have a hard time getting the first layer stuck down. They should have put the part flat on the bed and the front face would have been perfectly smooth and not require any sanding and you would have the holes nicely clear. The only sanding would be required as it curves up to the sides. The grid pattern (Teal color below) around the perimeter is called Support and holds up the print as it curves. It should be easily removable with just your fingers if properly configured. Here is what it should look like.
1707115133524.png


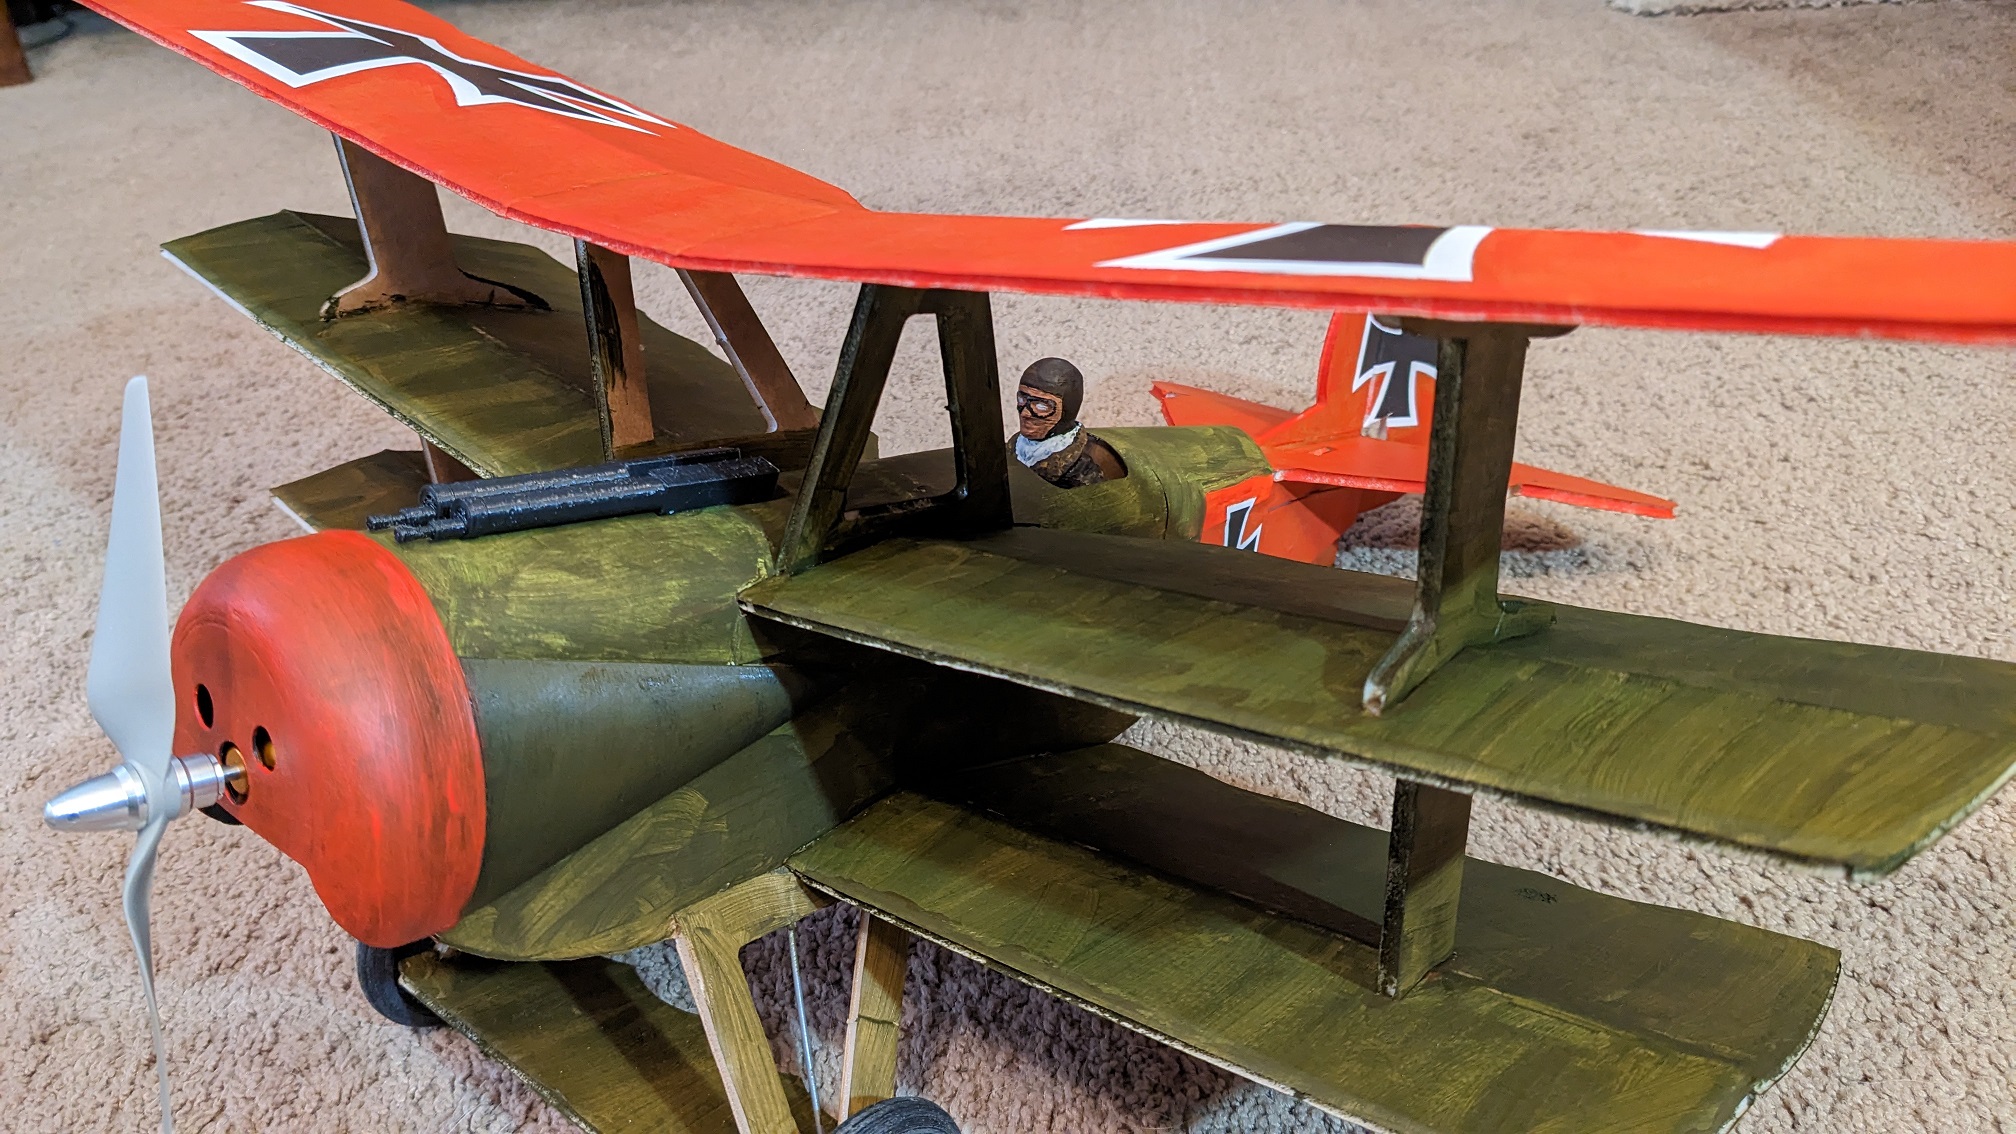
Besides the pictures of the finished, painted parts by me and others above, I also used the same cowl scaled up a little larger on my Fokker D.VIII. On those pictures, you'll see where the cowl has been sanded, but the other parts didn't.

They also printed the guns and side fairings in the wrong orientation (per #2 above). They would not require any Supports or any Infill. I image your side fairings are pretty heavy. Done properly, they will weigh about 7 grams in ABS. If you use LW-PLA, the weight will be almost half that.

If you plan on doing any printing in the future you'd be far better off just buying a printer and doing it yourself. I've seen Ender 3 on sale for as low as $130US. I know a few people that have gotten the newer Creality Ender 3 V3 SE and have said it's a huge improvement. The plastic cost for all the parts including the wheels is less than $0.50 US. As you see above, the cowling alone only cost about $0.05US!

Good luck on your next try.