Tench745
Master member
I think it was about a year ago now I was visiting a friend who has children. His son has a toy airplane that is the perfect blending of classic and caricature. Most of you with kids probably already know the plane. It's made by Green Toys and is available in a couple different colors, with one version on floats.
As soon as I saw it I wanted to see if it would it fly. I've seen blue, red, and green versions but I found a purple one on Facebook Marketplace for $10 and I had to have it.
I took some 3-view pictures and a bevy of measurements then plugged them into CAD.


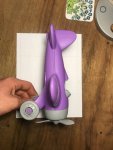
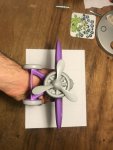

I decided to scale things up to a 36" wingspan. That gives me a wing area of about 305in². If I can keep the weight around 36oz, the wing loading will be reasonable.
Two things that didn't scale very well were the prop, and the wing.
Scaled up, the prop would be a 16" 3-blade, but it's difficult to get a small/light motor to spin a prop that big without a gearbox and I don't really want to get into that quite yet. So I'll be starting with a 12" 2-blade.
The wing on the toy is semi-symmetrical, incredibly thick and comically small. Each wing is only about 13-1/2" long with a root cord of about 10-1/2". If I scaled the toy exactly the wing would be 3" thick at the fuselage and almost 1-1/2" thick at the tip. To keep the drag down and make construction a little easier I opted for a much thinner, semi-symetrical wing, only 1-1/4" thick at the root.

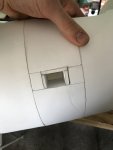
The fuselage is pretty simple, a 4" box with round formers over it. This makes figuring out the skins pretty easy because every section of skin is just a cone.
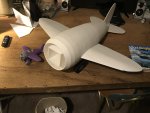

Then it was just a matter of fitting tail surfaces, cutting the cockpit, and figuring out a wing-joiner.
The tail took two tries. On version one I didn't think about a way to join the elevator halves and accidentally installed it upside-down anyway. Of course, I didn't realize my mistake until everything was assembled. This was an unexpected advantage though, because I could figure out my servo installations on a part that wasn't precious.

Version two uses a piece of 3/32 music wire to join the elevator halves. The Vertical and Horizontal are notched to slide over one another with some de-papered DTFB on either side to catch the fuselage skins.
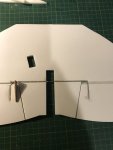

The wing spar is a simple C-channel. There is another C-channel that runs through the fuselage which accepts a third C-channel that acts as a wing joiner/reinforcement. I don't have a lot of confidence in the strength of this system, but if the wings get glued solidly to the fuselage skins, I think it will be okay for a while.

 View attachment
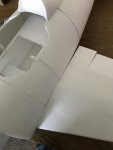

I'm waiting on a motor to arrive before I can finish up the electronics install.
Now I'm trying to figure out the landing gear install. The tentative plane is to bend some wire and zip-tie it to a plywood plate attached to the fuselage's center box. Of course, this is difficult to do with the skins on, and even more difficult to install the skins around a set of landing gear wires. If anyone has ideas on how to put landing gear on this chonky boi I'd be happy to hear them.
Oh, and I'll be gifting the purple plane to another friend's kid when I'm done taking my measurements. Spread the aviation bug.
As soon as I saw it I wanted to see if it would it fly. I've seen blue, red, and green versions but I found a purple one on Facebook Marketplace for $10 and I had to have it.
I took some 3-view pictures and a bevy of measurements then plugged them into CAD.


I decided to scale things up to a 36" wingspan. That gives me a wing area of about 305in². If I can keep the weight around 36oz, the wing loading will be reasonable.
Two things that didn't scale very well were the prop, and the wing.
Scaled up, the prop would be a 16" 3-blade, but it's difficult to get a small/light motor to spin a prop that big without a gearbox and I don't really want to get into that quite yet. So I'll be starting with a 12" 2-blade.
The wing on the toy is semi-symmetrical, incredibly thick and comically small. Each wing is only about 13-1/2" long with a root cord of about 10-1/2". If I scaled the toy exactly the wing would be 3" thick at the fuselage and almost 1-1/2" thick at the tip. To keep the drag down and make construction a little easier I opted for a much thinner, semi-symetrical wing, only 1-1/4" thick at the root.

The fuselage is pretty simple, a 4" box with round formers over it. This makes figuring out the skins pretty easy because every section of skin is just a cone.


Then it was just a matter of fitting tail surfaces, cutting the cockpit, and figuring out a wing-joiner.
The tail took two tries. On version one I didn't think about a way to join the elevator halves and accidentally installed it upside-down anyway. Of course, I didn't realize my mistake until everything was assembled. This was an unexpected advantage though, because I could figure out my servo installations on a part that wasn't precious.

Version two uses a piece of 3/32 music wire to join the elevator halves. The Vertical and Horizontal are notched to slide over one another with some de-papered DTFB on either side to catch the fuselage skins.


The wing spar is a simple C-channel. There is another C-channel that runs through the fuselage which accepts a third C-channel that acts as a wing joiner/reinforcement. I don't have a lot of confidence in the strength of this system, but if the wings get glued solidly to the fuselage skins, I think it will be okay for a while.


 View attachment


I'm waiting on a motor to arrive before I can finish up the electronics install.
Now I'm trying to figure out the landing gear install. The tentative plane is to bend some wire and zip-tie it to a plywood plate attached to the fuselage's center box. Of course, this is difficult to do with the skins on, and even more difficult to install the skins around a set of landing gear wires. If anyone has ideas on how to put landing gear on this chonky boi I'd be happy to hear them.
Oh, and I'll be gifting the purple plane to another friend's kid when I'm done taking my measurements. Spread the aviation bug.


