Hello, I am posting my first build tread. Here is how things went when assembling my FT Gremlin.

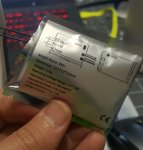
Frsky XM+ receiver for the build, ordered from Amazon.
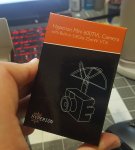
Hyperion Camera from the Flite Test store, ordered with the Gremlin.
XT-30 connector ordered from Amazon. I would like a smaller wire gauge for this. It was difficult to solder to the tiny pads. (sorry for blurry pic, but most know what XT-30 look like)

Getting started I plugged the Femto Flight Controller (FC) into my PC and connected via Betaflight. Attempting to connect while shorting the boot pads proved fruitless. Even after asking my wife to help. I tried STM USB VCP Drivers. I tried Zandig. No go. I decided to proceed with the build anyway and hope the forums presented a solution before I finished. First thing to do was tin the pads on the FC. I had the dulcet tones of TJ's voice playing via the Youtube build video through the entire process, so thanks TJ.

I have since added heat shrink tubing to the clips on my helping hands. I intend to grind the points off the clips "teeth" as well, they are pretty aggressive right now. Next up was to prepare the electronic speed controllers (ESC). Per the Guru himself "strip, twist, and tin. - TJ".

Soldering the ESCs to the FC was tricky at first, but one or two in I got the hang of things and it went pretty smooth.
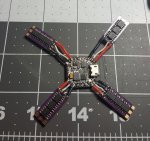
Following the ESCs I soldered on the battery lead and the receiver. I wish I had made the battery lead shorter. Maybe I can fix that in the future.
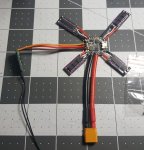
On to the motors. I left the motor wires the full length because I do not know what kind of frames I will make for this. I don't plan on keeping TJ's frame forever. Sorry TJ, nothing personal.
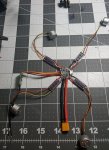
The FPV camera was next in the hot seat for soldering. Following the video I trimmed the wires and soldered it down. I use a wad of StickTac to hold things still when I solder. I find it to be very helpful.
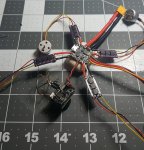
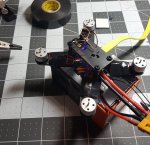
After the camera it was time to put everything on the frame. It is pretty cramped on there. At first I was having issues getting the ESC wires around the standoffs for the rear of the frame. Some finagling and it worked out. I used a couple of rubber bands to hold the camera in and down for now. I'll probably 3D print a mount/stand off piece for the front of the frame.
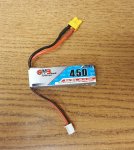
I have 5 of these batteries to use. So far I have 6-7 minute flight times just cruising around.
This is where things went completely out of my comfort zone and became a true learning experience. Surfing around the forum I found the post that recommended the ImmersionRC Driver Fixer. I downloaded that and ran it. Preparing Betaflight and shorting the boot pins then connecting the USB... DFU boot! Nice. Alright, time to flash the new firmware. Flash failed. Now I have read that Betaflight will say it failed, but it works anyway. I went to CLI and typed "version". Betaflight showed the latest version, but I didn't trust it so I flashed it again. It worked fine the second time. All good.
Now I needed to bind the receiver to my Taranis QX7. Set the transmitter to bind and with the help of my wife held the button and plugged in a battery. It didn't work. Three more tries later... it worked. Betaflight recognizes the transmitter movements. While I am in there I set the arm switch and the mode switch.
Following along with TJ I moved on to the motors. No props on I used the motor test mode to calibrate the ESCs and determine motor 2 and 3 needed reversed. I downloaded BLHeli Suite and connected to the Gremlin. I was unable to connect via the software. In the video TJ's stuff just worked. Probably because he has done this a thousand times. In the program there is a tab Select ATMEL / SILABS Interface. I tried all of those, changing the COM port to COM6 at the bottom of the program until I found one that connected. I am sorry, I don't remember which one it was. Once connected changing the motor direction was as easy as selecting which ESC at the bottom and moving a slider over one position until the motor direction read "REVERSED". I did this for motor 2 and 3 and hit the "write setup" button and disconnected.
After the ESC calibration I went back to Betaflight. I set the Gremlin level and calibrated the gyro. Went to the motor tab and into test mode (still no props) to check motor direction. All good. Attaching the props was as easy as TJ made it look, two screws per prop and you are done.
On to the maiden. I have a video. I am working on figuring out how to put it in here. Until then you'll just have to take my word that it flies well and I cannot wait to fly the field behind my office.
I will update the video when I figure it out.
I think I got it now. Thanks JimCR120.
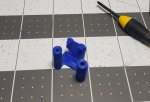
Some new parts!
I did a search on thingiverse and found a 3D printable camera mount/standoff combo. Set up the file in Cura and sent it to my printer.
I then took the gremlin top plate off. And removed the rubber bands I was using to hold the camera on.
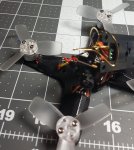
I used a tap to thread the standoffs for the M3 nylon screws. They are not great and don't stay very tight. I'll probably put some hot glue down the threads as a "thread locker".
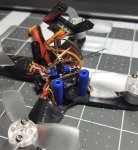
Finally to put it all together again.
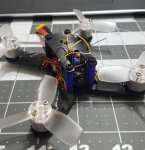
All up weight is 101 grams, the quad with no battery weights 72 grams.

Frsky XM+ receiver for the build, ordered from Amazon.

Hyperion Camera from the Flite Test store, ordered with the Gremlin.

XT-30 connector ordered from Amazon. I would like a smaller wire gauge for this. It was difficult to solder to the tiny pads. (sorry for blurry pic, but most know what XT-30 look like)

Getting started I plugged the Femto Flight Controller (FC) into my PC and connected via Betaflight. Attempting to connect while shorting the boot pads proved fruitless. Even after asking my wife to help. I tried STM USB VCP Drivers. I tried Zandig. No go. I decided to proceed with the build anyway and hope the forums presented a solution before I finished. First thing to do was tin the pads on the FC. I had the dulcet tones of TJ's voice playing via the Youtube build video through the entire process, so thanks TJ.

I have since added heat shrink tubing to the clips on my helping hands. I intend to grind the points off the clips "teeth" as well, they are pretty aggressive right now. Next up was to prepare the electronic speed controllers (ESC). Per the Guru himself "strip, twist, and tin. - TJ".

Soldering the ESCs to the FC was tricky at first, but one or two in I got the hang of things and it went pretty smooth.

Following the ESCs I soldered on the battery lead and the receiver. I wish I had made the battery lead shorter. Maybe I can fix that in the future.

On to the motors. I left the motor wires the full length because I do not know what kind of frames I will make for this. I don't plan on keeping TJ's frame forever. Sorry TJ, nothing personal.

The FPV camera was next in the hot seat for soldering. Following the video I trimmed the wires and soldered it down. I use a wad of StickTac to hold things still when I solder. I find it to be very helpful.

After the camera it was time to put everything on the frame. It is pretty cramped on there. At first I was having issues getting the ESC wires around the standoffs for the rear of the frame. Some finagling and it worked out. I used a couple of rubber bands to hold the camera in and down for now. I'll probably 3D print a mount/stand off piece for the front of the frame.

I have 5 of these batteries to use. So far I have 6-7 minute flight times just cruising around.

This is where things went completely out of my comfort zone and became a true learning experience. Surfing around the forum I found the post that recommended the ImmersionRC Driver Fixer. I downloaded that and ran it. Preparing Betaflight and shorting the boot pins then connecting the USB... DFU boot! Nice. Alright, time to flash the new firmware. Flash failed. Now I have read that Betaflight will say it failed, but it works anyway. I went to CLI and typed "version". Betaflight showed the latest version, but I didn't trust it so I flashed it again. It worked fine the second time. All good.
Now I needed to bind the receiver to my Taranis QX7. Set the transmitter to bind and with the help of my wife held the button and plugged in a battery. It didn't work. Three more tries later... it worked. Betaflight recognizes the transmitter movements. While I am in there I set the arm switch and the mode switch.
Following along with TJ I moved on to the motors. No props on I used the motor test mode to calibrate the ESCs and determine motor 2 and 3 needed reversed. I downloaded BLHeli Suite and connected to the Gremlin. I was unable to connect via the software. In the video TJ's stuff just worked. Probably because he has done this a thousand times. In the program there is a tab Select ATMEL / SILABS Interface. I tried all of those, changing the COM port to COM6 at the bottom of the program until I found one that connected. I am sorry, I don't remember which one it was. Once connected changing the motor direction was as easy as selecting which ESC at the bottom and moving a slider over one position until the motor direction read "REVERSED". I did this for motor 2 and 3 and hit the "write setup" button and disconnected.
After the ESC calibration I went back to Betaflight. I set the Gremlin level and calibrated the gyro. Went to the motor tab and into test mode (still no props) to check motor direction. All good. Attaching the props was as easy as TJ made it look, two screws per prop and you are done.
On to the maiden. I have a video. I am working on figuring out how to put it in here. Until then you'll just have to take my word that it flies well and I cannot wait to fly the field behind my office.
I will update the video when I figure it out.
I think I got it now. Thanks JimCR120.
Some new parts!
I did a search on thingiverse and found a 3D printable camera mount/standoff combo. Set up the file in Cura and sent it to my printer.

I then took the gremlin top plate off. And removed the rubber bands I was using to hold the camera on.

I used a tap to thread the standoffs for the M3 nylon screws. They are not great and don't stay very tight. I'll probably put some hot glue down the threads as a "thread locker".

Finally to put it all together again.

All up weight is 101 grams, the quad with no battery weights 72 grams.
Last edited:
