RaavHimself
Member
Hi everybody,
This is my just finished new flying 3D printed brick V2.2. So proud of it that I want to show off!!
It is (It wants to be) a scale model of the Quicksilver ultralight plane. It's taken me roughly a month since I had the idea. I was looking for (still am) a way to 3d print planes avoiding nasty one perimeter parts, and in the way, I sort of deviated towards a scale model of the Quicksilver (don't know why but I've always had a like for scale models of nearly anything).
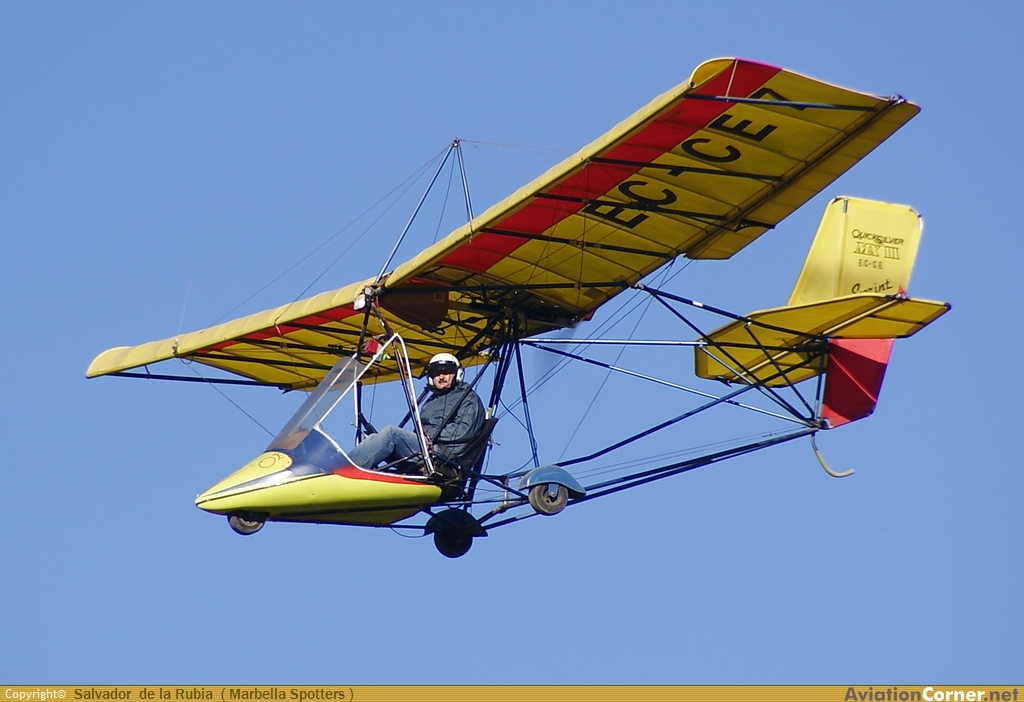
The Quicksilver line has been flying since the late 1970s and remains in production in 2018 by Quicksilver Aircraft of Temecula. California. Here's a link to the wikipage https://en.wikipedia.org/wiki/Eipper_Quicksilver.
About the model
The scale of the model is unknown, since I have based all the design on photographs, and never had anything that resembled a plan to start from. So what I did was measure the propeller and start from that point. Since in this plane, the propeller space is confined between two struts, I figured it was a good way to start, The problem was (is), there is no chance to switch to a bigger propeller if the plane is underpowered, but... let's go ahead.
So scaling the propeller down to 5" I got a wingspan of roughly one meter.
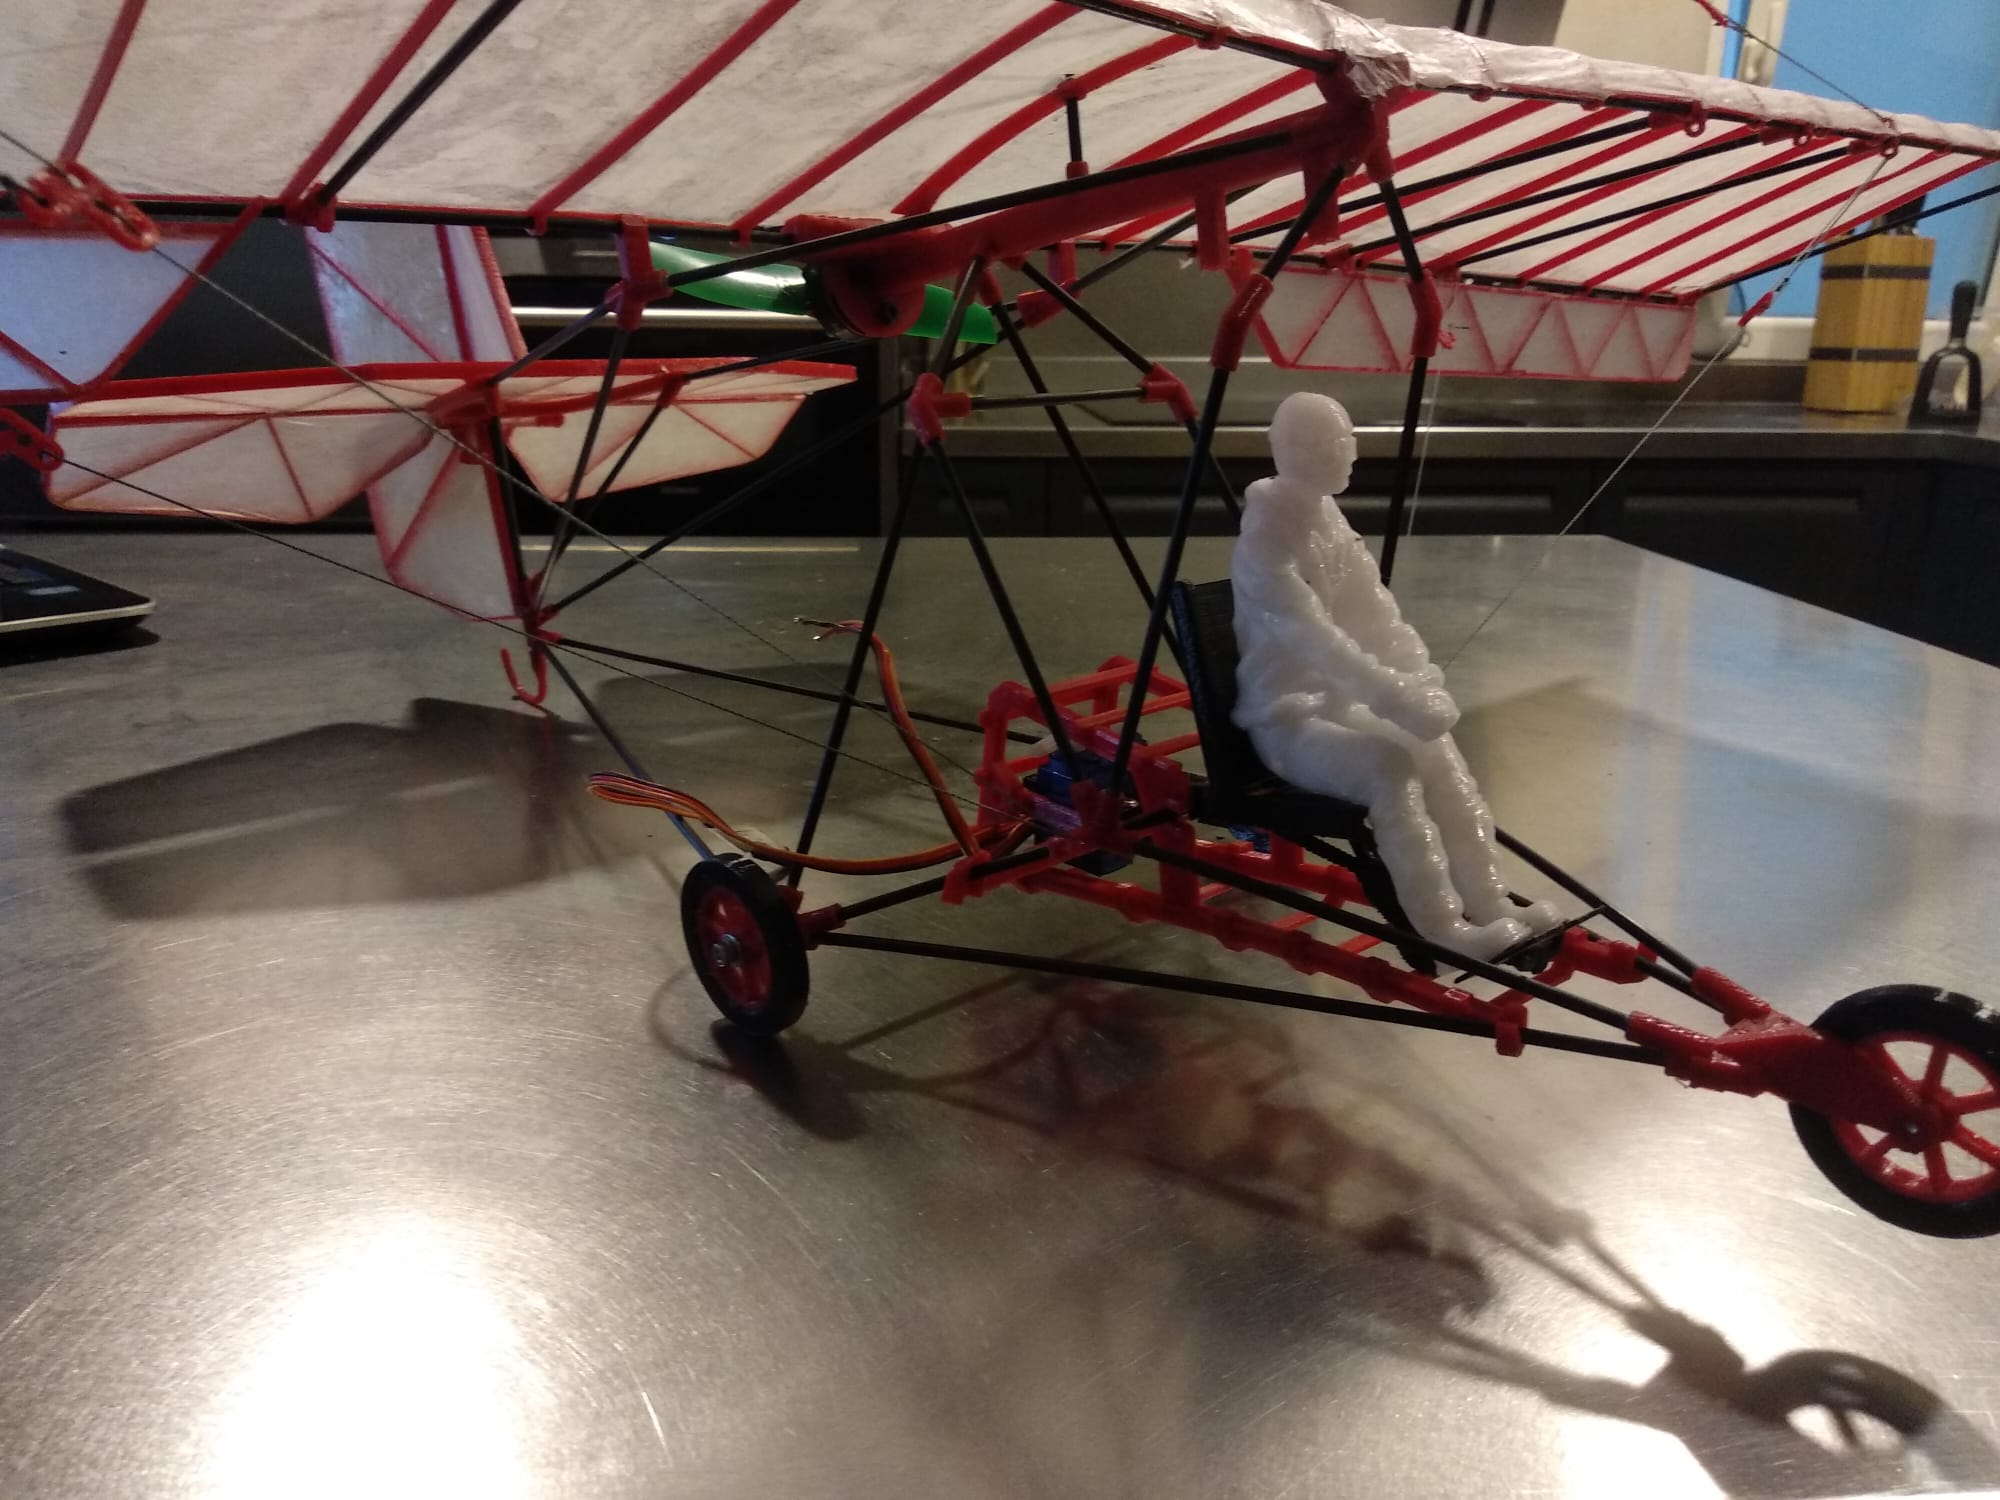
I started making a model with 3 mm fibre blass rods from a broken umbrella and red PETG (very little filament spent). All the 3D printed parts were at least 4 perimeters thick (1.6 mm) so the printing part was a cakewalk. I tried to copy all the bars and struts that the real plane has. Also, I wanted the wings, stabs and control surfaces 3D printed and covered with some sort of film, like the fabric in the real plane. It was really good I made this model first, as I was able to identify a good handfull of problems, like the tail being too heavy, the necessity of assembly templates (3D printed again) to position the struts or the difficulty (impossibility I should say) to use a heatshrink film for the covering. I ended doing it with paper and acetone diluted glue. Not practical.
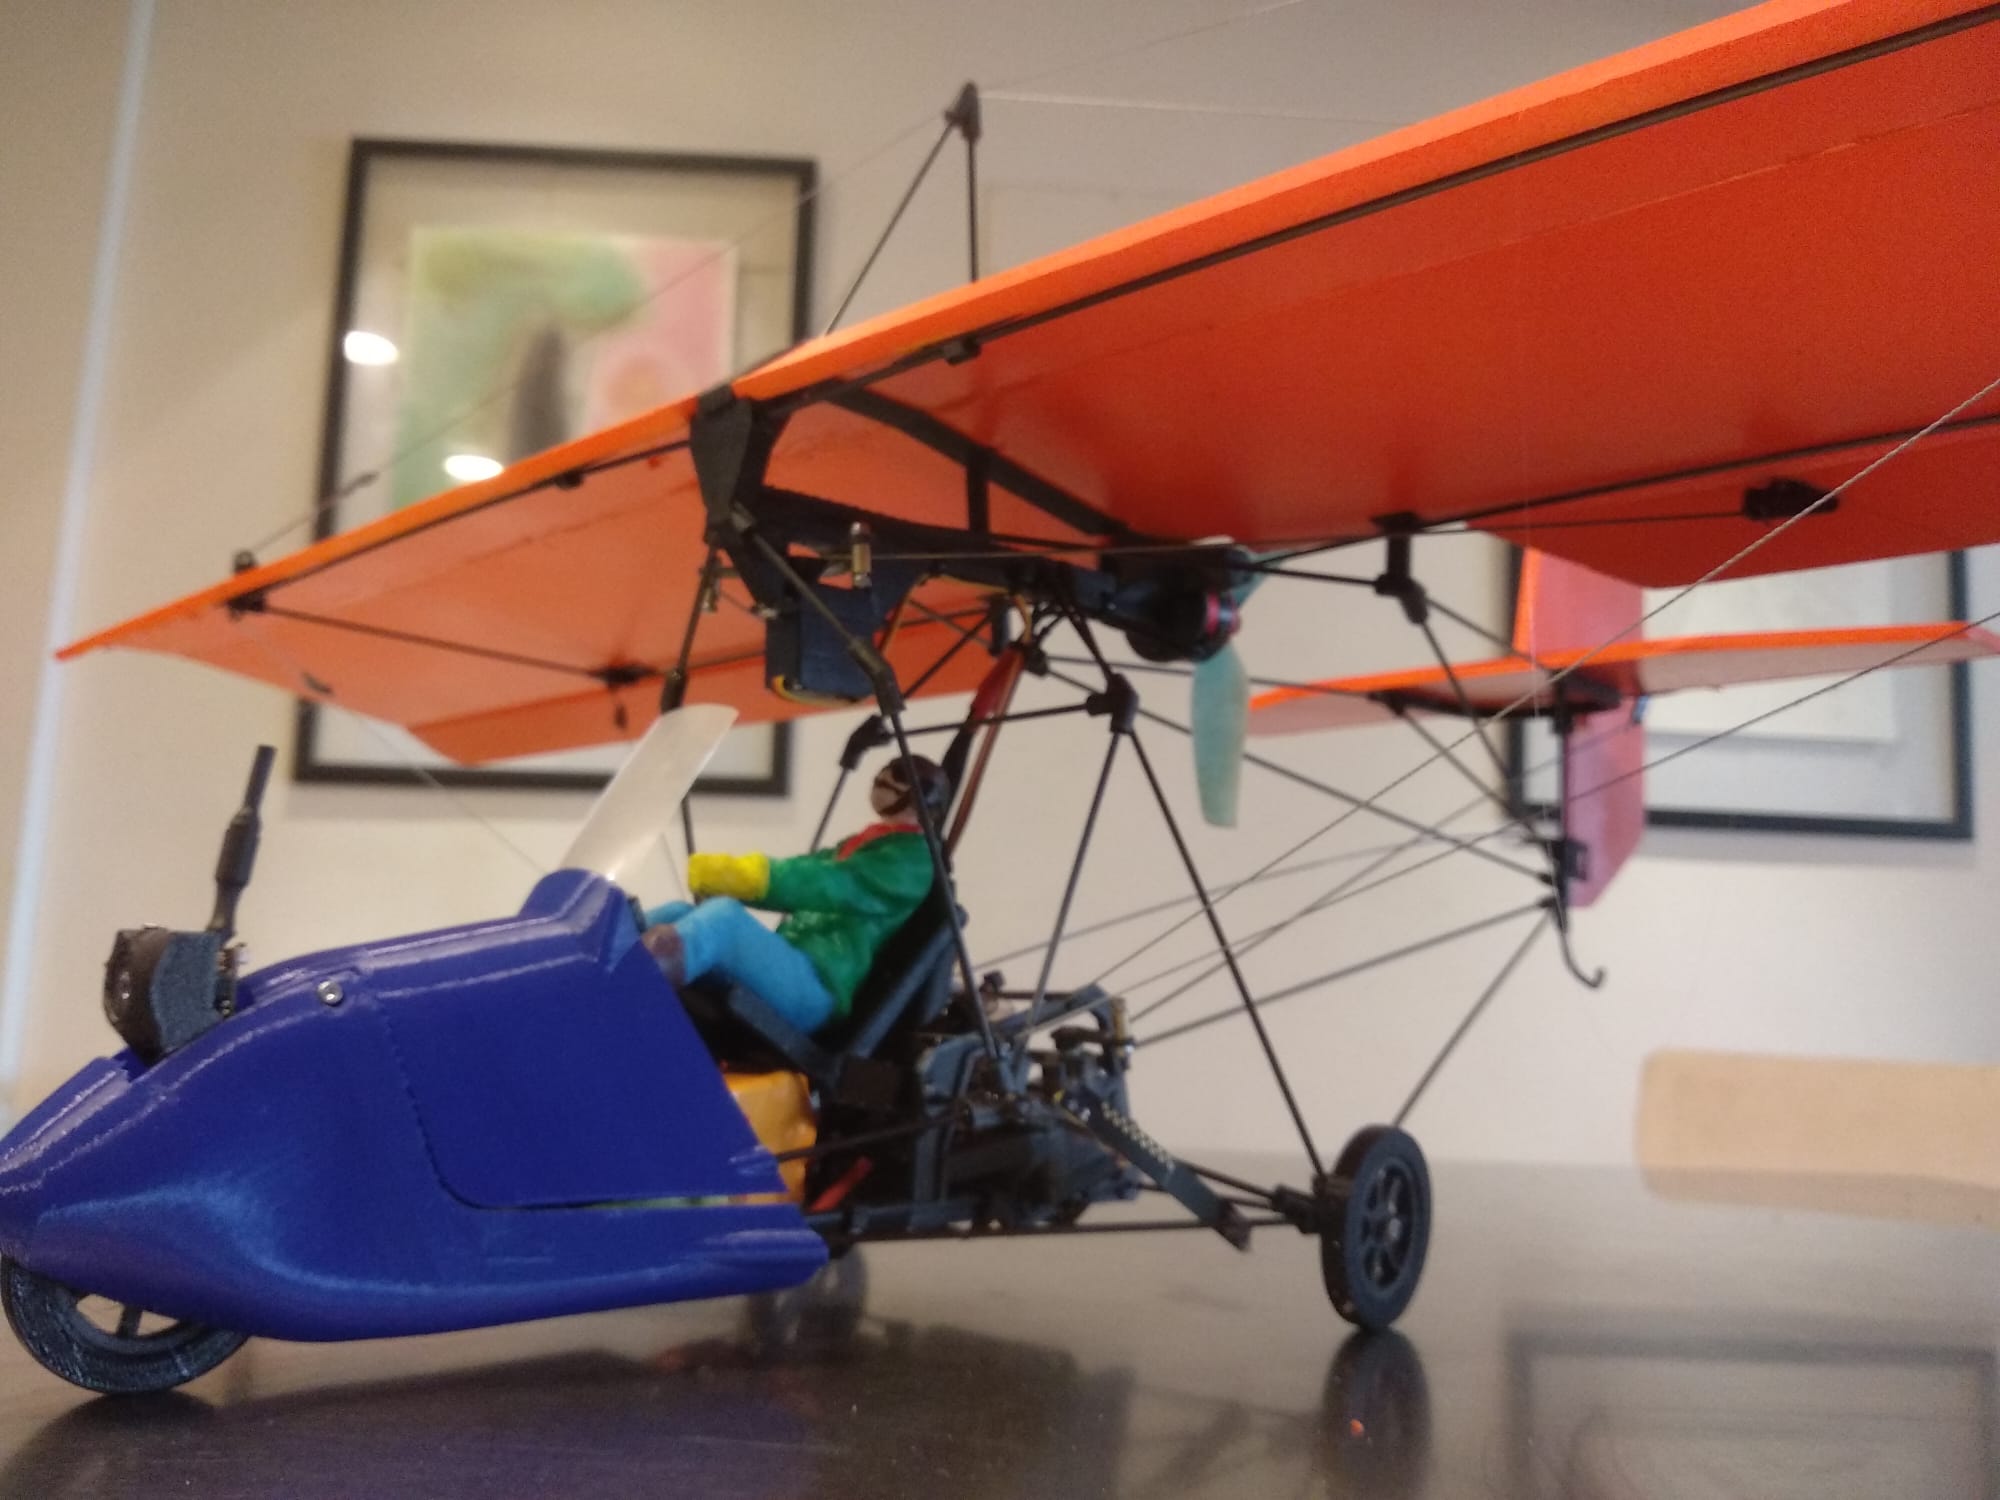
So the final model uses 2 mm CF rods as bars. I have tried to copy the real plane, but I have removed some of the bars of the wingsto save the weight. They are unnecessary since the final wings are foam sheet. I printed the knots with CF PETG and glued everything with epoxi. In case something had to be undone, the printed knots came out easily with a shearing hit paralel to the bar with a small chissel. A bit of sanding and ten minutes 3D printing a new knot and here we go again. The wings, stabs and control surfaces are made of paper covered foam sheet. Orange colour is spray paint.
The wings are one cambered and just one sheet of 5 mm foam. To provide them the adecuate strengh there are two CF rods that run underneath and give anchor to the tensioner wires. The wire is a fishing line. Also I have only kept 8 of the original 24 tensioner wires.
I have installed a 3 blade 5045 propeller and a 2205 2600KV motor from a miniquad. I figure that if the prop has to be small, I better turns fast. I haven't measured the thrust yet, but I can tell you that it is LOUD.
With a 4S 1500 mAh batt, CG position looks about right, In any case, there's no much room to move the battery (neither places to conceal it), so what I did was to install a system to vary the angle of the vertical stab, thus I can change the angle of attack. I don't know it it will work, but I will try that before starting to weight down the nose.
Talking about stabs, in the real plane the horizontal one looks way too small, anf the rudder looks just too big. I've kept the sizes though I am not sure of them, because changing them is very easy. (To be completely honest I am sure of very little in life) I did not keep the size of the ailerons though. They looked just too small. I wanted authority and now I don't know if I've made them too big. I've also increased the wingspan 4%. With such a small propeller I suppose that the bigger the drag and the slower the flight means the better for the prop's efficiency.
And that's about it. It's ready to go. Wish me luck
This is my just finished new flying 3D printed brick V2.2. So proud of it that I want to show off!!
It is (It wants to be) a scale model of the Quicksilver ultralight plane. It's taken me roughly a month since I had the idea. I was looking for (still am) a way to 3d print planes avoiding nasty one perimeter parts, and in the way, I sort of deviated towards a scale model of the Quicksilver (don't know why but I've always had a like for scale models of nearly anything).
The Quicksilver line has been flying since the late 1970s and remains in production in 2018 by Quicksilver Aircraft of Temecula. California. Here's a link to the wikipage https://en.wikipedia.org/wiki/Eipper_Quicksilver.
About the model
The scale of the model is unknown, since I have based all the design on photographs, and never had anything that resembled a plan to start from. So what I did was measure the propeller and start from that point. Since in this plane, the propeller space is confined between two struts, I figured it was a good way to start, The problem was (is), there is no chance to switch to a bigger propeller if the plane is underpowered, but... let's go ahead.
So scaling the propeller down to 5" I got a wingspan of roughly one meter.
I started making a model with 3 mm fibre blass rods from a broken umbrella and red PETG (very little filament spent). All the 3D printed parts were at least 4 perimeters thick (1.6 mm) so the printing part was a cakewalk. I tried to copy all the bars and struts that the real plane has. Also, I wanted the wings, stabs and control surfaces 3D printed and covered with some sort of film, like the fabric in the real plane. It was really good I made this model first, as I was able to identify a good handfull of problems, like the tail being too heavy, the necessity of assembly templates (3D printed again) to position the struts or the difficulty (impossibility I should say) to use a heatshrink film for the covering. I ended doing it with paper and acetone diluted glue. Not practical.
So the final model uses 2 mm CF rods as bars. I have tried to copy the real plane, but I have removed some of the bars of the wingsto save the weight. They are unnecessary since the final wings are foam sheet. I printed the knots with CF PETG and glued everything with epoxi. In case something had to be undone, the printed knots came out easily with a shearing hit paralel to the bar with a small chissel. A bit of sanding and ten minutes 3D printing a new knot and here we go again. The wings, stabs and control surfaces are made of paper covered foam sheet. Orange colour is spray paint.
The wings are one cambered and just one sheet of 5 mm foam. To provide them the adecuate strengh there are two CF rods that run underneath and give anchor to the tensioner wires. The wire is a fishing line. Also I have only kept 8 of the original 24 tensioner wires.
I have installed a 3 blade 5045 propeller and a 2205 2600KV motor from a miniquad. I figure that if the prop has to be small, I better turns fast. I haven't measured the thrust yet, but I can tell you that it is LOUD.
With a 4S 1500 mAh batt, CG position looks about right, In any case, there's no much room to move the battery (neither places to conceal it), so what I did was to install a system to vary the angle of the vertical stab, thus I can change the angle of attack. I don't know it it will work, but I will try that before starting to weight down the nose.
Talking about stabs, in the real plane the horizontal one looks way too small, anf the rudder looks just too big. I've kept the sizes though I am not sure of them, because changing them is very easy. (To be completely honest I am sure of very little in life) I did not keep the size of the ailerons though. They looked just too small. I wanted authority and now I don't know if I've made them too big. I've also increased the wingspan 4%. With such a small propeller I suppose that the bigger the drag and the slower the flight means the better for the prop's efficiency.
And that's about it. It's ready to go. Wish me luck
Attachments
-
 avc_00199920 (1).jpg237.3 KB · Views: 0
 -
 Model.jpeg259.9 KB · Views: 0
 -
 WhatsApp Image 2021-03-09 at 15.15.08.jpeg163 KB · Views: 0
 -
 WhatsApp Image 2021-03-09 at 15.15.42 (1).jpeg185.7 KB · Views: 0
 -
 WhatsApp Image 2021-03-09 at 15.15.44 (2).jpeg191.5 KB · Views: 0
 -
 WhatsApp Image 2021-03-09 at 15.30.37.jpeg106.1 KB · Views: 0
 -
 WhatsApp Image 2021-03-09 at 15.31.40.jpeg93 KB · Views: 0