Pretty straightforward concept: Design and build a super-low-budget DLG
Approximate major material costs (not including electronics or basic hardware): ~$12
2 sheets, DollarTree foam board: $2
40" CF tube spar: $10
CF arrow shaft: Free (used, from scrap bin at archery shop)
I recently put together my first FliteTest design - the FT Racer - and was struck by how simple and STRONG the folded-wing construction method was. I thought "this would be perfect for a budget-DLG wing".
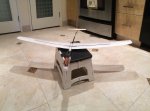
So I drew up a simple tapered wing using the same basic folding and hot-gluing method most of the FliteTest designs use, so it's real simple and easy to throw together. It's only 40" span because I wanted to use a carbon-fiber tube-spar and all I had on hand was a 40" CF tube. I also had the notion that a 40" CF tube is fairly representative of what most people could get from their local hobby shop (I think?), and thought that was in keeping with the FliteTest theme of this project.
The full span spar makes the wing extremely strong and rigid, able to stand up easily to even the most abusive throws. The only carbon in the plane is the 40" CF tube and an arrow shaft from my local archery place for the fuse stick.
I don't expect it to perform exceptionally well as a DLG-proper, because it came out a tad heavy (par for the course), but I'll still throw it for practice. I DO expect it to be a good medium to high wind sloper. And the way I've designed the removable wing, it should be almost trivial to make a larger floater-wing.
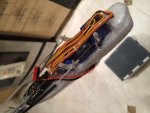
At first I built it with rudder, and misjudged the servo-placement in the nose pod. If you look close at the assembled pics there's a little unplanned bump on the bottom of the nose. I had to poke one of the servos out the bottom so I could fit two close enough to fit but not interfere. I've since ditched the rudder altogether, I wasn't really using it anyway, and switched the elevator from steel-pushrod to pull-string-spring. These changes really helped to lighten the tail and get the balance forward.
To make the wing removable, I designed a blade-style sliding fit with two locking pins. I reinforced the pin holes with a 5mm CF tube, and use a smaller CF tube as the lock rods. It took some elbow grease and adjustment on the first assembly, but it holds real nice. After several strong DLG throws, the joint is still holding up nicely. Plus it packs away nice and neat in the trunk.
For a throwing peg, I used a little piece of CF blade on the wingtip, epoxied with CF tow into the wing spar. That way all the loads go straight into the strong spar and not into the foam.
As a follow-up, I plan on building a second wing with a simple foamboard spar instead of a CF tube. This should save considerable weight, and shouldn't sacrifice too much strength. It also would be nice to have a little dihedral, but we'll cross that bridge later.
The AUW came in just over 11 ounces, and with a final wing area of 230sq-in the wing loading is around 7oz/sq-ft. Certainly heavy for a real DLG, but not bad overall.
Maiden slope flight at Bluff Park! Wind was a little light, but I was able to get some time in the air, and a few clips as it flew past my camera (didn't have my hat, had to tape it to the railing).
Finally got some good discuss-launching video at Fairview Park:
Not a high-performance DLG, but with a little flaps dialed in for camber it actually flies quite nicely!
She flew great in both scenarios. I was scraping by a bit on the slope, thanks to the heavier wing loading (slope flight was prior to tail-lightening changes); If the wind was a little stronger and consistent I think it would've been awesome!
I honestly was pleasantly surprised at how it performed as a DLG at the park. I wasn't able to stay up for more than 30 seconds at a time, but for an inexperienced DLG-pilot and a relatively heavy plane I think she performed admirably!
Very stable, no serious tip stalls; all in all a pretty nice plane. I'm a happy designer.
Attachments
-
 6.jpg859.1 KB · Views: 30
 -
 7.jpg275.9 KB · Views: 34
 -
 8.jpg253.2 KB · Views: 31
 -
 9.jpg397 KB · Views: 45
 -
 10.jpg372.2 KB · Views: 22
 -
 11.jpg408.2 KB · Views: 29
 -
 12.jpg501.2 KB · Views: 26
 -
 13.jpg334.5 KB · Views: 26
 -
 14.jpg535.5 KB · Views: 51
 -
 15.jpg387 KB · Views: 29
 -
 16.jpg342.2 KB · Views: 22
 -
 17.jpg291 KB · Views: 30
 -
 18.jpg231.7 KB · Views: 22
 -
 19.jpg297.8 KB · Views: 27
 -
 1.png324.6 KB · Views: 25
 -
 2.png353.8 KB · Views: 25
 -
 3.png67.1 KB · Views: 31
 -
 4.png109.8 KB · Views: 23
 -
 5.png335 KB · Views: 26


