P47 Thunderbolt mod build

Beavis

Member
Well, I am now into my first scratch build. After wrecking a FT Spitfire and cutting my teeth flying the Simple Scout/mini Scout, I am ready to venture into warbird territory.

The P47 is my favorite warbird. But its curves present challenges for a foam build. So I dare to dream...

The Spitfire showed me that the spirit of a warbird can be reproduced without having to stay 100% faithful. I especially liked the Spitfire's wings.

After building a few Scouts, I realized that wing building shouldn't be too tough. I always wondered what I could create by modding the wings and tail. Then one day I looked at the 1.2m E-flite P47 hanging in the garage. I started to see design elements that would cross over.

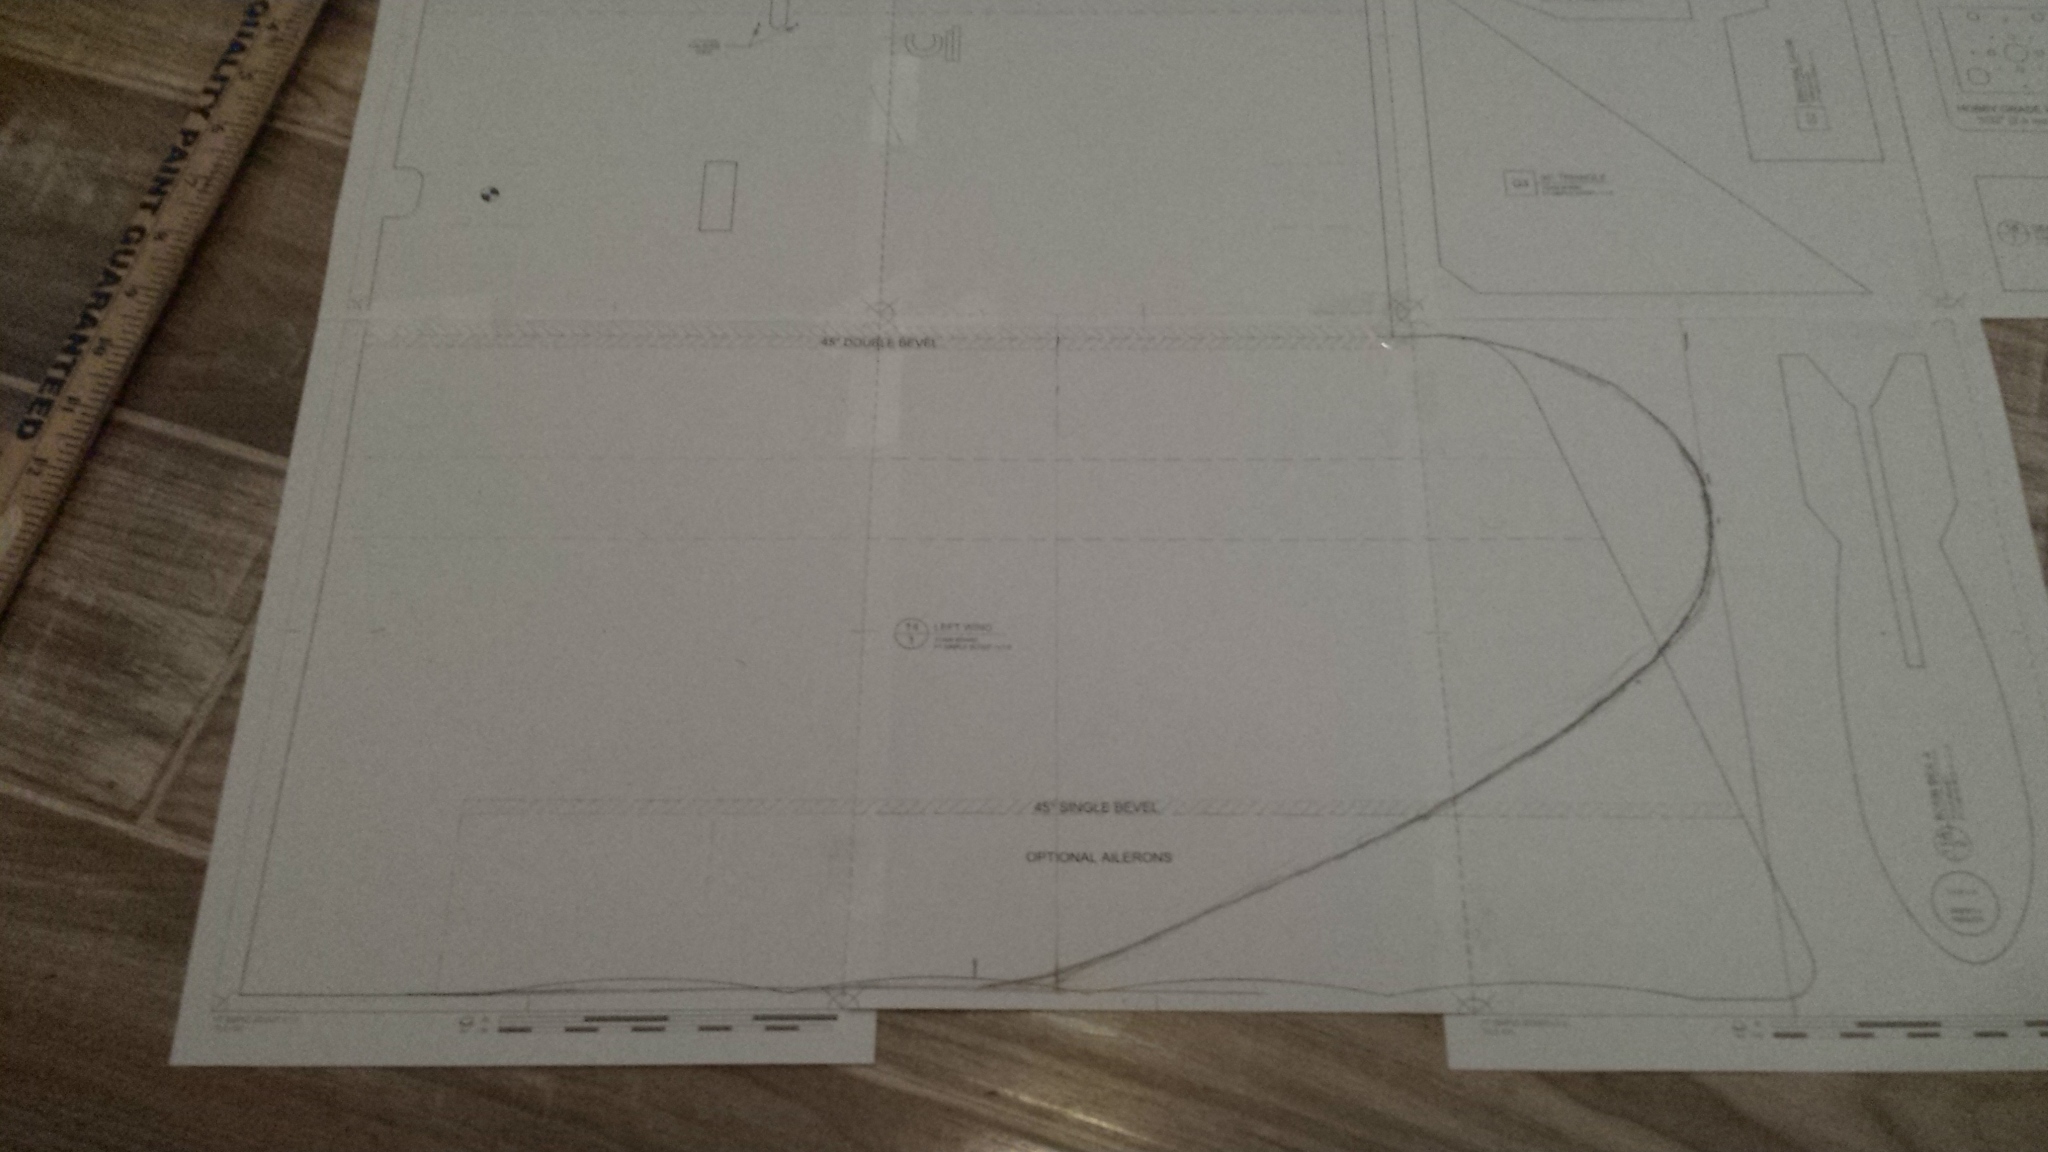
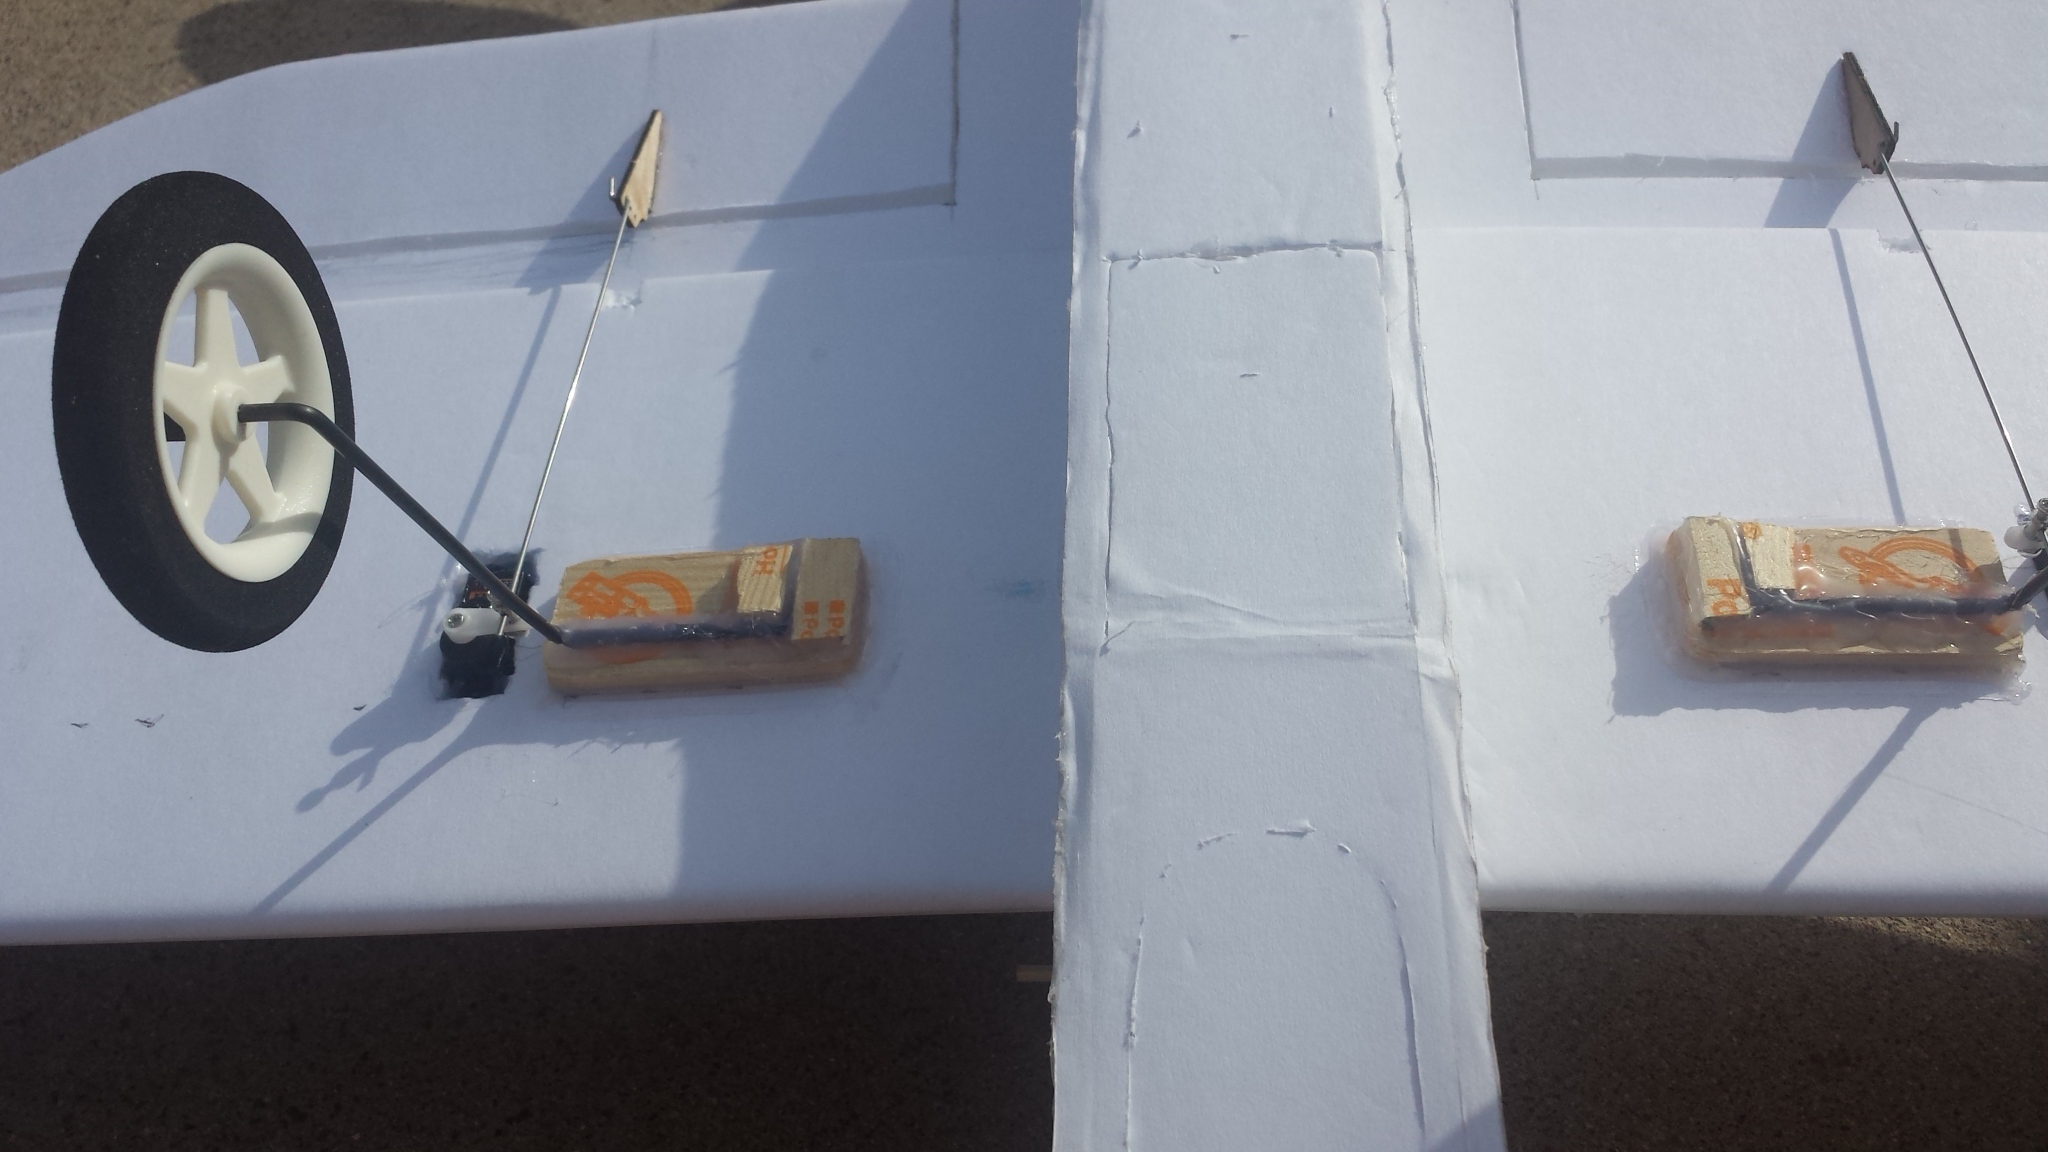
So here is what I started. I started with the Simple scout wings, and modded the shape to approximate the P47 wing shape. It is not 100% to scale, but is at recognizable as a P47 wing.
 

Attachments

  • 20180109_004640.jpg
    20180109_004640.jpg
    690.4 KB · Views: 0
  • 20180109_031428.jpeg
    20180109_031428.jpeg
    283.4 KB · Views: 0
Last edited:

Beavis

Member
Here is the final wing, using the simple scout assembly plans. I haven't figured out yet if I will do ailerons out toward the tips and leave room for future flaps, or just keep it easy by making the ailerons further inboard.

The wings are a little larger than scale proportions (38" wingspan tip to tip), and a touch wider, but I am hoping that will be fine. I don't like to fly super fast (yet), so I hope the slightly larger wings will help with low speed ability.
 

Attachments

  • 20180109_040637.jpg
    20180109_040637.jpg
    680.2 KB · Views: 0

Beavis

Member
My biggest challenge will be with the fuselage. The P47 is fat and round, which doesn't make for an easy foam project. And this is also my first scratch build.

The first challenge was to take the existing box fuselage from the scout, and mod it to approximate the Bolt. I had to fatten up the chin a little, so I cut the fuse with a little extra.

The 2nd challenge was to mod the scout fuse for the wings to ride lower. For this I had to trim the scout's fuse reinforcements. I though about doing some reinforcements above the wing, but the scout's fuse was pretty strong to begin with if you don't cut out the gear/float slots.
 

Attachments

  • 20180110_015136.jpg
    20180110_015136.jpg
    462.9 KB · Views: 0
  • 20180110_025328.jpeg
    20180110_025328.jpeg
    492.5 KB · Views: 0

Beavis

Member
Here is a preliminary test fit of the wing to the fuse. I will probably not cut out the access hole in the bottom of the fuse, but will make my elevator and rudder servos accessible from the top/cockpit area. This is because the scout's servo mount location was just under the wing, and these wings don't allow enough space to mount the servo's beneath the wings. My other option is to take a cue from the Spitfire, and mount the servos in the fuse just forward of the elevator. This will probably be determined by how the plane balances out with C pack power pod, 2200 3s battery, etc.

Next weekend's efforts will focus on modding the scout's rudder and elevator to mimic the shape of a P47. Then I will have to balance and determine servo locations as mentioned above.
 

Attachments

  • 20180110_142012.jpeg
    20180110_142012.jpeg
    406.3 KB · Views: 0
  • 20180110_142001.jpg
    20180110_142001.jpg
    675.9 KB · Views: 0

Beavis

Member
Jpot1, thanks!

I had a couple of spare hours this morning, so I did the tail section...
 

Attachments

  • 20180111_152126.jpg
    20180111_152126.jpg
    551.4 KB · Views: 0
  • 20180111_152101.jpg
    20180111_152101.jpg
    785.7 KB · Views: 2

Beavis

Member
Servos are installed. I made an access hole under the cockpit area to glue them in from the top.

Balance is currently pretty nose heavy, but I am hoping that changes once I get the fuselage shaping and cockpit installed to give it some sexier curves.

The power pod from my Scout (B pack) fits nicely for now.
 

Attachments

  • 20180114_232843.jpg
    20180114_232843.jpg
    656.3 KB · Views: 1
  • 20180114_232902.jpg
    20180114_232902.jpg
    665.8 KB · Views: 0
  • 20180115_005337.jpg
    20180115_005337.jpg
    574.2 KB · Views: 1

Beavis

Member
And the build is pretty much complete, minus the aesthetics.

I used poster board with several formers to make the cockpit and fuselage curves. I did a first layer to give an overall cigar shape, and then a 2nd layer to do the cockpit and the "spine". Part of the challenge was to integrate a top hatch for the battery in case I squeeze in a 2200 3s battery.

I started from the back and found that the cockpit just covered the rear edge of the hatch, so it became a great place to anchor the rear of the hatch.

Landing gear were salvaged from my wrecked Spitfire.
 

Attachments

  • 20180122_112409.jpg
    20180122_112409.jpg
    928.7 KB · Views: 2
  • 20180122_112338.jpg
    20180122_112338.jpg
    628.6 KB · Views: 0
  • 20180122_112254.jpg
    20180122_112254.jpg
    498.9 KB · Views: 0
  • 20180122_112235.jpg
    20180122_112235.jpg
    506 KB · Views: 0
  • 20180122_112216.jpg
    20180122_112216.jpg
    802 KB · Views: 0
  • 20180122_112158.jpg
    20180122_112158.jpg
    1.1 MB · Views: 1

rockyboy

Skill Collector
Mentor
Great job! Now let's see it fly! :applause:

Paint after maiden flight - it's just better luck that way :black_eyed:
 

Beavis

Member
Thx! I just gave it a coat of minwax poly to prep for painting. I also gave it a neo magnet on the battery hatch just forward of the cockpit so I can eliminate the extra skewer. I can squeeze a 2200 3s all the way forward, and it balances about perfect. A 1050 3s leaves me with lots of room. A battery voltage alarm fits aft of the battery in either config.

Maiden was going to be today, but it was too windy. I will recruit my son into videographer duty.

Since this is based on the Scout design, I wonder if it will fly as nicely.

I am looking at pics of razorbacks to get an idea of paint schemes. My son wants to do OD green, and I am good with that. I don't know yet if I will do an historical plane, or develop my own name and nose art.
 

Beavis

Member
I was out beating on one of my other toys, and stopped by a nearby airfield/museum for a photo op and warbird inspiration...
 

Attachments

  • 20180123_173635.jpg
    20180123_173635.jpg
    843.2 KB · Views: 2

Beavis

Member
Maiden complete, total satisfaction, and came back unscathed!

Here it is:
https://youtu.be/u6x3imOvBO8

It took some trimming to bring it under control (nosing up), so I will have to figure it out if it was a tiny touch tail heavy - I thought initial balance was a tiny touch nose heavy. I had to trim in some down elevator to level it out, but it flew nice after that. Maybe it's the thrust angle on the motor.

The C pack left PLENTY of room for more power. I flew this on a touch over half throttle. I had low rates selected, with 30% expo on all surfaces. It had plenty of maneuverability. The ailerons weren't as touchy as the Scout, probably because they have smaller area on this design. I had lots of flight time on a 2200 3s battery.

Since this was a first scratch build, I didn't know what to expect. But I did start from an excellent proven design as inspiration. Differences from the Scout in flight:

  • Scout tends to tip down on a bank turn, requiring some extra elevator. This plane would bank, cut a pretty tight turn, but didn't seem to want any extra elevator except as required to execute the turn.
  • Scout tends to "wag" in flight on a straight course. This plane didn't wag.
  • Scout has very responsive ailerons due to the huge surface area. This plane is more mild and fluid due to smaller aileron surface.


Next up is paint!!!
 

Beavis

Member
Thanks, Grif. I shimmed under the motor mount to the firewall at the 12:00 screw. Now I have a tiny bit of down angle. It makes sense, since my Scout would also tend to climb unless I gave a little bit of downward trim.

Paint is done. This was my inspiration piece:
p47 in the mood inspiration.jpg

And this is my P-47 Thunderfoam...
20180127_001957.jpg
20180127_002040.jpg
20180127_002125.jpg

  • Prep was performed with Minwax Polyurethane clear from a quart I had sitting in the garage for a decade.
  • The OD Green was Rustoleum 2 in 1 Oregano, in satin. $4.
  • The gray for the belly was Rustoleum 2 in 1 Stone Gray. $4.
  • The white for the cowl and stripes was some garage leftover Krylon gloss white.
  • Decals were snagged off web pics, and modded/sized as needed using MS Paint. They were printed on standard printer paper, and sprayed with aerosol clear polyurethane to keep colors from bleeding and paper from wrinkling once glued. They were then applied with medium CA glue. I was totally surprised how well this worked. They stayed smooth, didn't wrinkle, and didn't lose color resolution at all.
  • I didn't want any goofy pilot silhouette in the cockpit, so I decided to go with a sky reflection in the glass. I had some mid-60's Pontiac Metallic Blue Silver engine paint sitting around, and it turned out kinda cool.

It's not totally scale or 100% authentic, but I'm ok with that. I'm working with folded DTFB.

So... final cost? 3 sheets of DTFB ($3), 1 sheet of DT poster board ($1), 2.5" wheels ($7), $8 in new cans of paint, $15 Lemon RX, $60 C power pack from FT, and glue/tape/time. Just shy of a Ben Franklin.

Now that it's pretty, I can go fly it again.;)