Hello again everyone!!!
Today I am bringing to you the first part of my review of a quad I was actually quite excited to review, once again at the hand of Gearbest: The DM007 Explorers
http://www.gearbest.com/rc-quadcopters/pp_141747.html
I wanted to review this quad because there are a lot of reviews out there on internet all over the place about this model, but it all seems to be very contradictory information, as some people say that it is a very good quad, whilst others say that it’s very bad… so I decided I wanted to find out for myself to be able to give a first-hand opinion on it, showing all the good points as well as the bad points.
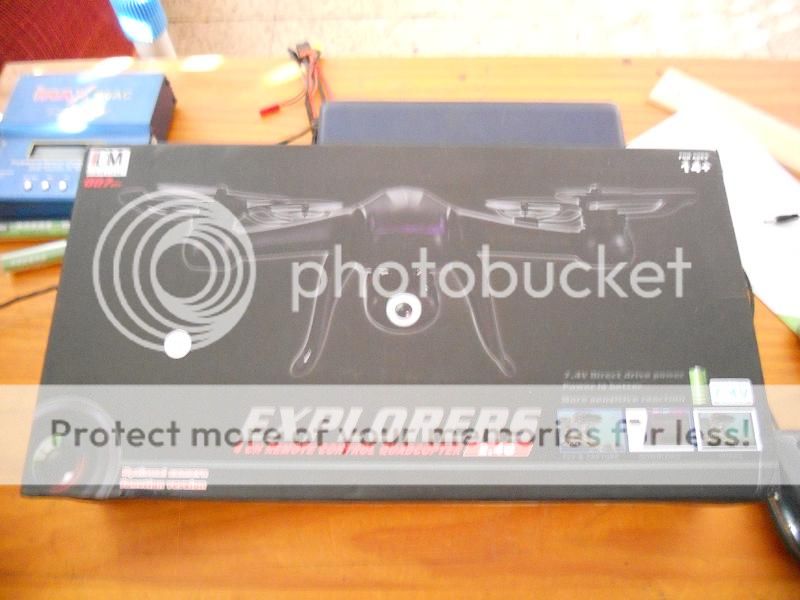
As usual, it arrived very promptly at my house, and when it arrived I had to resist the temptation to rip it all open and take time to find my camera. The box is a nice size, not too big and not too small, and pretty light in fact. The components tray slides out the side, rather than the usual opening the top up. Just from the photo you can see it looks like a really aggressive looking quadcopter. On the box also comes additional basic information, with the 7.4V battery standing out as something quite unusual in this class of quad, as well as a 2mp camera, which when we take the price into consideration, is actually quite extraordinary.
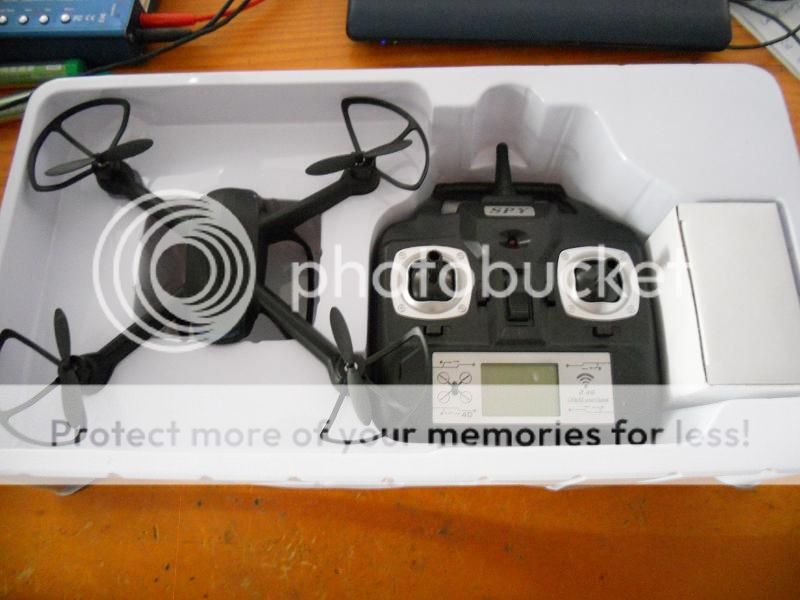
Inside we find all the components of the quad very well protected inside the molded plastic container. Another strange thing is that the quad comes completely assembled, so you just basically have to connect the battery, put 4 AA cells in the transmitter, and you can fly right out of the box!!
The transmitter itself is almost identical to the Syma model transmitter, although it does have it’s own small details, like no “false buttons” on the sides of the screen, but the screen itself shows all the information in the same way its Syma counterparts do. The throttle trim serves no actual trimming purpose, as its been reassigned to function as the camera mode election button, to choose between activation and deactivation of either photo (up) or video (down). It is also important to point out that if you are going to record a video, to remember to turn off the camera BEFORE you disconnect the battery, otherwise it will not save the recorded achieve. The right gimbal also has a push down button under it (in mode 2), similar to the ones you find on the Cheerson mini transmitters… this button is to activate and deactivate the Headless mode, a mode that surprisingly doesn't actually come advertised on the box anywhere, but is nonetheless a very nice feature to include for those that like it. It also has the typical 2 shoulder buttons, with the left one to change between low and high rates, and the right one to activate the flip feature, which you just press, and move the right stick in any direction and the quad will flip in that direction.
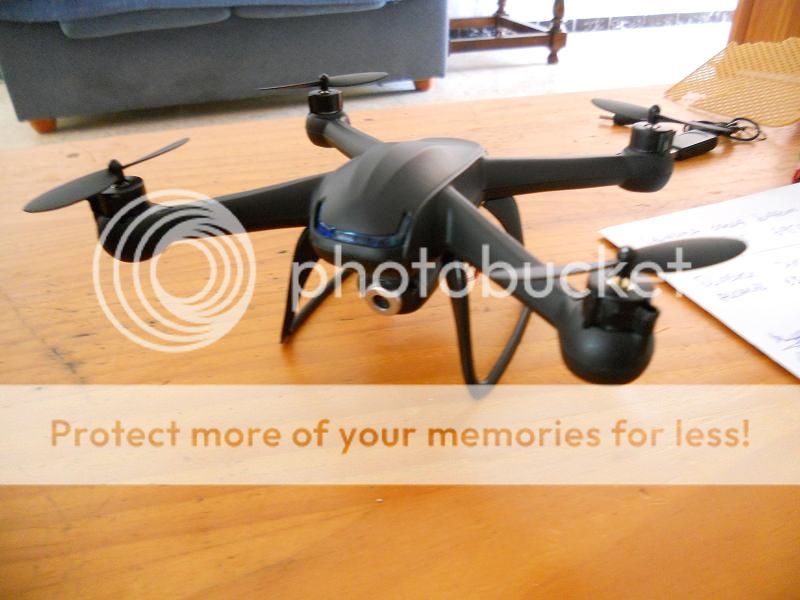
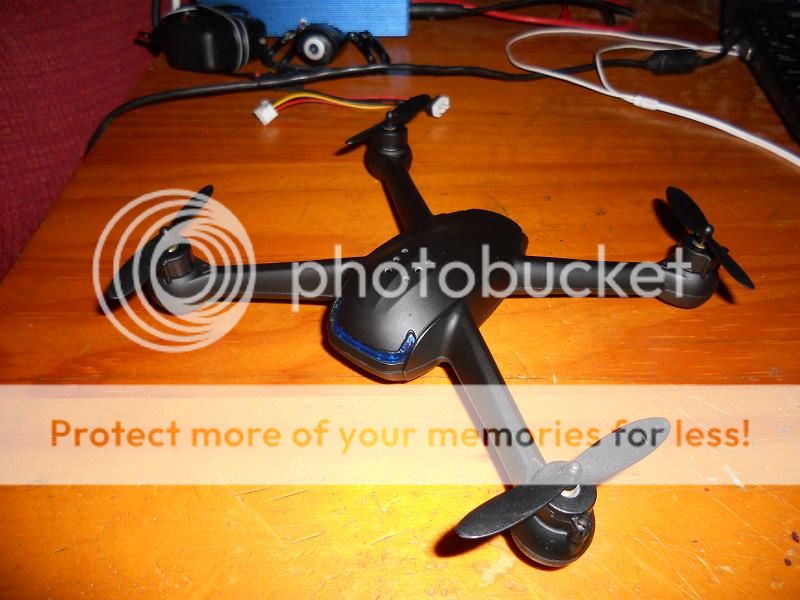
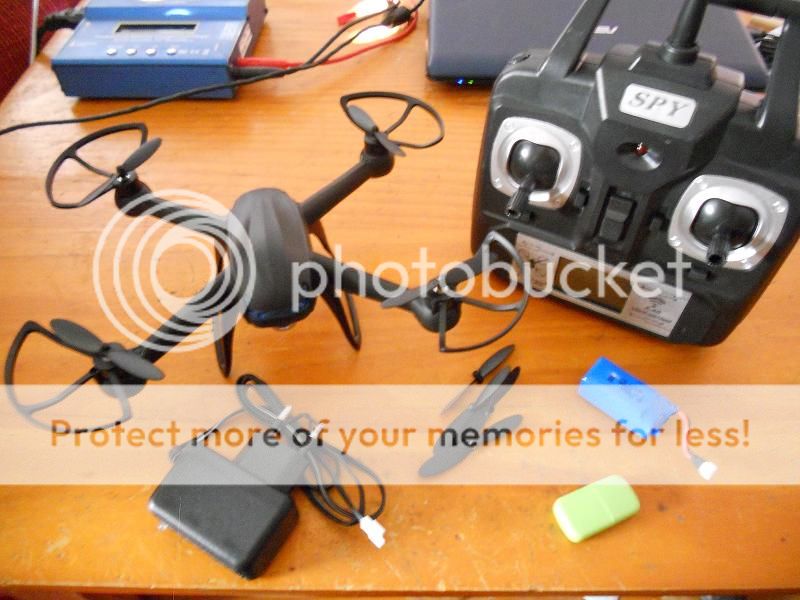
The contents of the box also includes, apart from the quad and the transmitter, a small box which contains a 7.4V battery charger to plug into the wall (extra careful not to use this on 1S batteries eventhough it has the same usual connector, as it could cause these to explode), a spare set of props, a 2S 400mAh battery, a 4gb microSD card for the camera as well as a USB microSD card reader, these last two items usually very rare in this type of class of model. The quad itself looks great, with a very “angry” look, of a diagonal size of 180mm, bringing this quad to an unusual “in between” size class, being larger than a micro, but smaller than a mini.
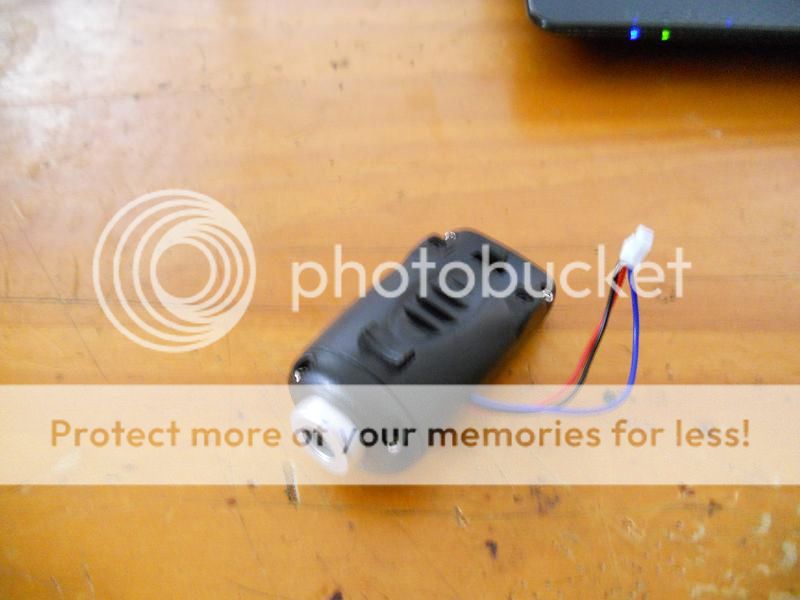
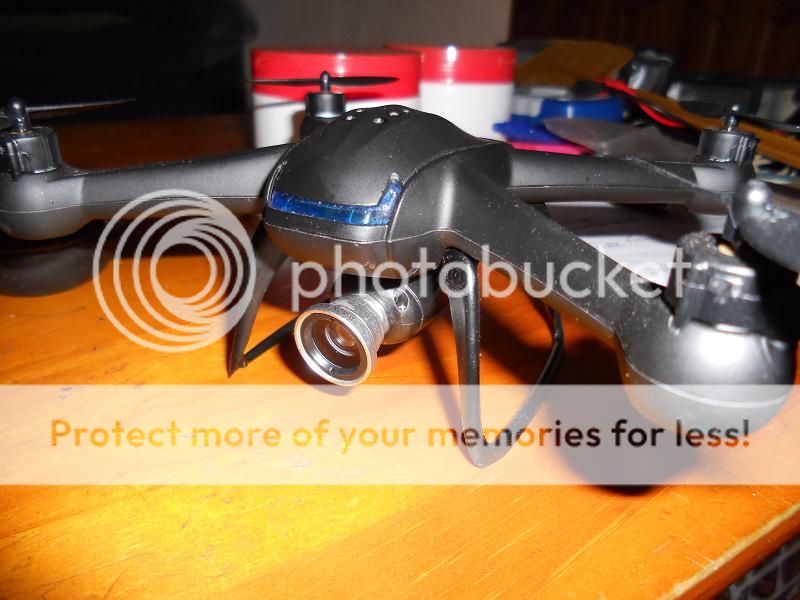
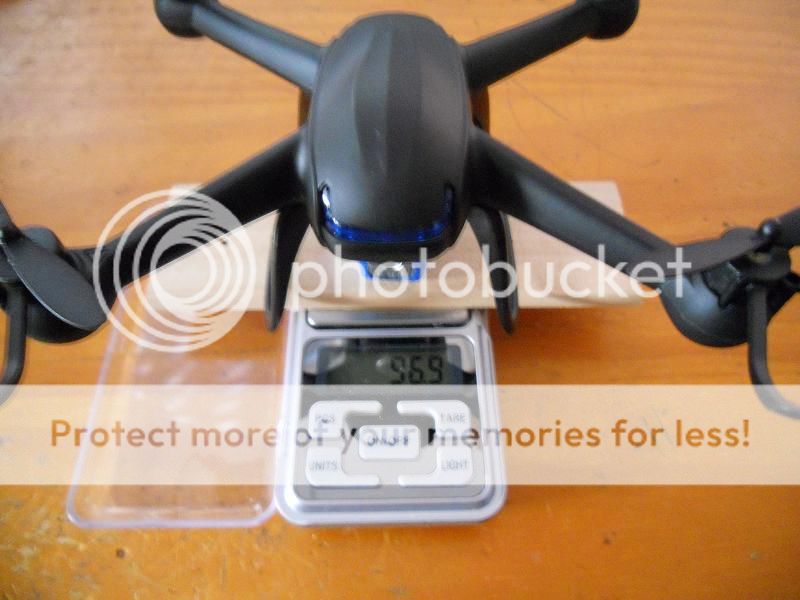
The quad itself, with the battery installed, is actually very light, although it seem very solid to the touch… we’ll see how it holds up in the air. The landing gear and the camera are held on with a clip system, making it very easy to remove them for when you just want to fly some LOS acro fun, saving this way the weight of these as well as the wind resistance they impose.
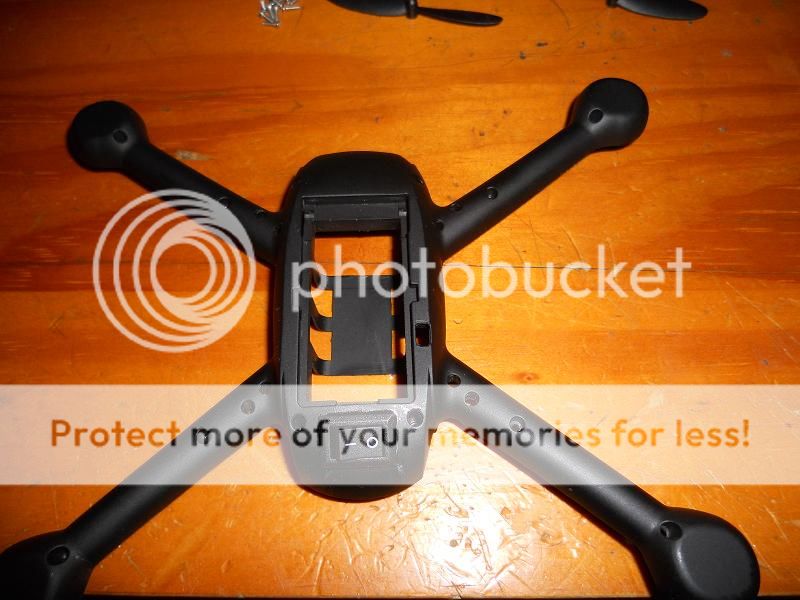
Seeing as I have the curiosity of cat, I couldn’t resist the temptation to take out a screwdriver and open the quad up to see how the internal workings were…
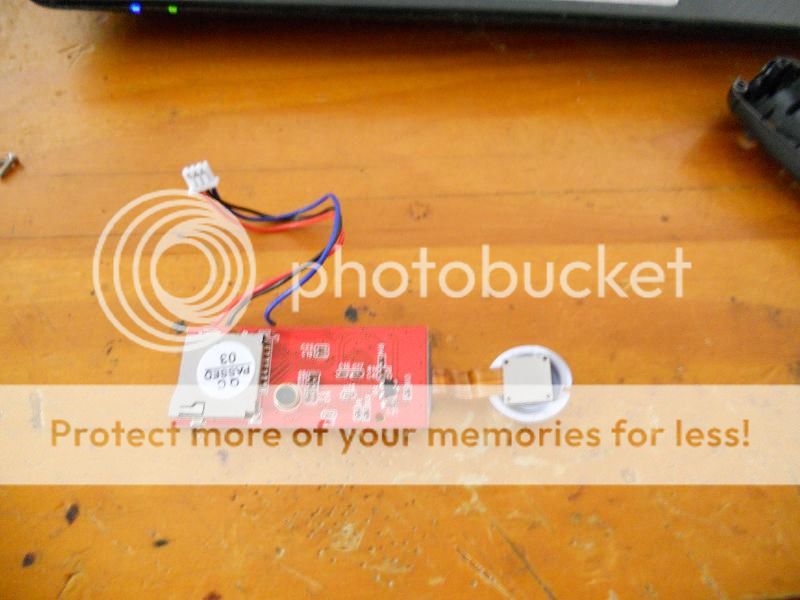
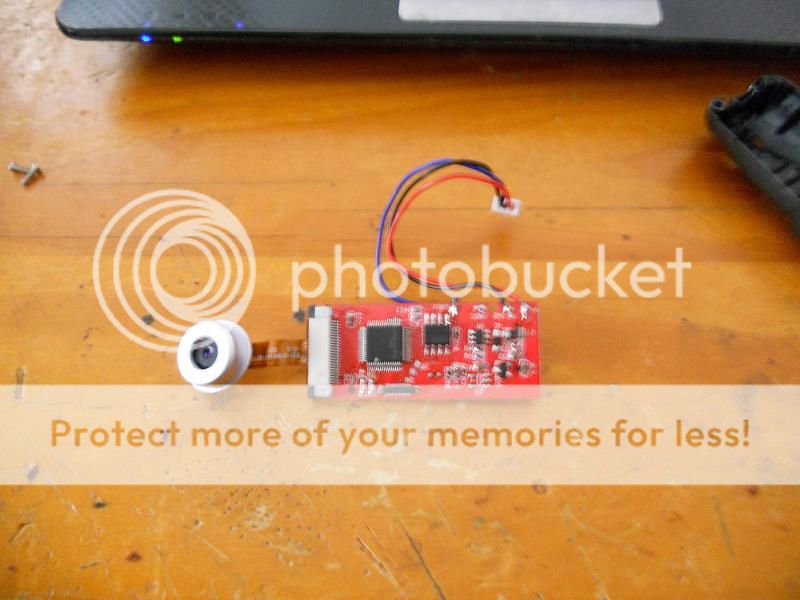
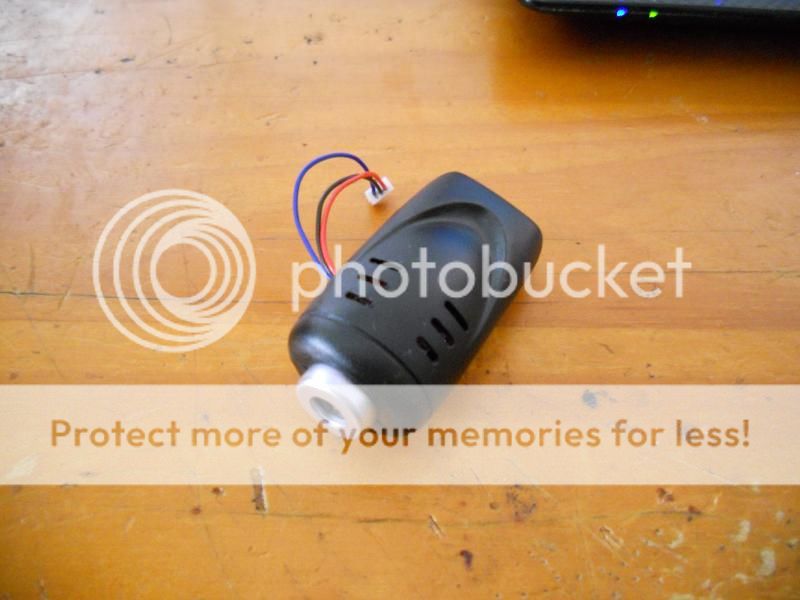
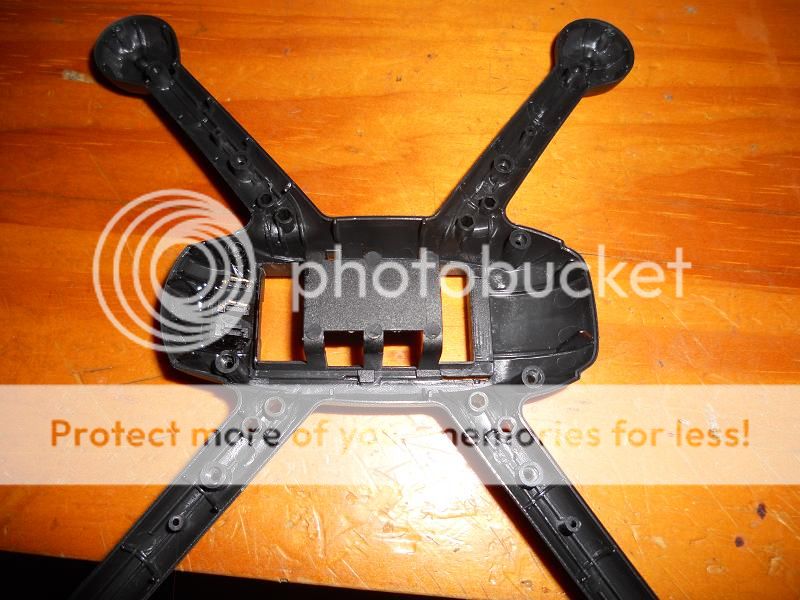
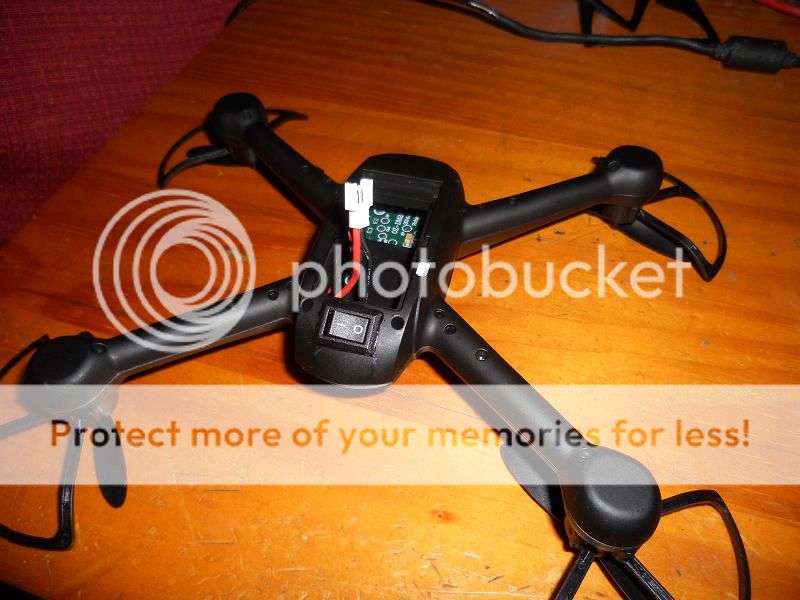
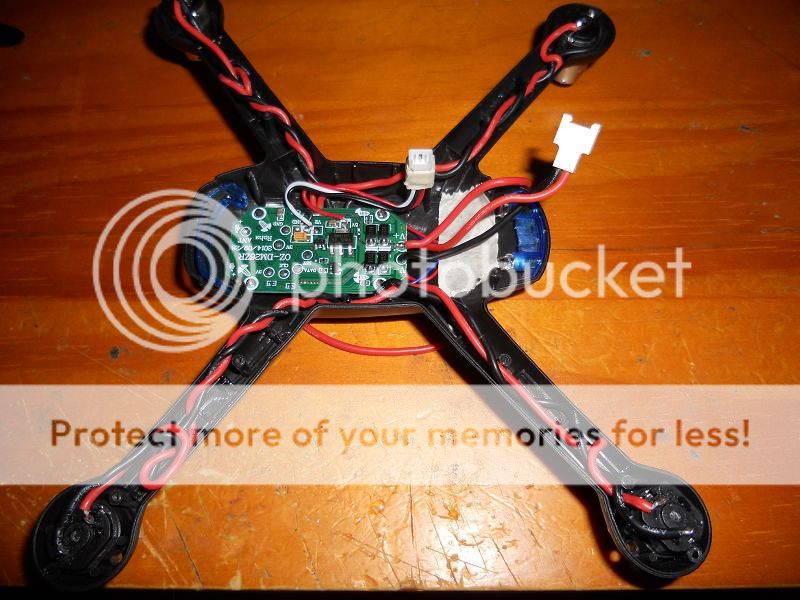
Inside you find a main board that serves as FCB as well as 4x ESC with 926 type MOSFET son the top half to control the motors, along with all the reception system. Indecently, this receiver is based on the architecture of the nRF24L01 system just like the Syma models, and as such can be “deviated”. The board also has 2 SMD type LEDs on the front, and another 2 dual colour LEDs on the back via wires, markings for a 5V circuit and also a 3.3v one (for things like the camera), and also marked on the board are reset, data and other points, so it might even be possible to reflash this board later on… The motors are rather large, not like the typical coreless motors you would usually find on this size of model, brushed, which seem quite tough, and are fed with a 24AWG wire which might be a little overkill. It might be possible to change this wireing for a 26 or 28AWG wire to save weight without it degrading performance. The cable used is a silicone sheath wire, the solder points are pretty good, and in general it looks like quite a sound design. The plastic seems rather fragile now it’s open, so it’s quite clear that the rigidness and strength came from the shape when put together. The camera connector is exactly the same as the one used on the Syma X5 range, with the wires in the same order even, meaning that the cameras are interchangeable… in fact the X5SW camera from Syma (WiFi transmission) comes with the same clip system on the front and the screw holes align with those of the DM007 camera, so you can even use that WiFi camera to turn this into a small FPV quad in no time.
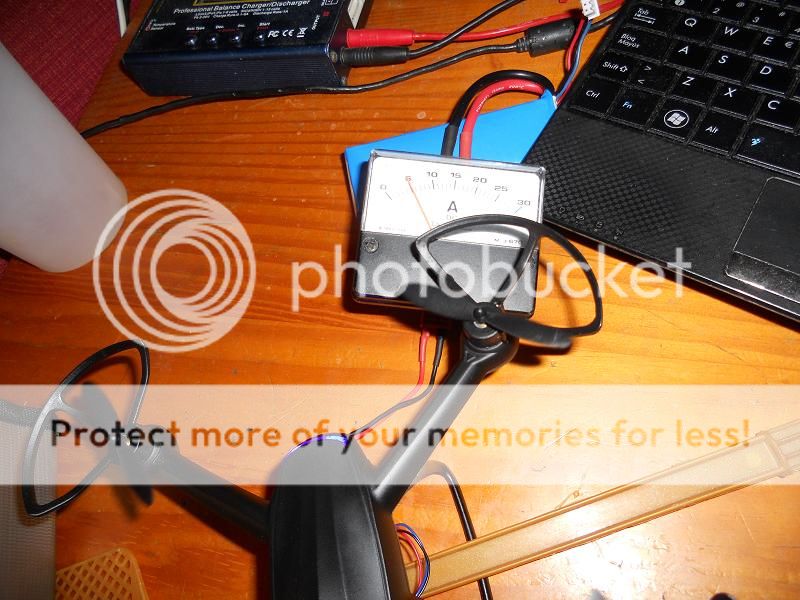
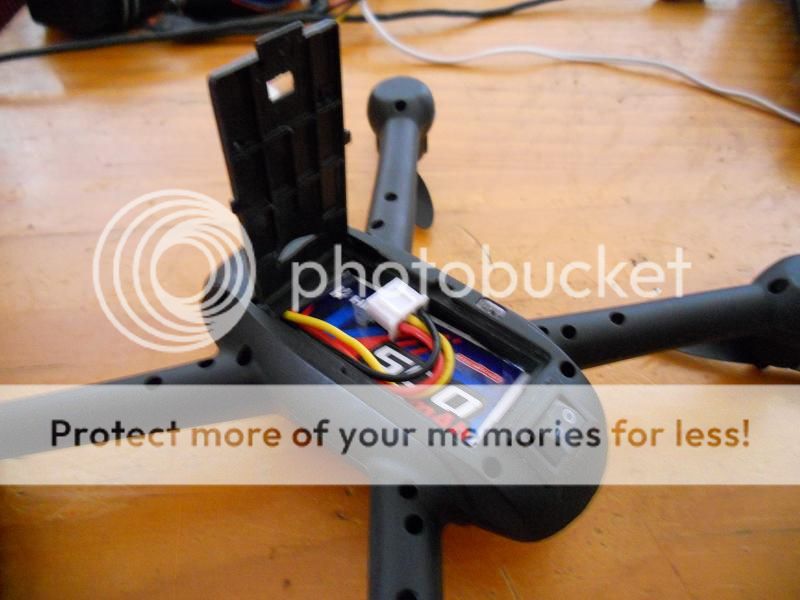
The battery compartment is VERY tight and it’s very hard to insert or remove the battery, especially considering you have to plug it in before fitting it into place. This makes its use more complicated, especially at the end of the flying session as it’s harder to unplug the quad (take no notice of the switch, it’s a small modification I made that I will detail later on).

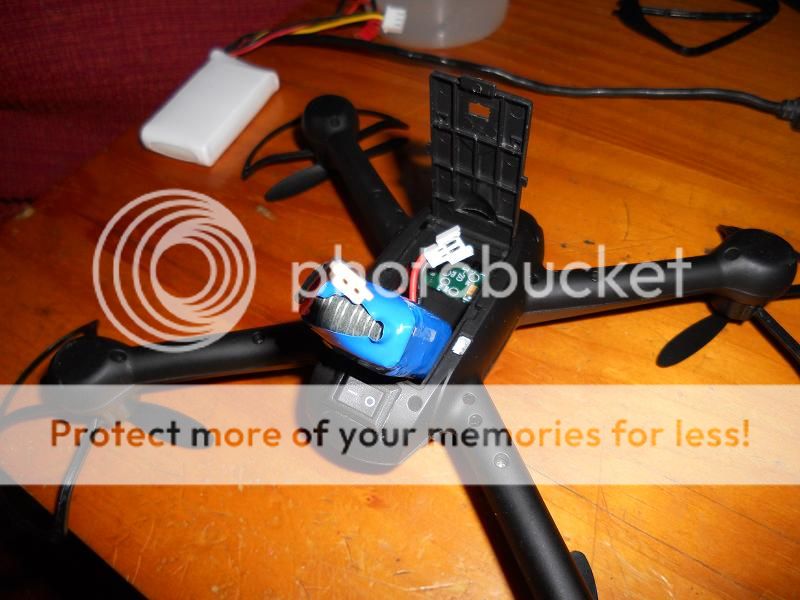
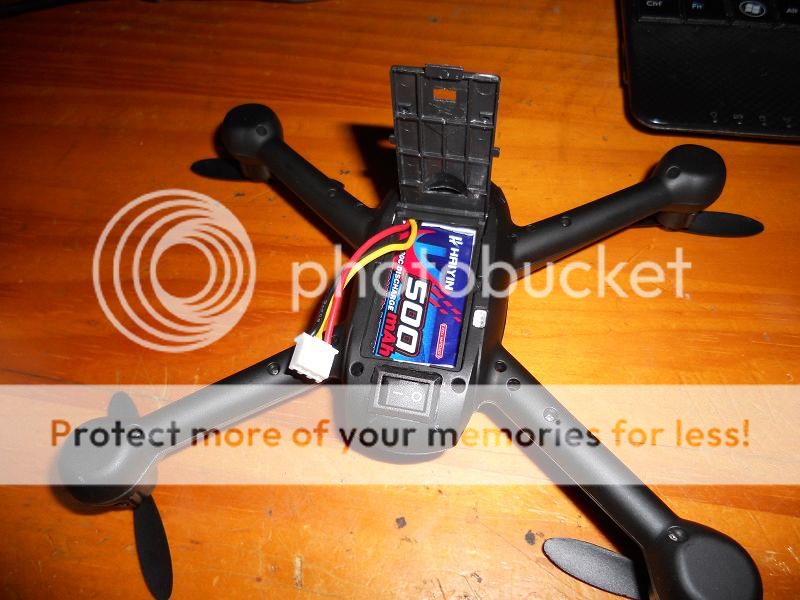
As you can see, the battery doesn't have a balance port, which doesn't entirely convince me on the long run as far as life expectancy is concerned. Something I find strange also is the choice of props used, as they are the same size as those you would find on a Hubsan X4 or a Walkera Ladybird, both models considerably smaller… I guess the direct drive motors makes this necessary, which is an advantage as you no longer have gearing that can get dirty or fail in the way, but means you have to stick to less efficient props. I hole when it comes to flying they give good results over the geared choice.
At this point, it looks to be a VERY nice looking quad, with very smooth curved lines, but also an aggressive taste to it, with a face that reminds me of Gort, the robot from “The Day the Earth Stood Still (the 1951 version, no the newer Keanu Reeves one… I’ve always been a girl for the classics ). The battery is a but of a pain in the backside, we’ll have to see what results it gives. The transmitter is the typical toy class one that comes with this type of quad, nothing special, but enough to control it. The camera seems interesting as it has a better resolution (1280x720) than most, meaning we are no longer trapped with the usual 4:3 screen size typical of this type of quad. Off the bat, am liking this quad very much, and the bad points seem outweighed by the good ones so far… we’ll just have to see if this holds out for the flight, recording quality, and all that jazz…
Today I am bringing to you the first part of my review of a quad I was actually quite excited to review, once again at the hand of Gearbest: The DM007 Explorers
http://www.gearbest.com/rc-quadcopters/pp_141747.html
I wanted to review this quad because there are a lot of reviews out there on internet all over the place about this model, but it all seems to be very contradictory information, as some people say that it is a very good quad, whilst others say that it’s very bad… so I decided I wanted to find out for myself to be able to give a first-hand opinion on it, showing all the good points as well as the bad points.
As usual, it arrived very promptly at my house, and when it arrived I had to resist the temptation to rip it all open and take time to find my camera. The box is a nice size, not too big and not too small, and pretty light in fact. The components tray slides out the side, rather than the usual opening the top up. Just from the photo you can see it looks like a really aggressive looking quadcopter. On the box also comes additional basic information, with the 7.4V battery standing out as something quite unusual in this class of quad, as well as a 2mp camera, which when we take the price into consideration, is actually quite extraordinary.
Inside we find all the components of the quad very well protected inside the molded plastic container. Another strange thing is that the quad comes completely assembled, so you just basically have to connect the battery, put 4 AA cells in the transmitter, and you can fly right out of the box!!
The transmitter itself is almost identical to the Syma model transmitter, although it does have it’s own small details, like no “false buttons” on the sides of the screen, but the screen itself shows all the information in the same way its Syma counterparts do. The throttle trim serves no actual trimming purpose, as its been reassigned to function as the camera mode election button, to choose between activation and deactivation of either photo (up) or video (down). It is also important to point out that if you are going to record a video, to remember to turn off the camera BEFORE you disconnect the battery, otherwise it will not save the recorded achieve. The right gimbal also has a push down button under it (in mode 2), similar to the ones you find on the Cheerson mini transmitters… this button is to activate and deactivate the Headless mode, a mode that surprisingly doesn't actually come advertised on the box anywhere, but is nonetheless a very nice feature to include for those that like it. It also has the typical 2 shoulder buttons, with the left one to change between low and high rates, and the right one to activate the flip feature, which you just press, and move the right stick in any direction and the quad will flip in that direction.
The contents of the box also includes, apart from the quad and the transmitter, a small box which contains a 7.4V battery charger to plug into the wall (extra careful not to use this on 1S batteries eventhough it has the same usual connector, as it could cause these to explode), a spare set of props, a 2S 400mAh battery, a 4gb microSD card for the camera as well as a USB microSD card reader, these last two items usually very rare in this type of class of model. The quad itself looks great, with a very “angry” look, of a diagonal size of 180mm, bringing this quad to an unusual “in between” size class, being larger than a micro, but smaller than a mini.
The quad itself, with the battery installed, is actually very light, although it seem very solid to the touch… we’ll see how it holds up in the air. The landing gear and the camera are held on with a clip system, making it very easy to remove them for when you just want to fly some LOS acro fun, saving this way the weight of these as well as the wind resistance they impose.
Seeing as I have the curiosity of cat, I couldn’t resist the temptation to take out a screwdriver and open the quad up to see how the internal workings were…
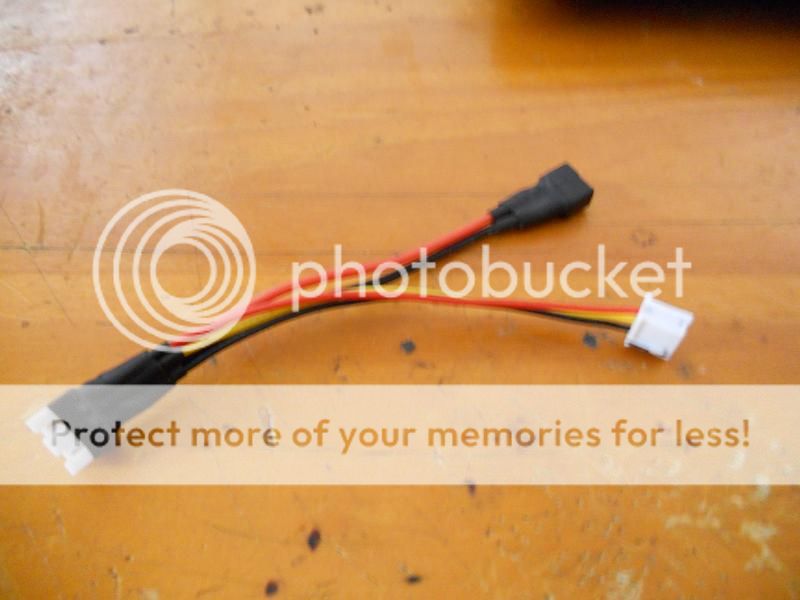
Inside you find a main board that serves as FCB as well as 4x ESC with 926 type MOSFET son the top half to control the motors, along with all the reception system. Indecently, this receiver is based on the architecture of the nRF24L01 system just like the Syma models, and as such can be “deviated”. The board also has 2 SMD type LEDs on the front, and another 2 dual colour LEDs on the back via wires, markings for a 5V circuit and also a 3.3v one (for things like the camera), and also marked on the board are reset, data and other points, so it might even be possible to reflash this board later on… The motors are rather large, not like the typical coreless motors you would usually find on this size of model, brushed, which seem quite tough, and are fed with a 24AWG wire which might be a little overkill. It might be possible to change this wireing for a 26 or 28AWG wire to save weight without it degrading performance. The cable used is a silicone sheath wire, the solder points are pretty good, and in general it looks like quite a sound design. The plastic seems rather fragile now it’s open, so it’s quite clear that the rigidness and strength came from the shape when put together. The camera connector is exactly the same as the one used on the Syma X5 range, with the wires in the same order even, meaning that the cameras are interchangeable… in fact the X5SW camera from Syma (WiFi transmission) comes with the same clip system on the front and the screw holes align with those of the DM007 camera, so you can even use that WiFi camera to turn this into a small FPV quad in no time.
The battery compartment is VERY tight and it’s very hard to insert or remove the battery, especially considering you have to plug it in before fitting it into place. This makes its use more complicated, especially at the end of the flying session as it’s harder to unplug the quad (take no notice of the switch, it’s a small modification I made that I will detail later on).
As you can see, the battery doesn't have a balance port, which doesn't entirely convince me on the long run as far as life expectancy is concerned. Something I find strange also is the choice of props used, as they are the same size as those you would find on a Hubsan X4 or a Walkera Ladybird, both models considerably smaller… I guess the direct drive motors makes this necessary, which is an advantage as you no longer have gearing that can get dirty or fail in the way, but means you have to stick to less efficient props. I hole when it comes to flying they give good results over the geared choice.
At this point, it looks to be a VERY nice looking quad, with very smooth curved lines, but also an aggressive taste to it, with a face that reminds me of Gort, the robot from “The Day the Earth Stood Still (the 1951 version, no the newer Keanu Reeves one… I’ve always been a girl for the classics
). The battery is a but of a pain in the backside, we’ll have to see what results it gives. The transmitter is the typical toy class one that comes with this type of quad, nothing special, but enough to control it. The camera seems interesting as it has a better resolution (1280x720) than most, meaning we are no longer trapped with the usual 4:3 screen size typical of this type of quad. Off the bat, am liking this quad very much, and the bad points seem outweighed by the good ones so far… we’ll just have to see if this holds out for the flight, recording quality, and all that jazz…